Experiment Tree Nodes
- Activities
- Controls
- Deprecated
Overview
Welcome to the Experiment Tree Nodes Reference Guide.
The Experiment Tree is where you bring the questionnaires and tasks you've created into an experiment that you can send to participants.
Experiments are made up of Nodes. In the screenshot of the Experiment Tree shown below, each rectangular box is a Node, and the arrows connecting them show the flow of participants through the experiment.
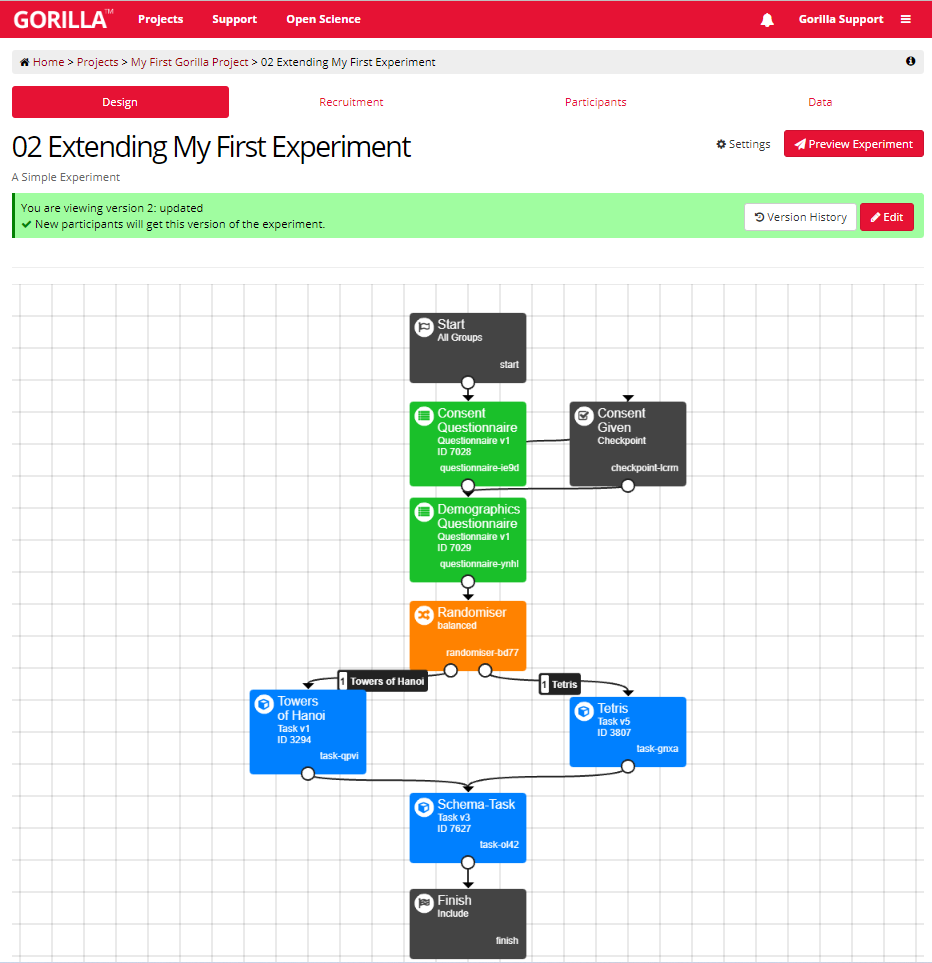
This screenshot shows the new Experiment Builder interface. If you’re still using the classic interface, it will appear slightly different.
In this guide, you can find out how and when to use each Experiment Tree Node. To learn more about a specific Node, browse the list of Nodes in the menu. For ease of reference, Nodes are divided into the following categories:
- Activities are the tasks, questionnaires, games, and shops you want your participants to take part in
- Controls control how participants enter, exit, and progress through your study. They also allow you to direct participants' paths through your experiment by adding randomisation, delays, branching based on previous answers, and more.
Questionnaire Node
This page shows what a Questionnaire Node looks like once you add it to an Experiment. For information on how to build a Questionnaire, see our Questionnaire Builder 2 guides.
A Questionnaire Node contains a single questionnaire within your experiment.
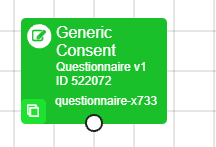
In New Experiment Builder, a Questionnaire with a pencil icon at the top-right means you are currently making changes. A Questionnaire with two upward arrows at the top-right means there is a newer version of this questionnaire available. Find out more in our guide to updating your nodes.
For a simple survey, a Questionnaire Node may be the only Node you need to add to your Experiment Tree. Just connect the Start Node to the Questionnaire Node, then connect the Questionnaire Node to the Finish Node, and you're all set!
More often, a Questionnaire Node will be used as one part of a larger study: for example, to display instructions, to collect demographic information, or to display debrief information.
Once the participant has completed the Questionnaire, they will advance to the next Node in the experiment tree.
Each Questionnaire Node has a Key that uniquely identifies it in your experiment. The Key is displayed at the bottom of the node. For example, the Key of the Questionnaire Node in the screenshot above is questionnaire-6kne. The Key will be part of the filename of the file containing your questionnaire data, and will also be included within the file under the column 'Tree Node Key'.
Click on the Questionnaire Node in the experiment tree to access its configuration settings.
Randomise questionnaire elements?
(Only available in Questionnaire Builder 1)
Default = No
Whether to randomise the order of questionnaire elements.
Options:
- Yes
- No
- Yes (except first)
- For randomising everything except instructions
- (Manual Override)
- Allows you to set the value of this dropdown based on embedded data
This setting only appears for questionnaires built in the legacy Questionnaire Builder. For questionnaires built in Questionnaire Builder 2, you can control randomisation within the questionnaire itself using the randomisation settings.
Task Node
This page shows what a Task Node looks like once you add it to an Experiment. For information on how to build a Task, see our Task Builder 2 guides.
A Task Node contains a single task within your experiment.
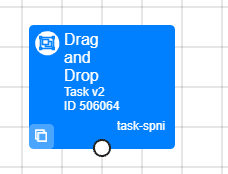
In New Experiment Builder, a Task with a pencil icon at the top-right means you are currently making changes. A Task with two upward arrows at the top-right means there is a newer version of this task available. Find out more in our guide to updating your nodes.
In the Experiment Tree, a Task Node can be any of the following: a Task Builder 2 Task, a Task Builder 1 Task, a game made in Game Builder, a shop made in Shop Builder, or a task made in the Code Editor.
Once the participant has completed the Task, they will advance to the next Node in the experiment tree.
Adding conditions to your experiment
To add conditions to your experiment, simply add multiple versions of the same task to your experiment tree. Open the expandable section below for more information on how to do this.
To add multiple conditions of a task to your experiment:
- In your task, specify what you want to change between conditions by adding multiple spreadsheets or manipulations.
- Add the Task multiple times to the Experiment Tree, creating one Task Node for each condition.
- Click each Task Node and use the Spreadsheet and Manipulation settings to customise it for that condition. For example, the Task Node in the screenshot above is set up to use the spreadsheet 'Easy'.
- For a between-participants design, direct participants to different Task Nodes using Control Nodes such as Branch, Allocator, or Randomiser. For a within-participants design, randomise the order of Task Nodes between participants using an Order Node.
If the elements you want to vary between conditions are all contained in the spreadsheet, you can instead just add one Task Node to the experiment tree and use a Counterbalance Node to randomly assign participants to spreadsheets or spreadsheet columns. See the Counterbalance Node documentation for more details.
Each Task Node has a Key that uniquely identifies it in your experiment. The Key is displayed at the bottom of the node. For example, the Key of the Task Node in the screenshot above is task-yvdc. The Key will be part of the filename of the file containing your task data, and will also be included within the file under the column 'Tree Node Key'.
Click on the Task Node in the experiment tree to access its configuration settings.
Spreadsheet
Default = the first spreadsheet uploaded to your task
From the dropdown menu, select which spreadsheet you want to use for this version of the task.
You will only see more than one spreadsheet in this dropdown if you have uploaded multiple spreadsheets to your task.
[Other Manipulations by Name]
Default = the default value you set for the manipulation within your task
Any other manipulations you have set up in your Task will appear here under the name and description you have given them. For example, if you have set up a manipulation called Time Limit, it will appear below the Spreadsheet dropdown:
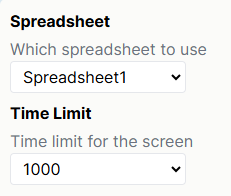
If you have defined Options for the manipulation, a dropdown menu will appear, allowing you to select from these values. Otherwise, a text box will appear for you to type in the value.
Start Node
The Start Node is where participants enter your experiment.
As soon as a participant enters a Start Node, they are recorded on your experiment's Participants tab as 'Live' and counted towards your total Recruitment Progress. A token will be reserved for the participant at this point. Find out more about what happens to tokens as participants progress through your experiment.
The initial screen the participant sees at the Start Node will depend on the recruitment policy you are using. Open the expandable section below for more information.
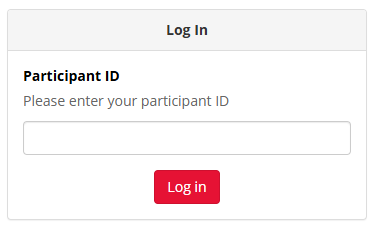
For recruitment policies where participants use an ID to log in (Pilot, Supervised, and Email ID), participants entering the Start Node will see a login screen:
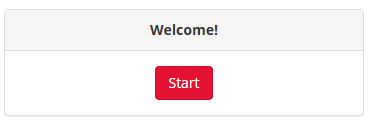
For all other recruitment policies, participants entering the Start Node will see a Welcome screen with a Start button:
After the Start Node, participants will progress on to the next connected Node in the experiment tree.
You can pass information from your recruitment service to Gorilla by adding parameters to the URL that participants use to access the experiment. Any information included in the URL will be saved to the Store. For example, if you send your participants to Gorilla with
https://research.sc/my-login-link?id=123&myvar=group1
then your participant would start the experiment with an Field in the Store called 'myvar' set to 'group1'. You can find out more about adding custom parameters to the recruitment URL in our Custom 3rd Party Recruitment Guide.
Experiments with multiple start points
Most experiments will only need one Start Node. However, it is possible to have multiple Start Nodes. This is useful if you are recruiting groups of participants with different characteristics outside of Gorilla, and you want to send those pre-defined groups to different tasks within your experiment. Open the expandable section below for more details on how to achieve this.
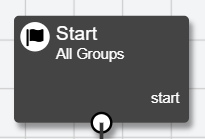
The 'Group' setting on the Start Node allows you to send different pre-defined groups of participants down different paths through the experiment. An experiment with multiple Start Nodes could look like this:
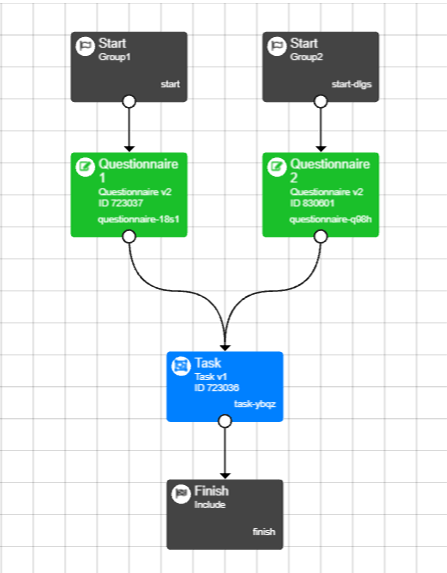
The Group on the first Start Node has been set to Group1, and the Group on the second Start Node has been set to Group2.
Participants who begin the experiment from the Group1 Start Node will complete Questionnaire 1, whereas participants who begin the experiment from the Group2 Start Node will complete Questionnaire 2. Then, all participants will complete the Task.
You can recruit different groups of participants to your experiment and direct them to the appropriate Start Node. The way you do this will depend on the recruitment policy you are using.
If you are using Email Shot, Email ID or Supervised recruitment, you can manually assign participants to a Start Node group in the participant spreadsheet that is uploaded to the Participants tab of the Experiment Builder prior to recruitment.
If you are using Simple Link, Pilot or 3rd Party recruitment, multiple links will be generated in the Recruitment tab of your experiment, as shown below:

You can also use this method in conjunction with a 3rd party recruitment service that allows you to pre-screen participants to check if they match your group criteria. As an example, you may want to recruit 100 participants who are aged between 18 and 40, and 100 participants who are aged 41 and over. Using multiple Start nodes with a 3rd Party recruitment service, you can achieve this balanced sample size by sharing the separate recruitment links with different pre-screened populations within the recruitment service.
Click on the Start Node in the experiment tree to access its configuration settings.
Group
(Only applies if using multiple Start Nodes)
Default = blank
Name of the participant group that should begin from this Start Node. Leave blank to have all groups start here.
Start Node Group names cannot be more than 255 characters long.
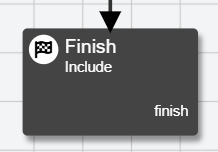
Finish Node
The Finish Node marks the end-point of your experiment for participants whose data you want to collect.
Once participants reach a Finish Node, they can perform no further tasks or questionnaires. At this point, the participant is:
- Marked as 'Completed' on the Participants tab.
- Shown their Completion Code if the 'Show Completion Code' setting has been checked, or redirected to an external site if an Onward URL has been entered.
- Counted towards your recruitment progress.
- Included in your downloadable data.
- Their reserved Token is consumed.
If a participant has not reached a Finish Node, but you still want to use their data, you can manually include them. Doing this will permanently consume a token.
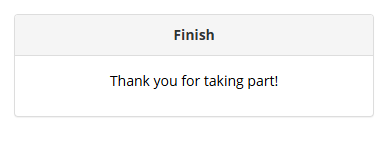
When a participant reaches the Finish Node they will see a Thank You screen:
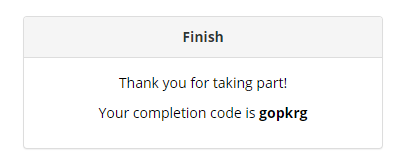
When the Show Completion Code setting is toggled on, participants will also see their own unique completion code:
If an Onward URL is added, participants will not see a Thank You screen on Gorilla, and instead will be immediately redirected to the URL.
Experiments with multiple completion points
Most experiments will only need one Finish Node. However, it is possible to have multiple Finish Nodes.
This is useful if you want to have participants end at different points in your experiment, but still want to include all their data. Open the expandable section below for more details on how to achieve this.
Using multiple Finish Nodes allows you to include and download data from all your participants, even if they left the experiment at different points. An experiment with multiple Finish Nodes could look like this:
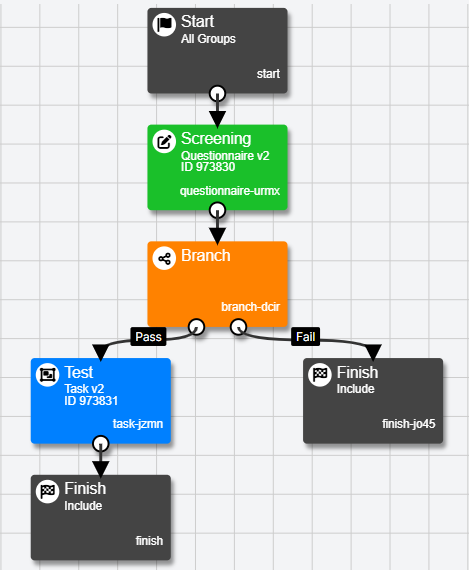
Here, an initial Screening questionnaire determines whether or not participants move on to the Test task. Adding an extra Finish Node on the Fail branch ensures that you will still receive screening data from participants who did not pass the screening.
If you do not need to access data from participants who failed the screening, you could replace the second Finish node with a Reject node. The tokens reserved for these participants would then be returned once they reach the Reject node, allowing you to recruit other participants in their place.
Click on the Finish Node in the experiment tree to access its configuration settings.
Basic Settings:
Onward URL
Enter the URL of an external site to redirect participants to once they reach the Finish Node. By default, the participant is sent to the Gorilla finish screen.
This setting is most often used to send participants back to an external recruitment service such as Prolific, to confirm that they completed the experiment. You can also use it to send participants on to followup tasks/questionnaires hosted outside of Gorilla.
If you are using Prolific, SONA, or another integrated recruitment service, this is the only setting on the Finish Node you need to fill in; Gorilla will do the rest automatically.
Optionally, you can personalise the Onward URL for each participant by including values from the Gorilla Store within the URL. For example, if you have a Store field called eventID, you could incorporate this in the URL by entering the following in the Onward URL field:
http://www.your-base-url.com/$${eventID}
You can also append the participant's PublicID, External Session ID, and values from the Gorilla Store to the Onward URL as URL parameters using the settings below.
Additional Settings: (click 'Show Additional Settings' to show)
Append PublicID
Use this setting to manually add the participant's PublicID to the Onward URL so it can be sent on to the external site. Enter the parameter name you want to give to the PublicID. This should match the requirements of your external site.
For example, if you enter id, a participant with PublicID 12345 will be redirected to http://www.your-onward-url-above.com?id=12345
You do not need to use this setting if you are using an integrated recruitment service that automatically passes the participant ID back from Gorilla.
Append External Session ID
Use this setting to append the external session ID to the URL. Enter the parameter name you want to give to the External Session ID. This should match the requirements of your external site.
For example, if you enter externalID, a participant with External Session ID 67890 will be redirected to http://www.your-onward-url-above.com?externalID=67890
Append Store/Embedded Data
Use this setting to pass data from fields in the Gorilla Store on to the external site. This allows you to, for example, change which external task/questionnaire is presented to participants based on their responses in Gorilla.
Enter the Store fields you want to append to the Onward URL, separated by commas. By default, they will be appended with the name you gave the fields within Gorilla. If you need to append the values, but with a different name, enter the name of the field followed by the name to use in the URL, separated by a colon.
For example, if you enter val1, val2:myval, a participant with val1 of 5 and val2 of 10 will be redirected to http://www.your-onward-url-above.com?val1=5&myval=10
Show Completion Code
Toggle this setting on to show each participant a unique completion code when they reach the Finish Node.
Note: Participants will not see a completion code if an Onward URL is entered in the Finish Node, even if ‘Show Completion Code’ is selected. Participants are sent to the Onward URL immediately.
The generated completion code will be included in the data output in the 'Participant Completion Code' column. The participant can make a note of this code and quote it to request their data to be deleted.
They can also use this code on third-party tools such as Amazon Mechanical Turk, to verify that they have completed the task.
Disable default behaviour
Toggle this setting on to disable Gorilla's default behaviour.
Default behaviours are the types of information that are passed back to your recruitment service, such as Survey Codes or Session IDs, or presented to your participant, such as Completion Codes.
If you are using Prolific, SONA, or another integrated recruitment service, you only need to enter the Onward URL in the above settings, because Gorilla will automatically send other required information back.
If the 'Disable default behaviour' setting is toggled on, this information will not be sent automatically by Gorilla. Instead you must manually configure the settings above. Without doing this manual configuration, you will be unable to validate which participants have completed the study or have been rejected, and so you may end up paying participants who have been rejected. If you select this setting, take care to ensure your manual configuration works correctly!
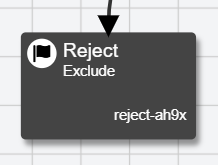
Reject Node
The Reject Node marks the end-point of your experiment for participants whose data you do not want to collect.
Once participants reach a Reject Node, they can perform no further tasks or questionnaires. At this point, by default, the participant is:
- Marked as 'Rejected' on your Participants page.
- Not counted towards your Recruitment Progress.
- Not included in your downloadable data.
- Their reserved token is returned.
You can override this default behaviour if you need to collect rejected participants' data, but still want to record that they were rejected - see the 'Participant Inclusion' option in the Configuration Settings below.
Rejecting participants based on specific criteria
A common use case for the Reject Node is to exclude participants on the basis of some criteria: for example, if they withdraw from the experiment or fail to pass an attention check. Open the expandable section below for more details on how to achieve this.
To exclude participants on the basis of specific criteria:
- Save the relevant criteria to the Store within a Task or Questionnaire. Add that Task or Questionnaire to your experiment.
- Add a Branch Node after the Task or Questionnaire in the experiment tree. Create two Branches: a Pass branch for participants who pass your criteria and a Fail branch for participants who fail.
From the first dropdown in each branch's settings, select the name of the Store field where you saved the criteria.
Embedded data saved in Task Builder 1 and Questionnaire Builder 1 will not show up automatically in the dropdown. For these, select (Enter Manually) and type in the name of the embedded data field.
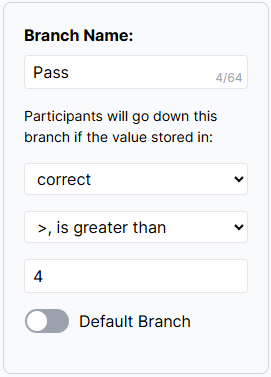
- Using the second dropdown and the final box in each branch's settings, set the criteria you want to use to send participants down this branch. The screenshot below shows participants being sent down the Pass branch if the value in the
correctfield is greater than 4:
- Toggle on Default for the Fail group. You can leave all other fields for this group blank.
You can see examples of using Reject Nodes with Branch Nodes in the following sample experiments:
Experiments with multiple rejection paths
It is possible to have multiple Reject Nodes in your experiment.
This can be useful if you want to reject participants at different points in your experiment: if for example they do not meet the requirements for your experiment, or did not score highly enough to progress to the next stage of testing. Open the expandable section below for more details on how to achieve this.
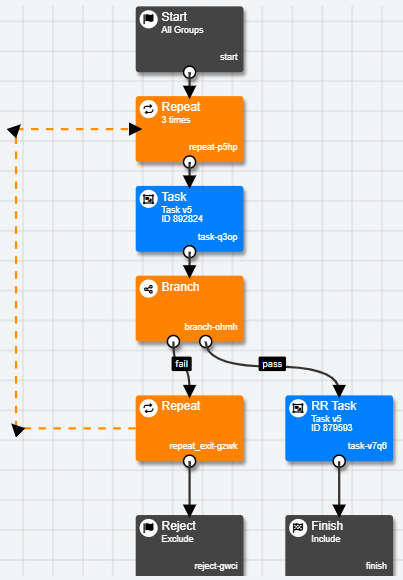
Using multiple Reject Nodes allows you to reject participants at different points in the experiment, keeping track of the reason for each rejection. An experiment with multiple Reject Nodes could look like this:
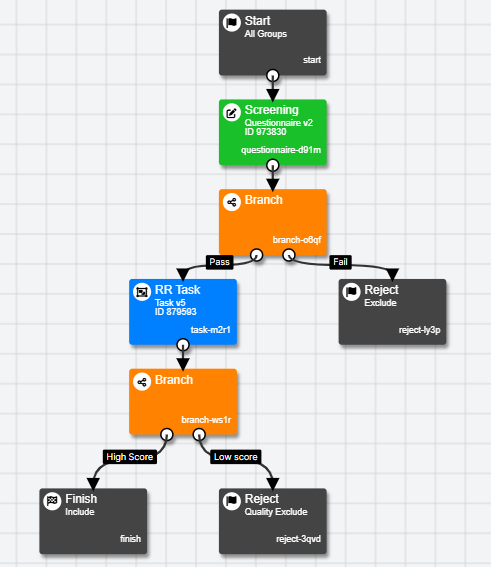
Here, an initial Screening questionnaire decides whether or not participants move on to the RR Rask. Participants who fail the screening questionnaire are rejected, as are participants who receive a low score on the RR Task.
The 'Rejection Status' setting has been used to mark the participants who fail the initial screening as Rejected, and to mark the participants who receive a low score on the RR task as Rejected - Quality. This setup enables you to see at a glance how many participants have been rejected at each point on your Participants tab.
Samples that use this node
Reject Node Demo (Manipulation Check)
Reject Node Example (Participant Withdrawal)
Click on the Reject Node in the experiment tree to access its configuration settings.
Basic Settings:
Onward URL
Enter a URL to redirect participants to once they reach the Reject Node. By default, the participant is sent to the Gorilla finish screen. This is identical to the Finish Node's default finish screen.
This setting is most often used to send participants back to an external recruitment service such as Prolific, to confirm that they participated in the experiment. You can also use it to send participants on to followup tasks/questionnaires hosted outside of Gorilla.
If you are using Prolific, SONA, or another integrated recruitment service, this is the only setting on the Reject Node you need to fill in; Gorilla will do the rest automatically.
Optionally, you can personalise the Onward URL for each participant by including values from the Gorilla Store within the URL. For example, if you have a Store field called eventID, you could incorporate this in the URL by entering the following in the Onward URL field:
http://www.your-base-url.com/$${eventID}
You can also append the participant's PublicID, External Session ID, and values from the Gorilla Store to the Onward URL as URL parameters using the settings below.
Participant Inclusion
Default = Exclude
Options:
- Exclude
- When a participant reaches the Reject Node, their reserved token is returned to the Recruitment Target of the experiment
- The participant is not included in your experiment's downloadable data
- Include:
- When a participant reaches the Reject Node, their reserved token is consumed
- The participant is included in your downloadable data
- The participant counts towards your Recruitment Progress
Some experimental set-ups require collection of rejected participants' data. In this specific case, you may want to include participants who end your experiment at a Reject Node.
Rejection Status
Default = Rejected
Select an option from the dropdown to set the rejection type for participants who reach this Reject Node. For some recruitment policies (e.g., Kantar Profiles), this will affect the link that your participants return to.
Options:
- Rejected
- Participants reaching this Reject Node will be marked as Rejected under 'Status' on the Participants tab
- Rejected - Over Quota (for use with Quota Nodes)
- Participants reaching this Reject Node will be marked as RejectedOver Quota under 'Status' on the Participants tab
- Rejected - Quality
- Participants reaching this Reject Node will be marked as RejectedQuality under 'Status' on the Participants tab
Additional Settings: (click 'Show Additional Settings' to show)
Append PublicID
Use this setting to manually add the participant's PublicID to the Onward URL so it can be sent on to the external site. Enter the parameter name you want to give to the PublicID. This should match the requirements of your external site.
For example, if you enter id, a participant with PublicID 12345 will be redirected to http://www.your-onward-url-above.com?id=12345
You do not need to use this setting if you are using an integrated recruitment service that automatically passes the participant ID back from Gorilla.
Append External Session ID
This allows you to append the external session ID to the URL. Enter the parameter name you want to give to the External Session ID. This should match the requirements of your external site.
For example, if you enter externalID, a participant with External Session ID 67890 will be redirected to http://www.your-onward-url-above.com?externalID=67890
Append Store/Embedded Data
Use this setting to pass data from fields in the Gorilla Store on to the external site. This allows you to, for example, change which external task/questionnaire is presented to participants based on their responses in Gorilla.
Enter the Store fields you want to append to the Onward URL, separated by commas. By default, they will be appended with the name you gave the fields within Gorilla. If you need to append the values, but with a different name, enter the name of the field followed by the name to use in the URL, separated by a colon.
For example, if you enter val1, val2:myval, a participant with val1 of 5 and val2 of 10 will be redirected to http://www.your-onward-url-above.com?val1=5&myval=10
Show Completion Code
Toggle this setting on to show each participant a unique completion code when they reach the Reject Node.
If 'Participant Inclusion' is set to Include, the generated completion code will be included in the data output in the 'Participant Completion Code' column. The participant can make a note of this code and quote it if they later request their data to be deleted.
They can also use this code on third-party tools & software such as Amazon Mechanical Turk, to verify that they have completed the task.
Disable default behaviour
Toggle this setting on to disable Gorilla's default behaviour.
Default behaviours are the types of information that are passed back to your recruitment service, such as Survey Codes or Session IDs, or presented to your participant, such as Completion Codes.
If you are using Prolific, SONA, or another integrated recruitment service, you only need to enter the Onward URL in the above settings, because Gorilla will automatically send other required information back.
If the 'Disable default behaviour' setting is toggled on, this information will not be sent automatically by Gorilla. Instead you must manually configure the settings above. Without doing this manual configuration, you will be unable to validate which participants have completed the study or have been rejected, and so you may end up paying participants who have been rejected. If you select this setting, take care to ensure your manual configuration works correctly!
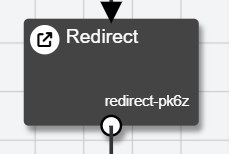
Redirect Node
The Redirect Node sends participants from Gorilla to an external site and back again.
There are two reasons to use the Redirect Node:
- You need to send your participants from Gorilla to another research platform and then back to your Gorilla experiment. Open the expandable section below for more details on how to achieve this.
To create an experiment that combines Gorilla tasks and questionnaires with studies hosted on another platform:
- Add a Redirect Node to your experiment at the point where you wish the participant to do a task or questionnaire hosted outside of Gorilla.
- In the 'URL' field, enter the link to your external task.
- Use the 'Add PublicID' setting to append the participant's PublicID to the URL. Enter the parameter name you want to give to the PublicID. You will need to ensure that the external site is configured to retrieve a parameter with this name from the URL at their end.
- Optionally, you can also pass data from fields in the Gorilla Store to the external site using the 'Add Store/Embedded Data' setting. For more information, see Configuration Settings below.
- Use the 'Redirection' setting to configure if you want participants to be redirected immediately, or shown a message first.
- Configure your task on the external site so that on completion, it sends participants back to your Gorilla experiment. Depending on the recruitment policy you have used, you may be able to use the Experiment URL, or you may need to configure a completion token in order to ensure participants are recognised - see the 'Completion' section of the Configuration Settings below for details. For a walkthrough of how to do this for Qualtrics specifically, see our Qualtrics page.
- Optionally, you can add a delay before the participant is allowed to resume the Gorilla experiment by selecting Delay in the 'Completion' setting on the Redirect Node.
- You are running a longitudinal or multi-part study using Prolific as your recruitment service. Open the expandable section below for more details on how to achieve this.
To create a longitudinal or multi-part study hosted on Gorilla where you recruit participants from Prolific:
- Create the entire multi-part study as one experiment in Gorilla.
- Prepare a separate Prolific study for each session in advance. It's easiest to create a study for the first session, then duplicate this study to create the subsequent sessions. This should ensure that the completion URL that goes in each Redirect Node stays the same.
- The Study Link setting in each Prolific study should use the same URL: the recruitment link for your Gorilla experiment (make sure 'I'll use URL parameters' is selected). The automatic integration between Prolific and Gorilla means that Gorilla will always remember where in the tree a participant needs to be placed in order to resume the experiment, based on their unique Prolific ID.
- In your Gorilla experiment, add a Redirect Node at the end of each session. In the 'URL' field, paste the completion URL from the Prolific study corresponding to the just-completed session.
- When participants are redirected back to Prolific, it will change the status of the participants' submission to 'Awaiting Review', ready for you to approve their payment and to see which Prolific IDs need to be invited back for the next session.
- When launching each followup session on Prolific, use the same Gorilla experiment URL and a custom allowlist containing the Prolific IDs of the participants from the previous stage.
For more information, see our page on longitudinal studies and our Prolific recruitment policy page.
Redirect Nodes only allow a participant to return to a Gorilla task if paired with a Return URL on the external site that sends participants back to Gorilla. Otherwise, the participant will remain on the external site they have been redirected to. The Return URL you use will depend on the recruitment policy you have chosen and how you have set up the Redirect Node - see 'Completion' section of the Configuration Settings below.
Samples that use this node
Click on the Redirect Node in the experiment tree to access its configuration settings.
URL
Enter the link to the external site that you want your participants to be redirected to.
Add PublicID / Append PublicID
Use this setting to add the participant's PublicID to the URL so it can be sent on to the external site. Enter the parameter name you want to give to the PublicID. This should match the requirements of your external site.
For example, if you enter id, a participant with PublicID 12345 will be redirected to http://www.your-url-above.com?id=12345
Add External Session ID / Append External Session ID
This allows you to append the external session ID to the URL. Enter the parameter name you want to give to the External Session ID. This should match the requirements of your external site.
For example, if you enter externalID, a participant with External Session ID 67890 will be redirected to http://www.your-url-above.com?externalID=67890
Add Store/Embedded Data / Append Store/Embedded Data
Use this setting to pass data from fields in the Gorilla Store on to the external site. This allows you to, for example, change which external task/questionnaire is presented to participants based on their responses in Gorilla.
Enter the Store fields you want to append to the URL, separated by commas. By default, they will be appended with the name you gave the fields within Gorilla. If you need to append the values, but with a different name, enter the name of the field followed by the name to use in the URL, separated by a colon.
For example, if you enter val1, val2:myval, a participant with val1 of 5 and val2 of 10 will be redirected to http://www.your-onward-url-above.com?val1=5&myval=10
Redirection
Default = Redirect immediately
Options:
- Redirect immediately
- As soon as your participant finishes the previous node in the experiment, they will be automatically redirected
- Show a message first
- Participants will first be shown a message informing them of the redirection, and redirected when they press a button
Title
(Only available when 'Redirection' is set to Show a message first)
Enter the title of the redirection message you want to show.
Message
(Only available when 'Redirection' is set to Show a message first)
Enter the redirection message you want to show.
Button Text
(Only available when 'Redirection' is set to Show a message first)
Enter the text you want to appear on the button participants click to be redirected.
Completion
Default = Immediate
This setting controls what happens to participants when they return to Gorilla after being redirected.
Options:
- Immediate
- When participants return to your experiment after being redirected, they will immediately move to the next Node in your Experiment Tree
- You will need to use a recruitment policy which allows a participant to return under the same ID
- With most integrated third-party recruitment policies, you should be able to use the Experiment URL to link the participant back to your experiment, but we cannot guarantee this will work with every recruitment policy. Be sure to test this with your specific recruitment policy before you send the experiment live
- If the Experiment URL does not work for your recruitment policy, we recommend instead using the Completion Token method and appending the participant's completion token to the Return URL to ensure they are recognised as the same participant on returning
- Delay
- Prevents your participant from returning to Gorilla from the redirected site for the time period that you specify, after which they will be moved to the next Node
- Otherwise, this works the same way as Immediate, so you will need to use a recruitment policy which allows a participant to return under the same ID
- Completion Token
- (We appreciate that the terminology is confusing, but 'Completion Tokens' are not the same as participant tokens. Using the Redirect node will not consume any reserved participant tokens, as these are only spent once the participant reaches the Finish node)
- By default, selecting this option will append a participant-specific completion token as a parameter to the Redirect URL under the name
completion_token - At the end of your external task, link participants back to your experiment using the following base URL:
https://research.sc/participant/login/resume/You must append the participant's specific completion token to the end of this URL, or the participant will not be recognised as having completed your external task. The way in which you do this will depend on the external site you are using: see our Qualtrics page for details of how to do this in Qualtrics - If your external site does not have a built-in method for saving embedded data, you will need to use JavaScript to extract the participant's completion token from the Redirect URL and append it to the Return URL. To see an example of how to do this, visit our Redirect Node example page, right-click and select 'View Page Source'. The relevant script is in the function generateURL() at the bottom of the HTML code
- If your external site does not allow you to edit the return URL, you will instead need to use the 'Append Full Return URL' setting - see below
- When participants return through their unique URL including their completion token, they will register as having completed the task and automatically continue your experiment starting from the next node in the experiment tree. If they try to return without the completion token, they will be redirected again to your external site until they finish the task and are returned to Gorilla with the completion token
Days
(Only available when 'Completion' is set to Delay)
Enter the number of days (whole numbers only) you want to elapse before participants are allowed to resume the experiment after being redirected.
The next day starts at 00:00 (midnight). If a participant enters your experiment and hits the Redirect Node at 23:50, and the delay is set to 1 day, it will be possible for that participant to return and resume within 10 minutes, i.e. at 00:00 (midnight). If you want to enforce a minimum number of hours' delay, use the 'Hours' setting in conjunction with the 'Days' setting.
If you want your delay to be less than a single day, leave the Days setting blank or type 0, and use the 'Hours' and/or 'Minutes' settings.
Hours
(Only available when 'Completion' is set to Delay)
Enter the number of hours (whole numbers only) you want to elapse before participants are allowed to resume the experiment after being redirected.
If you are also using the 'Days' setting, the Hours field will specify the number of hours of delay that will be added after 00:00 (midnight) once the specified number of days have elapsed. Use this combination if you want your participant to resume at a specific time of day. For example, a delay of 1 Day + 8 Hours means your participant will be prevented from taking part in your experiment until 08:00 the next day.
If you want your delay to be less than a single hour, leave the Hours setting blank or type 0, and use the 'Minutes' setting.
Minutes
(Only available when 'Completion' is set to Delay)
Enter the number of minutes (whole numbers only) you want to elapse before participants are allowed to resume the experiment after being redirected.
If you are also using the 'Hours' setting, the two times will be added together.
Completion Token Name
(Only available when 'Completion' is set to Completion Token)
Default = completion_token
If 'Completion' is set to Completion Token, Gorilla will append a participant-specific completion token to the Redirect URL. This optional setting allows you to change the parameter name for the completion token from its default of completion_token to a name of your choice. Enter the parameter name you wish to use for the completion token.
Append Full Return URL
(Only available when 'Completion' is set to Completion Token)
Toggle this setting on to append the full Return URL (i.e., https://research.sc/participant/login/resume/ + the participant's completion token) to the Redirect URL, instead of just appending the completion token. This may be preferred by some external sites.
By default, the parameter name for the full Return URL will be completion_token. You can change this by entering your preferred parameter name in the 'Completion Token Name' setting above.
Checkpoint Node
Checkpoint Nodes allow you to easily keep track of participants' progress.
Participants do not see anything on reaching a Checkpoint Node: they are purely for the researcher. On the Participants tab of your experiment, the name of the last checkpoint each participant passed through is listed in the 'Checkpoint' column.
You can use Checkpoints to easily bulk reject or include participants based on where they have got to in your experiment. Open the expandable section below for more details on how to do this.
You can combine Checkpoint Nodes with the Global Actions options on the Participants tab of the Experiment Builder to easily bulk reject or include participants.
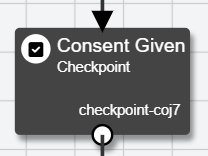
For example, imagine you have added two Checkpoint Nodes to your experiment: 'Consent', directly after the consent form, and 'Completed Task', directly after the task that constitutes the majority of your study.
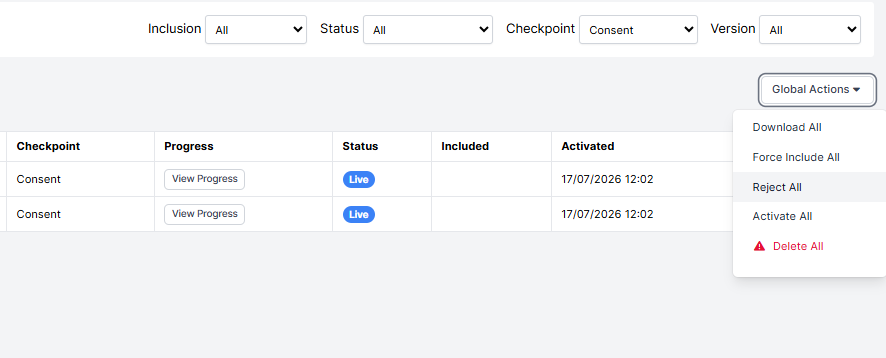
On the Participants tab, use the Checkpoint dropdown to filter by the Checkpoint the participants have reached. Select the 'Consent' Checkpoint, and under Global Actions, select Reject All. This will reject all participants who only got as far as the consent questionnaire in your experiment:
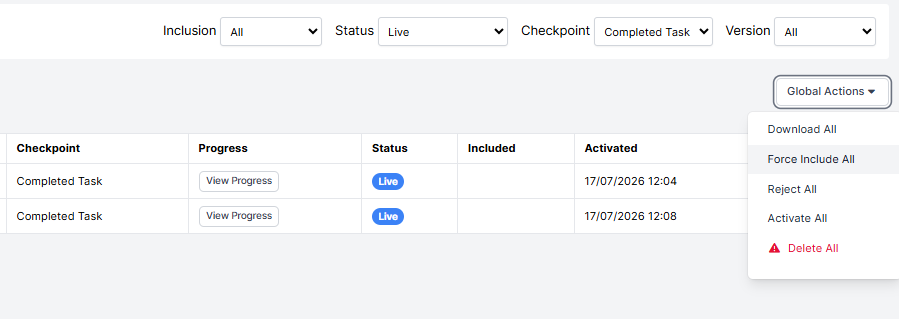
You can also do this for including participants who may have completed the majority of your experiment but missed a debrief questionnaire or left before reaching the Finish node, meaning they're not included in your data. Filtering by status (e.g. Live) can also be useful here! Set the filters to capture the participants you want to include, then click Global Actions -> Force Include All.
To find out more about how Checkpoint information appears in your downloadable data, open the expandable section below.
The name of the last checkpoint a participant passed through will be recorded in the Checkpoint column of your downloadable data. In addition to this, the Checkpoint Node adds 1 new data column to your data for each Checkpoint Node in your experiment:
| Column Name | Description |
|---|---|
| Checkpoint Node Key (e.g. checkpoint-coj7) | Will display the name of your checkpoint if that checkpoint has been completed, e.g. 'Consent Given'. If the participant did not reach this checkpoint, the column will be blank. |
Click on the Checkpoint Node in the experiment tree to access its configuration settings.
Name
Enter a name for the Checkpoint. Try to make the name meaningful, e.g. 'consent given', if used as a checkpoint after your consent questionnaire.
Each Checkpoint name cannot be more than 64 characters long.
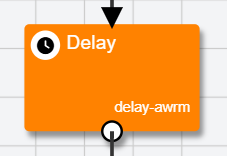
Delay Node
The Delay Node prevents a participant from continuing your experiment until the specified time has elapsed.
This node is useful if you wish to have controlled time delays between different parts of your experiment: for example, between a teaching and testing phase, to measure performance at regular intervals, or in a longitudinal study.
Participants can only resume your experiment after a delay if Gorilla has a way of recognising them when they return. This is easiest to achieve by using an ID-based recruitment policy, which allows your participants to return by logging in or clicking their personalised link.
If you instead choose to use an anonymous recruitment policy such as Simple Link, you must check both 'Send Reminder' and 'Reminder Form' in the configuration settings of the Delay Node, or it will be impossible for your participants to return and complete your experiment! This will require collecting participants' email addresses, so make sure you have ethical clearance for this first.
The delay begins when the participant first reaches the Delay Node. They will see a dialog box informing them of the delay. You can customise the title and message in the settings of the Delay Node.
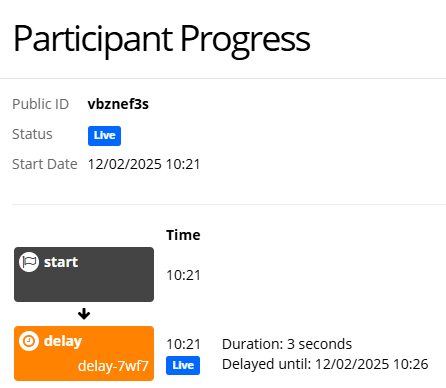
Once participants are live on your experiment, you can check when their delay will elapse by going to the Participants tab and clicking 'View Progress':
During testing and previewing of your experiment, we recommend reducing the specified delay to a few minutes so you can check your experiment is working as expected. Then, prior to piloting/full data collection, you can increase the delay again.
Tutorials that use this Node
Click on the Delay Node in the experiment tree to access its configuration settings.
Heading / Title
Enter the heading you want to show on the dialog box participants will see when they reach this node.
Message
Enter the message you want to show in the dialog box participants will see when they reach this node.
Days
Enter the number of days (whole numbers only) you want to elapse before participants are allowed to resume the experiment.
The next day starts at 00:00 (midnight). If a participant enters your experiment and hits the Delay Node at 23:50, and the delay is set to 1 day, it will be possible for that participant to resume within 10 minutes, i.e. at 00:00 (midnight). If you want to enforce a minimum number of hours' delay, use the 'Hours' setting in conjunction with the Days setting.
If you want your delay to be less than a single day, leave the Days setting blank or type 0, and use the 'Hours' and/or 'Minutes' settings.
Hours
Enter the number of hours (whole numbers only) you want to elapse before participants are allowed to resume the experiment.
If you are also using the 'Days' setting, the Hours field will specify the number of hours of delay that will be added after 00:00 (midnight) once the specified number of days have elapsed. Use this combination if you want your participant to resume at a specific time of day. e.g. a delay of 1 Day + 8 Hours means your participant will be prevented from taking part in your experiment until 08:00 the next day.
If you want your delay to be less than a single hour, leave the Hours setting blank or type 0, and use the 'Minutes' setting.
Minutes
Enter the number of minutes (whole numbers only) you want to elapse before participants are allowed to resume the experiment.
If you are also using the 'Hours' setting, the two times will be added together.
Send Reminder
Default = Off
This setting will only have an effect if you are using a recruitment policy which includes the participant's email address, or if you also use the 'Reminder Form' setting below
Toggle this setting on to automatically send a reminder email to the participant once your specified delay time has elapsed and they are able to continue.
Optionally, you can also send further manual reminders to specific participants by going to the Participants tab and selecting 'Resend email' in the Actions menu:

Reminder Form
Default = Off
If you enable this setting, the participant's email address will be visible on your participant dashboard, so you must ensure you have ethical clearance to collect this data
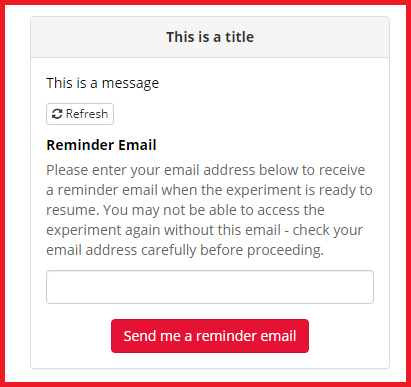
Toggle this setting on to display a reminder form that prompts the participant to enter their email address once they reach the Delay Node. If they do so, they will then be sent an automatic reminder if the 'Send Reminder' option is also enabled.
If the 'Send Reminder' and 'Reminder Form' settings are enabled, the following will display to participants when they reach the Delay Node:
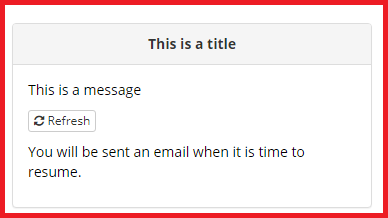
Once the participant has entered their email address, they will see the following:
If you are using an anonymous recruitment policy, such as Simple Link, you must toggle on both this setting and 'Send Reminder' above, or your participants will have no way to return and complete your experiment!
Quota Node
The Quota Node allows you to specify a separate recruitment quota for a part of your experiment.
Quota Nodes act like a ticket gate. Participants pass down the ACCEPT branch until your quota is full, at which point future participants will pass down the REJECT branch.
If a participant drops out before finishing the experiment (via Reject Nodes, a Time Limit or manual rejection), the Quota Node will automatically balance the assignment of future participants to replace them.
Unlike all other nodes, Quota Nodes take effect across versions of your experiment - they do not reset if you make changes to your experiment and commit a new version.
Usually, Quota Nodes come after a Branch Node which divides participants into groups on some criteria. If you want participants to be randomly assigned to a quota, use the Allocator Node instead.
For more information on how to set up a Quota Node, open the expandable section below.
- Add a new Quota Node to the Experiment Tree. Using the dropdown, either select a Quota name from the list or select 'Create New...' to add a new quota.
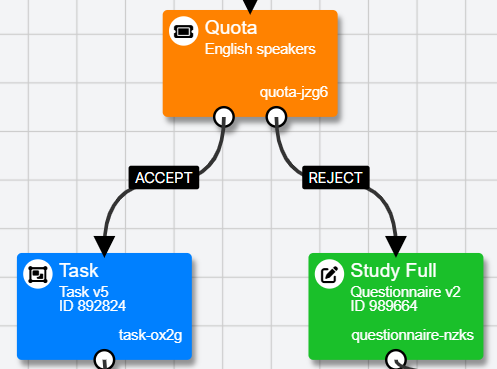
- Connect your Quota Node into your Experiment Tree flow. Usually, Quota Nodes come after a Branch Node. For example, in the screenshot below, the Branch Node divides participants into an 'English speakers' group and a 'Greek speakers' group based on their responses in the Language questionnaire. The Quota Nodes then impose one quota for English speakers, and one quota for Greek speakers.
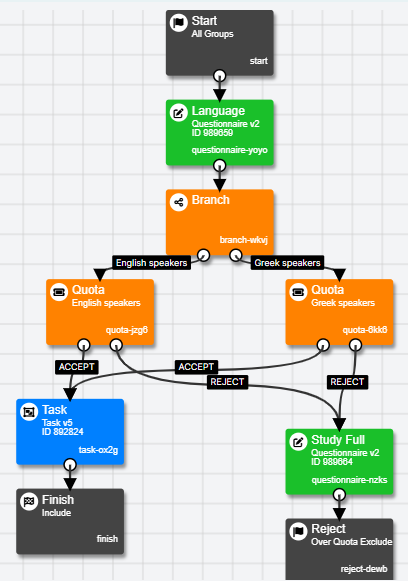
- Connect the ACCEPT and REJECT branches from each quota on to the appropriate nodes. In the screenshot above, the ACCEPT branches both go on to the Task node, then on to a Finish Node. The REJECT branches go to a 'Study Full' information questionnaire, then on to a Reject Node.
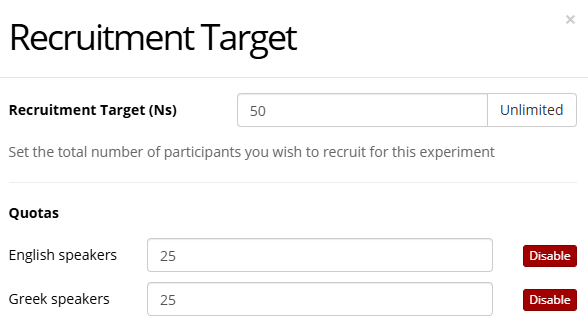
- On your experiment's Recruitment tab, click Change Recruitment Target to set a recruitment target for each of your Quotas. In the screenshot below, the target for both the English speakers and Greek speakers quotas has been set to 25.
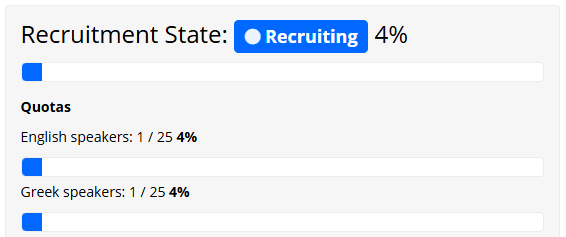
- Once participants are live on your experiment, you will be able to see the recruitment progress for each quota separately on the Recruitment tab.
- If all the Quotas for your experiment are full, participants will not be able to enter your experiment. To allow more participants to enter, increase your Quota size, or else manually reject 'Live' Participants who have not completed to free up space in your Quotas.
Quota Nodes account for participant dropout!
If a participant passes through a Quota Node but is then rejected, a new participant will be assigned to that Quota Node. You can find more information about when a participant dropped out of an experiment in the Consort data.
Quota Nodes will not work in Preview mode
No record of Previews are made, so previews do not contribute towards any Quota.
Disabling a Quota does not remove the Quota Node from your experiment
Instead, all participants who reach a disabled Quota Node will pass down the REJECT branch. To stop using the Quota to control recruitment to a section of your experiment, remove the Quota Node from the experiment tree and commit the new version of your experiment.
Tutorials that use this Node
To find out more about how Quota information appears in your downloadable data, open the expandable section below.
The Quota Node adds 1 new data column to your downloadable data for each Quota Node passed through by the participant:
| Column Name | Description |
|---|---|
| Quota Node Key (e.g. quota-jzg6) | Will display the status (ACCEPT or REJECT) of the participant passing through the Quota Node. ACCEPT means the participant was counted towards your quota and continued down the ACCEPT branch of your Quota Node. REJECT means the quota was full when the participant reached your Quota Node and continued down the REJECT branch of your experiment. If you have more than one Quota Node, and the participant can only pass through one, the column for the other Quota Node will be left empty. |
Click on the Quota Node in the experiment tree to access its configuration settings.
Quota
Select a name from a dropdown list of possible quotas, or create a new quota by selecting the 'Create new...' option and typing a name in the box.
Each Quota name cannot be more than 128 characters long.
On the Recruitment tab of your Experiment, click 'Change Recruitment Target'. You will be presented with two options for each quota:
Quotas
Type a number to set a Recruitment Target for each named Quota.
Enable/Disable
Default = Enabled
Click the button to toggle the status of a quota.
Options:
- Enabled
- Participants who reach this Quota Node will continue down the ACCEPT branch until the Quota is full.
- Disabled
- Participants who reach this Quota Node will continue down the REJECT branch until they complete the experiment (regardless of how many participants were previously recruited in this quota).
Click the 'Enable' button at any time to re-Enable a disabled Quota. Recruitment for this quota will then continue from where you left off.
Disabling a Quota will not remove the Quota Node from your experiment. To stop using the Quota to control recruitment to a section of your experiment, remove the Quota Node from the experiment's Design tab and commit the new version of your experiment.
Repeat Node
The Repeat Node sends participants back to do a section of your experiment again in a loop.
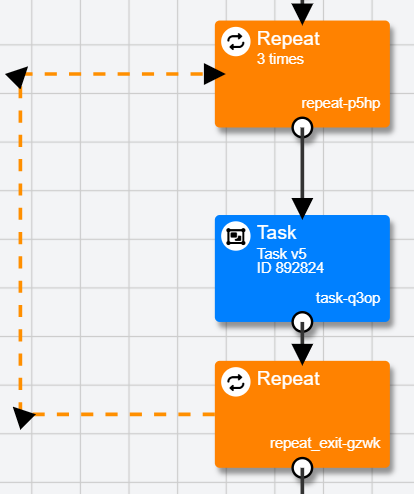
Unlike other Nodes, the Repeat Node is a dual Node system. Participants enter the top Repeat Node and then go on to any connected Tasks, Questionnaires etc. that follow. When participants reach the bottom Repeat Node, they follow the dotted line back to the top Repeat Node. This loop will continue for the number of repeats you specify in the 'Repeats' setting.
If you use the Randomiser, Order, Counterbalance, or Allocator Node within a Repeat, each of these nodes will only perform their function once and then keep the same settings through each repeat.
Repeating tasks only under specific criteria
A common use case for the Repeat Node is to have participants repeat a section of the experiment only if they fail to meet some criteria, for example, if they don't score highly enough on a test. Open the expandable section below for more details on how to achieve this.
In the example above, participants move on to another task if they fulfil the criteria to be sent down the Pass branch, and repeat the task if they instead go down the Fail branch.
The steps below apply to Task Builder 2. If you are using Task Builder 1, you will instead need to add the Reset Embedded Data script to your task and manually enter the embedded data name on the Branch Node.
To set this up using Task Builder 2:
- Save the score you want to use for branching to the Store within your task using the Save Accuracy component.
- You will need to reset this score each time the participant begins the task again. To do this, add a Reset Accuracy component to a screen at the beginning of the task, select 'Any Response' under Criteria, and select the field you use in the Save Accuracy component.
- Add the task to your experiment.
- Add a Branch Node directly after your task in the Experiment Tree. Add a new Branch with the Branch Name 'Pass'. From the first dropdown, select the Store field where you saved your score. Define your pass criteria using the second dropdown and the final box. For example, if a pass = scoring higher than 5, select 'greater than' from the second dropdown and enter 5 into the final box.
- Add a new Branch with the Branch Name 'Fail'. Toggle on Default, leaving all other settings for this branch blank.
- Add a Repeat Node to your Experiment Tree. Place the first node before your task and the second node (the one with 'exit' in the name) after the Branch Node. Connect all the Nodes as demonstrated in the screenshot above.
You can see an example of this setup in our Repeat and Branch Nodes Example.
Directing participants to different tasks on each repeat
You might want participants to see different tasks, or a different version of each task, on each repeat. Alternatively, in the case of a multi-part study, you might want to direct participants back to a different URL after each repeat. Open the expandable section below for more details on how to achieve this.
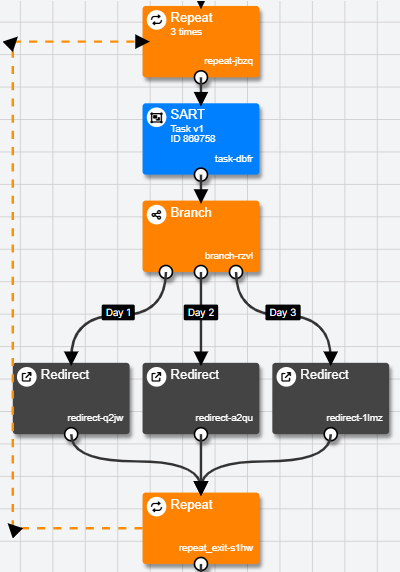
In the example above, participants are redirected to a different link after the task depending on which repeat iteration they are on.
To set this up:
- Enter
RepeatNumberin the 'Store Name' setting on the Repeat Node to save the current iteration of the repeat loop to the Store. - Add a Branch node within your Repeat loop at the point where you want to send participants to different content.
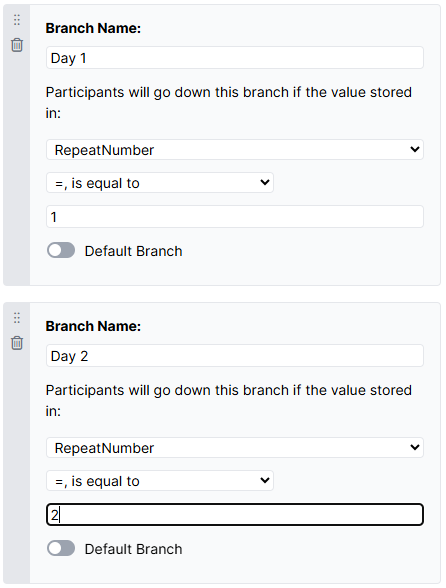
- Set up a Branch for each repeat number in the Branch Node settings. To do this, select RepeatNumber from the first dropdown, 'is equal to' from the second dropdown, and enter the repeat number itself in the final box. The screenshot below shows this setup for the groups corresponding to Day 1 and Day 2 from the above experiment.
- Drag the resulting branches from the Branch Node onto the tasks or other content that you want to show on each repeat.
Using the Repeat node in Multiplayer experiments
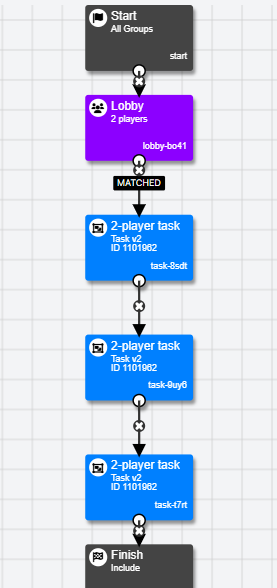
When adding the Repeat node to a Multiplayer experiment, the Lobby node must be placed within the repeat loop to ensure players are connected for each iteration of the task.
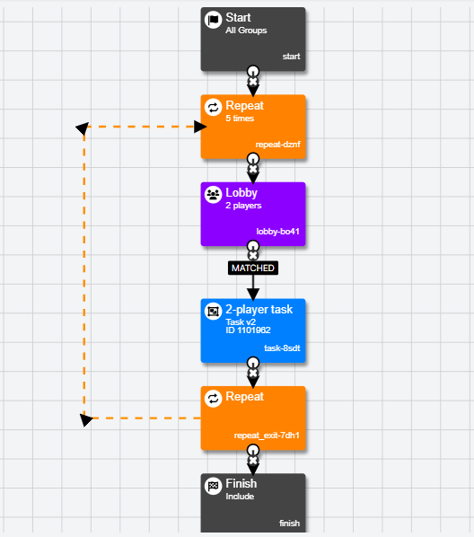
In the example above, the Lobby node is placed within the Repeat loop. This means that the connection between players can be re-established between each instance of the task. Participants will be matched with any other players in the Lobby, according to your matching criteria. If the Lobby node is placed outside of the Repeat loop, participants will only be connected for the first instance of the task and will then skip over the other iterations of the task.
If you would like participants to remain in the same matches for each iteration of the task, you will need to remove the Repeat node from your experiment. Instead, you will need to use the Lobby node to match players once, and then layout each instance of the task separately, as shown in the image below:
Make sure your Repeat Nodes are in the correct order!
The Repeat Node with 'exit' in its name should be after the Repeat Node without 'exit' in its name, and the arrows on the dotted line should lead back to an earlier point in your experiment.
Take care when using multiple repeat loops with a branch node!
In certain cases, you may want to use a repeat loop within another repeat loop. However, this can lead to issues if participants are redirected back to the outer loop before completing the inner loop. When this happens, Gorilla will detect that the previous iteration of the inner loop was not fully completed. As a result, problems may occur when the participant re-enters the repeat loop.
To resolve this issue, avoid branching within nested repeat loops by manually setting up the repeats in the experiment tree or incorporating the repeats directly into the task.
Samples that use this node
Repeat and Branch Nodes Example
Branching Based on the Number of Repeats Example
To find out more about how Repeat information appears in your downloadable data, open the expandable section below.
The Repeat Node adds information to your downloadable data in the following data column:
| Column Name | Description |
|---|---|
| Repeat Key | This column will contain the key for the repeat node. This will consist of the words repeat-key, the node key for the Repeat Node, then the number of the repeat. For example, if this is the second repetition of a task/questionnaire, this will end in #2. e.g. repeat-p5hp#2. |
Click on the Repeat Node in the experiment tree to access its configuration settings.
Repeats
Enter the maximum number of times you want a participant to see the sequence of nodes inside the Repeat Node.
For example, if you type 2, then the participant will see this sequence of nodes exactly 2 times in total: once initially and then once when they repeat them.
Store Name
Enter the name of a Store field to save the current number of times a participant has gone through the Repeat Node. This repetition number can then be used later in the experiment.
For example, if you enter RepeatNumber in the Store Name setting, you could then adjust the task content based on the number of times the participant has passed through the Repeat Node by retrieving the current value of the RepeatNumber field within the task.
Switch Node
The Switch Node allows participants to switch between two tasks, two questionnaires, or a task and a questionnaire during your experiment.
There are three main reasons to use the Switch Node:
You want to test participants' task preference, for example, how long they spend on a maths task compared to a verbal task.
You want to test comprehension of a document, for example, see how many times participants refer to text in order to answer questions about it.
You want to allow participants to consult instructions at will while completing a task.
For more information on how to set up a Switch Node, open the expandable section below.
- Add a Switch Component to the task(s) you want participants to be able to switch to/from.
- Add a Switch Button to the questionnaire(s) you want participants to be able to switch to/from.
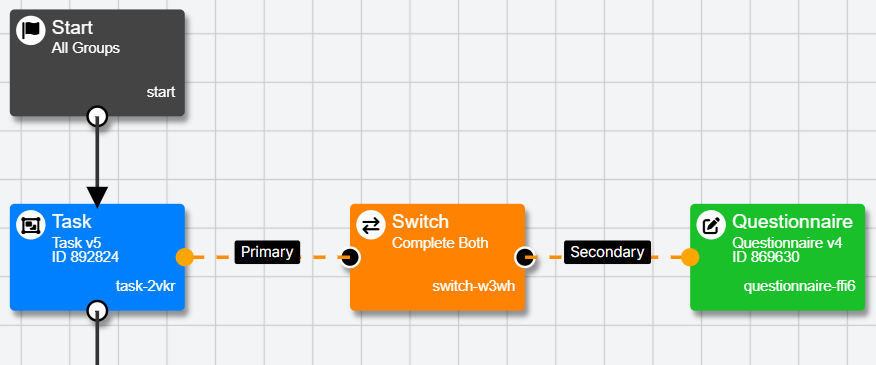
- Decide which task/questionnaire you want the participant to see first. Add this task/questionnaire to your experiment and connect it into the flow of your experiment tree. This will be the Primary task.
- Add a Switch Node into your experiment tree. Drag from its left side to tether it to the Primary task.
- Add your second task/questionnaire to your experiment. This will be the Secondary task.
- Drag from the right side of the Switch Node to tether it to your Secondary task. This node will not be included directly in the flow of your experiment tree; it will only be seen by the participant if they switch to it via a Switch button.
- Configure the settings on the Switch Node to decide how many times you want to allow participants to switch, and whether they need to complete both tasks. See 'Completion Criteria' in Configuration Settings below for more details.
Samples that use this node
Switching Between Informational Website and Questionnaire
Tutorials that use this Node
Switching between Tasks Tutorial
To find out more about how Switch information appears in your downloadable data, open the expandable section below.
The Switch Node adds 5 new data columns to your downloadable data:
| Column Name | Description |
|---|---|
| Switch Node Key (e.g. switch-w3wh)-time-primary | Total time (in ms) the participant spends on the primary task. |
| Switch Node Key (e.g. switch-w3wh)-percentage-primary | Time the participant spent on the primary task displayed as a percentage. |
| Switch Node Key (e.g. switch-w3wh)-time-secondary | Total time (in ms) the participant spends on the secondary task. |
| Switch Node Key (e.g. switch-w3wh)-percentage-secondary | Time the participant spent on the secondary task displayed as a percentage. |
| Switch Node Key (e.g. switch-w3wh)-switches | Count of the total number of switches a participant made between the primary and secondary tasks. |
The Switch Node also adds the following rows to your downloadable data each time a Switch Button is pressed:
| Column Name | Row Entry | Description |
|---|---|---|
| Response | SWITCH | This is the reaction time (in ms) at which the participant pressed the Switch Button. |
| Response | SWITCH ELAPSED | This is the total time (in ms) that the participant has spent on the task before pressing the Switch button. |
Click on the Switch Node in the experiment tree to access its configuration settings.
Max Switches
Default = unlimited
Enter the maximum number of times you want the participant to be able to switch between tasks. Leave blank for unlimited switches.
Completion Criteria
Default = Complete Both Tasks
Select from the dropdown the criteria for completing the switching task.
- Complete Both Tasks
- Regardless of number of switches, the participant will be made to complete both tasks fully
- Complete Primary Task
- The participant will be made to complete the Primary Task
- Complete Secondary Task
- The participant will be made to complete the Secondary Task
- Time Limit
- Once a set time limit is reached, regardless of the participant's progress in either task, the participant will be advanced to the node that comes after the Primary Task in the experiment tree
You must set a time (in ms) in the 'Total Time Limit' setting for the Time Limit setting to work correctly. Do not use this setting when switching between two questionnaires. This is because questionnaire metrics are recorded only upon completion of each page. The Time Limit criteria means that participants may be moved on before they complete the current page, risking data loss.
Total Time Limit
(Only available when 'Completion Criteria' is set to Time Limit)
Enter the maximum total amount of time (in ms) a participant may spend across the two tasks.
Randomiser Node
The Randomiser Node distributes participants at random between 2 or more paths through your experiment, in the ratios you specify.
The most common use case is when you have a between-subjects design and want to assign participants at random to conditions of your task.
Randomiser or Allocator?
The Randomiser Node and the Allocator Node do the same thing in slightly different ways. Here's our quick guide to which to use for your study:
- If you know how many participants you want to recruit in total, and how many you want in each group, use the Allocator Node.
- If you are recruiting an unknown number of participants, but know the ratio of participants you want in each group, use the Randomiser Node.
For more information on the types of randomisation available in Gorilla, check out our Randomisation and Attrition Guide.
For more information on how to set up a Randomiser Node, open the expandable section below.
- Add a Randomiser Node to your Experiment. Connect it into the flow of your experiment tree at the point where you want to randomise participants to different paths.
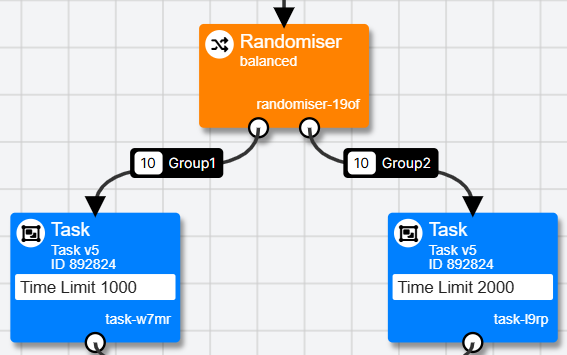
- Click the Randomiser Node to open its settings. Add as many Groups as you have conditions. Enter a memorable name for each one in the Group field.
- In the Ratio field for each group, enter the ratio of participants you want to assign to this group. For example, with two groups, ratios of 1 and 1 will result in half the participants going to the first group and half to the second.
- Scroll to the bottom of the settings and select the Randomisation Mode you want. Balanced = participants are randomised in batches the size of the sum of the group ratios. Random = participants are allocated to groups completely at random. See the next expandable section for more information on Randomisation Mode and how it interacts with your ratios.
- Save the settings on the Randomiser Node. Each white dot at the bottom of the node will correspond to one of your Groups. Drag the white dot onto the next node that should be presented to that group.
You can see an example of a Randomiser set up with two Groups in Randomiser and Manipulations.
Randomisation Mode: Balanced or Random?
The short version:
- To maximise the chances of ending up with balanced numbers in your groups, use Balanced mode.
- To assign participants to groups completely at random, use Random mode.
The Ratios you enter mean something slightly different depending on the Randomisation Mode you choose. Open the expandable section below for more details on how choosing a Randomisation Mode affects the meaning of your Ratios.
Let's say you have two groups, A and B. You want to send half your participants to Group A and half to Group B.
Balanced Mode
If you select Balanced mode, participants will be randomised without replacement, in batches the size of the sum of the group ratios.
If you enter the ratios 1 and 1, then for every 2 participants, 1 will be assigned to Group A and 1 will be assigned to Group B. So a possible sequence of assignments for the first 20 participants would be AB BA BA AB BA AB BA BA BA AB.
If you enter the ratios 5 and 5, then for every 10 participants, 5 will be assigned to Group A and 5 will be assigned to Group B. So a possible sequence of assignments for the first 20 participants would be BAAABABABB ABBAAABABB.
When using Balanced mode, bear in mind that the Randomiser node resets across versions of your experiment. If you make changes and commit a new version, the randomisation will start from scratch, without taking into account how many participants were randomised to each group in previous versions.
Random Mode
If you select Random mode, participants will be randomised with replacement, one by one, according to the relative ratio for each group - i.e. the ratio for that group divided by the sum of all the ratios.
Here, ratios 1 and 1 and ratios 5 and 5 would be exactly equivalent. In both cases, participants would be randomised to Group A with a probability of 0.5 (1/2 or 5/10) and to Group B with the same probability.
Unlike in Balanced mode, each participant's assignment would be independent of all previous participants' assignments. So this mode is more truly 'random', but at the cost of being unlikely to produce well-balanced groups (except in very large samples).
For more information on the differences between Balanced and Random modes and how they are affected by participant dropout, see our Randomisation and Attrition Guide.
If you're running an experiment and your conditions appear imbalanced, check out our Troubleshooting Guide.
Randomiser Nodes do not account for participant dropout
To account for participant dropout, use the Allocator Node, or manually adjust your Group ratios on a subsequent round of recruitment to replace participants who did not finish. See our Randomisation and Attrition guide for more information.
Balanced mode will not work in Preview
When you preview an experiment, a Randomiser Node set to 'Balanced' will act like a Randomiser Node set to 'Random'. The Randomiser Node has no knowledge of previous previews, as these are not recorded. This means it will act independently of any prior events.
Randomisation inside a Repeat Node only happens once
If you use a Randomiser node inside a Repeat Node, the randomisation of participants to groups will only occur once. A given participant's group will remain the same on each repeat.
During testing and previewing of your experiment, if you wish to control which path the Randomiser node will assign you to, you can change the ratios of all groups to a ratio of 0, except the group you want to preview. This will ensure your preview goes down the path with the non-zero value.
Please make sure to change your ratios back to the correct values before sharing your experiment with participants.
Samples that use this node
Branching Based on Previous Randomisation
To find out more about how Randomiser information appears in your downloadable data, open the expandable section below.
The Randomiser Node adds 1 new data column to your downloadable data for each Randomiser Node in your experiment:
| Column Name | Description |
|---|---|
| Randomiser Node Key (e.g. randomiser-19of) | This column contains the name of the randomiser group this participant was assigned to. e.g. 'Group1' or 'Group2'. |
Click on the Randomiser Node in the experiment tree to access its configuration settings.
Group Allocations
Group
Enter a name for this group/condition.
Group names must be unique and the Group field cannot be left empty. Each group name cannot be more than 128 characters long.
Ratio
Ratio of participants that will be assigned to this group.
The exact mathematics of how the ratio is used depends on the randomisation mode (see below), but the proportion of participants assigned to any one branch will always be equal to that branch's ratio divided by the sum of all ratios.
The following settings apply to the node as a whole:
Randomisation Mode
Default = Balanced
Options:
- Balanced
- Participants are allocated to groups in the above ratios, in sets the size of the sum of all ratios
For two groups with ratios 1 and 2, for every 3 participants, 1 will be assigned to the first group and 2 will be assigned to the second. For two groups with ratios 10 and 20, for every 30 participants, 10 will be assigned to the first branch and 20 will be assigned to the second. This is random without replacement.
- Random
- Participants are allocated to groups with a probability equalling the ratio for that group divided by the sum of all ratios
In Random mode, two groups with ratios 1 and 2 behave exactly the same as two groups with ratios 10 and 20: participants are assigned to the first group with probability 1/3, and to the second group with probability 2/3. This is random with replacement.
Store Name
Enter the name of a Store field to save the participant's allocated Group. This group name can then be used later in the experiment.
For example, you can use a Branch node to ensure that participants who were randomised to Group 1 in the first part of the experiment are then allocated to Group 2 in the second part of the experiment, and vice versa.
See an example of how to set this up in Branching Based on Previous Randomisation.
Branch Node
The Branch Node sends participants down different paths in your experiment based on their previous responses or performance.
Any information you want to use in a Branch Node - for example, a participant's response to a question in a questionnaire, or the number of trials they got correct in a task - must first be saved to the Store. Find out more about how to save to the Store within a questionnaire and how to save to the Store within a task.
You can also save information from previous Repeat, Randomiser, and Allocator Nodes by using the 'Store Name' setting, and Counterbalance Nodes by using the 'Name' setting. This allows you to send participants down different paths depending on the condition they were previously randomised to, or how many times they have repeated a section of the experiment.
Branching based on multiple criteria - for example, if a participant failed several attention checks, or submitted a specific combination of responses? You'll need to either:
- combine the criteria into a single Score (Questionnaire Builder 2) or a single Store field (Task Builder 2)
- use multiple Branch Nodes to check the criteria one by one
For an example of how to chain multiple Branch Nodes together to check several criteria, see Advanced Branching Tutorial.
For more information on how to set up a Branch Node, open the expandable section below.
- Save the information you want to base your branching on to the Store.
- To branch participants based on their response in a questionnaire, save that response to the Store and add that questionnaire to the experiment.
- To branch participants based on their accuracy in a task, save the number of correct answers to the Store and add that task to the experiment.
- To branch participants based on the group they were randomised to earlier in the experiment, enter a name in the 'Store Name' setting on the Randomiser or Allocator Node, or in the 'Name' setting on the Counterbalance Node.
- To use Branch Nodes in conjunction with Repeat Nodes, see our dedicated guides on the Repeat Node page.
- Add a Branch Node to your Experiment. Connect it into the flow of your experiment tree at the point where you want to send participants down different paths.
- Click the Branch Node to open its settings. Add as many Branches as you need. Enter a memorable name for each one in the Branch Name field.
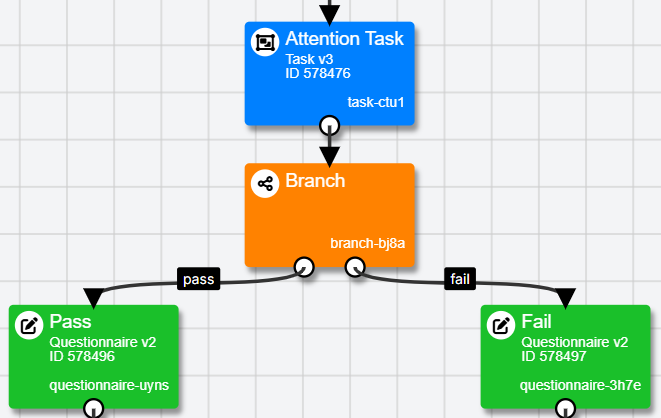
- Use the remaining settings to define the conditions under which participants should be sent down this branch. In the screenshot below, participants whose
correctscore is greater than 4 are sent down the 'Pass' branch:
The first dropdown menu contains all Store fields currently available in your experiment. Select the one that contains the information you want to base your branching on.
Embedded data saved in Task Builder 1 and Questionnaire Builder 1 will not show up automatically in the dropdown. For these, select (Enter Manually) and type in the name of the embedded data field.
Then, use the second dropdown and the final box to define how the values of this field correspond to your branches.
- Once you have set up all your branches, set one of them as Default. This will ensure that if none of the conditions are met, participants will still proceed in the experiment. To do this, toggle on Default at the bottom of one branch's settings.
- Save the settings on the Branch Node. Each white dot at the bottom of the node corresponds to one of your branches. Drag the white dot onto the next node that should be presented on that branch.
You can see an example of a Branch Node set up to branch participants based on percentage correct in a task in Performance Branching.
If your experiment branching isn't working correctly, check out our Troubleshooting Guide!
Samples that use this node
Branching Based on Previous Randomisation
Tutorials that use this Node
Performance Branching Tutorial
Branching from a Questionnaire Tutorial
To find out more about how Branch information appears in your downloadable data, open the expandable section below.
The Branch Node adds 1 new data column to your downloadable data for each Branch Node in your experiment:
| Column Name | Description |
|---|---|
| Branch Node Key (e.g. branch-bj8a) | This column contains the group name of the branch this participant passed through, e.g. 'pass' or 'fail'. |
Click on the Branch Node in the experiment tree to access its configuration settings.
Branch Name
Enter the name of the branch that the participant will be directed down if they match its criteria.
Branch Names must be unique and the Branch Name field cannot be left empty. Each Branch Name cannot be more than 128 characters long.
You then need to define the conditions under which participants will be sent down this branch, as demonstrated in this screenshot:
From the first dropdown, select the field in the Store that contains the information you want to base your branching on.
The dropdown will contain all Store fields currently available in your experiment. This includes any Store fields used to save information within the tasks and questionnaires in your experiment tree, any names entered into the 'Store Name' settings on a previous Repeat, Randomiser, or Allocator Node, and any name entered into the 'Name' setting on a previous Counterbalance Node.
Embedded data saved in Task Builder 1 and Questionnaire Builder 1 will not show up automatically in the dropdown. For these, select (Enter Manually) and type in the name of the embedded data field. What you enter must match the name of the embedded data field exactly, or your branching will not work.
From the second dropdown, select a rule to use when comparing the data from the Store to the value you enter in the box below.
Options:
=, is equal to
!=, is not equal to
<, is less than
<=, is less than or equal to
>, is greater than
>=, is greater than or equal to
In the final box, enter the reference or threshold value that you want to compare to the information in the Store field, according to the rule you selected in the second dropdown above.
If you are basing your branching on a specific response from a questionnaire, the value will be the response you want to match. You can see an example of this setup here: Tutorial: Branch Node (from Questionnaire Builder 2).
If you are basing your branching on task performance, the value will usually be a number corresponding to the threshold that defines a pass or a fail. You can see an example of this setup here: Performance Branching.
This setting is case-sensitive; what you enter must exactly match the value you want to compare against.
Default Branch
Toggle this setting on to make this branch the default branch. Participants who do not match any rules defined in the Branch Node will be assigned to the default branch.
Order Node
The Order Node counterbalances the order in which Task and Questionnaire Nodes appear to your participants.
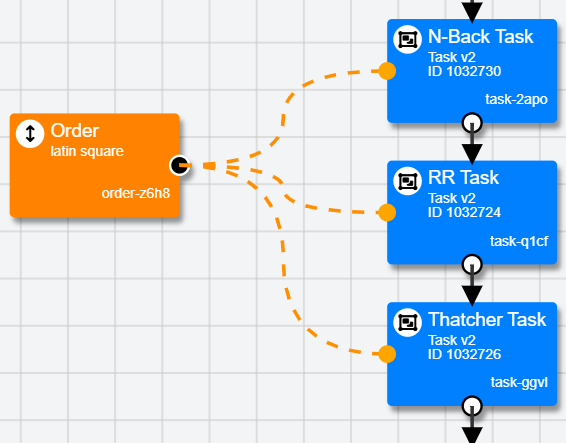
The most common use case is when you have a within-subjects design (i.e. all participants do the same series of tasks) and want to control for order effects.
For more information on how to set up an Order Node, open the expandable section below.
- Add the tasks and questionnaires whose order you want to counterbalance to your experiment tree. Connect them together in an initial order.
- Add an Order Node to your experiment tree and place it on the left-hand side.
- Drag from the right side of the Order Node to tether it to each of the nodes whose order you want to counterbalance. Once each node has been tethered, an orange dotted line will appear connecting it to the Order Node.
- Click the Order Node to open its settings, and choose the Randomisation Mode you want to use (see Configuration Settings below for more information). Save the settings and connect up the rest of the experiment tree.
Samples that use this node
Demo: Intervention with 3 test points
To see these examples in action, use the recruitment link on the experiment's Recruitment tab to view the study multiple times as a participant. Simply previewing the experiment will not work: no record of Previews are made, meaning the node will display the same order irrespective of earlier previews.
You can see the order a particular participant was assigned to by going to the Participants tab and clicking View Progress. The participant's order will be shown next to the Order Node as a series of letters, corresponding to the nodes' original order as laid out in the Experiment Tree. e.g. BCA would mean this participant saw the second node, followed by the third node, followed by the first node.
Order Nodes will not work in Preview mode
When you preview the experiment, nodes will always be in the same order. To check the Order Node is working, view it as a live participant (you can temporarily replace your Finish Node with a Reject Node to avoid consuming tokens).
The Order Node cannot shuffle the order of groups of nodes
To randomise the order of groups of nodes, lay out all possible orders in your Experiment Tree and use a Randomiser Node or Allocator Node to assign participants to each order.
The Order Node resets across experiment versions
If you make changes to your experiment and commit a new version, the Order Node will start assigning orders again from scratch, without accounting for how many people have been assigned to each order across previous experiment versions.
Shuffling order inside a Repeat Node only happens once
If you use an Order node inside a Repeat Node, the order will change between participants, but within one participant's experiment tree the order will remain the same on each repeat.
To find out more about how Order information appears in your downloadable data, open the expandable section below.
The Order Node adds 1 new data column to your downloadable data for each Order Node in your experiment:
| Column Name | Description |
|---|---|
| Order Node Key (e.g. order-z6h8) | This column contains the order that the Order Node assigned the participant to see the nodes. Nodes are referred to by letters corresponding to their original order as laid out in the Experiment Tree. e.g. BCA would mean this participant saw the second node, followed by the third node, followed by the first node. |
Click on the Order Node in the experiment tree to access its configuration settings.
Randomisation Mode
Default = Latin Square
Select the Randomisation Mode you want to use. In both cases, as far as possible, Gorilla will attempt to assign the same number of participants to each task order.
Options:
- Latin Square
- Uses a standard Latin Square design to create a subset of all possible permutations of task order. In this subset, each task will appear an equal number of times at each position in the order
- For example, if you have 3 tasks tethered to the Order Node, selecting Latin Square will cycle through the orders ABC, BCA, CAB
- Balanced
- Uses all possible permutations of task order
- For example, if you have 3 tasks tethered to the Order Node, selecting Balanced will cycle through the orders ABC, ACB, BAC, BCA, CAB, CBA
- The number of possible permutations quickly gets large (N factorial). For any order nodes connected to 6 or more task nodes, Latin Square will always be used
Counterbalance Node
The Counterbalance Node randomly assigns different versions of your task to different participants.

The most common use case is when you have a number of different stimuli sets in your task and want to counterbalance the assignment of participants to stimuli sets.
When to use the Counterbalance Node
To use the Counterbalance Node, the elements of your task you want to vary need to be in the spreadsheet. You can then randomly assign a specific column within a spreadsheet, or a whole spreadsheet, to each participant.
If you need to randomly allocate participants to entirely different tasks, or to the same task with different manipulations, use the Randomiser or Allocator Node instead.
The Counterbalance Node assigns values to participants randomly without replacement, in batches the size of the number of values. For example, if you have 20 spreadsheets, then participants 1-20 will each be randomly assigned a unique spreadsheet out of the 20; participants 21-40 will each be assigned a unique spreadsheet out of the 20; and so on. Read more in our Randomisation and Attrition Guide.
There are two ways to use the Counterbalance Node, depending on what your task requires:
- You only need to randomly assign one element per trial (e.g. the stimulus shown to participants). Open the expandable section below for more details on how to achieve this.
If you are using Task Builder 1, the following method will not work. You should use the multiple spreadsheets method detailed in the next expandable section instead.
- Add each stimulus set to your spreadsheet as an additional column. In Counterbalance Node (Single Spreadsheet), columns L1-L5 in the spreadsheet of the Categories task contain the 5 word lists we want to counterbalance.
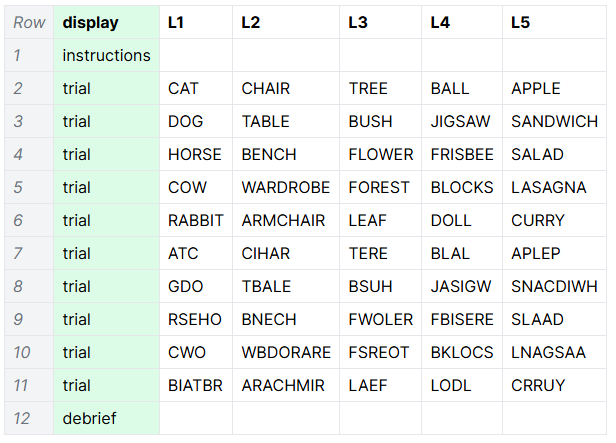
- Go to the component in your task that displays your stimulus (in the example, this is a Markdown Text component). Click the binding icon next to the relevant setting (here, the 'Raw Text' setting that controls what text is displayed).
- In the binding window, toggle on Show Advanced Settings. Click Store at the top right. In the Field dropdown, click 'Create new...' and enter a memorable name, e.g.
StimList. From the second dropdown, select 'Look for a spreadsheet column with that name'.
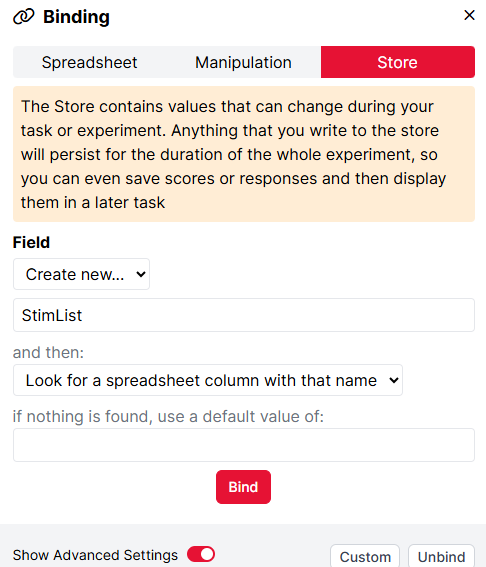
- Click Bind. Once you have done this, the component will appear bound to the spreadsheet via the Store field
StimList, like this:
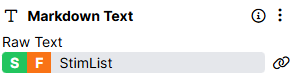
- Commit the changes to your task and add it to your experiment.
- Add a Counterbalance Node to your experiment tree. In the Name field, enter StimList. In the Values field, enter the names of the columns that contain your stimulus sets, separated by commas: for example, L1,L2,L3,L4,L5. Name and Values are case-sensitive - take care to make sure they match the names of your Store field and your spreadsheet columns exactly!
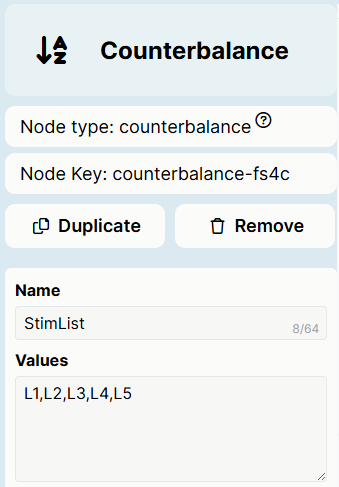
- Save the settings and place the Counterbalance Node before your task in the experiment tree. Connect all the nodes together into the experiment flow.
- You need to randomly assign multiple elements per trial (e.g. the stimulus shown to participants and the associated correct answer). Open the expandable section below for more details on how to achieve this.
- Create each version of your task as an additional spreadsheet, and upload all these spreadsheets to your task. In Counterbalance Node (Multiple Spreadsheets), the Naming Task contains 2 spreadsheets: 1 and 2.
- Within your task, bind your stimuli, correct answers, etc. to the spreadsheet as normal.
- Add a Counterbalance Node to your experiment tree. In the Name field, enter a memorable name, e.g.
selectSpreadsheet. In the Values field, enter the names of your task spreadsheets separated by commas: for example, 1,2. Values are case-sensitive - take care to make sure they match the names of your spreadsheets exactly!
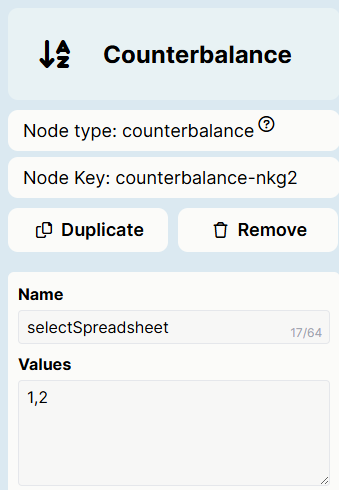
- Save the settings and connect the Counterbalance Node into the flow of your experiment.
- Add your Task node after your Counterbalance Node and connect them together.
- Click your Task node to open its settings. In the Spreadsheet dropdown, select (Manual Override).
- In the text box that appears below, enter the name you gave your Counterbalance Node, enclosed in curly brackets and preceded by two dollar signs: for example,
$${selectSpreadsheet}. Names are case-sensitive - take care to match the name you entered in your Counterbalance Node exactly!
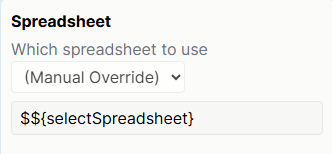
- Save the settings and connect the rest of your experiment flow.
Counterbalance Nodes do not account for participant dropout
To account for participant dropout, use the Allocator Node, or manually adjust the Values on a subsequent round of recruitment to replace participants who did not finish. See our Randomisation and Attrition guide for more information.
In Preview, the selection of Values is completely random
When you preview an experiment multiple times, the Counterbalance Node will select a completely random Value each time. The Counterbalance Node has no knowledge of previous previews, as these are not recorded.
The Counterbalance Node resets across experiment versions
If you make changes to your experiment and commit a new version, the Counterbalance Node will start assigning Values again from scratch, without accounting for how many people have been assigned to each Value across previous experiment versions.
Counterbalancing inside a Repeat Node only happens once
If you use a Counterbalance node inside a Repeat Node, the counterbalancing of participants to spreadsheets/spreadsheet columns will only occur once. A given participant will see the same spreadsheet/spreadsheet column on each repeat.
Samples that use this Node
Counterbalance Node (Single Spreadsheet)
Counterbalance Node (Multiple Spreadsheets)
Tutorials that use this Node
Counterbalance Node Tutorial (uses multiple spreadsheets)
You can find out which counterbalance value a participant has been assigned to by viewing their progress in the Participants tab and looking at the information next to the Counterbalance node.
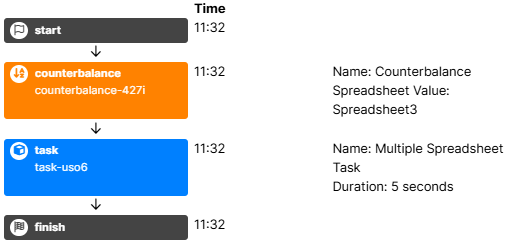
To find out more about how Counterbalance information appears in your downloadable data, open the expandable section below.
The Counterbalance Node adds 1 new data column to your downloadable data for each Counterbalance Node in your experiment:
| Column Name | Description |
|---|---|
| Counterbalance Node Key (e.g. counterbalance-fs4c) | This column contains the Value (i.e., spreadsheet or spreadsheet column) that was assigned to this participant. e.g. L1. |
Click on the Counterbalance Node in the experiment tree to access its configuration settings.
Name
Enter a name for your Counterbalance Node.
Once you enter it here, this will become the name of a field in the Store. For each participant, this field will contain the Value they have been assigned by the Counterbalance Node.
- If your Values are the names of spreadsheet columns, use advanced binding within your task to 1) bind to this field in the Store then 2) look for a spreadsheet column with that name.
- If your Values are the names of spreadsheets, enter the name of this field in the 'Manual Override' setting of the Spreadsheet dropdown when configuring your task in the experiment tree, in the format
$${Name}.
Counterbalance names cannot be more than 64 characters long.
Values
List the names of the spreadsheet columns or spreadsheets you want to assign participants to, separated by commas.
Participants will be assigned values randomly without replacement: for example, if you have 5 values, then for every 5 participants who enter your experiment, one will be assigned each value.
This setting is case-sensitive; what you enter must exactly match the names of your spreadsheets and/or spreadsheet columns.
Allocator Node
The Allocator Node distributes participants at random between 2 or more paths through your experiment, up to your specified maximum number of participants for each path.
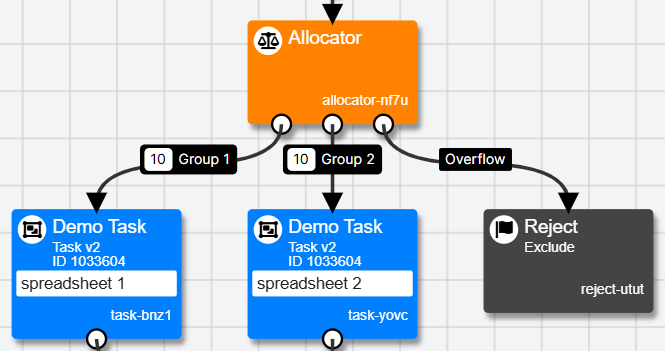
Once the maximum number of participants for each path has been reached, future participants will go down the Overflow branch. Connecting the Overflow branch to a Reject Node will prevent these additional participants from consuming a token.
If a participant drops out before finishing the experiment (via Reject Nodes, a Time Limit or manual rejection), the Allocator Node will allow another participant down the path they took to replace them.
Randomiser or Allocator?
The Randomiser Node and the Allocator Node do the same thing in slightly different ways. Here's our quick guide to which to use for your study:
- If you know how many participants you want to recruit in total, and how many you want in each group, use the Allocator Node.
- If you are recruiting an unknown number of participants, but know the ratio of participants you want in each group, use the Randomiser Node.
For more information on the types of randomisation available in Gorilla, check out our Randomisation and Attrition Guide.
For more information on how to set up an Allocator Node, open the expandable section below.
- Add an Allocator Node to your Experiment. Connect it into the flow of your experiment tree at the point where you want to randomise participants to different paths.
- Click the Allocator Node to open its settings. Add as many Groups as you have conditions. Enter a memorable name for each one in the 'Group' field.
- In the 'Max number of participants'/'Max Allocation' field for each group, enter the total number of participants you want to recruit to this group.
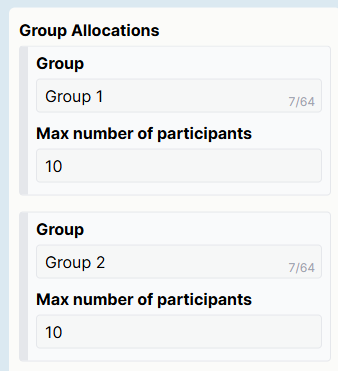
- Save the settings on the Allocator Node. Each white dot at the bottom of the node will correspond to one of your Groups, with one additional white dot for Overflow. Drag the white dot for each group onto the next node that should be presented to that group.
- The Overflow group will contain any participants who arrive at the Allocator Node after all groups have reached their maximum number of participants (including both live + complete participants). Drag the white dot for Overflow on to where you want these participants to go - for example, to a Reject Node, or on to a specific condition if you do not want to reject them.
You can see an example of an Allocator set up with two Groups in Example: Allocator Node.
If you're running an experiment and your conditions appear imbalanced, check out our Troubleshooting Guide.
Allocator nodes account for participant dropout!
If a participant is assigned to a given group by an Allocator Node but is then rejected or deleted, the Allocator Node will assign another participant to that group. You can find more information about when a participant dropped out of an experiment in the Consort data.
The Allocator Node resets across experiment versions
If you make changes to your experiment and commit a new version, the Allocator Node will start assigning participants to groups again from scratch, without accounting for how many people have been assigned to each group across previous experiment versions.
Allocation inside a Repeat Node only happens once
If you use an Allocator Node inside a Repeat Node, allocation of participants to groups will only occur once. A given participant's group will remain the same on each repeat.
During testing and previewing of your experiment, if you wish to control which path the Allocator node will assign you to, you can change the Max number of participants of all groups to 0, except the group you want to preview. This will ensure your preview goes down the path with the non-zero value.
Please make sure to change these values back to the correct ones before sharing your experiment with participants.
Samples that use this node
To find out more about how Allocator information appears in your downloadable data, open the expandable section below.
The Allocator Node adds 1 new data column to your downloadable data for each Allocator Node in your experiment:
| Column Name | Description |
|---|---|
| Allocator Node Key (e.g. allocator-nf7u) | This column contains the group name of the allocator branch this participant was assigned to, e.g. Group 1 or Group 2. |
Click on the Allocator Node in the experiment tree to access its configuration settings.
Group Allocations
Group
Enter a name for this group/condition.
Group names must be unique and the Group field cannot be left empty. Each Group name cannot be more than 128 characters long.
Max number of participants / Max Allocation
Enter the maximum number of participants you would like to be assigned to this Group.
The following setting applies to the node as a whole:
Store Name
Enter the name of a Store field to save the participant's allocated Group. This group name can then be used later in the experiment.
For example, you can use a Branch node to ensure that participants who were randomised to Group 1 in the first part of the experiment are then allocated to Group 2 in the second part of the experiment, and vice versa.
See an example of how to set this up in Branching Based on Previous Randomisation. (This example uses the Randomiser Node, but the setup using the Allocator Node would be the same.)
Lobby Node
This node is only available if you have access to Multiplayer. See our Pricing page for more information.
The Lobby Node is used in Multiplayer experiments to group together participants who are going to play together.
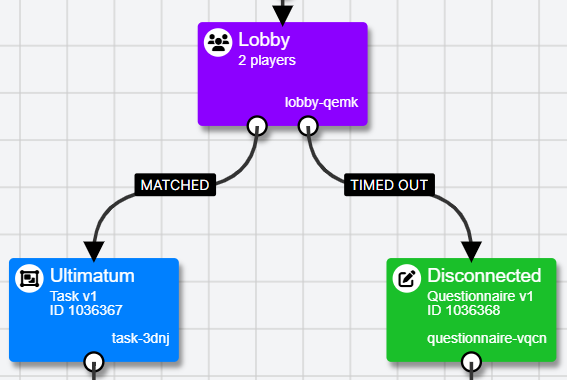
Participants who are grouped together for multiplayer experiments are put into the same room. Everyone starts off in the Lobby and then gets assigned to a room with the other players they are going to play with.
Participants who reach the Lobby node will wait there until they have been matched with enough other players to proceed:
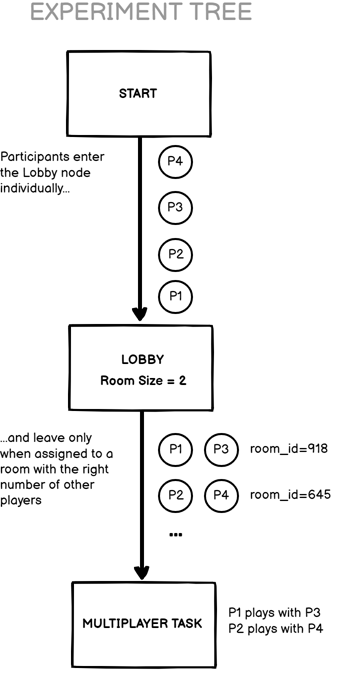
For a walkthrough of how to set up the Lobby Node in a multiplayer experiment, see the Multiplayer How-To Guide.
Samples that use this node
Ultimatum Game Experiment - 2 Players
To find out more about how Lobby information appears in your downloadable data, open the expandable section below.
The Lobby Node does not add any new columns to your downloadable data. However, the Lobby Node Key (e.g. lobby-qemk) of the Lobby Node where the participants were most recently matched will be included in the room ID listed in the Room ID column.
Click on the Lobby Node in the experiment tree to access its configuration settings.
Players
Enter the number of players that should be assigned to each room. This must match the number of players specified in your multiplayer task.
Title
Enter the title you want to display at the top of the dialog box participants will see when they reach this node.
Message
Enter the message you want to display in the dialog box participants will see when they reach this node.
Mode
Default = Automatic
The 'Mode' setting determines how participants are matched into rooms (i.e., groups that take part in the multiplayer task together). You can find more information on player matching in the Multiplayer How To Guide.
- Automatic
- Gorilla will match participants into rooms for you
- If you want automatic assignment to be completely random, ensure the 'Matchmaking' setting below is not enabled. If you want to define rules for automatic assignment (e.g., to match players with particular characteristics together), ensure the 'Matchmaking' setting below is enabled and define your criteria using the 'Player Criteria' settings below
- Manual
- You will manually match players into rooms. Manual assignment happens in the matchmaking room, which can be accessed using the URL that appears at the top of the Lobby node when the experiment is live
Matchmaking
Default = Off
Enable this setting to define criteria that determine how players should be matched into rooms. Set up these criteria using the 'Fixed Order' and 'Player Criteria' settings below.
Fixed Order
(Only available when 'Matchmaking' is enabled)
Default = Off
Set up your 'Player Criteria' first (see final setting below). You can then use Fixed Order to determine how these criteria relate to player positions.
For example, if you want Player 1 to always be male and Player 2 to always be female, enter Player 1 and Player 2 criteria accordingly and then ensure Fixed Order is enabled. If you want each room to contain a male player and a female player, but want their player positions to be assigned at random, set up the same criteria but leave Fixed Order disabled.
Time Limit (ms)
Set the maximum time you want participants to have to wait to be matched.
Adding a Time Limit will create a TIMED OUT branch from the Lobby node which you can connect to another node in your Experiment Tree. Participants who have not been matched after the time limit is reached will proceed down the TIMED OUT branch instead of the MATCHED branch.
Mingle Time (ms)
Set the time you want to wait before starting to match participants into rooms. This can allow time for other participants to enter the lobby and create more potential matches.
Mingle Player Count
Set the number of players that need to be in the lobby to trigger matchmaking to start.
This setting takes precedence over the 'Mingle Time' setting: for example, if you set Mingle Time to 30000 ms (30 seconds) and Mingle Player Count to 6, then matchmaking will start as soon as 6 players are in the lobby, even if this is before 30 seconds have elapsed.
Player Criteria
(Only available when 'Matchmaking' is enabled)
Set up the criteria you want Gorilla to use to automatically match players into rooms. To use a value as a criterion for player matching, it must be saved in the participant's Store. Find out more about saving to the Store in our Store guide.
Field
The name of the Store Field that contains the criterion you want to use for this player. For an example, see the Multiplayer How To Guide.
Value
The value in the Store Field that you want to equal to assign a participant as this player. For an example, see the Multiplayer How To Guide.
Live Branch
This feature is currently only available on Early Access - please contact us if you're interested in trying it out!
The Live Branch Node allows you to change the path participants will be sent down while they are taking part in your experiment.
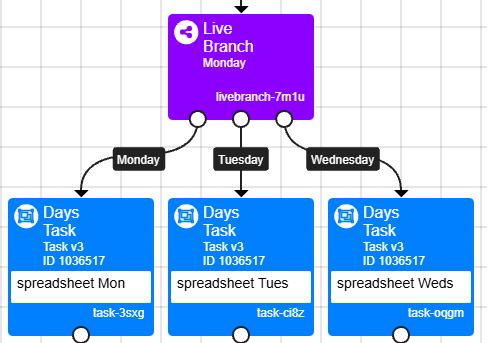
Set up as many groups as you have conditions and select one as the default. This will be the initial branch all participants are sent down. At any point while the experiment is live, click the Live Branch node in the experiment tree, open the link at the top, and select from the 'Set current branch' dropdown:
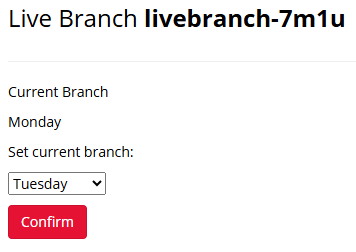
Click Confirm. All participants who arrive at the Live Branch node will now be sent down the branch you selected.
Click on the Live Branch Node in the experiment tree to access its configuration settings.
Group
Enter a name for the current branch. Each group name cannot be more than 128 characters long. Make sure to choose one group as the default branch.
Store/Embedded Data Field
Enter the name of a Store field to save the participant's allocated Group. This group name can then be used later in the experiment.
For example, you can use a Branch node to ensure that participants who were sent to Group 1 in the first part of the experiment are then allocated to Group 2 in the second part of the experiment, and vice versa.
See an example of how to set this up in Branching Based on Previous Randomisation. (This example uses the Randomiser Node for the first step, but the setup using the Live Branch Node would be the same.)
Live Gate
This feature is currently only available on Early Access - please contact us if you're interested in trying it out!
The Live Gate Node prevents participants from continuing your experiment until you choose to let them progress.
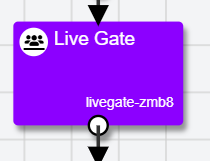
Participants who arrive at the Live Gate node will initially be held at that node, behaving as though it were a Delay Node. When you're ready to let participants through, click the Live Gate node in the experiment tree, open the link at the top, and click 'Activate All':
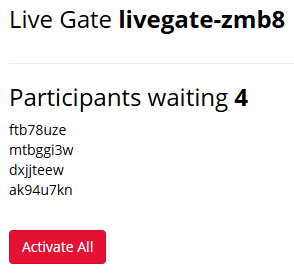
There are three reasons to use the Live Gate node:
- You are running a live event and want participants to be held at a certain point until you are ready for them to proceed to the next stage of the experiment.
- You want to delay participants until a specific date/time. (If you want to delay them by a specific interval, use a Delay Node instead.)
- You are running a Multiplayer study - use a Live Gate node before each Lobby node in your study to control the flow of participants through the experiment.
Once the 'Gate' has been opened, participants will automatically pass through it when they arrive there.
Click on the Live Gate Node in the experiment tree to access its configuration settings.
Title
Enter the title you want to display at the top of the dialog box participants will see when they reach this node and wait for the Gate to open.
Message
Enter the message you want to display in the dialog box participants will see when they reach this node and wait for the Gate to open.
Reward Node
This node is deprecated. It will still appear in experiments where it has already been added, but cannot be added to experiments in New Experiment Builder.
Reward nodes are purple with a icon in the top left corner.
Reward Nodes allow you to give a reward (e.g. a voucher or gift card) to any participant that reaches this node. Reward Nodes can be used in a number of different ways:
- They are useful for triggering participant payment based on how far through the experiment your participant has got.
- They can be used in conjunction with 3rd party recruitment services to implement variable rewards.
- They can be implemented on their own in order to provide rewards to participants on any recruitment policy.
Currently, rewards are implemented through a partnership with BHN Rewards. In order to use rewards in Gorilla, you will need to sign up for a BHN Rewards account. Once you have done so, follow our integration guide to trigger rewards using the Reward node.