From Simple Components to Advanced Functionality
Overview
This guide provides in-depth walkthroughs on how to achieve specific functionality within Task Builder 2. Previously, these setups would have been difficult to achieve in Task Builder 1, and many required scripting, but Task Builder 2 has made them much easier to implement in your experimental protocol. To achieve the functions described, many of the tasks use Advanced Binding settings.
Browse the list of topics in the menu to find walkthroughs of each use case. You can find all of the tasks referenced in this guide in our From Simple Components to Advanced Functionality Project. Each page will have a link to the specific task which showcases the features.
Adding a back button
There are a few different ways in which you may need to implement a back button in your task, depending on your task setup and what you are looking to achieve. You can find each of the three methods described below in the Adding a Back Button Task. Each of the methods described refer to a different display and spreadsheet within this task. To preview each method, select the appropriate spreadsheet in the dropdown after clicking 'Preview' on the task.
1. Returning to a previous screen in the same display
This setup refers to the BackButton1 display and spreadsheet in the task linked above.
You can add a back button to go back to a previous screen in the same display by using the Branch component. To set this up, we have a standard Continue Button prefab to allow participants to continue to the next screen. A second Button has been added to the screen with a Click Response component. The Click Response component has been set up to record the response ‘back’ when clicked.
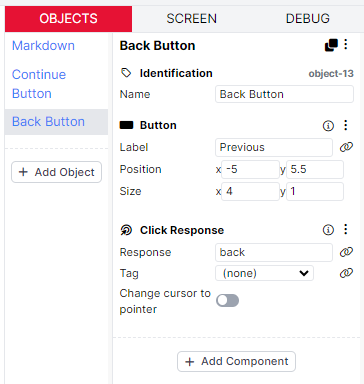
This response is then used in the Branch component, so that when this response is received, participants are branched to the previous screen in the display.
2. Returning to a previous trial in the spreadsheet
This setup refers to the BackButton2 display and spreadsheet in the task linked above.
You can add a back button to return to a previous trial in a similar way to the method described above. In this example, you will also need an additional Button with the Click Response recorded as ‘back’, as shown above.
In this setup, we use the Jump to Row component to jump back a row in the spreadsheet. The Jump to Row component only works if it is on the final screen within a display. Since our task display has two screens, a main trial screen and a fixation screen, going back involves three steps: 1) adding an additional blank screen called 'Back' to the end of the display, 2) adding a Branch component to the main trial screen to send the participant to the 'Back' screen if they press the back button, and 2) adding a Jump to Row component to the 'Back' screen to send the participant back to the previous trial.
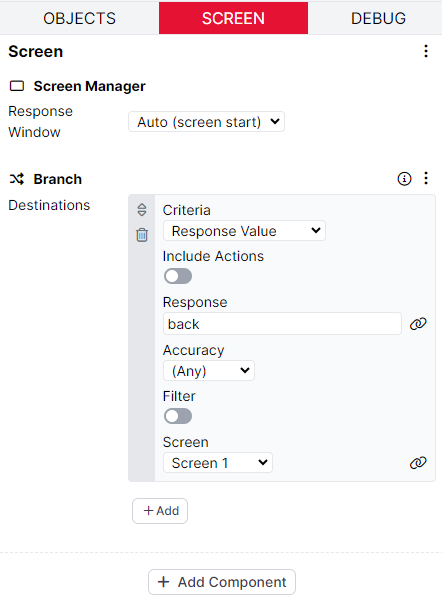
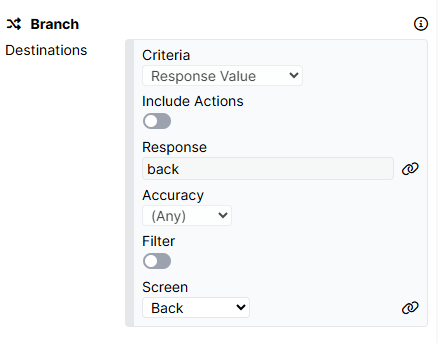
The Branch component on the main trial screen looks similar to example 1 above. When the response 'back' is received, we go to the screen called 'Back':
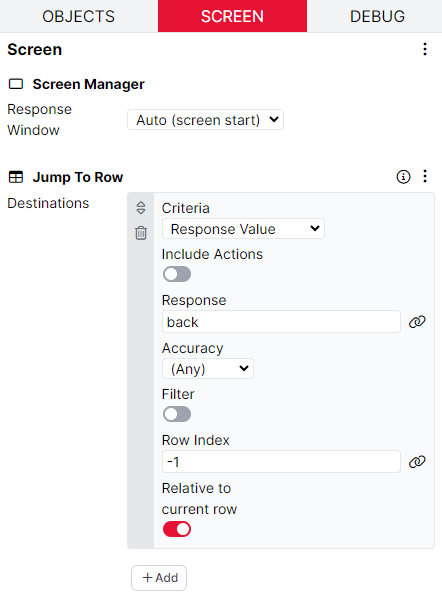
The 'Back' screen at the end of the display is blank, with two components on the screen tab: a Time Limit set to a small number of milliseconds, and a Jump to Row component that jumps the participant back a row in the spreadsheet. We do this by setting the row index as -1 and using the 'Relative to current row' toggle. This logic means that the participant is jumped back to the previous row in the spreadsheet (setting the Criteria to 'Any Response' means reaching the time limit will trigger this logic).
We also need to make sure that participants only reach the 'Back' screen if they press the back button. To do this, we add another Branch component to Screen 2 of the display (the fixation screen that follows every trial) with Criteria set to 'Any Response' and Screen set to 'End Display':
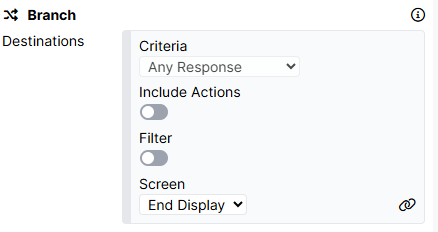
This ensures that participants who reach the fixation screen (and therefore did not press the back button) are moved straight to the end of the display and on to the next trial.
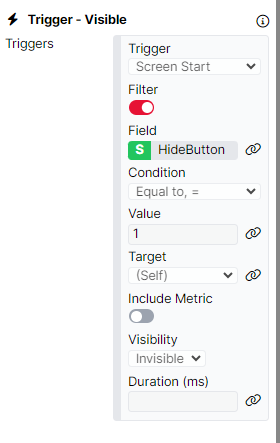
We also do not want the back button to appear on the first trial in the task, as there is no previous trial to return to. We achieve this with a Trigger - Visible component on the back button object. On screen start, we use the Filter toggle to evaluate the 'HideButton' column of the spreadsheet. If the value is equal to 1 in this column, we want the button to be invisible. In the spreadsheet, we have entered a 1 in this column for the first trial so that the back button does not appear.
3. Using a Progress Bar with a back button
This setup refers to the BackButton3 display and spreadsheet in the task linked above.
If we want a back button and a progress bar that adapts to the participant moving backwards and forwards through a task, then we need a slightly different setup to those described above.
On the Continue Button, instead of adding the Click to Continue component, we have added a Click Response component with the response ‘next’. This is because we use the response provided by the Continue button to control the Progress Bar increasing.

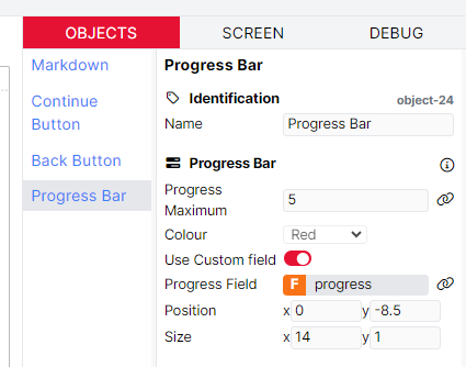
For this Progress Bar component, we use the custom field called ‘progress’. We use the Custom Field in this setup, so that we can increase and decrease the progress bar based on the responses received from the participant. This way, we can make sure the progress bar increases when we move forwards in the task, and decreases when we move backwards.
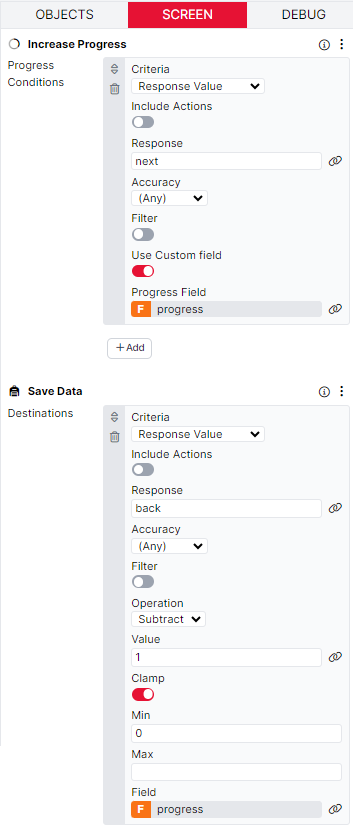
In the Increase Progress component, we increase the progress each time the response ‘next’ is received. Again, we need to make sure that the Custom field is used and we bind this to the ‘progress’ field. Then, to make sure that the Progress component adapts when the back button is pressed, the Save Data component handles this. When the response ‘back’ is received, we subtract 1 from the progress field. Importantly, we clamp the minimum so that the value cannot go below 0.
Note that the example only has one screen in the task display, so the Jump to Row component can be used directly to jump the participant back. If your back button is not on the final screen in your task display, you will need to use the setup shown in example 2 above to first Branch participants to the end of the display, then use Jump to Row to jump them back to the previous trial.
Changing Stimuli Based on Responses
You can dynamically change the stimuli shown on a screen based on a participant's response. Below are three examples of common setups researchers often want to create and instructions for implementing each one.
These examples are:
- Changing Stimuli using a Slider with an Adaptive Slider (Portion Size) Task
- Changing Stimuli using a single Click Response with a BART task
- Changing Stimuli using multiple Click Responses with a Gorilla Image Selector task
Although these examples use custom bindings to change image stimuli, the same approach can also be used to dynamically change video or audio stimuli.
1. Changing Stimuli using a Slider with a Adaptive Slider (Portion Size) Task
To see the setup explained below in action, take a look at our Adaptive Slider (Portion Size) Task.
In this task, participants drag a slider to see different portion sizes.
To do this, first, create your stimuli outside of Gorilla. These could be images with different colour saturation, audio files with different pitches, or whatever your task needs! Label your stimulus files with numbers, like 'img-1.jpg', 'img-2.jpg', etc.
In this example, there are four images with one, two, three, and four cupcakes, so we have four image files labelled cupcake1.jpg, cupcake2.jpg and so on. Then add these stimuli to the Stimuli tab.

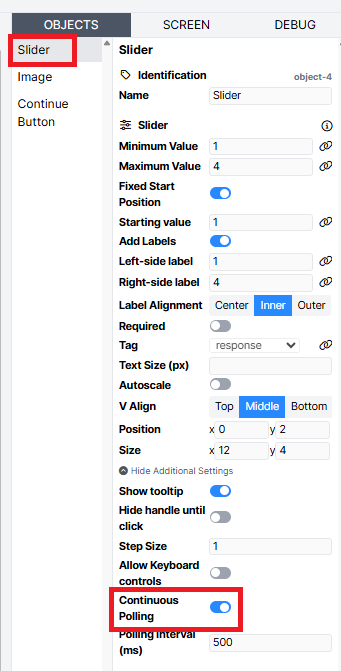
Next, add a Slider component to the screen where you want participants to respond. Configure the slider to suit your task, then set a Starting Value. Then select 'Show Additional Settings', toggle on 'Continuous Polling', and set the polling interval to 500ms. This means Gorilla will submit the participants' current slider value as an Action every 500ms, allowing the displayed stimulus to update quickly as the slider moves.
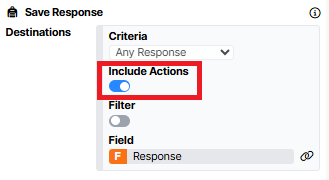
Next, go to the Screen tab and add a Save Response component. For this component, toggle on the “Include Actions” setting to capture the continuous polling actions from the Slider. You will then want to create a new field in the Store. In our example, we have created a new field called Response. This means that whatever response the participant gives on that screen will be stored in the Response field.
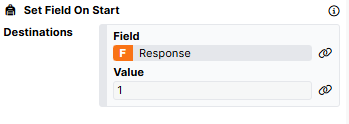
In this example, we want the image cupcake1.jpg to always be displayed when the screen appears. To achieve this, add a Set Field On Start component and set the Response field (created earlier) to equal 1. Additionally, make sure the slider’s starting value matches the value set in the Set Field On Start component. In this case, set the slider to start at 1.
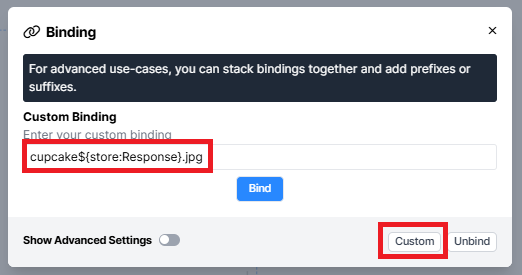
Finally, configure the image component using a custom binding. Click the image component’s binding icon, then select “Custom” in the bottom-right of the pop-up to create your own binding. In our example, the image should change based on the value stored in the Response field. To reference this value, use the syntax ${store:Response}. Since the images are named sequentially (e.g., 'cupcake1.jpg,' 'cupcake2.jpg,' etc.), enter the following into the custom binding field: cupcake${store:Response}.jpg. This ensures that whenever the response value updates in the store, the displayed image automatically updates to match it.
2. Changing Stimuli using a single Click Response with a BART Task
To see this setup in action, take a look at our BART task.
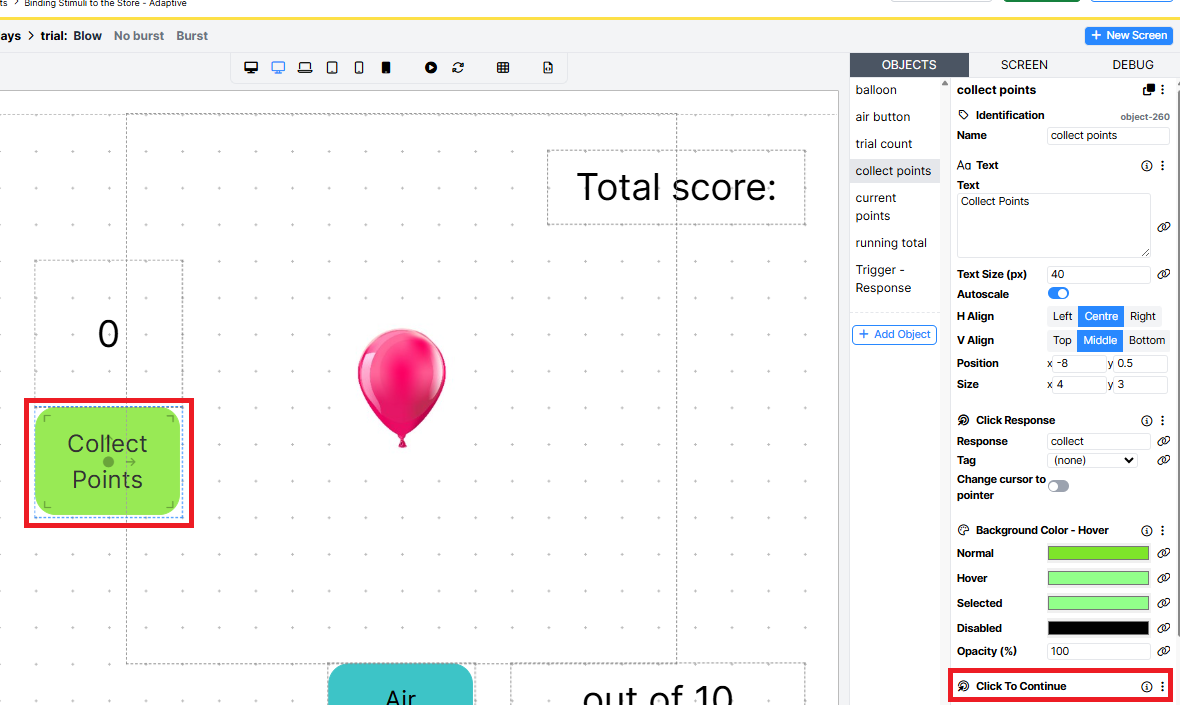
In the task, the participant clicks a button, which then changes the image to a bigger balloon.
To do this, create your stimuli outside of Gorilla. These could be images with different colour saturation, audio files with different pitches, or whatever your task needs! Label your stimulus files with numbers, like 'img-1.jpg', 'img-2.jpg', etc. It is important that all stimulus files have the same start (e.g. 'img-') and file suffix.
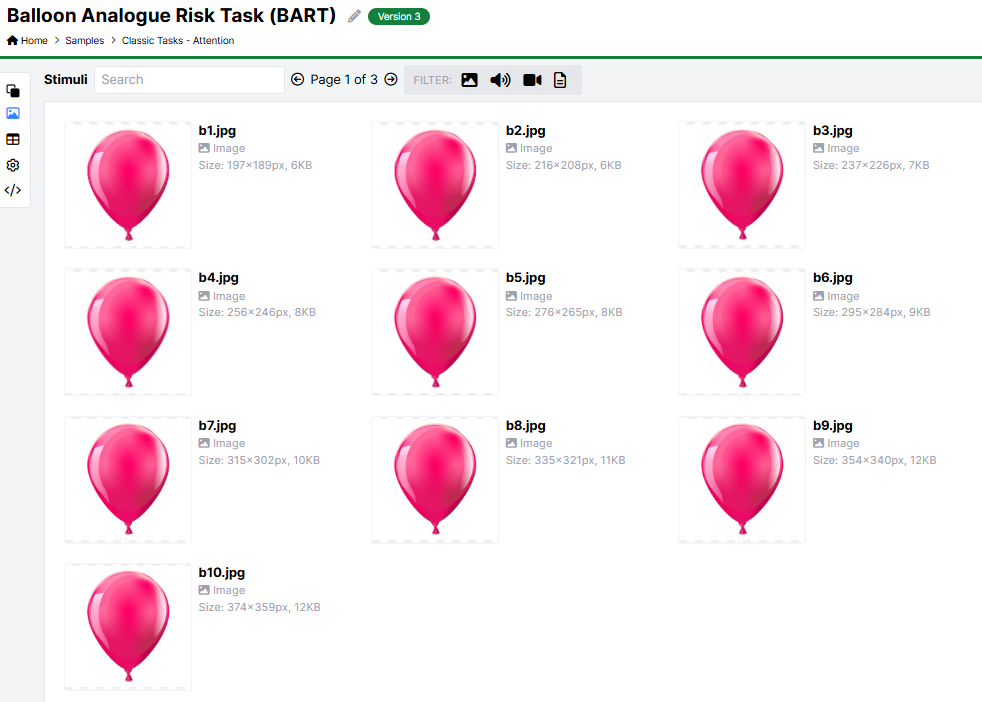
In this example, we have labelled the files b1.jpg, b2.jpg, b3.jpg, etc. and have added these stimuli to the Stimuli tab.
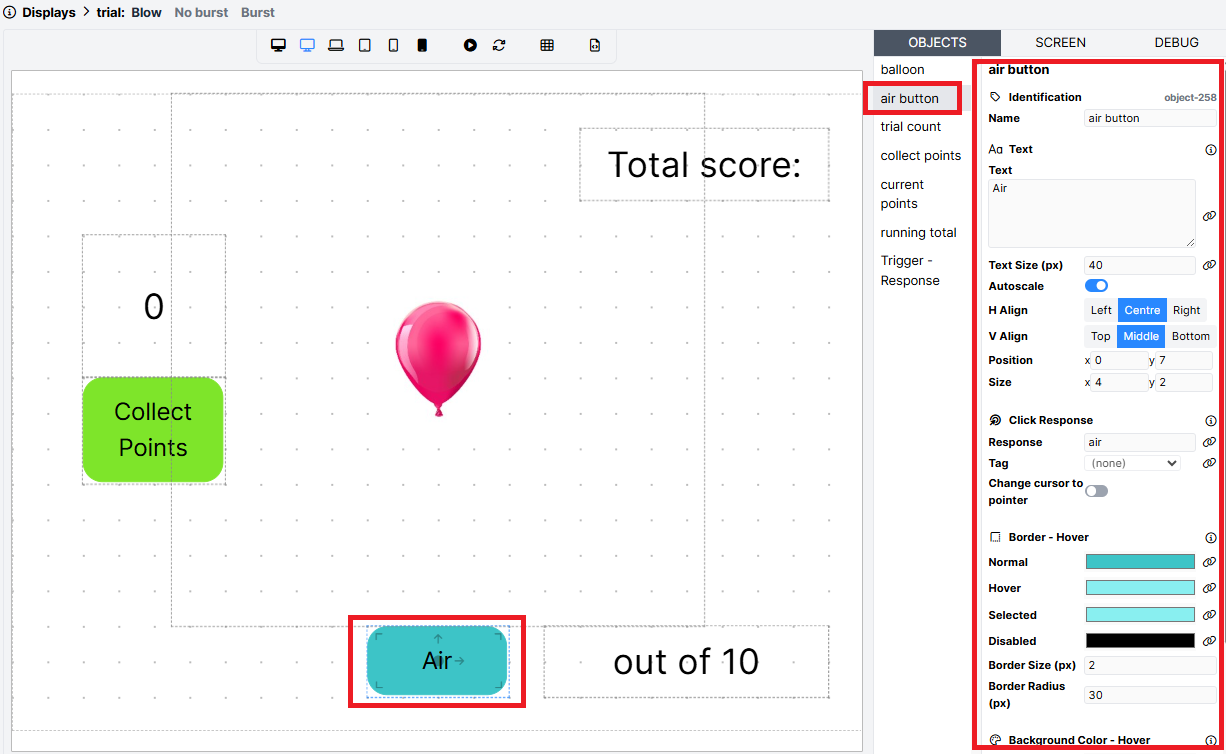
Next, add a response option to the screen. Use a Markdown Text component together with a Click Response component to create a button. In the Click Response component, set the response value to match your task. In this example, when the participant presses the Air button, the response value 'air' is recorded.
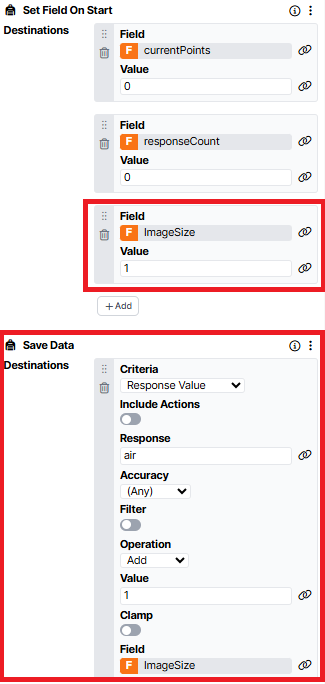
Next, go to the Screen tab and add a Set Field on Start component. Create a new Field called ImageSize and set its value to 1. This initial value determines which image is presented first.
Still on the Screen tab, add a Save Data component. Set the Criteria to Response Value and enter the relevant response value (for example, air). Set the Operation to Add, the Value equal to 1, and the Field to ImageSize. This means that the ImageSize Field starts at 1, and each time the participant presses the air button, its value increases by 1.
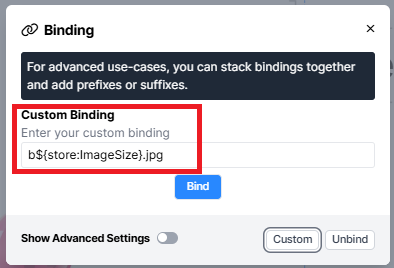
Next, set up the stimulus that will change. Add a single stimulus component, such as an Image component. Click the binding icon next to the Image property, select Custom, and enter the start of your file name. In this example, the file names begin with b. Then add ${store:ImageSize} followed by the file extension, for example, b${store:ImageSize}.jpg. The ${store:ImageSize} expression is replaced with the current value of the ImageSize Field. Since the Field starts at 1, the first image displayed is b1.jpg. Each time the participant gives the specified response, the value increases, so the next file loaded becomes b2.jpg, then b3.jpg, and so on.
Finally, add a separate Continue Button so that participants can press the response buttons multiple times before moving on. You'll also need to add an Advance - Continue component on the Screen tab.
The sample task includes several additional features, but you only need the steps described in this guide to create the changing image effect.
3. Changing Stimuli using multiple Click Responses
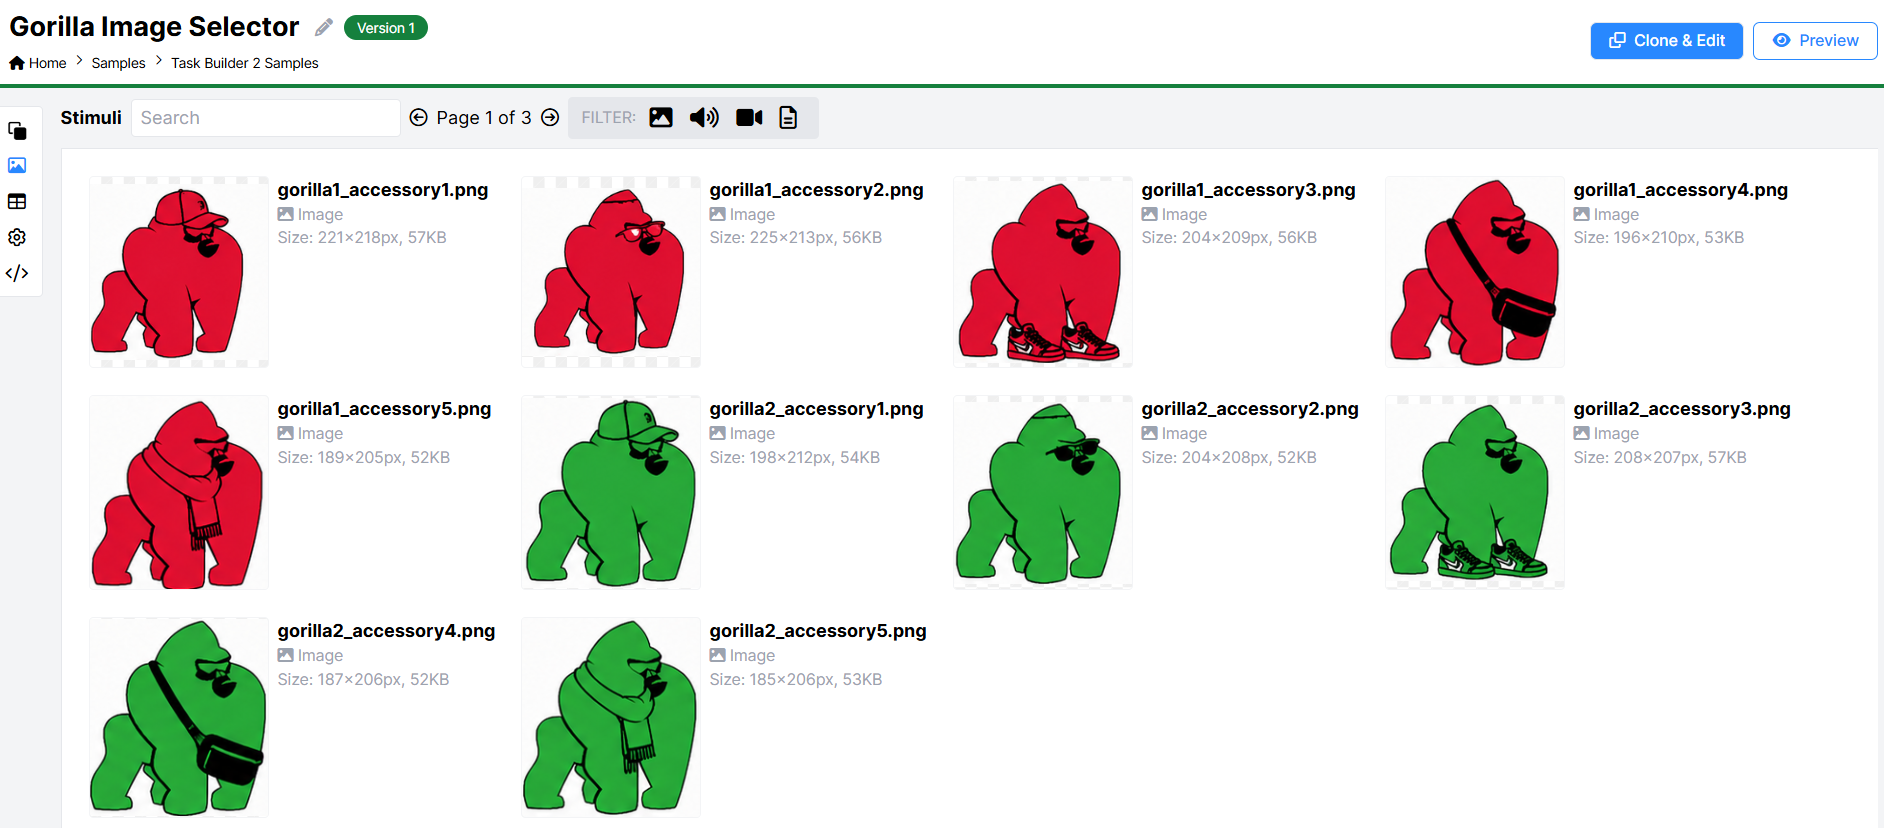
To see the setup explained below in action, take a look at our Gorilla Image Selector task.
This example builds on the single click response setup shown in the previous section. If you haven't already, we recommend working through that example before setting up stimuli that change based on multiple click responses.
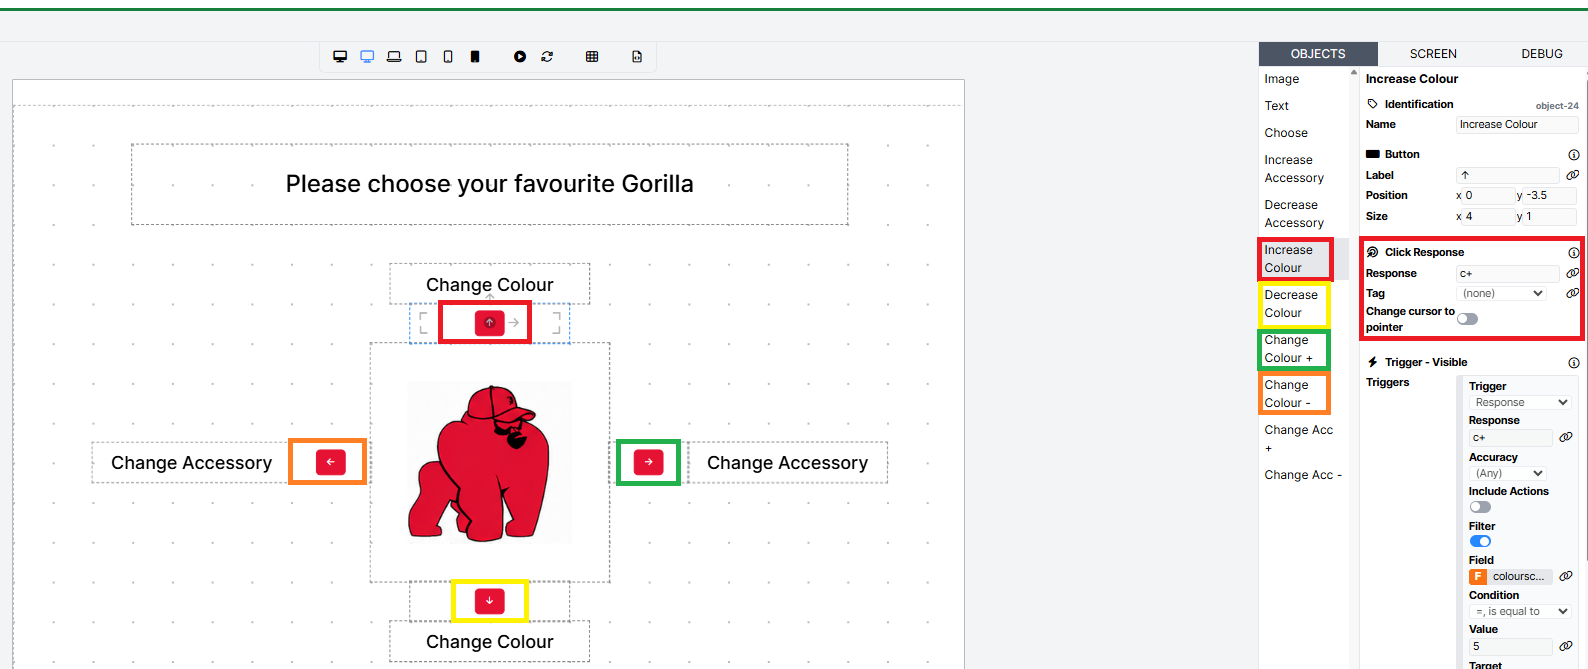
In this task, participants customise the Gorilla by selecting a colour and accessory. They click the up and down arrows to change the Gorilla's colour, and the left and right arrows to browse the available accessories. This type of setup is commonly used for body image selector tasks, where an image changes across multiple dimensions (for example, width and height).
First, create your stimuli outside of Gorilla. These should include every possible combination of the dimensions you want participants to change. Name the files using a consistent structure, for instance, dimensionX_1_dimensionY_1.png, dimensionX_1_dimensionY_2.png, and so on. It is important that every stimulus file follows exactly the same naming convention and uses the same file extension.
In this example, we have named the files 'gorilla1_accessory1.png,' 'gorilla1_accessory2.png,' 'gorilla1_accessory3.png' and so on. Once you have created your stimuli, add them to the Stimuli tab.
Next, add four response buttons to the screen. You can create each button using a Button component together with a Click Response component.
Assign a different response value to each button. In this example:
- Left arrow: c-
- Right arrow: c+
- Up arrow: a+
- Down arrow: a-
The 'c' responses change the Gorilla's colour, while the 'a' responses change the accessory.
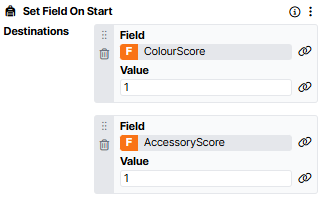
Next, go to the Screen tab and add a Set Field on Start component. Create two new Fields called ColourScore and AccessoryScore, and set both values to 1. These initial values determine which image is displayed when the task first loads.
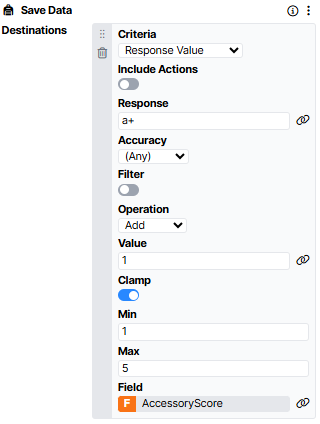
Still on the Screen tab, add a Save Data component. You'll configure four destinations - one for each response value. For the first destination, set the Criteria to Response Value and enter the response value a+. Set the Operation to Add, the Value to 1, and select AccessoryScore as the Field. Turn on Clamp, then set the minimum value to 1 and the maximum value to 5. This ensures that participants cannot move beyond the range of available images.
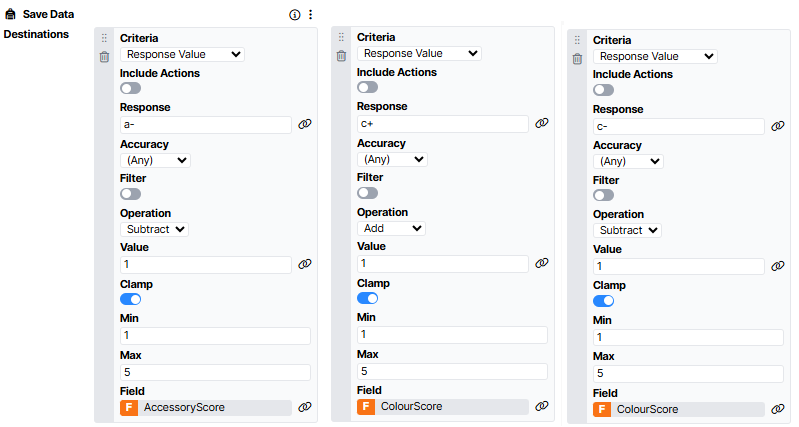
Repeat this process for the remaining three response values (a-, c+, and c-). For the a- and c- responses, change the operation to subtract instead of add. For the c+ and c- responses, select ColourScore as the Field instead of AccessoryScore.
These settings mean that the ColourScore and AccessoryScore start at 1. Each time a participant presses a response button, the appropriate Field is increased or decreased by 1, depending on the selected button.
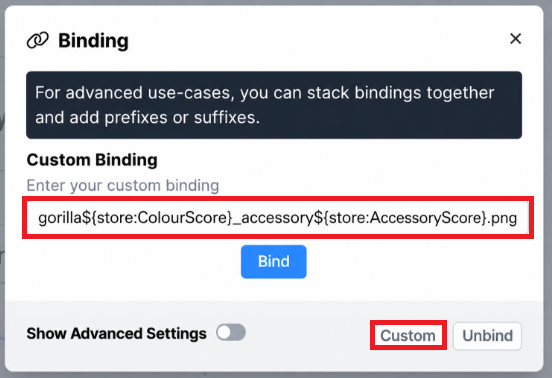
Next, set up the image that will change. Add a single Image component to the screen. Click the binding icon next to the Image property, select Custom, and build the image filename using your stored Field values.
- Start by entering the constant part of the filename:
gorilla - Next, insert the colour Field:
${store:ColourScore} - Then add the constant text:
_accessory - Finally, insert the accessory Field and the file extension:
${store:AccessoryScore}.png - The completed custom binding should look like this:
gorilla${store:ColourScore}_accessory${store:AccessoryScore}.png
When the task runs, ${store:ColourScore} and ${store:AccessoryScore} are automatically replaced with the current values stored in those Fields. Since both Fields start at 1, the first image displayed is 'gorilla1_accessory1.png'. Each time a participant presses a response button, the appropriate Field is updated, and the filename changes accordingly, causing the corresponding image to be displayed.
Finally, add a separate Continue Button so that participants can press the response buttons multiple times before moving on. You'll also need to add an Advance - Continue component on the Screen tab.
Delay feedback until next screen
We have created a simple Delayed Feedback Task to demonstrate the functionality described below.
In this task setup, participants type their response into a Text Entry component. The response accuracy is evaluated by the Scorer component. We want to give participants feedback on this response, but not on the same screen. Therefore, the Feedback component will not work here, as this component is designed to give immediate feedback. Instead, we use the Save Data component to store the response accuracy until it is needed.
First, we need to add an additional column to the spreadsheet. In this task, we have added a column called ‘Saved Response’. In this column, each trial has a unique entry: ‘trial1’ and ‘trial2’. These will become the names of fields in the Store that each trial’s response accuracy will be saved to.

To do this, we set up two criteria in our Save Data component. The first is for when the Response Accuracy is correct. When a correct response is received, we want to set the Store field for this trial to ‘correct’. As we have multiple trials, we need to use the advanced binding settings in the Field to make sure each trial’s response is stored separately in the correct field.
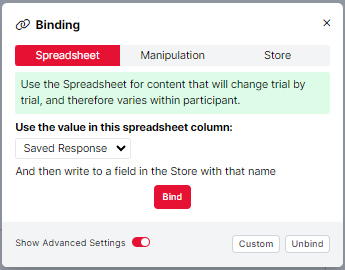
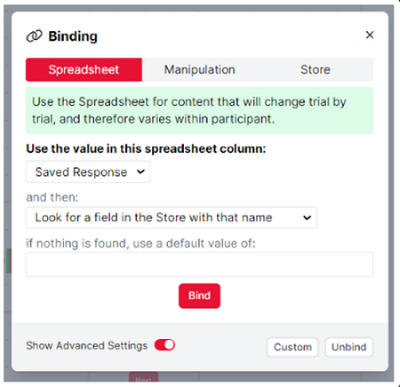
To achieve this, we use the Advanced Settings toggle to tell Gorilla to look at the spreadsheet column ‘Saved Response’ and then use the value here to write to a field in the Store with that name. When you open the binding modal, it should look like the image below, with the Advanced Settings toggled on:
Then, once the binding has been configured, the component configuration settings should look like the example below:
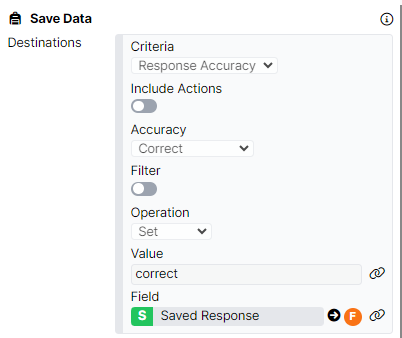
We apply this same logic for when the Response Accuracy is incorrect. Instead of setting the value to 'correct', we set it to 'incorrect'.
Then, on the second screen of the display, we want to give participants feedback on the response they have just given. In this example, we have two Image components, each one giving correct or incorrect feedback. To control which image should be shown to the participant, we use the Trigger - Visible component on each image object. Both objects have two triggers. The first sets the image to be invisible on screen start. Then, we need to evaluate the value in the Store for this trial to decide whether correct or incorrect feedback should be given.
The screenshots below show how to set this second trigger up on the correct feedback object. On screen start, we use the Filter toggle to evaluate the value in the Store for this trial. Again, we will need to use the advanced settings to ask Gorilla to look at the spreadsheet column Saved Response, and then look for a field in the Store with that name, as demonstrated in the image below:
If the value in this field is equal to 'correct', then we want the correct feedback to be Visible. If the value does not meet this condition, it will remain invisible.
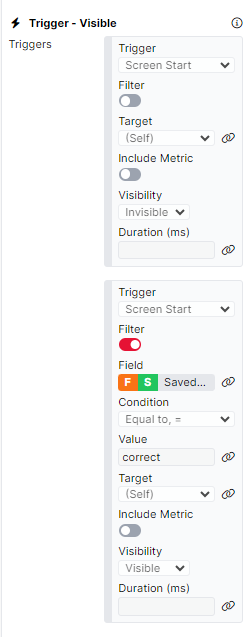
Then, we apply these same triggers to the incorrect feedback object. This time, rather than the value being equal to 'correct', we evaluate whether it is equal to 'incorrect'.
Ending tasks after incorrect responses
You can control when a task should end based on a variety of different criteria. Below, you can find descriptions of some of the setups we frequently see researchers wanting to implement and how they can be achieved.
1. End task after x total incorrect trials
To see the setup explained below in action, take a look at our Exit Condition - 3 Incorrect Trials Task.
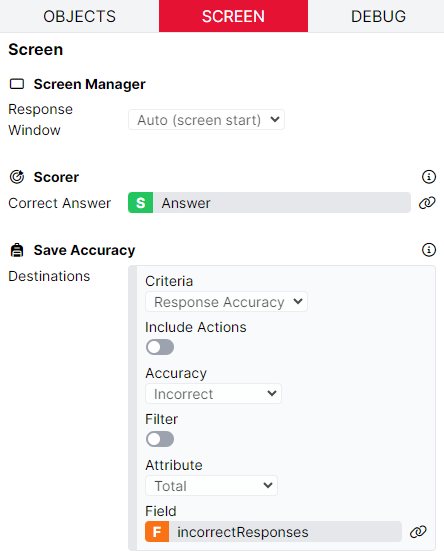
In this task, we have a simple display with two screens. On Screen 2, participants are presented a number and respond by stating that the number is either odd or even. The accuracy of participants’ responses are recorded using the Scorer component. On this screen, we also need to use the Save Accuracy component to save the number of incorrect responses given to a field in the Store called ‘incorrectResponses’.
In this example, we want the task to end as soon as participants have given 3 incorrect responses. We set this up on Screen 1 of the display, which is a blank screen with a very short time limit. On this screen, we also use the Task Early Exit component to evalutate how many incorrect responses have been given, and whether the task should end. To do this, we set the criteria to Any Response (this includes the 'timed out' response that will be triggered by the Time Limit component). We add a Filter and check whether the Value in the incorrectResponses field is equal to 3. If this criteria is met, the task will end and the Exit Value defined will be saved to the Exit Field. In this case, the Value 'Exit' will be saved to the TaskExit field in the Store.
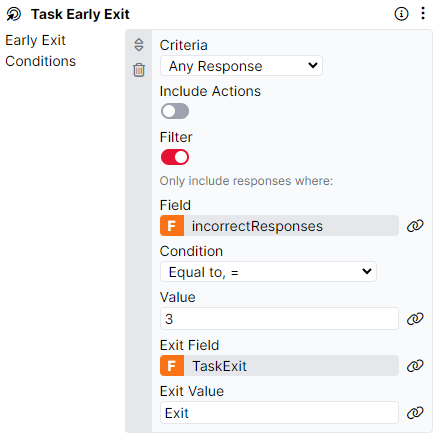
We could then use this Exit Field and Value in a Branch Node to direct participants to a Reject Node and end the entire experiment. If the Early Exit criteria is not met, participants will continue with the task.
2. End task after x consecutively incorrect trials
To see the setup explained below in action, take a look at our Exit Condition - Consecutive Incorrect Task.
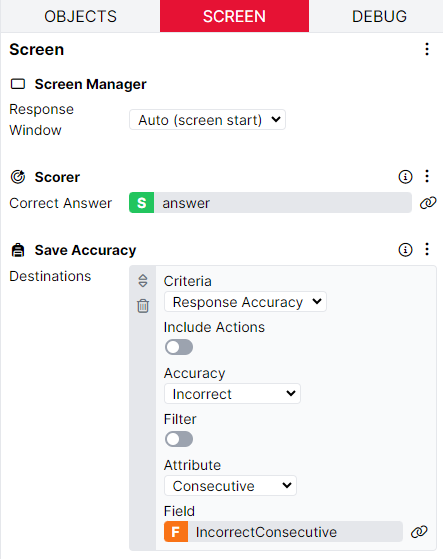
This task is very similar to the setup described above. However, in this example, we want the task to end if a participant gives 2 incorrect responses in a row. To do this, we have a Scorer component to record the accuracy of the responses. Then, we have a Save Accuracy component set up to save the Consecutive Incorrect responses to a field in the Store called 'IncorrectConsecutive'.
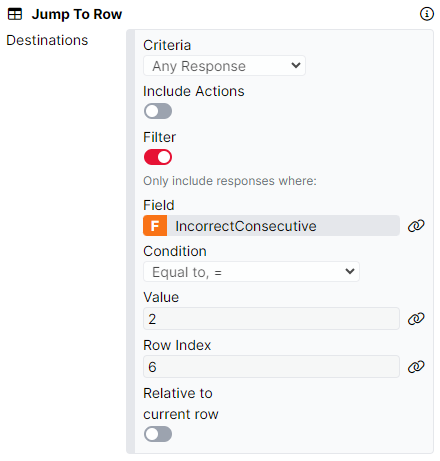
Then, on Screen 2 with the fixation cross, we can check the value in the IncorrectConsecutive field in the Store. In this example, we do this via the Jump to Row component. This is because we would like to direct participants to the end display of the task, to inform them that the task is over. To do this, we set the criteria to Any Response (this includes the 'continue' response that will be triggered by the Fixation component). We add a Filter and check whether the value in the IncorrectConsecutive field is equal to 2. If so, the participant will be jumped to row 6 in the spreadsheet, which is the end display. If this criteria is not met, participants continue with the rest of the task.
3. End task after x incorrect trials in y consecutive blocks
To have a closer look at the task setup described below, see our Exit Condition - Incorrect Trials in Consecutive Blocks Task.
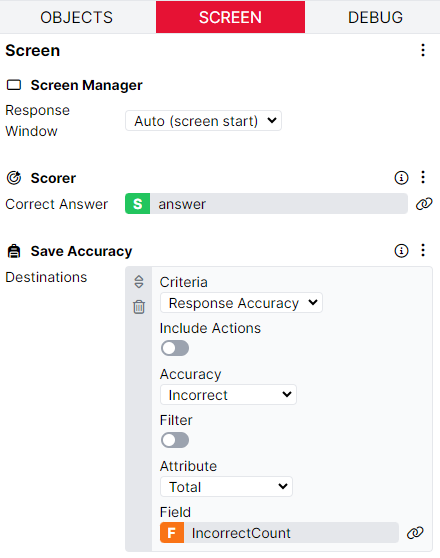
In this example, we want the task to automatically end if the participant gives 1 or more incorrect responses in 2 consecutive blocks of trials. The task setup is the same simple odd/even number identification as above. On the trial screen, the Scorer component records the response accuracy, and the Save Accuracy component stores the number of incorrect responses to a field called 'IncorrectCount'.
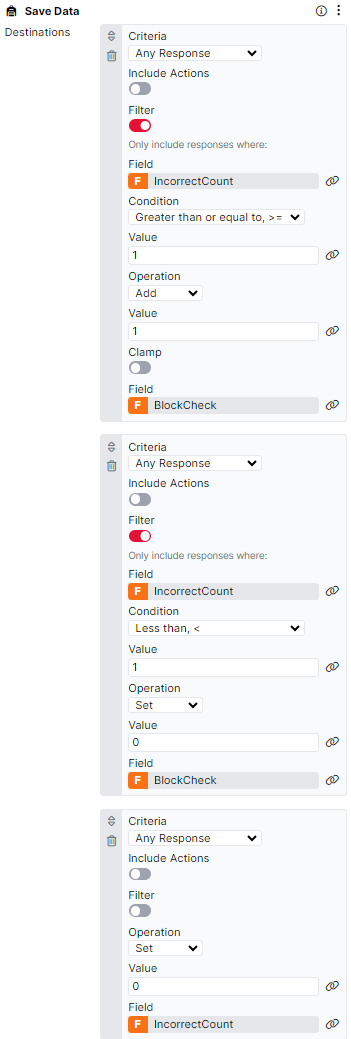
After each block of trials in the task, we present the 'check' display. This display has a single blank screen with a short time limit. On this screen, we use the Save Data component to evaluate the number of incorrect responses given in the previous block. If the Value in the IncorrectCount field is greater than or equal to 1, then we add 1 to the field 'BlockCheck'. This field will be used to keep track of whether incorrect responses have been given in consecutive blocks. If the Value in the IncorrectCount field is less than 1, then we know that all trials were responded to correctly, and we set the value in the BlockCheck field to 0. Finally, on Any Response (this includes the 'timed out' response that will be triggered by the Time Limit component), we set the IncorrectCount to the value of 0, ready for the next block of trials.
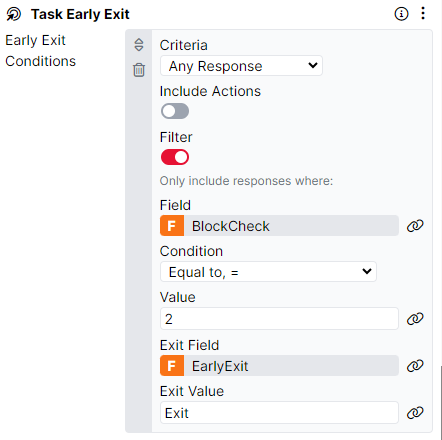
Finally, we use the Task Early Exit component to control when the task should end. Here, we have set this up so that when the Value in the BlockCheck field is equal to 2, the participant should be exited from the task.
Increasing task difficulty
Have a look at the Increasing Difficulty Task for an example of how to set up the functionality described below.
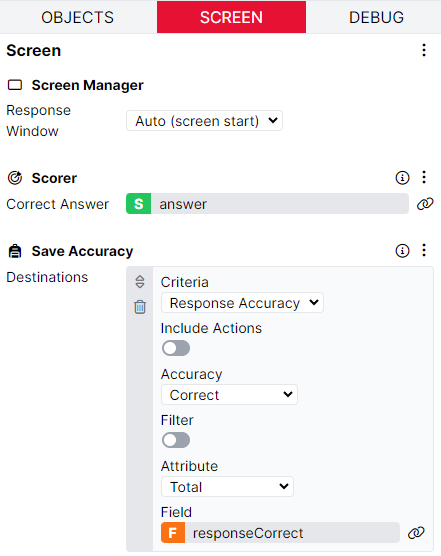
In this task, we ask participants to answer maths questions. We would like the questions to get more difficult as the participant gives correct answers. To implement this, we use the Change Difficulty (Spreadsheet) component. On Screen 1, participants give their response to the maths question via the Single Number Entry component. We evaluate the accuracy of the response given using the Scorer component and the number of correct responses given is saved to a field in the Store called 'responseCorrect' using the Save Accuracy component.
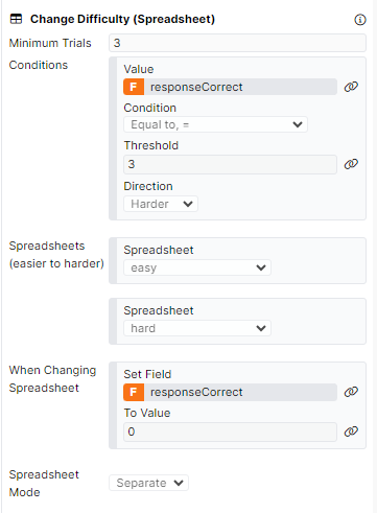
Screen 2 is a simple fixation screen where we evaluate whether the task difficulty should be increased. The Change Difficulty (Spreadsheet) component is configured so that participants must complete a minimum of 3 trials before the Change Difficulty logic is executed. The Condition for changing the difficulty is that, if the value in the responseCorrect field is equal to 3, the task difficulty should become harder. We must also define the order of spreadsheets from easiest to hardest, so that the difficulty can be adjusted correctly. When the difficulty is changed, and participants start a new spreadsheet, we make sure that the responseCorrect field in the Store is set to 0 so that the response accuracy can be calculated from the beginning.
This task setup can be easily expanded so that the task also gets easier when incorrect responses are received. To do this, the number of incorrect responses will also need to be saved to a field in the Store, and a second Condition should be added to the Change Difficulty (Spreadsheet) component.
Inserting an Attention Check Screen
You can randomly display a screen within your task to perform an attention check. Below, you will find descriptions of some common setups researchers often want to implement and instructions on how to achieve them.
1. Inserting an Attention Check Screen Randomly in a Single Trial Block
To see the setup explained below in action, take a look at our Inserting a Screen at Random Points: Single Block example.
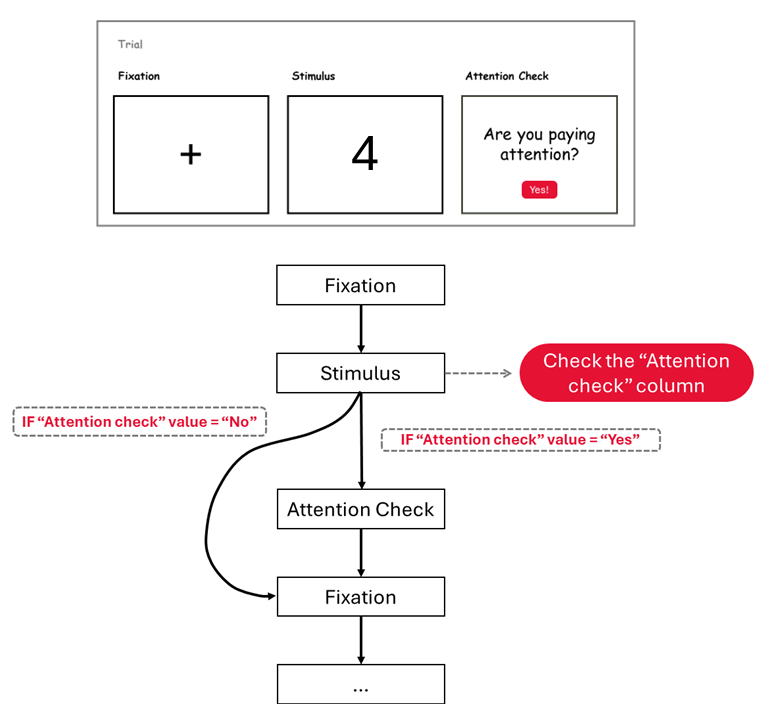
In this task, we have set up a simple Go/No-Go procedure within three screens: Fixation, Stimulus, and Attention Check. Every trial will involve participants seeing the fixation cross and the Go/No-Go stimulus, and then, once per block, we need to randomly branch participants to the attention check screen. On the Attention Check screen, we will check that the participant is paying attention to the task.
To implement this, we use the Branch component in combination with Binding to the spreadsheet.
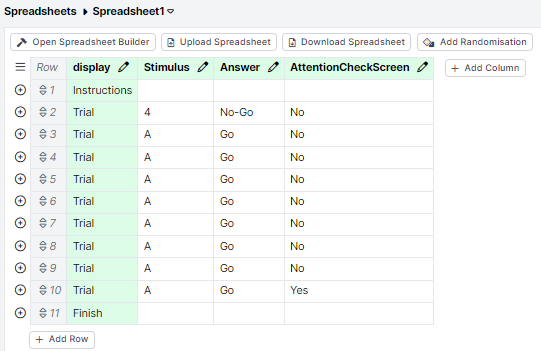
First, we create a new column in the spreadsheet to randomly assign participants to either see the attention check screen or proceed directly to the next trial. For every nine trials, we want to display the attention check screen once. Therefore, this column should contain "no" eight times and "yes" once.
Next, we need to randomise the values within the "Attention Check Screen" column. To do this, we add a Randomise Within Column component and select the "Attention Check Screen" column to apply the randomisation. Additionally, we need to add a Randomise Trials component and select the "display" column to randomise the order of the trials.
Then, we need to add a Branch component to the Stimulus screen in our task display. Every trial will include the Stimulus screen, but participants may or may not be directed to the Attention Check screen. Therefore, we add the Branch component to the Stimulus screen instead of the attention check screen. To do this, navigate to the Stimulus screen, select the Screen tab, then add the Branch component.
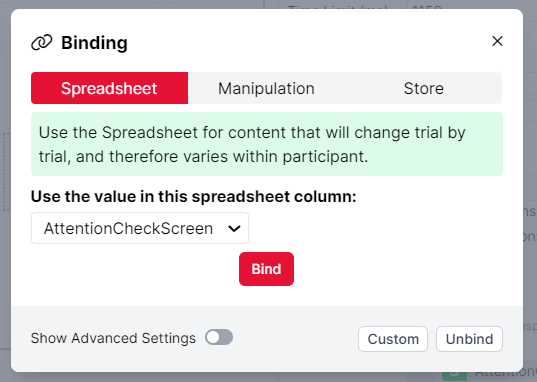
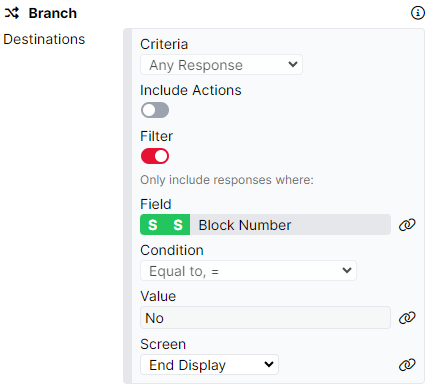
To set up the Branch component, set the criteria to "Any Response". We then toggle on the Filter. Within the Filter settings, we want set the Field to the “Attention Check Screen” column. To do this, click the binding icon next to the Field box (the grey interlinked chains icon), select the "Attention Check Screen" column from the drop-down menu, and click "Bind."
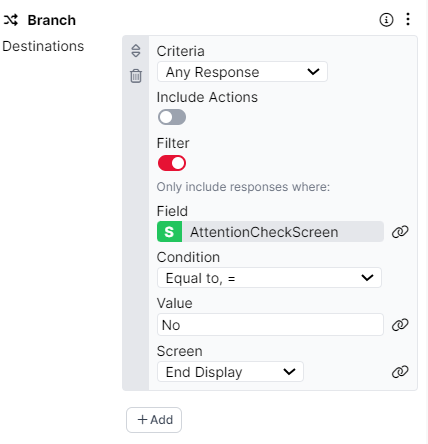
Once we have set this up to use the values in the "Attention Check Screen" spreadsheet column as a filter, we need to specify what Gorilla should do when it finds a "yes" or a "no" value.
When a participant completes a trial with "no" in this column, they should proceed directly to the next trial without seeing the attention check screen. To set this up, configure the condition to "Equal to, =" with the value "No" and set the Screen to "End Display."
If "yes" is in this column, the participant will see the attention check screen before moving on to the next trial. Gorilla will automatically continue with the next screen in the display if the value is not "no," so we do not need to specify what happens for "yes."
2. Inserting an Attention Check Screen Once in Multiple Trial Blocks
To see the setup explained below in action, take a look at our Inserting a Screen at Random Points: Multiple Blocks example.
This task is very similar to the setup described above. However, in this example, we want multiple blocks of trials with a single attention check within each block. To implement this, we use the Branch component in combination with Advanced Binding to the spreadsheet.
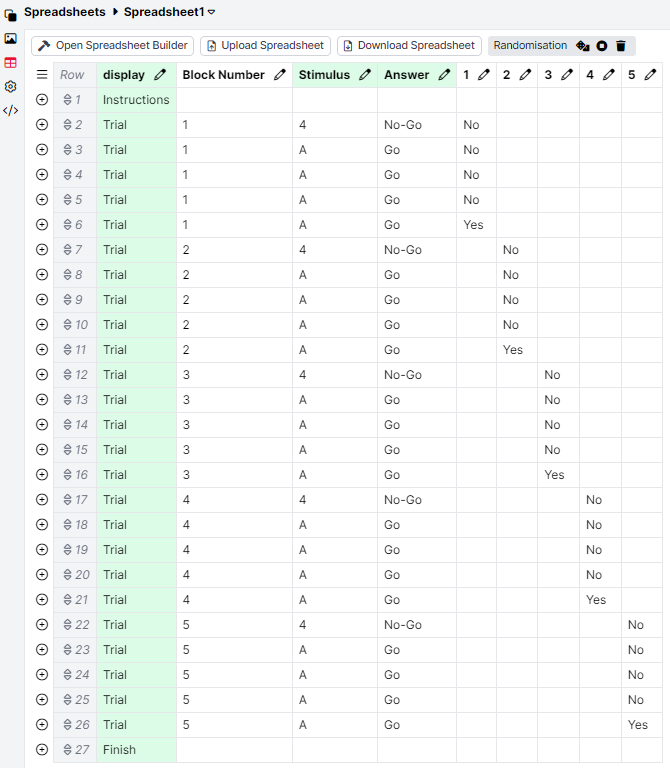
To start, add a new column to our spreadsheet to specify the block each trial belongs to. In our example, we have five blocks of trials, so this column will contain the values "1" to "5".
Next, create a new column for each block. For our example, we will create five new columns labelled "1", "2", "3", "4", and "5". Each block of five trials should include the attention check screen once. Therefore, each column should contain "no" four times and "yes" once for the trials in that block. Your spreadsheet should resemble the screenshot below.
Next, similar to the previous example, we need to Randomise the values Within each new Column (i.e., "1", "2", "3", "4", and "5"), but not within the "Block Number" column. To do this, add a "Randomise Within Column" component and add each of the columns 1-5 to this component (see the video below for guidance).
Additionally, to randomise the trial order within each block, add a Randomise Trials component and select the "Block Number" column.
You can preview all these randomisations by clicking on the dice icon at the top of the screen to ensure they are working as intended.
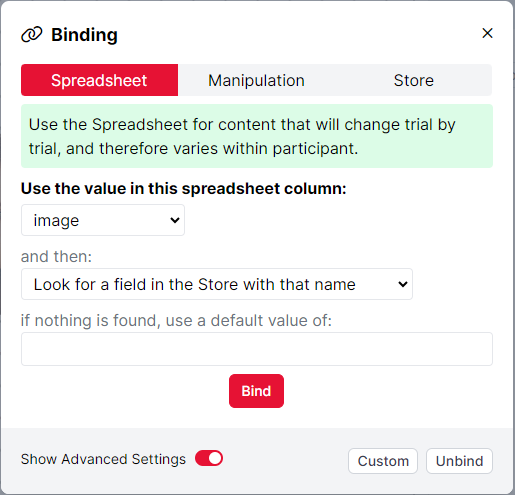
Then, we need to add a Branch component with a similar set-up to the previous example, except for the Field section. With the Field, we want Gorilla to read a value from the Block Number column and then look for another column named after that value. For instance, Gorilla will first check the "Block Number" column, read "1", then locate and use the data from column "1" to populate the Field.
To enable this functionality, we'll use Advanced Binding in the Field section. First, click the binding icon (two interlinked chains) next to the Field text entry box, toggle on advanced settings, select "Block Number" from the "Use the value in this spreadsheet column" dropdown, select "Look for a spreadsheet column with that name" from the second dropdown, and then click "Bind".
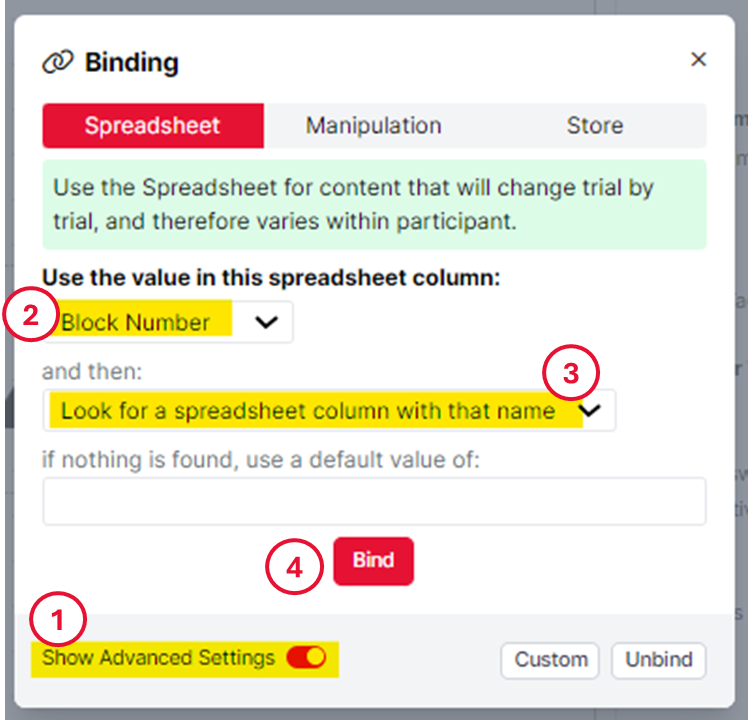
Your branching component should now look like the image below.
Repeating incorrect trials
For this section, please refer to the Learning with Dropout Task which showcases how to repeat trials until a correct response has been given for every one.
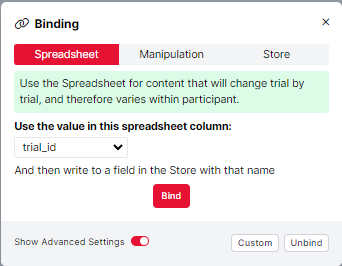
In this task, participants are asked to learn the colour pairings. After the learning phase, participants are asked to complete a simple recall on the Recall (all trials) display. Here, we test participants on their learning of each of the colour pairings. The accuracy of the responses are recorded via the Scorer component. We also need a method to record which trials have been answered incorrectly, and therefore need repeating. To do this, we use the Save Data component and its Advanced binding settings. When the response accuracy is incorrect, we want to set the value for this trial to ‘wrong’ and when the response accuracy is correct, we want to set the value for this trial to ‘right’. To make sure the response accuracy for each trial is saved to the Store separately, we ask Gorilla to look in the spreadsheet column ‘trial_id’ and then write to a field in the Store with that name. When you open the binding modal, it should look like the image below, with the Advanced Settings toggled on:
Then, once the binding has been configured, the component configuration settings should look like the example below:
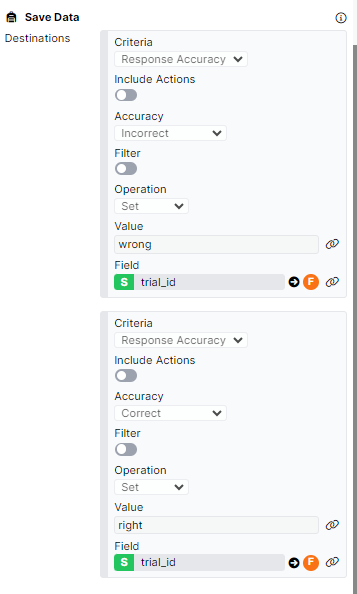
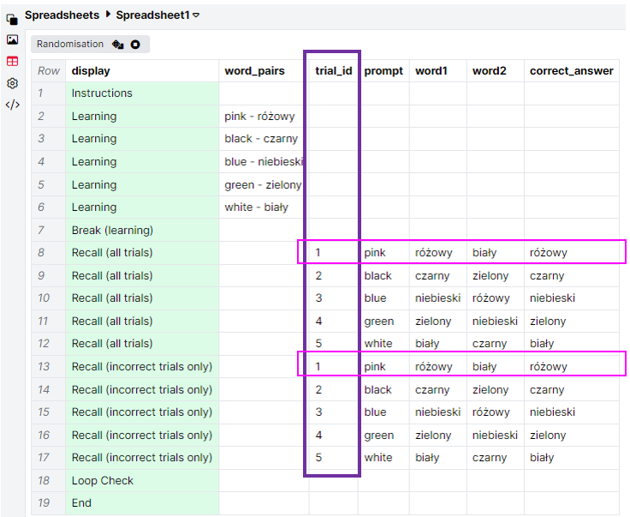
In the trial_id spreadsheet column, we have given each trial a unique entry. With this advanced binding setup in the Save Data component, it means that we can save the correct/incorrect value to unique fields in the Store for each trial. For example, for the pink-różowy colour pairing, if a participant gives an incorrect response Gorilla will look in the trial_id column and find '1'. This is then used as the name of the field in the Store which we set to 'wrong' via the Save Data component.
Once each trial has been shown once, we have a second recall display called ‘Recall (incorrect trials only)’, where only the trials which were previously answered incorrectly will be repeated. To set this up, all trials are listed again in the spreadsheet. Importantly, each colour pairing has the same trial_id in both the Recall (all trials) and Recall (incorrect trials only) displays.
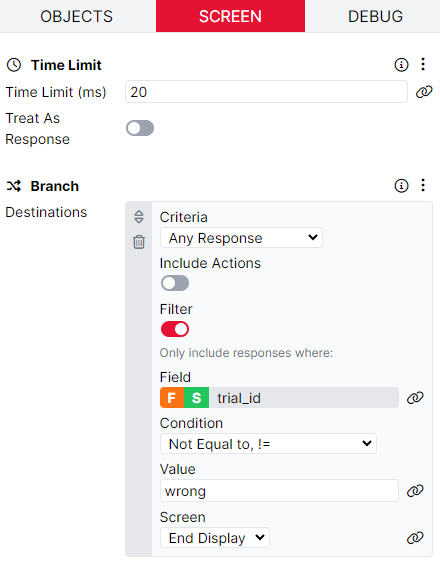
The display structure is exactly the same in the 'Recall (incorrect trials only)' display, except for the addition of a screen before the fixation. On this screen, we evaluate whether the rest of the trial should be shown, depending on whether this trial has been previously responded to correctly or incorrectly. To do this, we use the Branch component. We set the criteria to Any Response (this includes the 'timed out' response that will be triggered by the Time Limit component). We add a Filter and specify the Field we want to check. Again, we use the Advanced Binding settings to ask Gorilla to use the Value in the trial_id column of the spreadsheet, and find a field in the Store with that name. This is why it is important that each Recall (incorrect trials only) trial has the same trial_id value as the original Recall (all trials) trial, to ensure the correct field in the Store is associated with the recall. If the value in this field in the Store is not equal to the value 'wrong', then the display ends. Otherwise, participants continue to the next screen in the display.
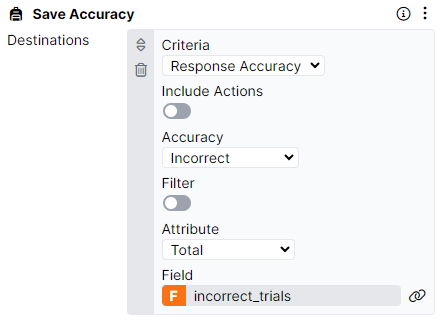
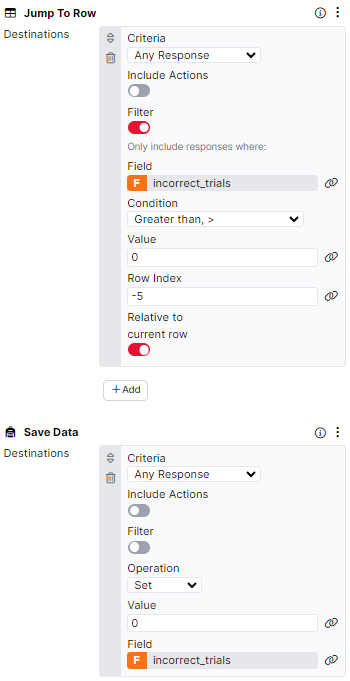
On the response screen for this display, we have the same setup as previously using the Save Data component, so the response accuracy can be saved to the Store via the trial_id column of the spreadsheet. There is also a Save Accuracy component which saves the number of incorrect trials given on these trials. We save the number of incorrect trials to a field called incorrect_trials.
Once all the trials have either been presented or skipped, we need to check if any trials should be repeated again. You can see this in action on the Loop Check display. Here, we have a blank screen with a very short time limit. The Jump to Row component is used to jump participants back 5 rows if the Value in the incorrect_trials field is greater than 0. Importantly, we use the Save Data component on this screen to set the Value in the incorrect_trials field back to 0, so the accuracy can be evaluated correctly if the trials are repeated again.
Once the incorrect_trials field is 0 throughout all of the Recall (incorrect trials only) trials, participants will continue to the End display and the task will finish.
Running total with live update
To see the functionality described below in action, refer to the Running Total Task.
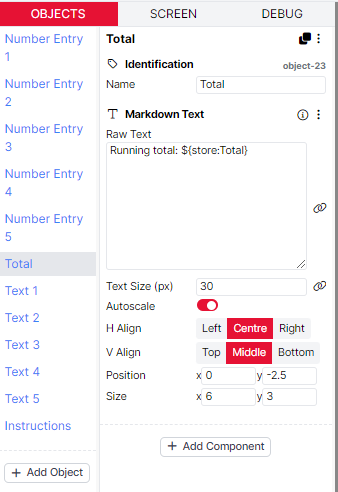
In this task, we want to show participants a running total of five Single Number Entry components. The aim of this task is to enter a number in each of the boxes to reach a sum total specified in the 'answer' column in the spreadsheet. In the example, the specified total is 100. Participants can change the value they have entered in any box and click 'Save' to update the total.
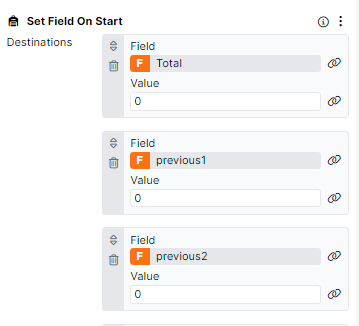
Each time the participant changes a value, we need to 1) subtract the amount previously entered in this box from the running total and 2) add the amount currently entered in this box to the running total. To do this, we need to set up two fields in the Store for each box: a 'current' field and a 'previous' field. At the start of the task, the 'previous' field needs to be 0 for each number entry box. We set this up, and also set the initial value of the running total to 0, using the Set Field on Start component.
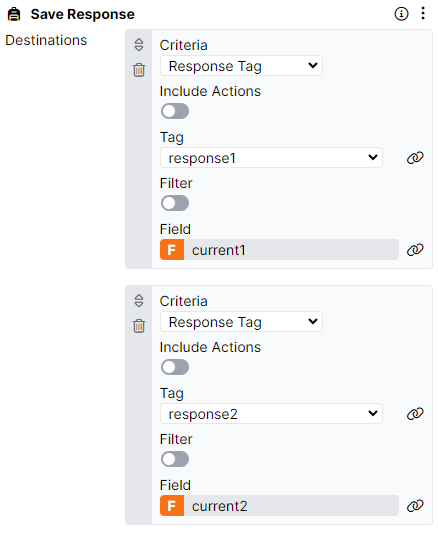
To add the individual numbers to the running total, we have given each number entry component a unique Response Tag e.g. response1, response2 and so on. When a response is received, we use the Save Response component to save the response to a unique field in the Store.
The screenshots below are from a task that uses the Single Number Entry component. If you are instead collecting your responses from a Slider component with Continuous Polling toggled on, then you will need to take the extra step of toggling on 'Include Actions' in both the Save Response and Save Data components.
Then, we use the Save Data component to handle the calculation of the running total. Each time a response is received via a number entry component, we carry out three actions. To understand this, let's look at at the Number Entry component ‘Number 1’ with the Response Tag ‘response1’ first. When we receive the 'response1' tag, this is saved to the 'current1' field in the Store via the Save Response component. Then, we add this value to the Total field in the Store via the Save Data component. When this tag is received, we also Subtract the Value in the ‘previous1’ field in the Store from the Total field. The first time a response is submitted from this component, we will subtract 0 as we have set the field to 0 on screen start. This will change when additional responses are received. Finally, we save the value in ‘current1’ to the field ‘previous1’. This way, when participants alter the number entered in the number entry field, the total will update accordingly by subtracting the previous response from the total.
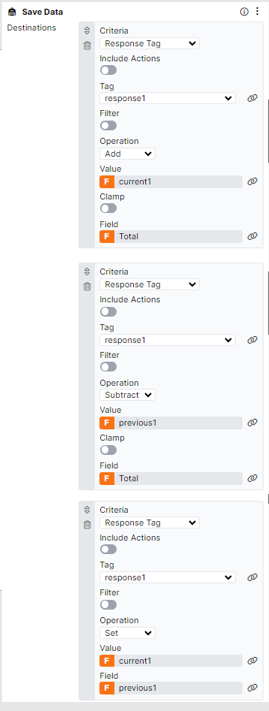
We implement the same setup for each of the response tags of the Number Entry component, so the Save Data component has 15 criteria in total (3 for each response).
We display the running total on the screen within a Markdown Text component using the syntax ${store:Total}.
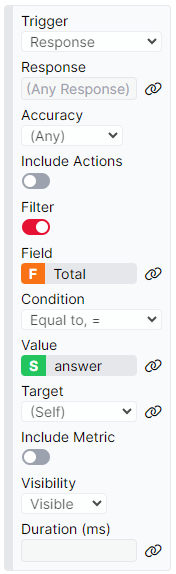
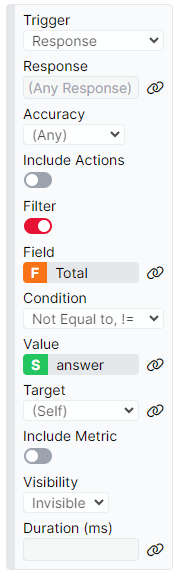
Finally, we need a way for the participant to be able to advance the screen once the running total matches the target total. To do this, we add a Continue button to the screen, and add a Trigger - Visible component to this button. We set up three Triggers: 1) to make the continue button invisible on screen start; 2) to make the continue button visible if any response is received and the Total field is equal to the target total specified in the answer column of the spreadsheet; 3) to make the continue button invisible if any response is received and the Total field is not equal to the target total specified in the answer column of the spreadsheet. The setup of Triggers 2 and 3 is shown below.
The last step is to add an Advance - Continue component to the Screen tab - this ensures that the participant can only advance to the next screen by clicking the Continue button once it appears.
Showing previous responses
Take a look at the Show Previous Responses Task to see the functionality described below in action.
In this task, we ask participants to rate a series of images. We want to save those ratings and present these to participants later in the task.
On the trial display, participants are asked to use the Slider component to rate their predicted productivity in the pictured office spaces. We want to save the response given here to the Store so that we can retrieve and redisplay this response in a later trial. To do this, we use the Save Response component and its Advanced Binding settings. When you open the binding modal, it should look like the image below, with the Advanced Settings toggled on:
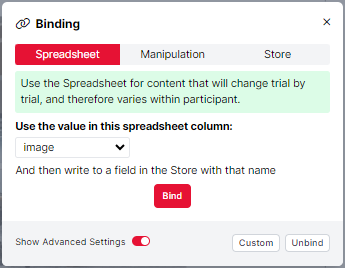
Then, once the binding has been configured, the component configuration settings should look like the example below:
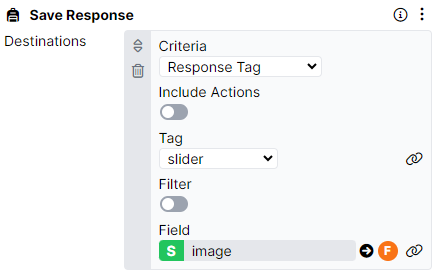
For each trial, a different image is used as defined by the ‘image’ column. Using the Save Response component, we tell Gorilla to look at this column and save the response to a field in the Store with the name of the current value in this column. This way, each response will be saved to a different field in the Store, named after the filename of the image used in the trial.
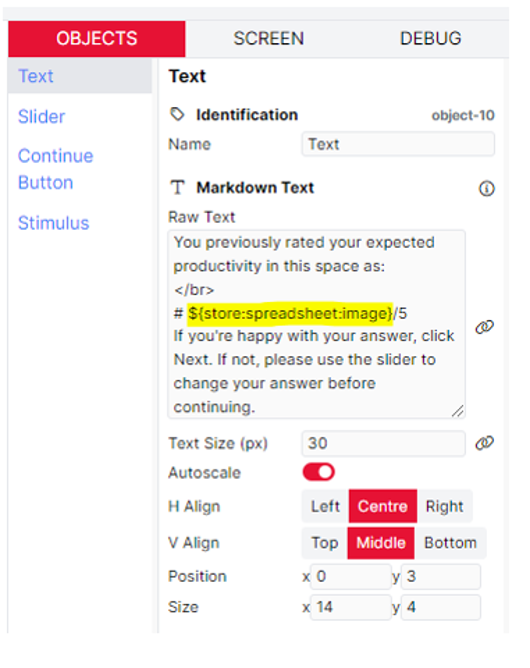
Once participants have rated each image once, we have a display that gives participants a fact about productivity in the workplace. Then, we want to show participants the same images again, the ratings they previously gave the image, and the opportunity to re-rate the image. To do this, we have a new display called ‘repeat_trial’ where we use the image column to recall the same 4 image files.
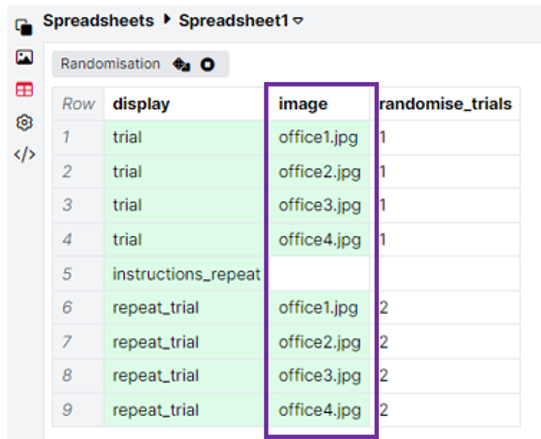
To show participants their previous response to the same image, we use the syntax ${store:spreadsheet:image} to retrieve the score previously given. This syntax will retrieve the value in the Store, which is named after the entry in the spreadsheet column ‘image’.
Stable random assignment
Have a look at the Stable Random Assignment Task to see how to set up the functionality described below.
The stimuli in this task are four face images and four names. We want to pair the face images with names randomly for each participant, but have these randomly assigned pairings remain stable during the task, so that the same face shows up with the same name consistently.
We perform the random assignment on the first row of the spreadsheet. We have a column named after each of our four image stimuli. (These column names must match the image filenames exactly, including extensions.) In each of these columns, we enter one of our four names.

We then use a Randomise Between Columns component applied to the four image columns to randomise the assignment of names to images.

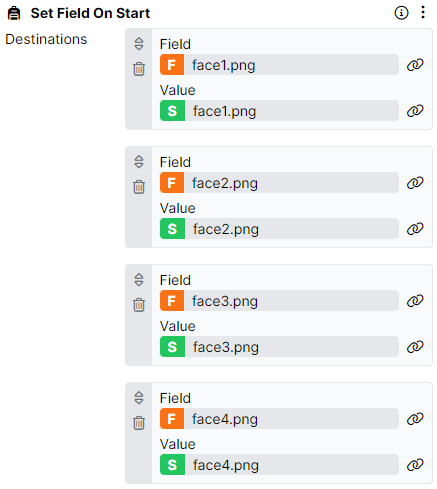
Within the task, we store these randomly assigned pairings on the 'prep' display. This is the display used in the first row of the spreadsheet, and so it will run at the beginning of the task. The display consists of a blank screen with a short timelimit: the real action happens on the Screen tab. Here, we use the Set Field on Start component to save our image-name assignments to the Store. We do this by creating a field named after each image stimulus. Again, the name of this field must match the image filename exactly:
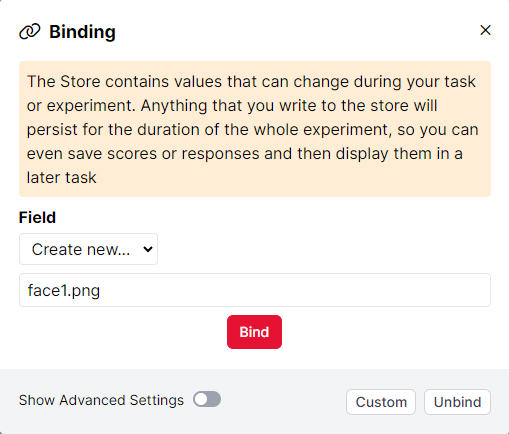
We bind the Value of each field to the correspondingly named column in the spreadsheet. So the field 'face1.png' will contain the name found in the 'face1.png' column after the contents of these columns have been randomised.
Finally, on Screen 2 of the 'trial' display, we bind the Image and Markdown Text objects to the face image and name for each trial. The Image is bound directly to the 'image' column in the spreadsheet, as normal. For the Markdown Text object, we toggle on 'Show Advanced Settings' and use an advanced binding. We look in the 'image' column in the spreadsheet, and then retrieve the value of a field in the Store named after the contents of that column.
This will retrieve the name stored for the current image.
Once each image-name pairing has been saved on the 'prep' display, it will not change. This means that we can retrieve the correct names across multiple blocks within a task, and even across multiple tasks within the same experiment! Simply use the same field names again in a later task in the experiment tree, and the correct names for each image will be retrieved.
Staircase with number of reversals
To see the setup described below in action, take a look at our Staircase with Number of Reversals task.
In each trial of this task, participants see two colours. Participants respond 'S' if the colours were the same or 'D' if the colours were different. The task uses a staircase paradigm to adapt the stimuli on the next trial based on accuracy in the current trial. If the participant gets a trial correct, the difference between the two colours on the next trial gets smaller. If the participant gets a trial incorrect, the difference between the two colours on the next trial gets larger.
The task also keeps track of the number of reversals. A reversal occurs each time the difference between colours switches from getting smaller to getting larger, or vice versa. After 6 reversals have occurred, the participant automatically exits the task. Alternatively, 6 correct 'same' responses on trials where the two colours are the same will also trigger an automatic exit from the task.
To see how the task is set up, we can start by taking a look at the Stimuli tab. Here, each of the colours is uploaded as a .png file. For illustration, the task uses shades of red. Each colour has an RGB value of (x,0,0), where x is the intensity of the red value. Each file in the Stimuli tab is named after the red intensity of the colour it shows:
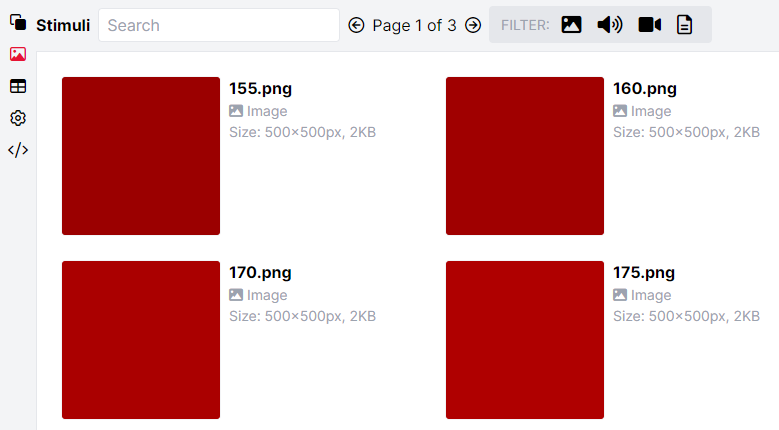
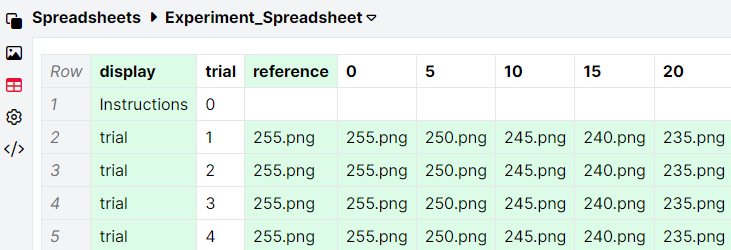
Next, we can take a look at the Spreadsheet tab. Here, the trial number is specified in the 'trial' column. The reference image for each trial is listed in the 'reference' column. In this example, the reference image remains the same throughout the task. The spreadsheet then contains additional columns with headings that range from 0-100 in increments of 5. These columns represent the difference in red intensity between the reference image and the comparison image listed in that column. Gorilla will use these columns to look up and retrieve the correct comparison image to show on each trial, depending on the current value of the difference between the two colours.
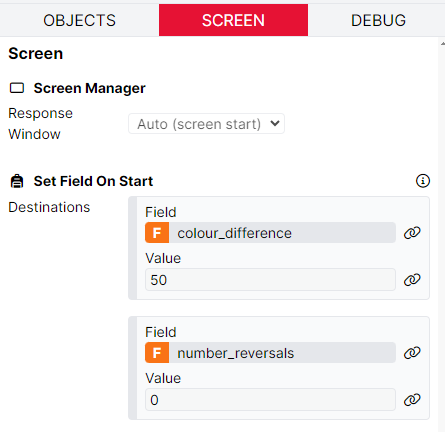
We can see how this works in practice by looking at the displays in the task itself. Starting with the Instructions display, on the Screen tab of our instructions screen, we use the Set Field on Start component to set the initial values of two Fields in the Store: colour_difference, which we use for tracking and updating the difference between the two colours on each trial, and number_reversals, which we use for tracking and updating the number of reversals during the task. We set colour_difference to an initial value of 50, and number_reversals to 0, since no reversals have happened yet.
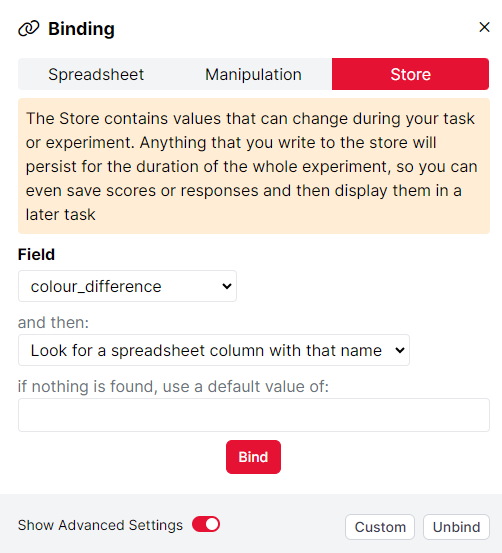
Our trial display consists of 6 screens. Screen 1 is a fixation cross. Screen 2 shows the reference colour, which is bound to the reference column in the spreadsheet. Screen 3 shows the comparison colour. The image on this screen is bound using advanced binding, selecting the Field colour_difference and then looking for a spreadsheet column with that name:
On the Screen tab of this screen, we use a Save Data component to set up which answer is correct on this trial: 'same' or 'different'. On trials where colour_difference equals 0, the reference image and the comparison image will be identical, and so the correct response will be 'same'. We save this in a Field called Correct:
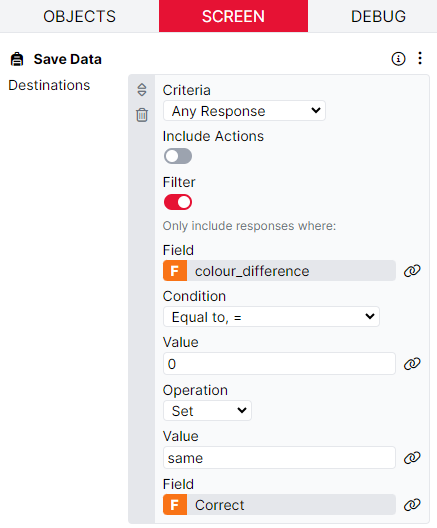
Within the same component, we also set Correct to 'different' in the case where colour_difference is not equal to 0.
On Screen 4, we collect the participant's response. On the Screen tab, the Scorer component checks whether the response was correct or incorrect by comparing it to the Correct field we set up on the previous screen. The Save Accuracy component then does two things. 1) It saves the number of consecutive correct answers to a Field called Accuracy_Store. This Field will have a value of 0 if the current trial was incorrect, and a value of 1 or greater if the current trial was correct. 2) It saves the number of consecutive correct answers to another Field named after the current value of colour_difference, using advanced binding:
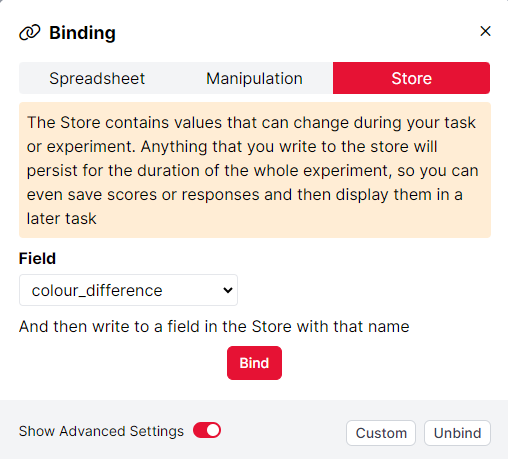
This will enable us to look up how many consecutive correct answers the participant has got on 'same' trials specifically (where colour_difference = 0). This means we can exit participants from the task once they have got 6 of these trials correct in succession.
The next component is the Change Difficulty - Staircase component. Here, we first set the conditions for the staircase to step up or step down. When the Accuracy_Store field (the number of consecutive correct answers) is greater than 0, i.e., the response to the current trial was correct, the staircase should step down. When this field is equal to 0, i.e., the response to the current trial was incorrect, the staircase should step up.
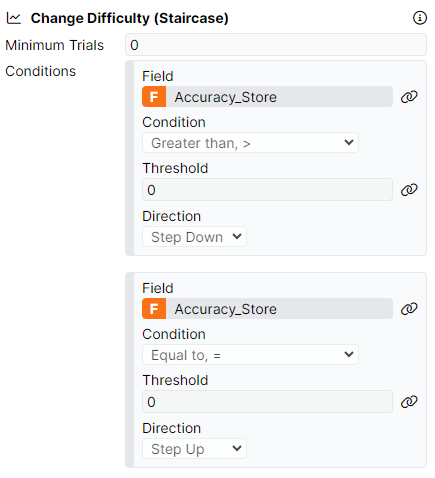
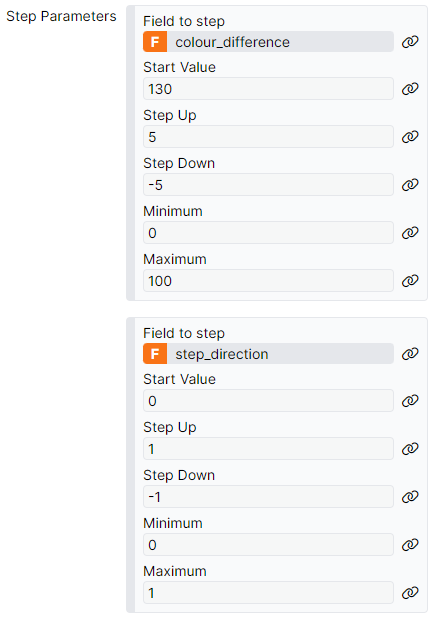
Next, we define the values that should change when the staircase steps up or down. First, the colour_difference field should increase by 5 on stepping up, and decrease by 5 on stepping down. We set the minimum value to 0 (i.e. the colours are the same), and the maximum value to 100. Second, we create a field called step_direction, which we use for tracking the current direction of the staircase in order to keep track of the number of reversals. This field increases by 1 on stepping up, decreases by 1 on stepping down, and is bounded between 0 and 1. The result is that step_direction will be 1 when stepping up, and 0 when stepping down.
Finally on this screen, the Branch component checks the current trial number, and sends the participant to screen 6 if the current trial number is 1. Screen 5 is where we evaluate the number of reversals. Since a reversal by definition cannot happen on the first trial, we skip this step on trial 1.
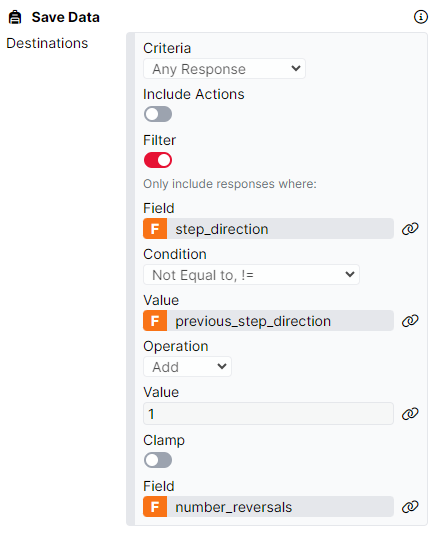
Screen 5 is a blank screen with a short timelimit. The action happens on the Screen tab, where we calculate the number of reversals, and exit the participant from the task if the conditions have been met. The Save Data component checks whether the current step direction is equal to the previous step direction (this will be set on Screen 6). If so, this means a reversal has occurred, and so 1 should be added to the number_reversals field:
The other component on this screen is a Task Early Exit component. This exits the participant from the task for one of two reasons. The first possible reason is that the number of consecutive correct responses on 'same' trials has reached 6. To retrieve the number of consecutive correct responses on 'same' trials, we look in a Store field called 0. This is because back on Screen 4, we saved the number of consecutive correct responses to a Field named after the current value of colour_difference, which on 'same' trials will be 0.
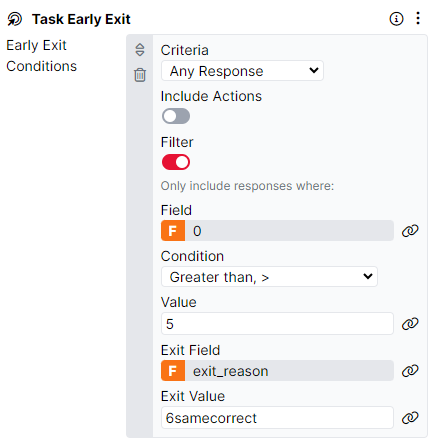
The second possible reason a participant could be exited from the task is if the number of reversals has reached 6. This is handled in the second Early Exit condition which checks whether number_reversals is greater than 5. In each case, the reason for an exit is stored in the field exit_reason so that if needed, it can be used later in the experiment.
Screen 6 is a break screen before starting the next trial. This screen shows some text displaying the current values of the relevant Store fields for staircasing. This text is included in the example so you can see more clearly how it works, but can be deleted when cloning the task and adapting it for your own use. Reaching this screen also means we're ready for the next trial, so we need to update the previous_step_direction field to equal the step direction from the trial we just completed. We handle this on the Screen tab, where a Save Data component sets the value of previous_step_direction to the current value of step_direction, ready for the next trial.
A note on step size: in this version of the task, the step size in the staircase is constant throughout the task. It would be possible to change the step size after e.g. a certain number of reversals by setting up a number of different trial displays, each with different settings in the Change Difficulty - Staircase component. You could then send participants to blocks of trials that use these different displays using the Jump to Row component.
Store and re-display multiple responses from a single screen
Take a look at our Store and Redisplay multiple responses task to see the setup described below in action.
In this example, we present participants with an image and they are instructed to write up to 10 words that they associate with this image. Once participants have finished writing the words, they will be presented with each of the words a second time, and are asked to rate the relatedness of these words on a Rating Scale.
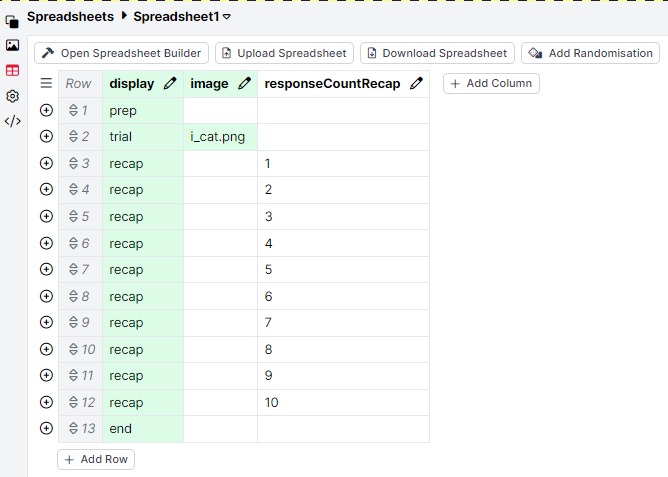
To understand how this setup is achieved, let's first have a look at the spreadsheet.
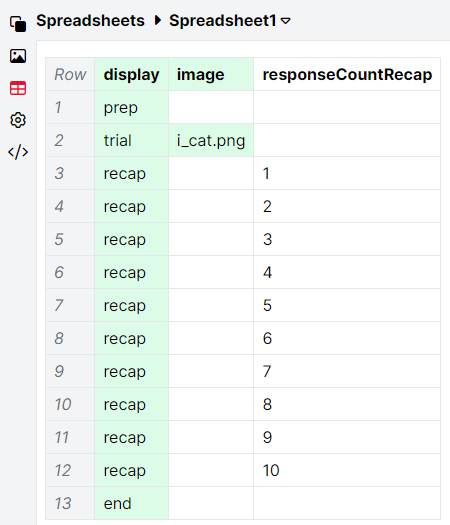
The first display presented to participants is a 'prep' display. Then, participants will be shown the 'trial' display where they will provide up to 10 word responses. Following this, we have listed 10 instances of the 'recap' display where participants will be shown the words they have previously submitted.
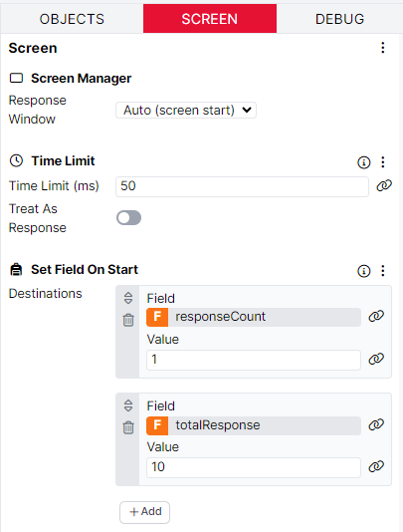
Now we understand how participants will flow through the task, we can have a look at how each of the displays have been built. The 'prep' display contains a single, blank screen with a short Time Limit of 50ms. A Set Field on Start component has also been added to prepare some of the fields in the Store we will be using in the next display. On this screen, we set the responseCount field in the Store to 1 and the totalResponse field to 10. More on how these fields function on the next display.
On Screen 1 of the trial display, participants provide up to 10 words via the Single Text Entry component. This component has been given the Response Tag 'response'. Using the Save Data component, each time this tag is received, we add the value of 1 to the responseCount field in the Store. Within the prep display, we previously set the value in this field to be 1, so after the first response is received from participants the value in this field will increase to 2. After the second response is received the value will be 3, and so on.
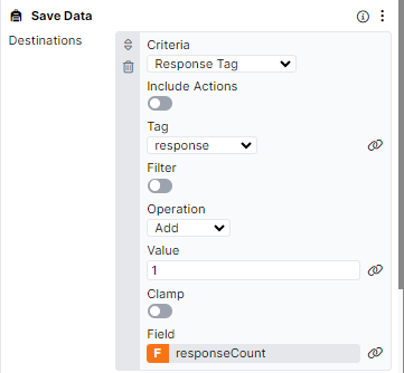
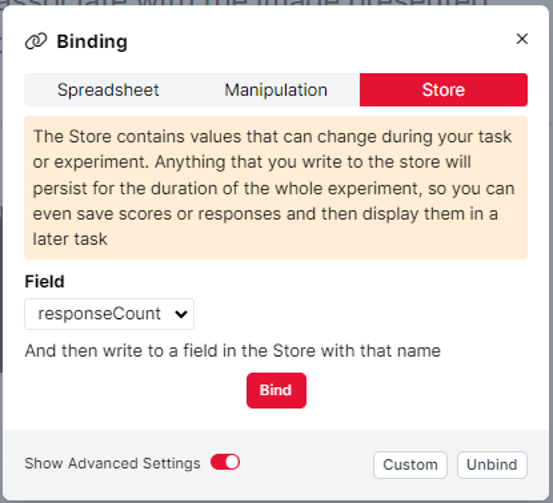
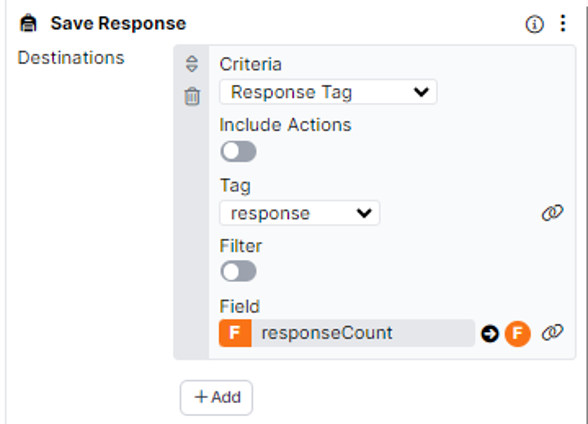
It is important that the responseCount field changes after each response is received so that each word submitted by participants can be saved to a different field in the store, allowing us to redisplay these later in the task. We store these responses via the Save Response component, using the Advanced Binding settings. This component is configured so that each time the Tag 'response' is received, we look in the responseCount field in the Store, and save the response to a field in the Store with that name. This means that when the first response is received, we store the response in a field called 1; when the second response is received we store the response in a field called 2, and so on. This is all handled by the Save Data component adding 1 to the responseCount field each time a response is received.
Once the binding has been configured, the component configuration settings should look like this:
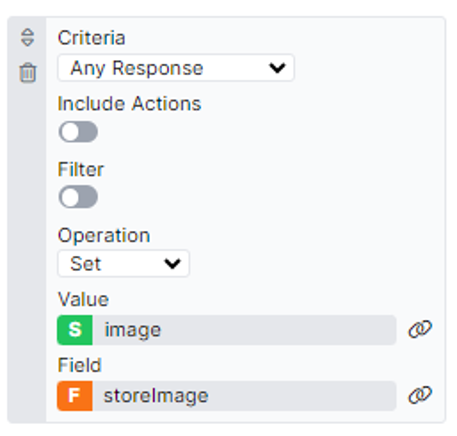
There are two further criteria configured in the Save Data component on this screen. We also save the image presented on the screen so we can redisplay this later in the task. The Image component is bound to the spreadsheet column 'image'. In the Save Data component, we save this by selecting Any Response from the dropdown, and setting the value in the image column of the spreadsheet to a field in the Store called 'storeImage'.
The final criteria of the Save Data component is setup to subtract 1 from the totalResponse field of the Store each time the tag 'response' is received. In the prep display, we previously set the value to 10. We use this value to show participants how many responses they have left, by binding the Text component to the totalResponse field. When the screen starts, this will show the number 10 and each time a response is received, the value will decrease by 1.
The final component on this screen is Advance - Continue. This prevents the default behaviour of the screen automatically advancing after the first response is received. Instead, the screen will only advance when the Continue Button is clicked, and allows multiple responses to be received on a single screen.
On Screen 2 of the trial display, we have another blank screen with a short Time Limit of 50ms. We also have the Save Data component, which subtracts 1 from the responseCount field in the Store. This has been added because the Save Response logic on Screen 1 will always run before the Save Data logic. This means that because the +1 to the responseCount always runs after we've added in the most recent response, it will always be one larger than it should be. This subtraction logic is important for recalling the correct number of responses later in the task and makes data analysis easier.
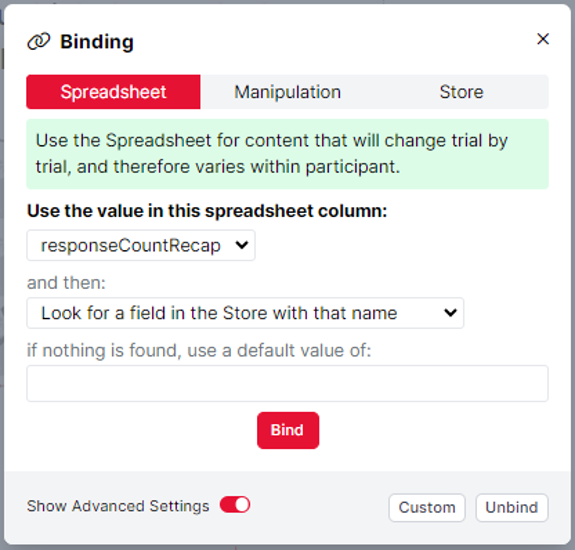
After the trial display is complete, participants move onto the recap display. Here, we redisplay the image used in the previous trial by binding the image component to the storeImage field. We also redisplay the words submitted by participants by using the Advanced Binding settings of a Text component. Here, we tell Gorilla to look at the responseCountRecap column of the spreadsheet and then look for a field in the Store with that name:
In the spreadsheet, each recap display has been given an entry from 1 to 10 in the responseCountRecap column of the spreadsheet, representing the number of responses that could have been submitted by participants. These match the names of the fields where we saved the responses to in the trial display, so Gorilla can now retrieve each of these responses separately.
Once participants have rated the word on the screen, the Continue Button will advance the screen. On Screen 2 of the recap display, we use the Jump to Row component to evaluate whether participants should be shown the next word, or if all of the words submitted by participants have already been shown and the task should end. To do this, we set the Criteria to Any Response and use the Filter toggle to run the evaluation. If the value in the responseCount field is equal to the value in the responseCountRecap column of the spreadsheet, the Jump to Row logic should run. If this criteria is met, participants will be jumped to row 13 of the spreadsheet, where the task will end. If this criteria is not met, the task will continue.
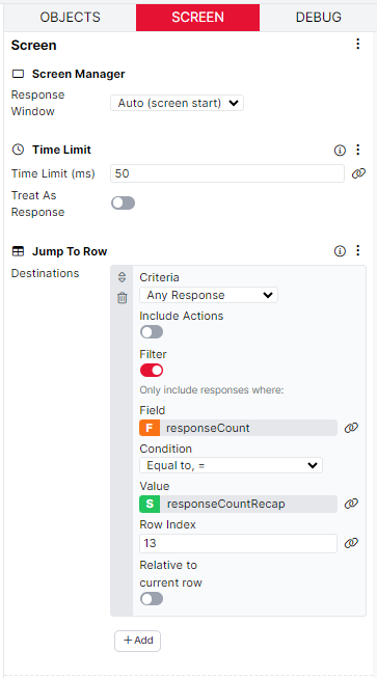
To explain this logic a bit further, if participants only gave 3 responses on the trial display, the value in the responseCount field will be 3. By running this Jump to Row logic, participants will see the first 3 recap displays. After this, the Jump to Row component criteria will be met, as the value in the responseCount field in the Store (3) will be equal to the value in the responseCountRecap column of the spreadsheet (3). This means that participants will only see the recap trials that redisplay a word submitted by them, rather than lots of empty displays where they did not submit enough words.