Questionnaire Builder 2 allows you to create surveys and questionnaires incorporating text, images and a wide variety of response possibilities. You can collect participants' responses, write them to the Store and let them answer different questions based on their responses. There is a very high degree of flexibility on the design of pages which you have complete control over!
Importantly, you do not have to touch a single line of code. The majority of classic questionnaires can be built in Questionnaire Builder 2.
Browse the list of topics in the menu to see what each part of the tool does, and follow our Step-by-step Guide to build your first questionnaire and learn the tools quickly.
A new Gorilla Questionnaire can be created within a Project by scrolling down to Tasks & Questionnaires, clicking 'Create New', and choosing Questionnaire Builder 2.
Then, you can enter a name for your new Questionnaire and press 'Create'. When choosing a name for your Questionnaire, try to make it something unique and memorable - a name you would easily associate with the Questionnaire contents.
You will use this name to identify your Questionnaire in your project. It is also the name people will see if you collaborate or share your Questionnaire with someone, so it's important that they would be able to recognise it easily too!
Once created, you will be directed to the Questionnaire Pages view, where you can start building your pages.
You can rename your Questionnaire at any time, or add a description, by clicking on the 'Actions' menu and selecting 'Name/Description'. Descriptions are limited to 1000 characters in length.
The Pages tab is where you configure all the elements of your questionnaire. A Page is simply a sequence of questions or text, similar to a page of a printed survey, but you can put as much or as little on it as you want. A Page can be a single object (which might suffice for simple instructions), but more commonly will be several objects in sequence (e.g. date entry, dropdown menu, text input, etc.).
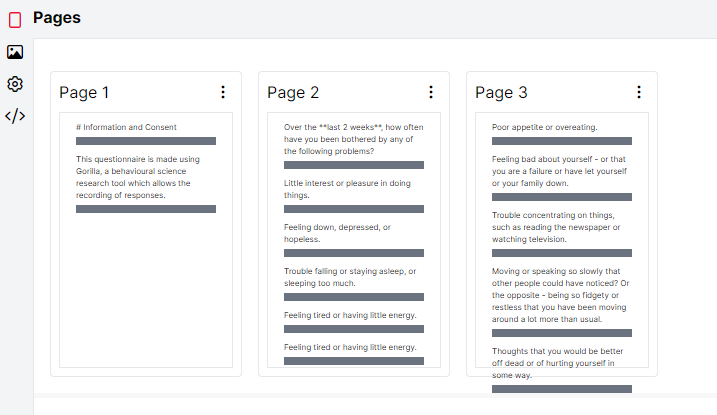
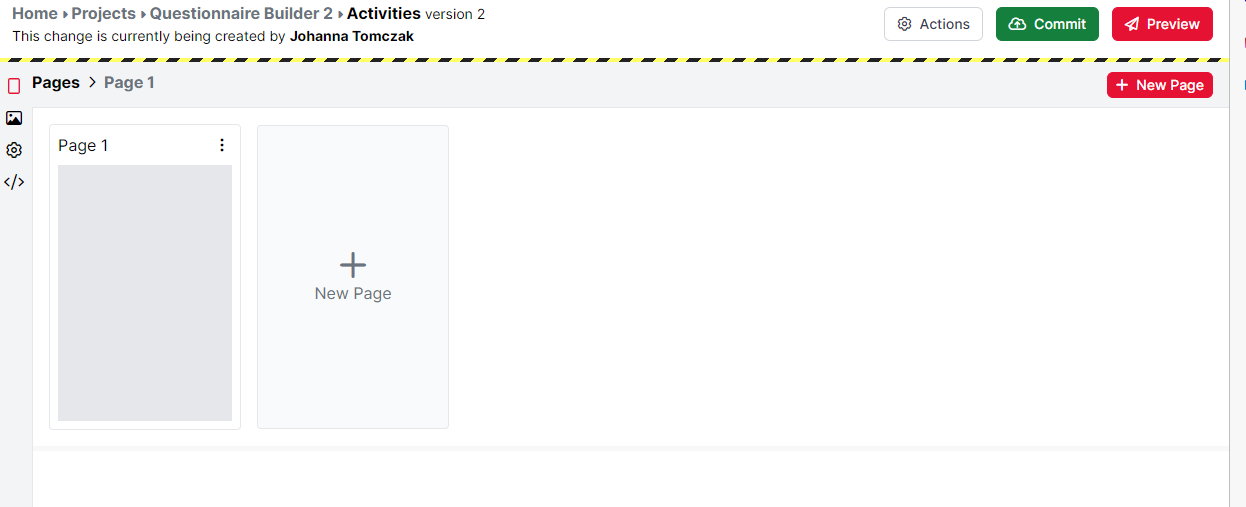
Start by clicking Edit on the right. This will create the second version of your questionnaire, as you can see in the second screenshot below.

You are now automatically starting to build on page 1 of your questionnaire, but you can also add more pages by clicking the New Page button.
Once you have created your questionnaire pages, you can then reorder them (by dragging and dropping them), copy and paste them, or remove them if you no longer need them. You can edit the name of a page by simply clicking on the page name and typing the new name.
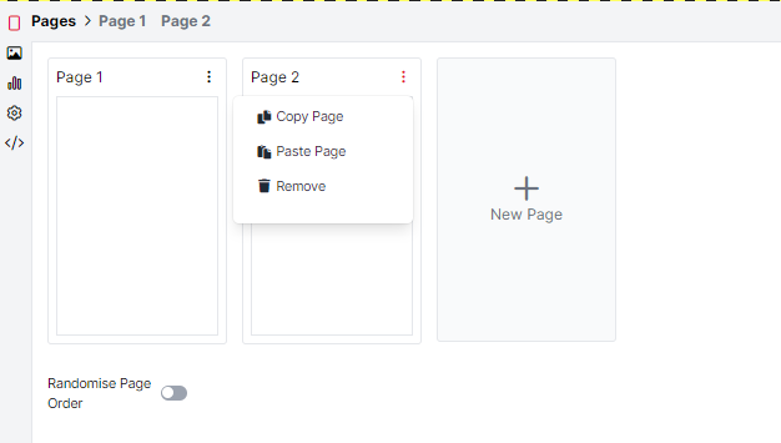
Note that page names are restricted to alphanumeric characters, spaces, dashes (-) and underscores (_) only.
This section is very similar to the way you use objects in Task Builder 2.
By clicking the Add Object button, you will have the choice between different objects available for questionnaires. Just choose the one you would like to add and click Create. For a full list of all objects, have a look at our Questionnaire Builder 2 Objects Guide.
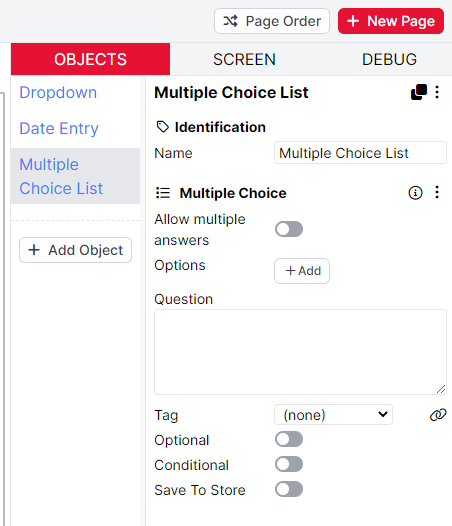
When you have added your object, your new object will now appear in the Object List, where you can edit its configuration settings (see image below for an example of the Dropdown object).
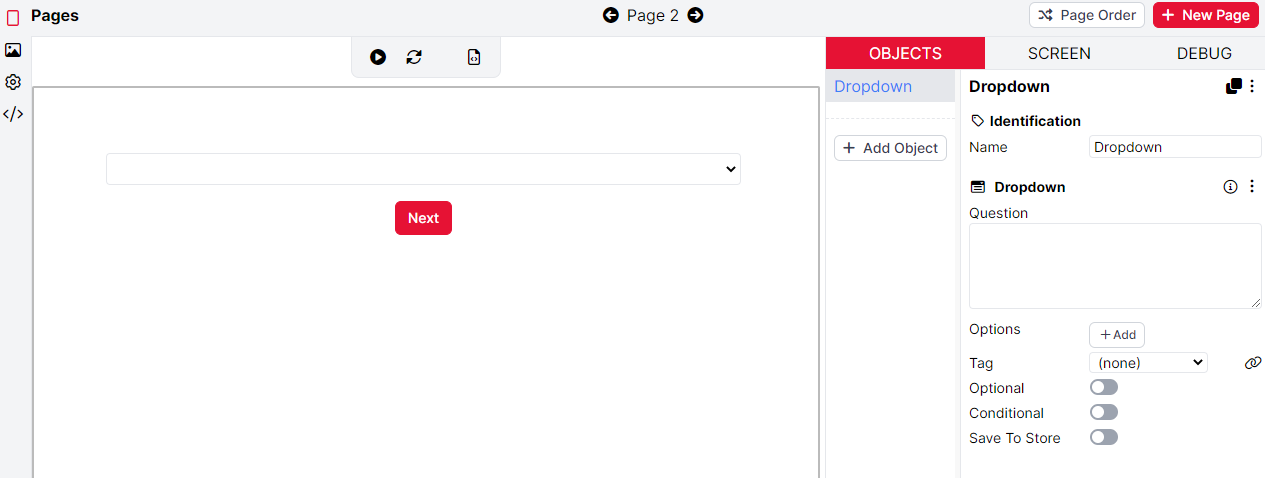
You can create a copy of an object by clicking the black Duplicate button at the top-right of the Object Editor. This will create the same object on the same page, which you can then edit. If you need the same object, but on another page, you can use the copy and paste functions under the 3 little dots instead. The video below shows these actions:
When you are adding several objects to one page, they will appear on your page in the order they appear in the Objects list. If you want to change their order, simply drag and drop them in the Objects list to fit your needs.
Every Object has a toggle for the Conditional setting. This is where you are able to set up whether you want to hide or show this object, based on a set of possible conditions. Let's say you want to ask participants first if they play an instrument. If they select Yes, you then want to show them a followup question about types of instruments they play.
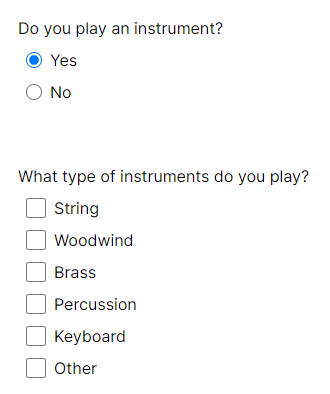
Below you can see a screenshot of the Conditional settings for the Multiple Choice object corresponding to the second question above.
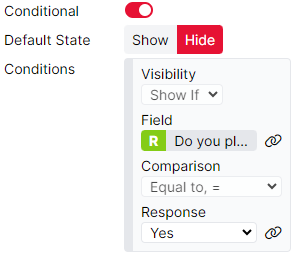
The Conditional setting is toggled on. The Default State is Hide, meaning that by default, this question will not appear. However, it will appear if our participants have answered 'Yes' to the previous question where we asked if they play an instrument. By binding to the response from this question, we can implement a skip logic (for participants who don't play an instrument) and a display logic (for participants who do play an instrument).
Tutorials that show this feature
Sometimes, you want to decide which page a participant sees next based on a manipulation or a response to a previous question. By using the Branch toggle in the Screen tab, you can set up a skip logic on every page and for every object you need this setting for. Below you can find an example where we are using the response from a previous question to branch participants to the appropriate page in the questionnaire.
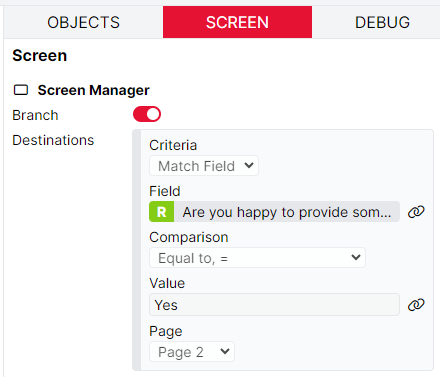
On the Screen tab, the Branch setting is toggled on. Under Criteria, the default 'Match Field' is selected. The Field is bound to a previous response, to the question 'Are you happy to provide some more details about yourself?' Participants who answered Yes to this question will be branched to Page 2 of the questionnaire. Any participants who do not meet this criteria will continue with the normal flow of your questionnaire.
You can instead choose to always branch participants to a given page, regardless of their responses, by selecting 'Always' instead of 'Match Field' from the Criteria dropdown. This is useful in cases where you have several alternative pages for different groups of participants to fill in, but want to direct all participants on to the same final page afterwards.
If a participant's answers meet the criteria for multiple branching Destinations, they will be sent to the last specified Destination for which they meet the criteria. You can reorder Destinations by dragging them up and down in the Destinations list within the Branch component to ensure your participants are branched to the appropriate page.
Tutorials that show this feature
There are three types of randomisation which are possible in Questionnaire Builder 2. You can randomise entire pages, individual questionnaire items or the answer possibilities within a questionnaire item.
Tutorials that show this feature
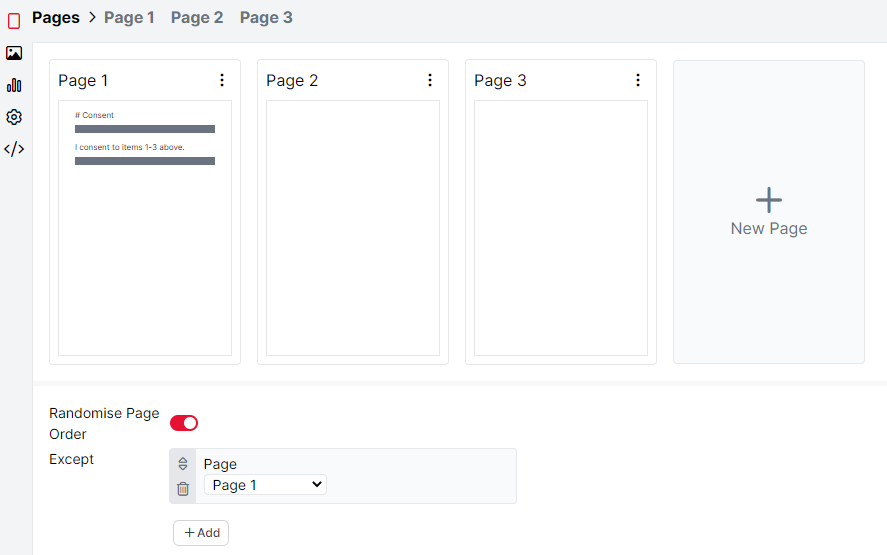
In the page view, at the bottom, you can see the toggle Randomise Page Order. Switched on, this will allow you to display all your pages in random order. If you want to make some exceptions (i.e. some pages should not be randomised), you can add those to the Except field.
In the Screen tab of each of your pages, you can see the toggle Randomise Questions. Switched on, this will allow you to display all your questions (i.e. objects) in random order. If you want to make exceptions (i.e. some questions should not be randomised), you can add those to the Except field.

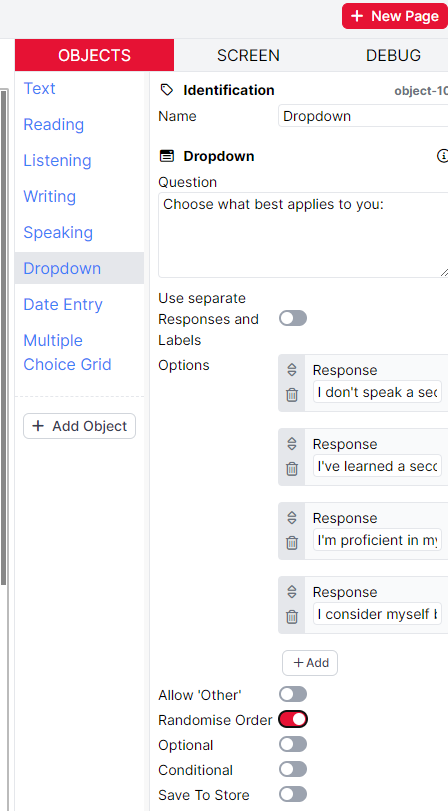
Some questionnaire objects also allow you to randomise the response options, so that these appear in a different order for participants. If this is the case, you can find the setting within the settings of the object. Below, you can see an example of the Dropdown object with the randomising response options switched on.
Stimuli are any media files (images, audio, video, etc.) which you can present to participants during your questionnaire.
You can add, delete, and manage stimuli on the Stimuli tab. To access the Stimuli tab, click the image icon in the left sidebar of the Questionnaire Builder. To add stimuli, click the Add First Stimuli button or the Add Stimuli button for any subsequent stimuli.

Browse the files on your computer and select the stimuli you want to add. Once the stimuli have uploaded, you will see a preview of each stimulus. Stimuli are shown 10 to a page. To navigate between pages, use the arrows at the top of the Stimuli tab. Click 'Remove' next to a stimulus to delete it from your task.
You can search for specific stimuli by typing part of the filename in the search box at the top left. You can also filter stimuli by type (image, audio, video, and document) using the Filter icons at the top of the Stimuli tab. Active filters are displayed in red, while inactive filters are displayed in black. Toggle whether a filter is active or inactive by clicking it.
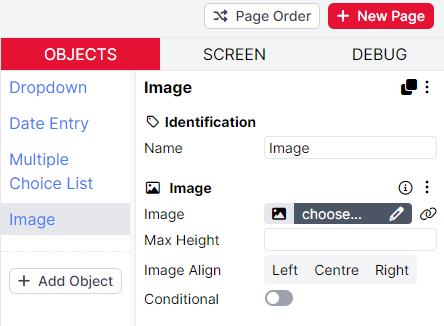
Now that you have created an object and uploaded your stimuli, you can then use the 'choose...' dialogue to pick the stimulus you want to display in your object configurations.
In Questionnaire Builder 2, we now have a Scoring tab where you can calculate participants' scores without needing a line of code!
Finding scores in your data
In the output data from your questionnaire, each score you define will appear in a separate column called Store: score-name. In short-format data, the participant's total score will be shown in their data row. In long-format data, the participant's cumulative score at the end of each page will be shown in the data rows for that page, and their total score will be shown at the end of the data file.
Samples that use this feature
Generalised Anxiety Disorder (GAD 7) - Uses a single score.
Barratt Impulsiveness Scale (BIS-11) - Uses multiple scores.
To set up scoring, navigate to the Scoring tab by clicking the icon on the left sidebar. Click 'New Score' at the top-right and enter a name for the score you want to calculate. The score will be saved under this name in the Store, allowing you to optionally use it later in the experiment.
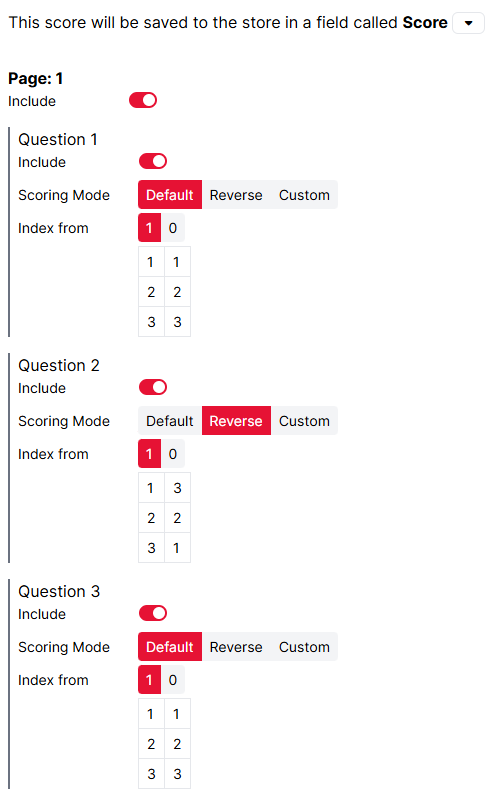
Once you have created a new Score, you will see a series of options for each page and question in your questionnaire. The screenshot below is from a questionnaire containing three Rating Scale questions with the possible responses 1, 2, and 3:
To exclude a page or a specific question from your score, toggle off 'Include' next to that page or question.
For each question included in your score, select the scoring mode you want:
Default = Responses are scored in ascending order
Reverse = Responses are scored in descending order
Custom = You define a custom score for each response
Individual (only available for Multiple Choice Grid) = Responses are scored differently for different questions/statements within the object. See section 'Individual scoring' below for how to set this up.
If you select Default or Reverse, you can choose if you want scores to start from 0 or 1 by using the 'Index from' setting. By default, scores will index from 1.
Once you select a scoring mode, the table below each question will show the actual responses for each question (left column) and how they will be scored (right column).
The screenshot above shows a score called 'Score', set up to include questions 1, 2, and 3 from Page 1. Questions 1 and 3 are scored in Default mode (i.e., ascending) and Question 2 is scored in Reverse mode (i.e. descending).
The Multiple Choice Grid object allows you to ask several questions within one questionnaire object. However, it's still possible to score the responses to these questions differently by using Individual scoring mode.
Let's use one of our sample questionnaires, the Barratt Impulsiveness Scale (BIS-11), as an example. The questionnaire asks participants to rate their agreement with a series of statements on a 4-point Likert scale:
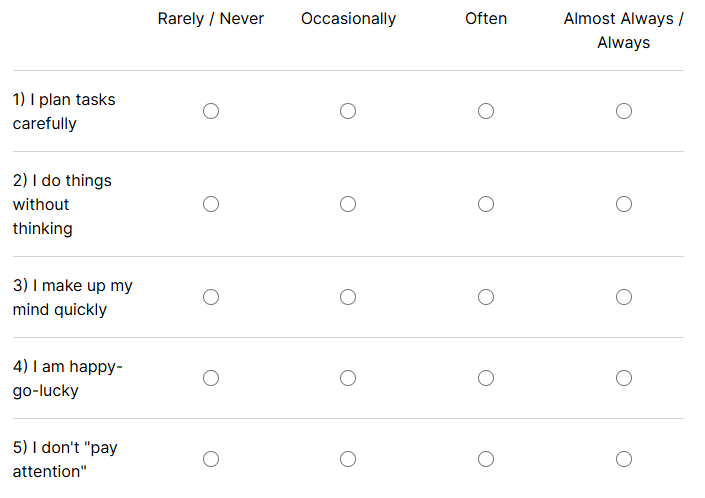
Not all of these statements should be included in all subscales of the questionnaire. Additionally, responses to some statements should be scored in ascending order, and others should be scored in descending order.
To achieve this, on the Scoring tab, find the Multiple Choice Grid question and set Scoring Mode to 'Individual'. This will reveal scoring options for all questions/statements within the Multiple Choice Grid separately.
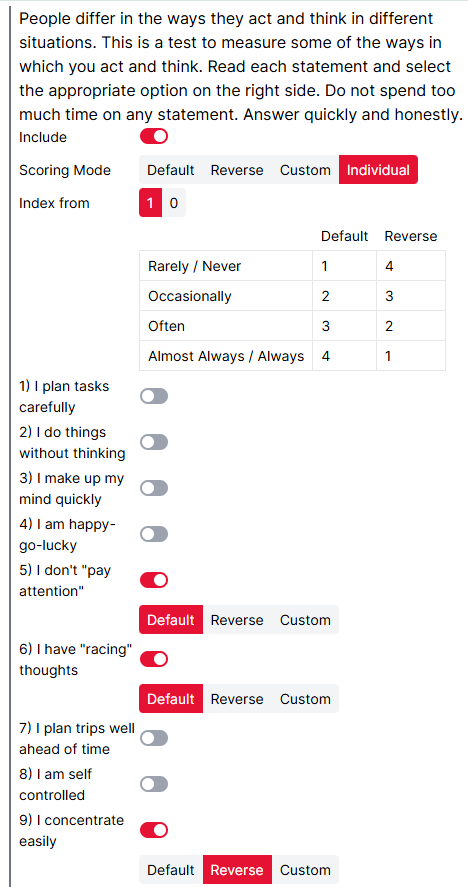
The screenshot above shows Individual scoring for the Attentional impulsivity subscale of the BIS. Questions 1, 2, 3, 4, 7, and 8 are not included in the score (toggled off). Questions 5 and 6 have Default scoring, and Question 9 has Reverse scoring. As shown in the table at the top, this means that for questions 5 and 6, Rarely/Never will be scored as 1, whereas for question 9, Rarely/Never will be scored as 4.
Once you have started building the pages of your questionnaire, you can preview how this will look to participants in two ways.
You can interact with a single page of a questionnaire by using the Play button, as shown in the video below:
In the video, you can see that once Play button is pressed, you can interact with the questionnaire objects on the page. In the Debug panel on the right, the recorded responses are shown. You can also view how the questionnaire will look on desktop and mobile devices by click on the different device icons at the top of the page.
At Gorilla, we also highly recommend previewing your survey in full, using the Preview button in the top-right corner of the Questionnaire Builder.
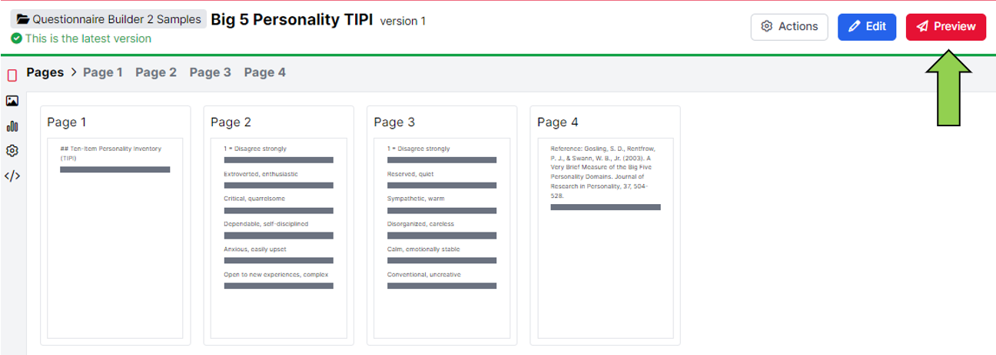
By clicking the Preview button, you can view the entire questionnaire from the perspective of a participant. At the end of the preview, you will be able to download the data from this preview. This is a great way to check that all the questionnaire responses are recorded in the way you expect, before launching your experiment.
Once you have set up the questionnaire, you can commit it. Committing means saving a version of the questionnaire that you can always go back to. You must commit your questionnaire to be able to add it to an experiment and send it to participants.
To do this, click the green 'Commit' button at the top right of the screen. Then, enter a description of your changes in the text box and press commit to save the new version of the questionnaire.
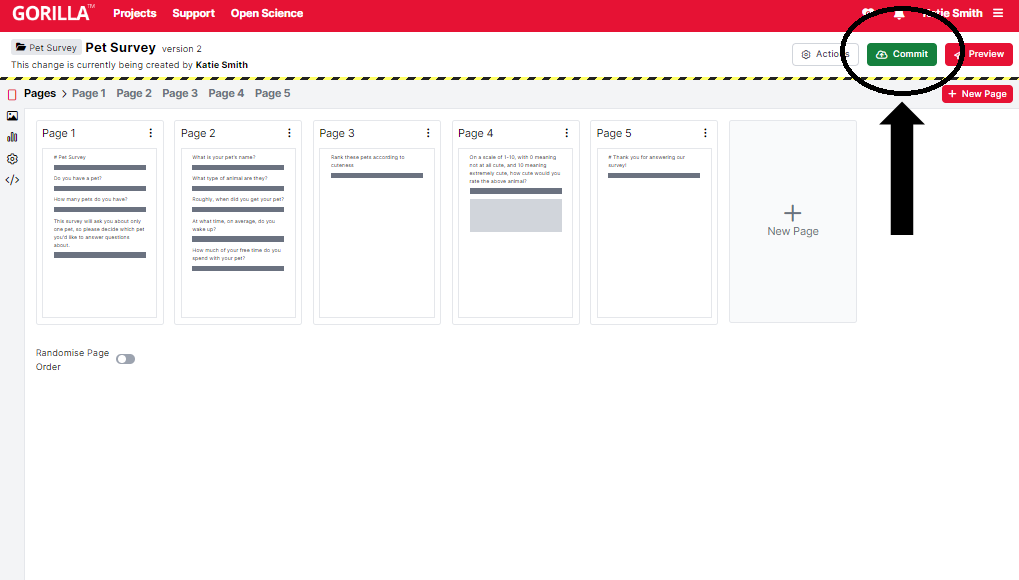
You will know the questionnaire version is committed when you can no longer edit the questionnaire, and the blue 'Edit' button replaces the green 'Commit' button. These changes indicate that you are now viewing the committed version of the questionnaire, not editing it.
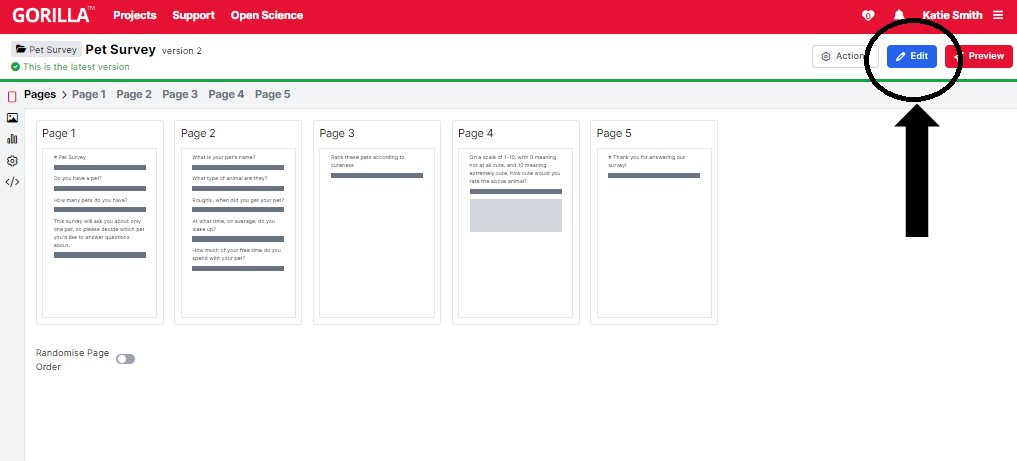
Each time you commit a new version of the questionnaire, the version number increases. You can view previous questionnaire versions by clicking on the 'Actions' button (to the left of the 'Edit' button), and then History.
From opening this History box, you can view previous questionnaire versions. The '(open)' text indicates that this is the version of the questionnaire you are currently working on and has not yet been committed.
To go back to a previous version of the questionnaire, choose this version from the dropdown and click 'Show this version' to view it. To roll back to this version, choose 'Restore' from the Actions menu.
To send a Questionnaire to participants, you need to add it to an Experiment.
The Experiment Tree forms a framework around your Questionnaire that allows participants to enter the Questionnaire. You can also connect your questionnaire to other questionnaires and tasks in a single experimental flow.
Once you have constructed an Experiment Tree, you’ll want to distribute it to participants. To do this, go to the Recruitment tab in the Experiment builder. In this tab, you can choose a Recruitment policy, which will generate a URL to send to participants. We offer a variety of recruitment policies, all explained in our Recruitment Policy Guide. After selecting a policy, set your Recruitment Target (i.e., how many participants you want to complete your experiment), and apply any Participant Requirements, such as a time limit or specific device types.
As participants begin the experiment, they will appear as Live in the Participants tab. When a participant reaches the Finish node, their status will change to Complete. You can then download the participants' data from the Data tab. Questionnaire data can be downloaded in a variety of formats - see our guide to generating data for more information.
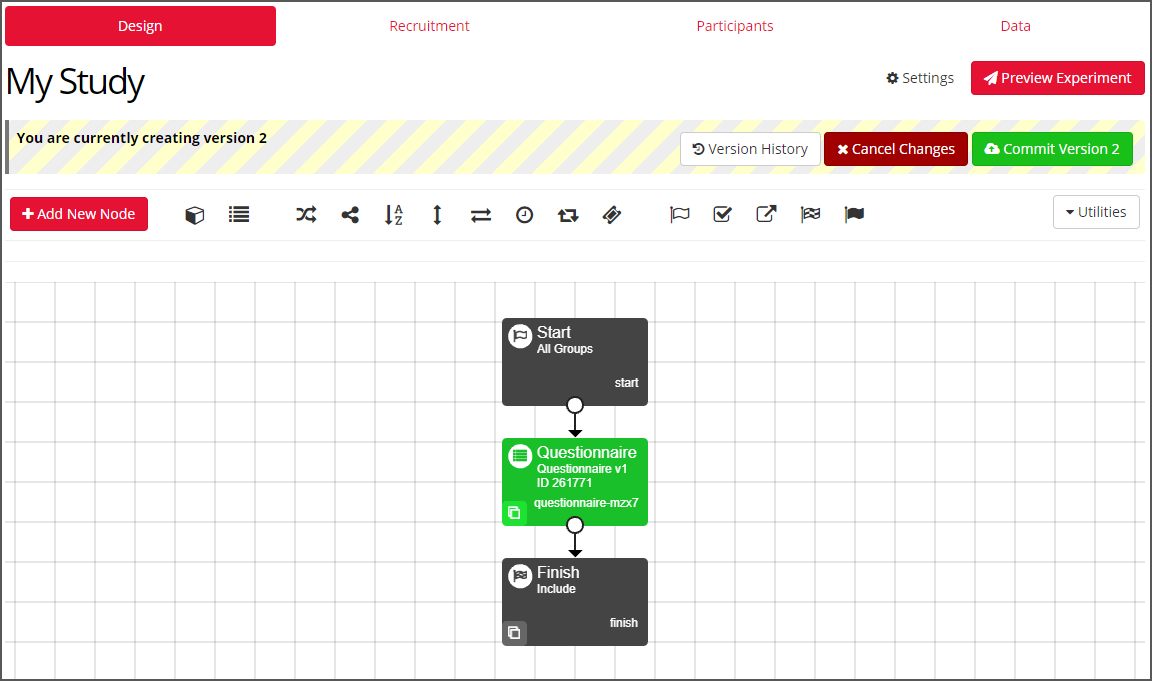
This screenshot shows the new Experiment Builder interface. If you’re still using the classic interface, it will appear slightly different.
You can find out more information on how to design and build your Experiments in our Experiment Builder: How-To guide.
Manipulations allow you to change settings on your questionnaire from within the experiment tree. You can use manipulations to implement between-participant conditions in your questionnaire.
To add a manipulation, navigate to the questionnaire setting you want to manipulate. For example, imagine you want to use a manipulation to vary the labels of your slider object between participants. Go to the relevant page and navigate to the Slider object and toggle Add Labels. Then click Bind (the link icon to the right of the setting).
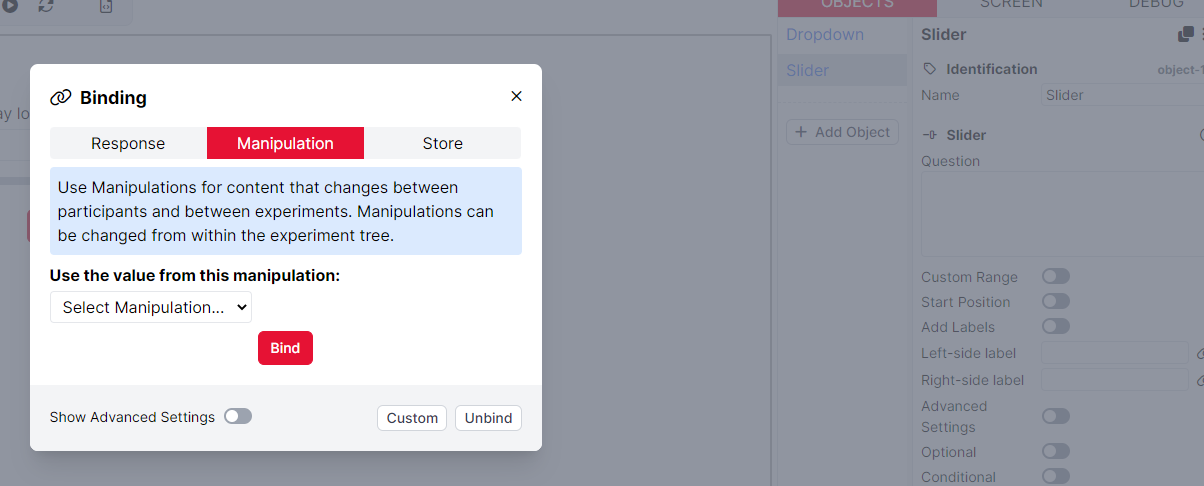
You can find more information about binding to manipulations, including how to configure manipulations in the Experiment Tree, in our Binding Guide.
To view all manipulations set up on your questionnaire, go to the Settings tab on the left and click Manipulations. Here, you can delete any manipulations you are no longer using by clicking the bin icon on the left of each manipulation. You can also add a description for your manipulation, set its Label and Key, define Options, and set up a default value.
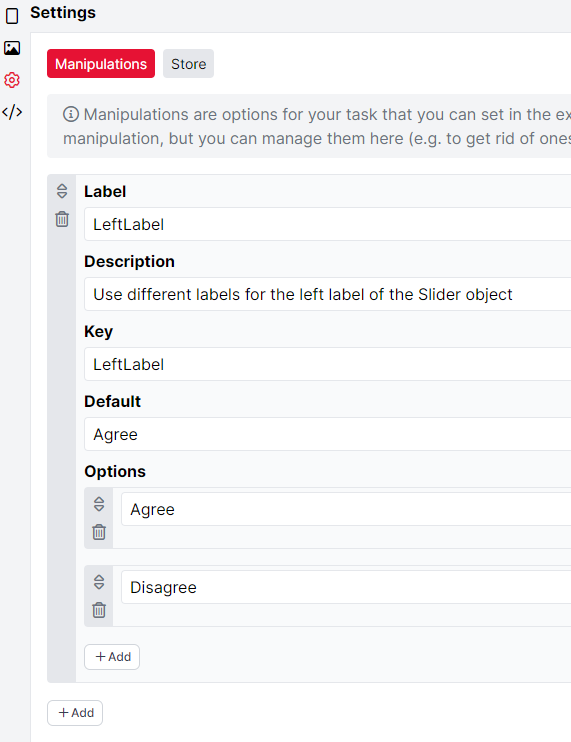
Label: This is the name of your manipulation, as it will appear in all configuration menus.
Description: Use this to add a description of your manipulation and its possible values.
Key: This is the name of your manipulation, as it will be referred to in Gorilla's underlying code. By default, the Key is identical to the Label. You will need to use the Key if you refer to your manipulation within a script.
Default: Use this to set a default value for your manipulation. This value will be used if you do not set a value manually within the Experiment Tree.
Options: Here, you can define options for the values of your manipulation. If you define options, these options will show up as a dropdown menu when you set up your Task in the Experiment Tree. If you do not define options, then you will enter the value of the manipulation in a free text field when you set up your Task in the Experiment Tree.
The Store is a place to save participant data that you want to use later in the questionnaire or the experiment: for example, participants' responses to specific questions. Each piece of data that you save in the Store will be saved in a named Field, so that you can retrieve it and use it later. If you're already familiar with Questionnaire Builder 1, this is analogous to what was previously called embedded data.
For example, imagine that you want to save participants' responses to the question "Have you ever attended swimming lessons?". Navigate to the object (the question) where you collect participants' responses. In the example below, we are using a Dropdown object with two response options ('Yes' or 'No').

To save the data from this object (question) to the store, click 'Show Additional Settings', toggle on 'Save To Store', and click to add a destination. Then, click the bind icon to open the Binding menu.

Within this menu, you can select to create a new Field under which the data from this object will be saved. You can then name and Bind this Field. In this example, the Field has been named "swimming-lessons".
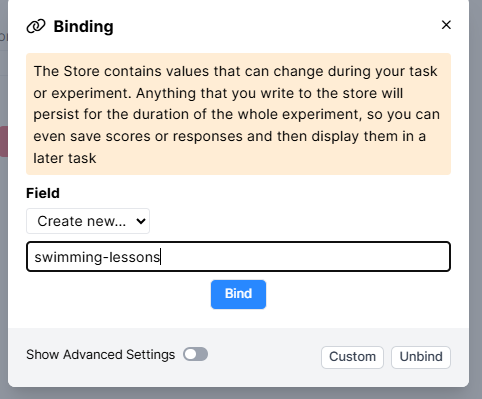
This will now appear under Destinations, preceded by an orange F (which indicates that you have created a Field in the Store).

In this example, the Response given by the participant (i.e., 'Yes' or 'No') was selected to be saved. Selecting Quantised would store a numerical value instead.
Now, navigate to the page where you want to retrieve and display the values of the Store field you created earlier.
There are two ways to retrieve fields from the Store and display their values on your questionnaire page:
Directly bind an object to a Store field. You can find how to do this in the Binding Guide.
Incorporate Store fields within a Markdown text object. This is the easiest way to show participants their responses.
To incorporate Store fields within a Markdown text object, first add an object to your screen containing a Text component. Then, in the component's Raw Text field, type the text you want to display to the participant. To retrieve and display data from the store, use the syntax ${store:myField}. For example, 'Hello ${store:firstName} {store:lastName}'.
To use the previous example, if you wanted to remind participants what they answered for the swimming lesson question, you could type something like this: You answered "${store:swimming-lessons}" to the question: "Have you ever attended swimming lessons?”
Tutorials that use this feature
Saving to and retrieving from the Store
The Customisation tab is available under Settings. You can access Settings via the cog icon on the left-hand side of the Questionnaire Builder:
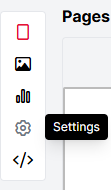
Once you're in Settings, click Customisation. Here, you can:
Toggle this setting on to show the participant a progress bar indicating their current position in the questionnaire. The bar will appear in red at the top of the screen, filling in from left to right as the participant moves through the pages.
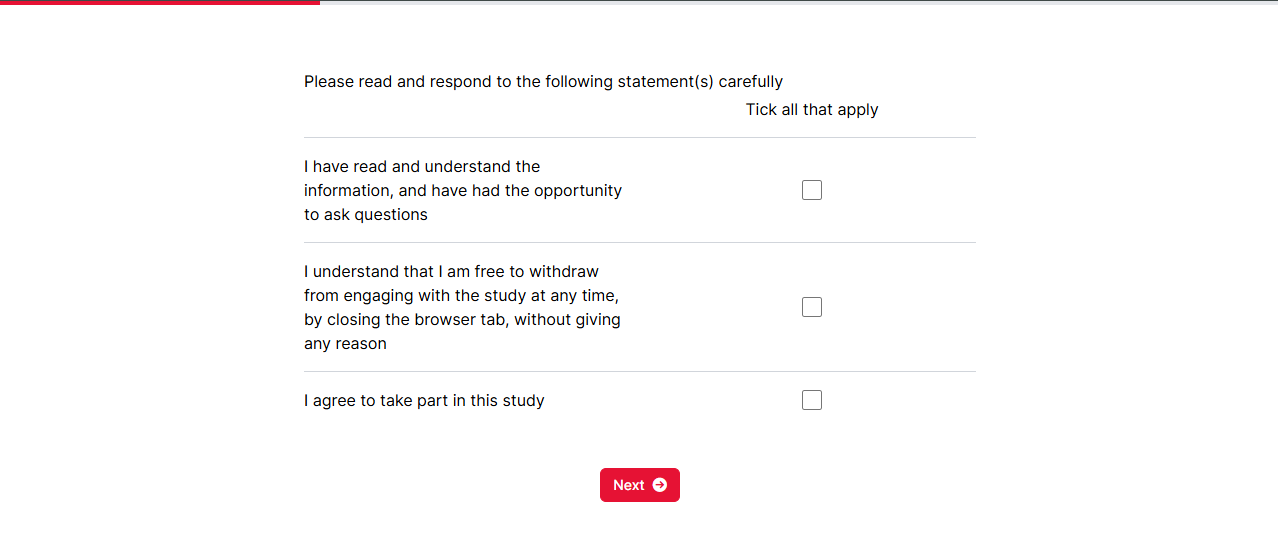
The Progress Bar updates according to the position of the current page within the questionnaire. If you are using Branching within your questionnaire to skip pages under certain conditions, the Progress Bar will reflect the original position of each page without taking branching into account.
Here, you can customise the label shown on the Next button at the bottom of each page of your questionnaire.
Toggle this setting on if you want to show a Back button that allows participants to return to previous pages of your questionnaire. You can also customise the label shown on this button.
Toggle this setting on if you want the text on your questionnaire pages to be displayed from right-to-left.
Scripting in Questionnaire Builder 2 is not yet available - watch this space!