Recruitment Requirements
Overview
Once your Gorilla experiment is ready to launch, it's time to recruit participants. As well as providing a range of recruitment options, Gorilla also allows you to control which participants access your study using Recruitment Requirements.
You can limit access to your experiment based on a participant's:
Any participant who doesn't satisfy your requirements will be prevented from accessing your experiment. They will be sent to a default page explaining why they are not eligible to take part.
You can also set a Time Limit, which will automatically reject participants who take longer than the specified time to complete your experiment.
To set requirements for your experiment, go to the Recruitment Tab:
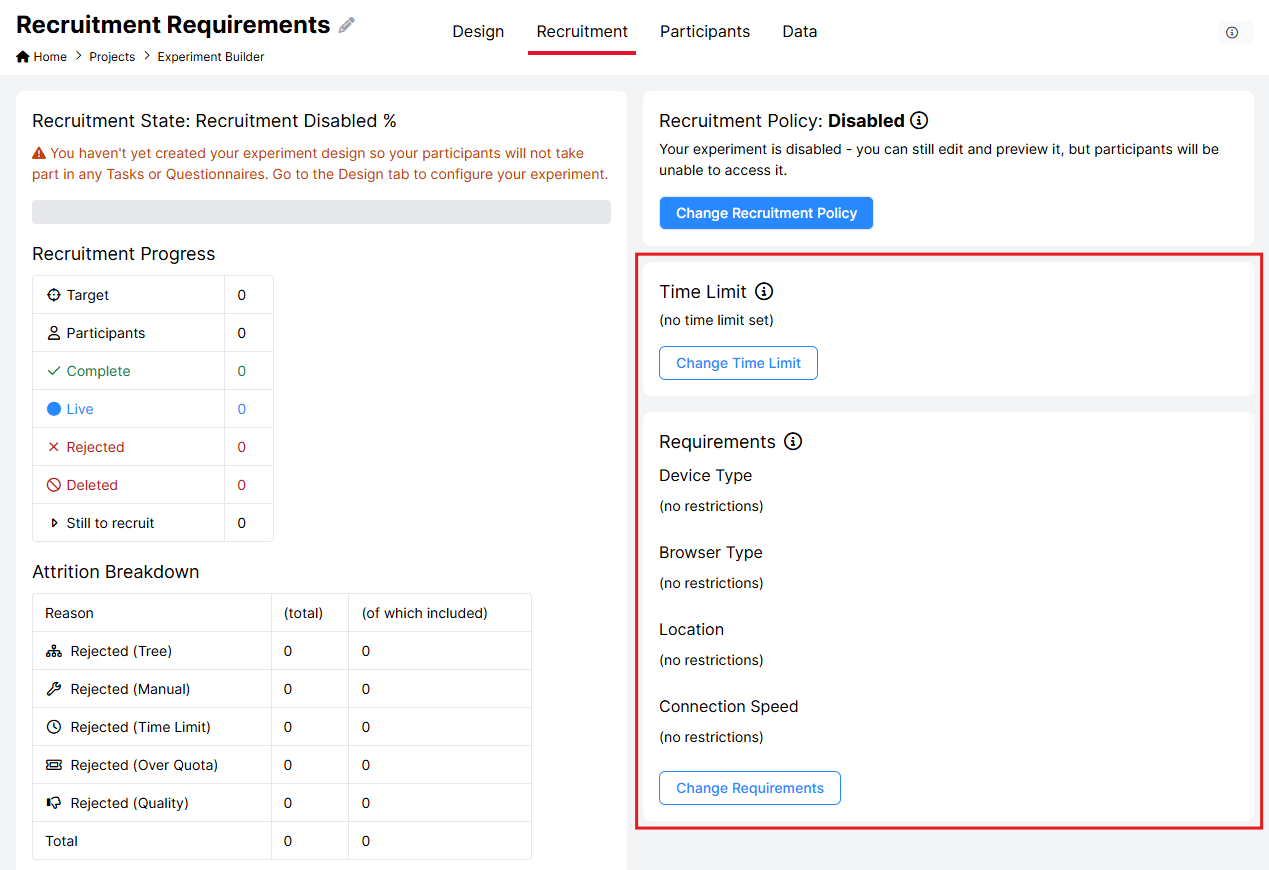
The screenshots on this page show the new Experiment Builder interface. If you’re still using the classic interface, it will appear slightly different.
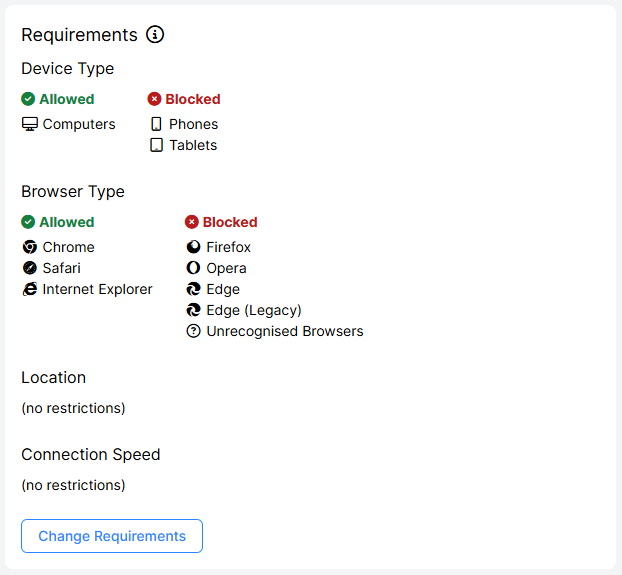
By default, all requirements are set to 'No Restrictions'. To change the requirements, click 'Change Requirements'.
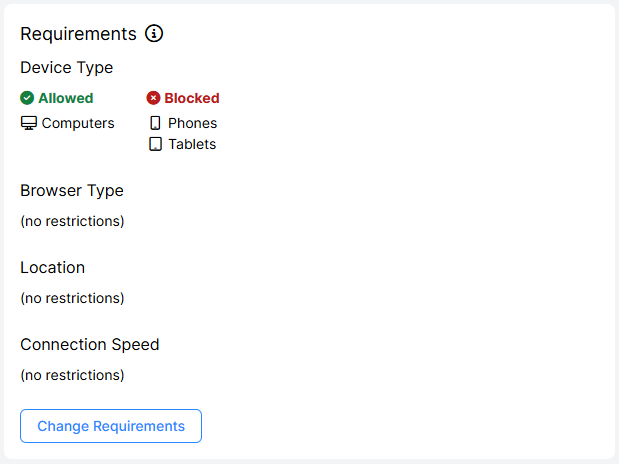
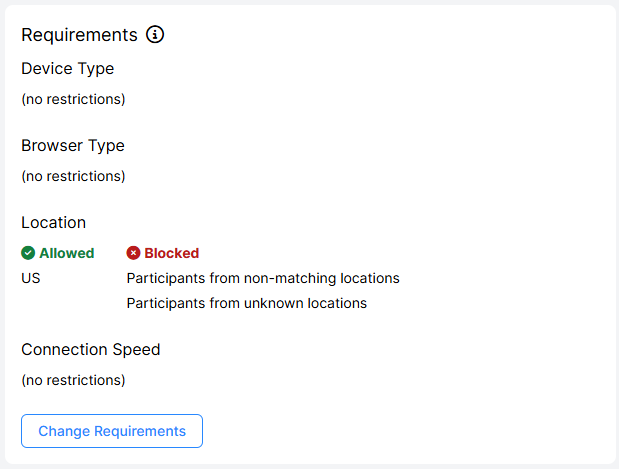
Once you have set requirements, they appear under green 'Allowed' and red 'Blocked' icons as shown below:
Check out the list of topics in the menu to learn about the different requirement options and about setting a time limit.
Device Types
Want to preview how your experiment looks on different devices? See our Device Preview Tutorial on how to use the browser's developer tools to view what your experiment looks like on mobiles/tablets. For support with optimising your experiment for different devices, check out our Responsive Layouts guide.
By default, participants can take part on all web enabled devices. You can optionally limit by device types by selecting the options that you want to accept. You can accept:
- Phones
- Tablets
- Computers (Desktops and Laptops)
We use an external library to detect whether a participant is using a phone. This library has a list of phones which we then exclude. It's not an exhaustive list, so some phones do still get through.
Apple devices
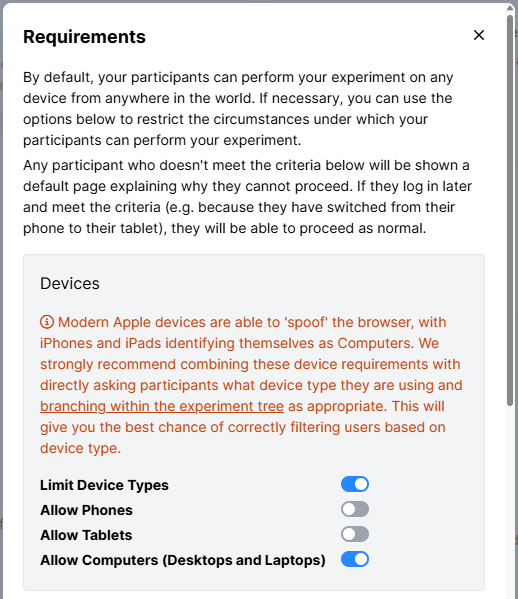
Modern Apple devices are able to 'spoof' the browser, with iPhones and iPads identifying themselves as Computers. We strongly recommend combining device requirements with directly asking participants what device type they are using and branching within the experiment tree. This will give you the best chance of correctly filtering users based on device type.
Mobile apps
If the participant clicks on a link from within a mobile app, the experiment may open within the app, rather than in a full browser such as Safari or Chrome. If this occurs, participants may not be able to complete tasks. We strongly recommend you ask participants to copy and paste the link for use on mobiles, rather than clicking it.
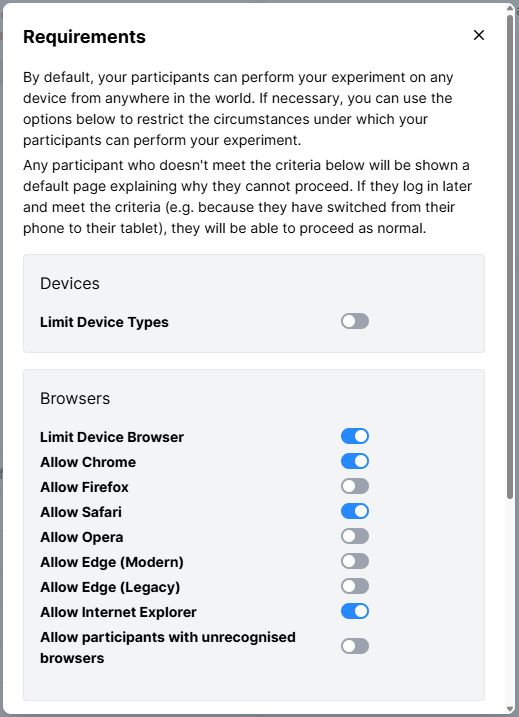
To limit participation by device type, click 'Change Requirements' and toggle on 'Limit Device Types'. Toggle on the device types you want to allow:
The screenshots on this page show the new Experiment Builder interface. If you’re still using the classic interface, it will appear slightly different.
Once you have set device requirements, they appear under green 'Allowed' and red 'Blocked' icons as shown below:
If participants try to access your experiment from a device type that is not allowed, they will reach a special page that tells them that their current device is not allowed and that they can try again from a different device.
Browser Types
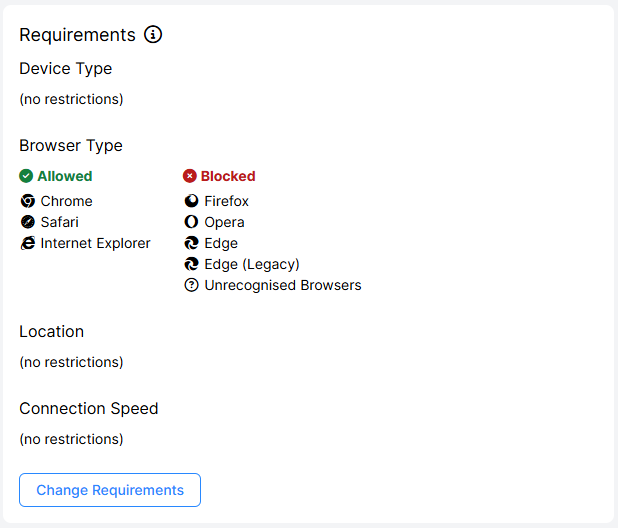
By default, participants can take part in any browser. You can optionally limit by browser by selecting the options that you want to accept. You can accept:
- Chrome
- Firefox
- Safari
- Opera
- Edge (Modern)
- Edge (Legacy)
- Internet Explorer
- Unrecognised browsers
We recommend previewing your experiment in a wide range of browsers to check it appears correctly, particularly if you are playing audio or video or using beta features such as Audio Recording, Video Recording, and Screen Recording.
If you discover that your experiment does not run as well in a specific browser, you can use the Browser Types requirement to prevent participants using that browser from accessing your experiment.
Mobile apps
If the participant clicks on a link from within a mobile app, the experiment may open within the app, rather than in a full browser such as Safari or Chrome. If this occurs, participants may not be able to complete tasks. We strongly recommend you ask participants to copy and paste the link for use on mobiles, rather than clicking it.
To limit participation by browser, click 'Change Requirements' and toggle on 'Limit Browser Types'. Toggle on the browsers you want to allow:
The screenshots on this page show the new Experiment Builder interface. If you’re still using the classic interface, it will appear slightly different.
Once you have set browser requirements, they appear under green 'Allowed' and red 'Blocked' icons as shown below:
If participants try to access your experiment from a browser that is not allowed, they will reach a special page that tells them that their current browser is not allowed and that they can try again from a different browser.
Location
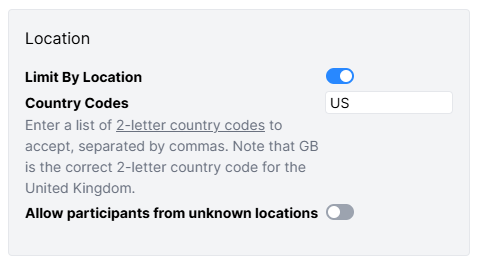
By default, anyone in any location can take part in your experiment. You can optionally limit by country by entering a list of countries from which you will allow participants.
Some people obfuscate their IP address so that the country cannot be detected. You can allow these participants by toggling on 'Allow participants from unknown locations'.
To limit participation by location, click 'Change Requirements' and toggle on 'Limit By location'. Enter the 2-letter country codes of the locations you want to allow, separated by commas:
The screenshots on this page show the new Experiment Builder interface. If you’re still using the classic interface, it will appear slightly different.
Once you have set location requirements, they appear under green 'Allowed' and red 'Blocked' icons as shown below:
If participants try to access your experiment from a location that is not allowed, they will reach a special page that tells them that they cannot participate in the experiment from their current location.
Connection Speed
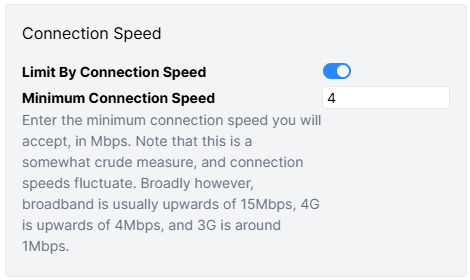
By default, participants with any connection speed can take part. You can optionally limit by connection speed by entering the minimum connection speed you want to accept.
For most experiments, there is no need to set a minimum connection speed. A participant's connection speed does not affect the accuracy of their reaction times, thanks to Gorilla's lookahead system.
You should only consider setting a minimum connection speed if your task involves a lot of high-bandwidth elements, such as large media files that you cannot compress to a smaller size. In these cases, participants on slow connections may experience pauses between trials while stimuli finish loading.
The connection speed detected by Gorilla will be different from the connection speed detected by a service like Speedtest. Speedtest measures the maximum theoretical connection speed in ideal conditions. The test Gorilla carries out is a more accurate representation of the participant's connection speed under current conditions.
To limit participation by connection speed, click 'Change Requirements' and toggle on 'Limit By Connection Speed'. Enter the minimum speed you will accept in Mbps:
The screenshots on this page show the new Experiment Builder interface. If you’re still using the classic interface, it will appear slightly different.
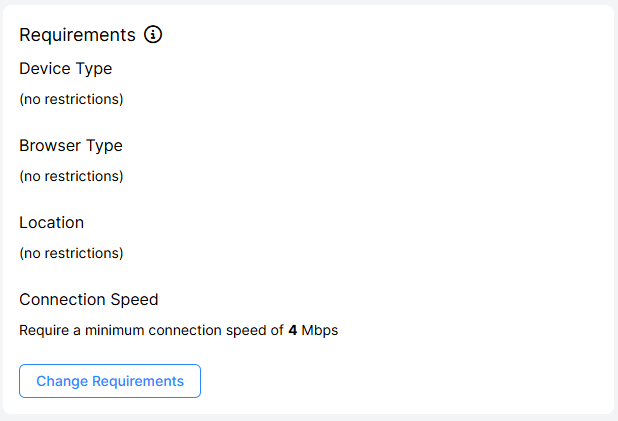
Once you have set a connection speed requirement, it appears in the Requirements section under Connection Speed:
If participants try to access your experiment using an internet connection that is too slow, they will reach a special page explaining this and that they can try again later when their connection speed is better.
Time Limit
The Time Limit setting allows you to automatically reject participants who have not completed your experiment within the time you specify.
It is designed to help you manage participant attrition, rather than act as a precise timing tool (unlike the Section Time Limit component within tasks, for example). Instead, it ensures that participants who abandon your experiment don't block new participants from joining.
For this reason:
- We recommend setting your Time Limit to be far longer than the actual time to complete your experiment. For example, if your experiment typically takes 15 minutes to complete, you might consider setting the Time Limit to 2 hours. This prevents participants who are simply slower than average from being unfairly rejected.
- When using the Time Limit with recruitment services that offer a similar Time Limit, make sure that your Gorilla experiment Time Limit matches the time limit set in the recruitment service.
We do not recommend using Time Limits for longitudinal studies. Participants may take varying amounts of time between sessions of a longitudinal study, making the overall Time Limit extremely hard to estimate. Using a Time Limit in a longitudinal study would likely result in unfairly rejecting participants.
Additionally, depending on ethics and your recruitment service, you will likely still have to pay participants who only complete the first half of your study, so you may wish to make use of their data rather than rejecting them.
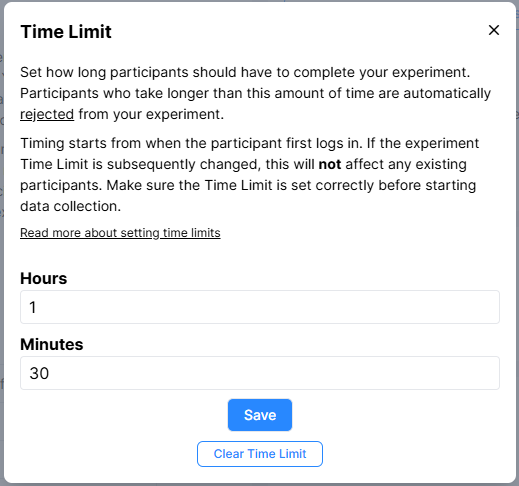
To set a Time Limit for your experiment, click 'Change Time Limit' on your experiment's Recruitment tab. This opens a box where you can enter a time limit in hours and minutes:
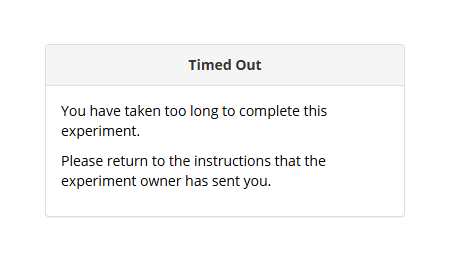
Participants will be automatically rejected when they have been live on the experiment for longer than the time specified in your Time Limit. This rejection will only happen once they move on from their current node. For instance, if the Time Limit expires while the participant is in the middle of a task/questionnaire, they will be rejected when they finish that task/questionnaire and attempt to progress.
When the participant attempts to progress, they will see a Timed Out message: