Task Builder 2 allows you to create behavioural tasks incorporating text, image, video, or audio stimuli, and collect participants' responses in a variety of ways (touch, mouse, keyboard, etc.) You can use prefabricated objects (prefabs), build your own out of fully customisable components, or any combination of the two. There is a very high degree of flexibility on the design of displays which you have complete control over!
Importantly, you do not have to touch a single line of code. The majority of classic behavioural experiments can be built in Task Builder 2.
Browse the list of topics in the menu to see what each part of the tool does, and follow our step-by-step guide to build your first task and learn the tools quickly.
Tasks are part of your experiment that allow you to collect psychological / cognitive data you are interested in.
In Task Builder 2 you create tasks using blocks of trials that can include text image, video or audio stimuli. Participants' response can be collected in a variety of ways, such as keyboard, mouse click, button press and more! The Task Builder automatically records Reaction Time Data.
You are also able to provide feedback to users based on their response accuracy or reaction times during a task.
You can read more about the available components you can use to build your task in our Task Builder 2: Components Guide.
A new Gorilla Task can be created within a Project by scrolling down to Tasks & Questionnaires, clicking 'Create New', and choosing Task Builder 2.
Then, you can enter a name for your new Task and press 'Create'. When choosing a name for your Task, try to make it something unique and memorable - a name you would easily associate with the Task contents.
You will use this name to identify your Task in your project. It is also the name people will see if you collaborate or share your Task with someone, so it's important that they would be able to recognise it easily too!
Once created, you will be directed to the Task Structure view, where you can start building your displays.
You can rename your Task at any time, or add a description, by clicking on the 'Actions' menu and selecting 'Name/Description'. Descriptions are limited to 1000 characters in length.
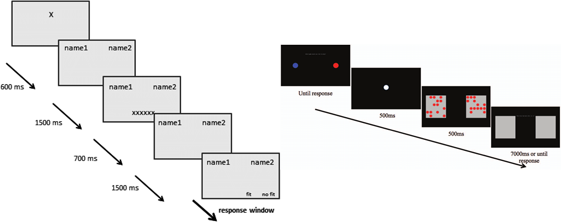
The Displays tab is where you configure all the different screens used in your task. A Display is simply a sequence of screens. A Display can be a single screen (which might suffice for a simple instructions or debrief screen), but more commonly will be several screens in sequence (e.g. Fixation, Stimuli Presentation, Response):

Displays are modelled on the screen sequence diagrams often used in academic papers, so it can be helpful to think of them in the same way:
A good first step when starting to build your task is to break it down into individual displays. The exact breakdown is up to you, but a common approach would be something like Instructions, Practice, Trial, Debrief:
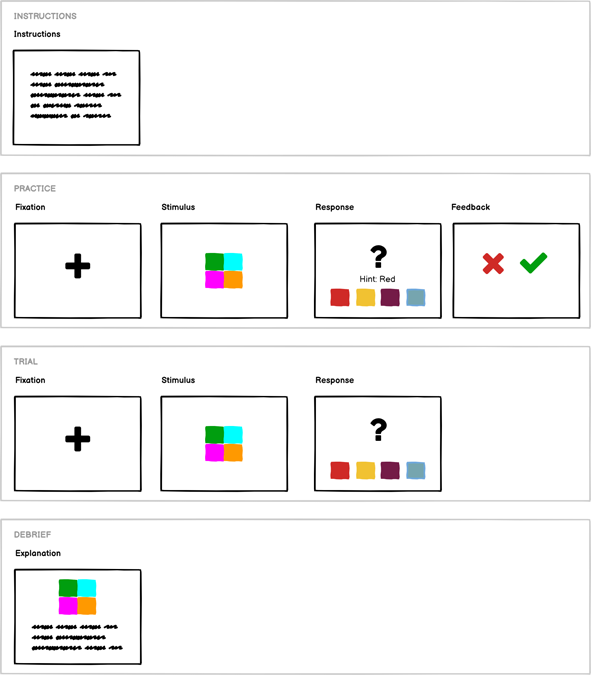
Obviously your real task will have likely have lots of trials, each with different stimuli, but you don't need to worry about that just yet. You just need to design the screen layout that you want to use for your trials. Later, you will use a spreadsheet to control which stimulus is shown for each trial.
It's often helpful to get the basic building blocks of your task in place first, and then come back afterwards and fill in the details - we call this process 'Storyboarding'.
Start by clicking New Display on the right:

Give your display a name, and click OK. You should now see your display with a single screen created for you.
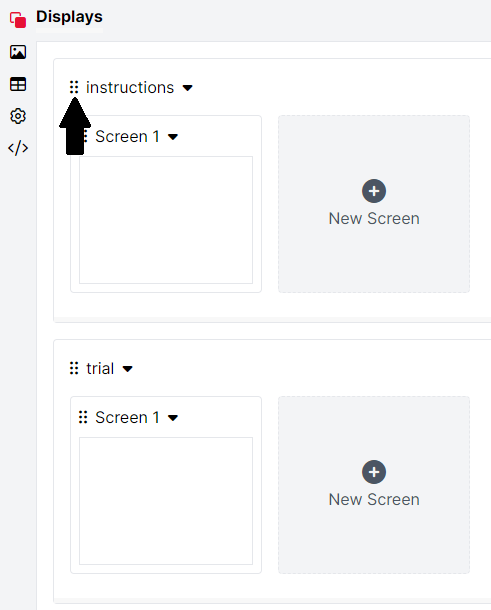
Click and drag the six dots at the top-left of each display to reorder them:
Use the down arrow at the top of your display to rename or remove it:
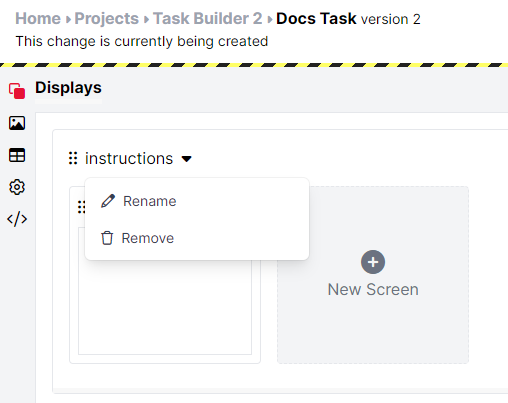
Note that display names are restricted to alphanumeric characters, spaces, dashes (-) and underscores (_) only.
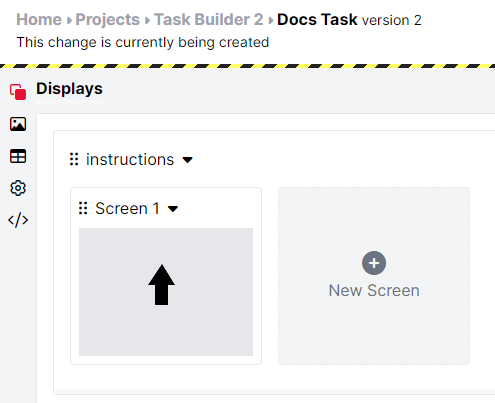
Click on a screen within a display to edit it:
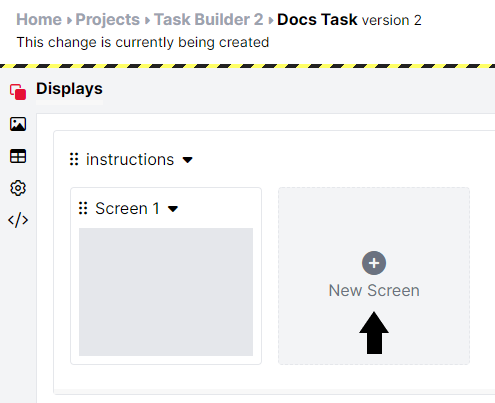
To add more screens to a display, click ' New Screen' to the right of the existing screens:
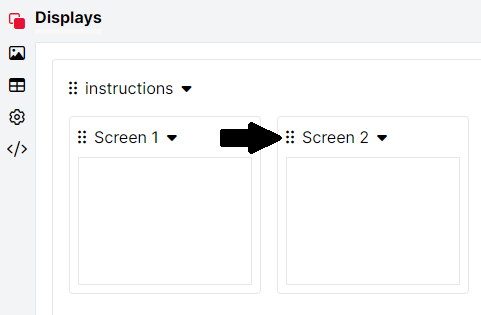
Click and drag the six dots at the top-left of each screen to reorder them:
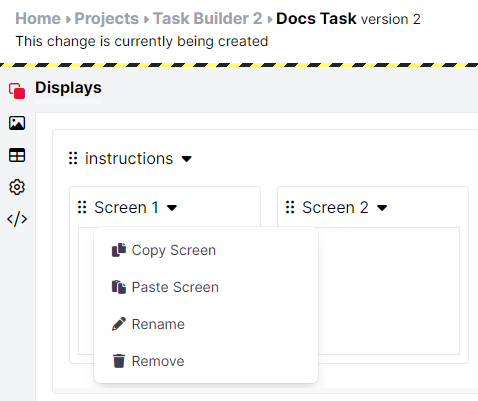
Use the down arrow at the top of each screen to open the screen menu. From here, you can copy, paste, rename, or remove the screen:
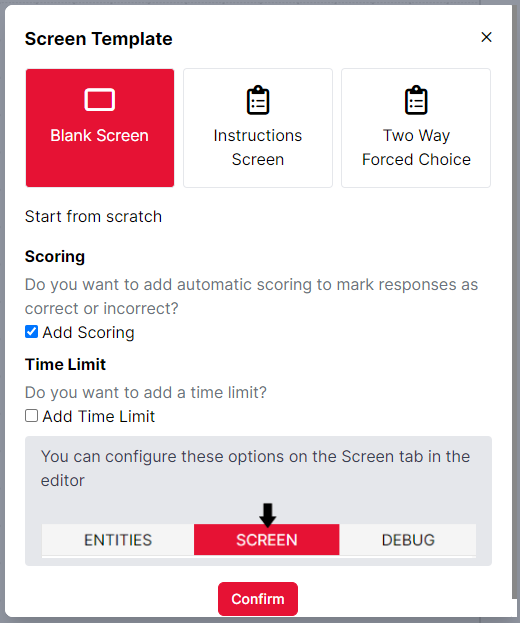
When you first open a screen for editing, you will see a menu prompting you to choose a template or start from a blank screen:
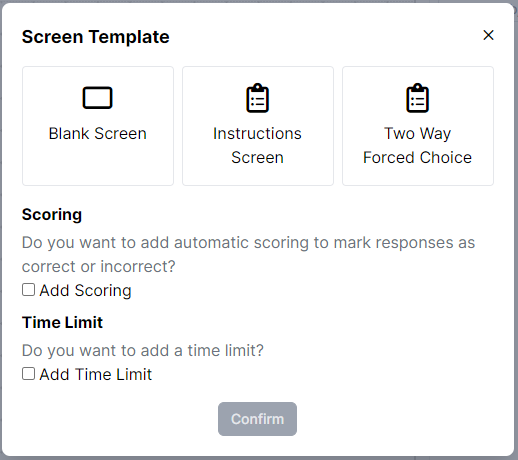
The Instructions Screen template is pre-populated with some text and a continue button. The Two Way Forced Choice template is pre-populated with an image and two text response buttons. You can also choose whether to add scoring and/or a time limit to your screen. If you're not sure yet, you can always add or remove these components later!
Once you select an option and click Confirm, you will be taken to the screen editor. The screen editor is split into three sections:
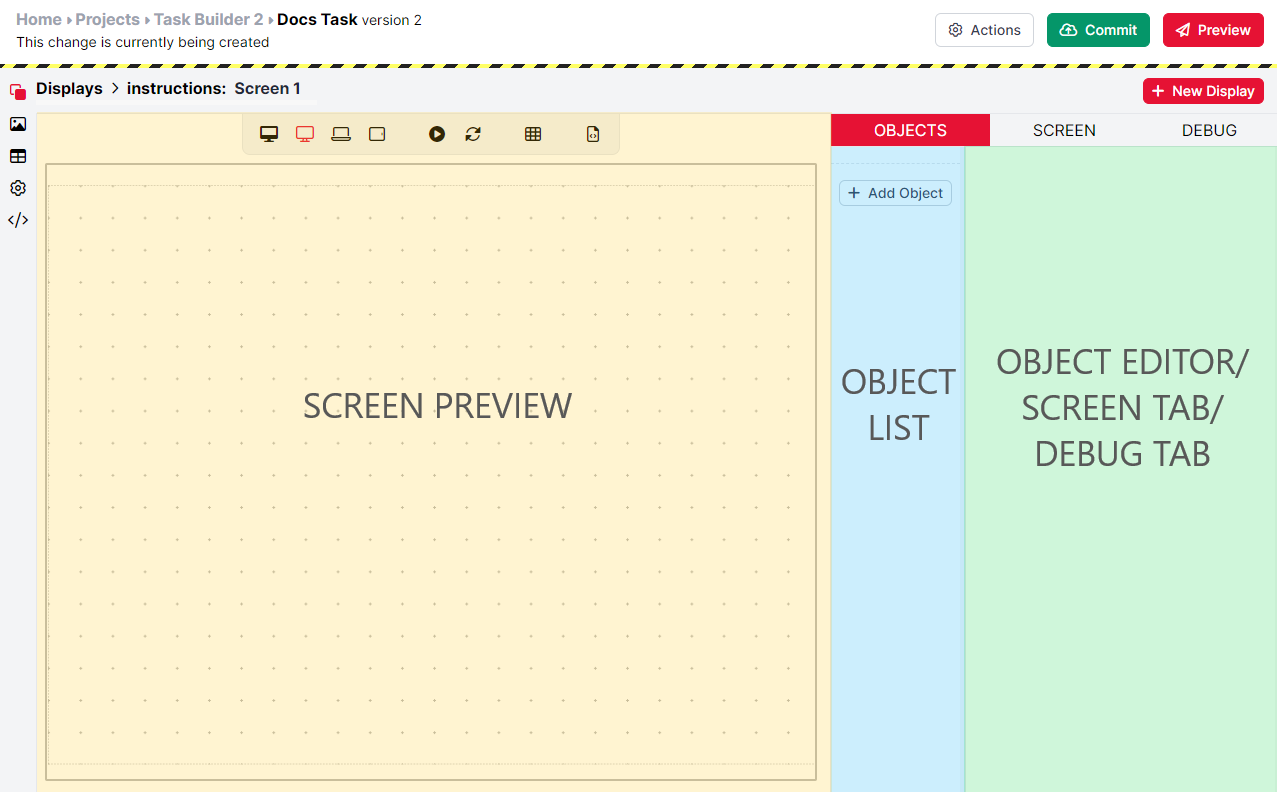
The Screen Preview (the large panel on the left highlighted in yellow) shows you a live preview of your screen.
In the bar across the top, the first four buttons can be used to click between different screen dimensions to see how your screen will look at those resolutions. Hover over each icon to see what device it represents. The in-editor preview tests four 'common' resolutions: Large Montor (1920 x 1080); Small Monitor (1280 x 1024); Laptop (1440 x 900); Tablet (1024 x 768). These are just the common measurements and won't be indicative of all possible devices. The previews can be used as a guide to make sure things will approximately display correctly. Therefore, for most participants, if it looks okay in these previews it should be okay for them. However, you should continue to test and pilot your experiment across different devices and use all of the available screen space when creating your task. You might also want to consider using the Customisation settings to optimise the layout of your task for different devices. For more information, have a look at the Device Preview Tutorial.
The Play and Reload buttons allow you to preview the sequence of events on your screen from start to finish. Press Play to preview the screen, and Reload to start the preview again from the start. Clicking the Play button again will take you back to edit mode, where you can make further changes to your screen.
The Grid button lets you toggle the positioning grid between large, small, and off. For more information on the grid, see our Task Builder 2 Positioning and Layout Guide.
The final button, View Source, allows you to view the underlying code that controls the objects and components on the screen. If you prefer, you can edit the source directly to add or edit objects or components and adjust their settings, instead of using the graphical user interface. The Source also provides an easy way to copy entire Screens from one Task to another: simply click 'View Source' on the screen you want to copy from, select all text in the Source, and copy. Then create a new Screen in the task you want to copy to, click 'View Source' on that screen, and paste. Clicking 'Back to Tools' at the top-left of the Source will return you to the standard view of the Screen Editor.
The Object List (the middle panel highlighted in blue) shows a list of all the objects on your screen. Depending on whether you started with a blank screen or a template, this list will either be empty or will contain some pre-populated objects.
You can reorder objects in the Object List by clicking and dragging them up and down. This controls the front-to-back order in which visual components of objects are displayed on the screen. Objects placed higher in the list will be displayed behind objects placed lower in the list.
The panel on the right highlighted in green has three functions, depending on which tab above it is selected in red: OBJECTS, SCREEN, or DEBUG.
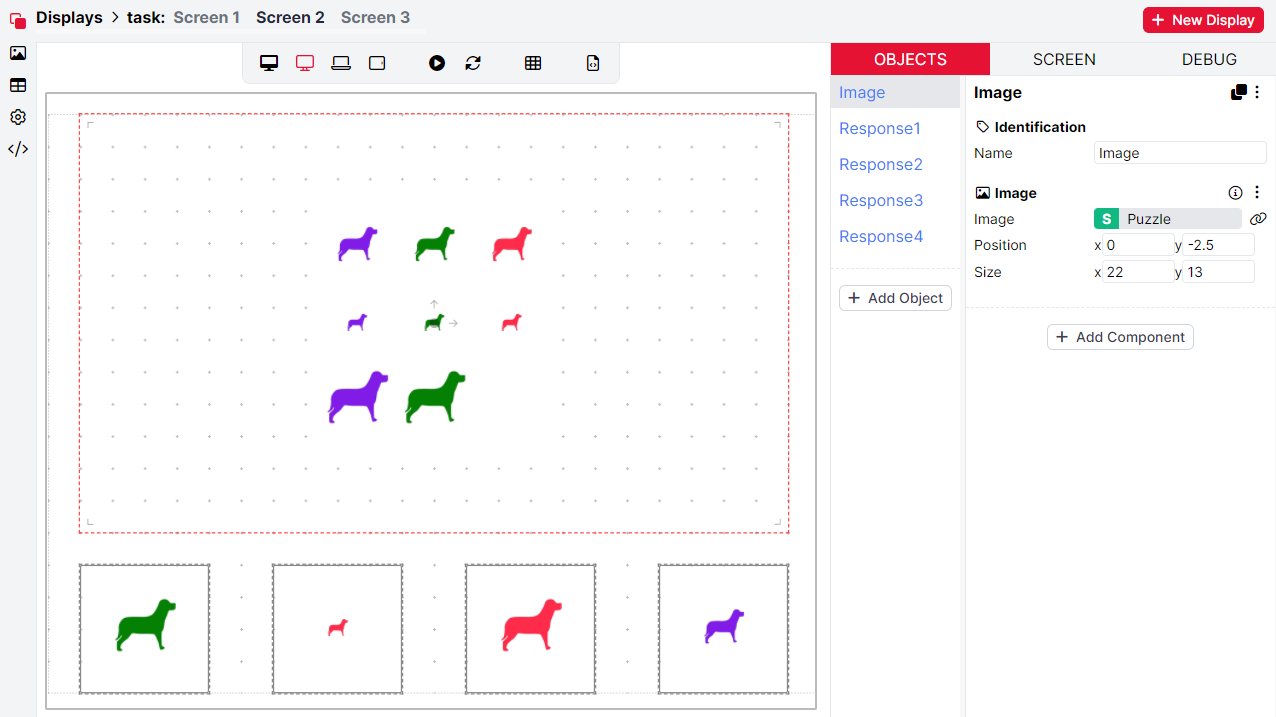
When OBJECTS is selected, this panel functions as the Object Editor. Clicking on an object in the Object List will open its configuration options and components here:
When SCREEN is selected, this panel functions as the Screen Tab. Here, you can add special components to implement things that apply to the entire screen, like adding a timelimit to the screen, accuracy scoring, or saving responses to use later in your task or experiment:
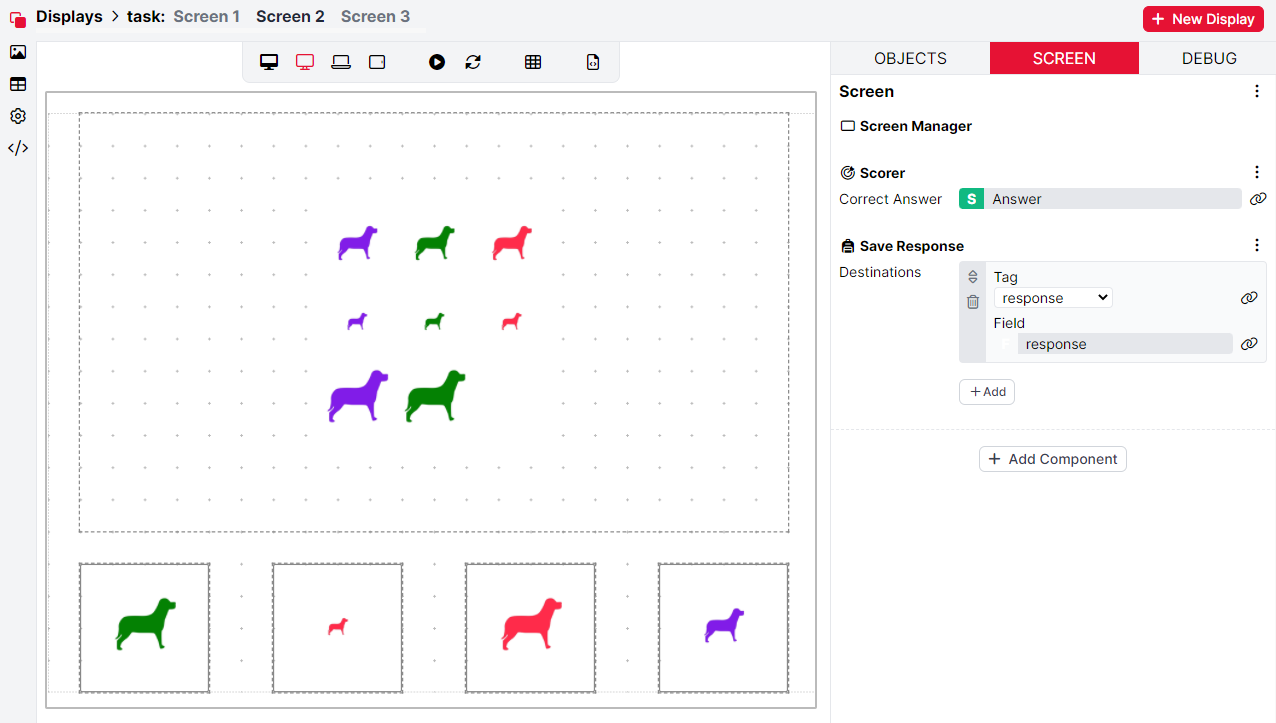
Some screen events happen in a pre-determined order - see our Response Processing Guide for more information. Within those constraints, screen components are executed in top-to-bottom order. You should therefore add your screen components in the order in which you want them to happen during the task.
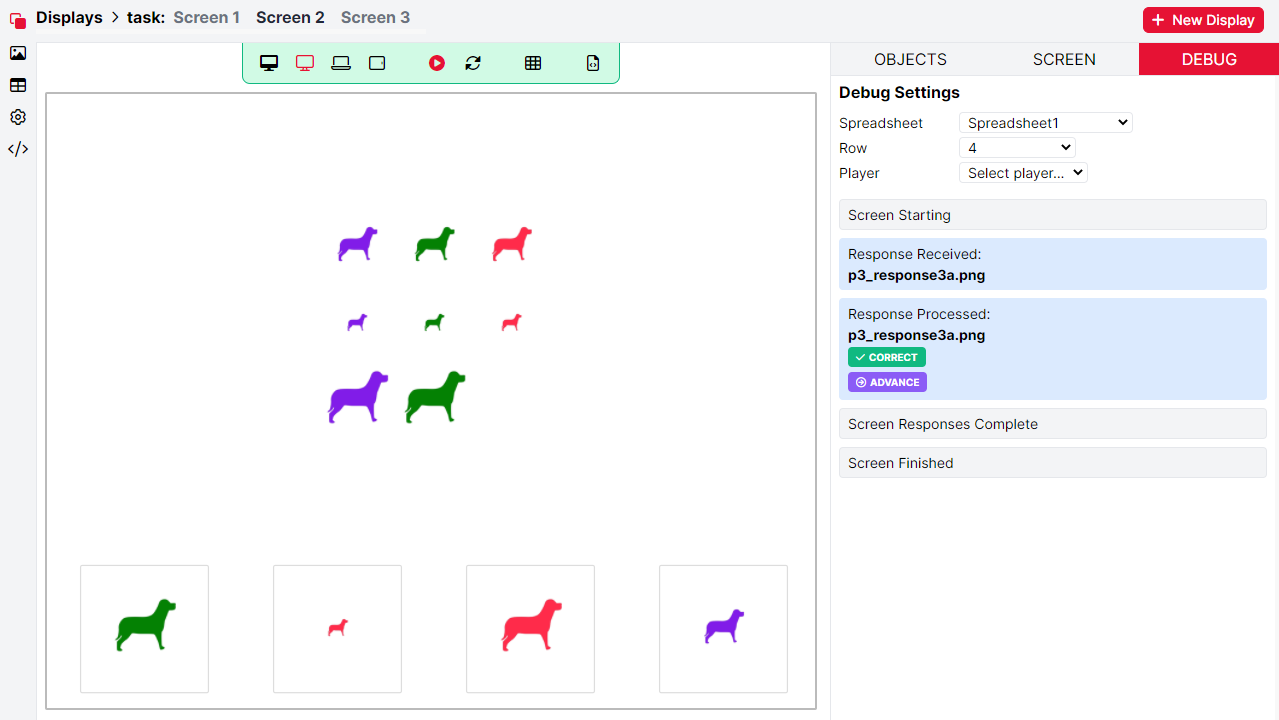
When DEBUG is selected, this panel functions as the Debug Tab. The Debug tab will automatically open when you press the Play button above the Screen Preview. Here, you can select specific trials of your task to show on the screen preview using the dropdown menus. Press Play to preview the sequence of events on your screen (including non-visible events like responses). You can also preview what the screen will show for a given player when using Multiplayer. You can see a video example of using the Debug tab, along with more information about the sequence of events on screens, in our Response Processing Guide.
Find out more about previewing your task in the Preview and Debug section of this guide.
Click the Add Object button to add a new object to your screen:

This will open the Object Builder menu:
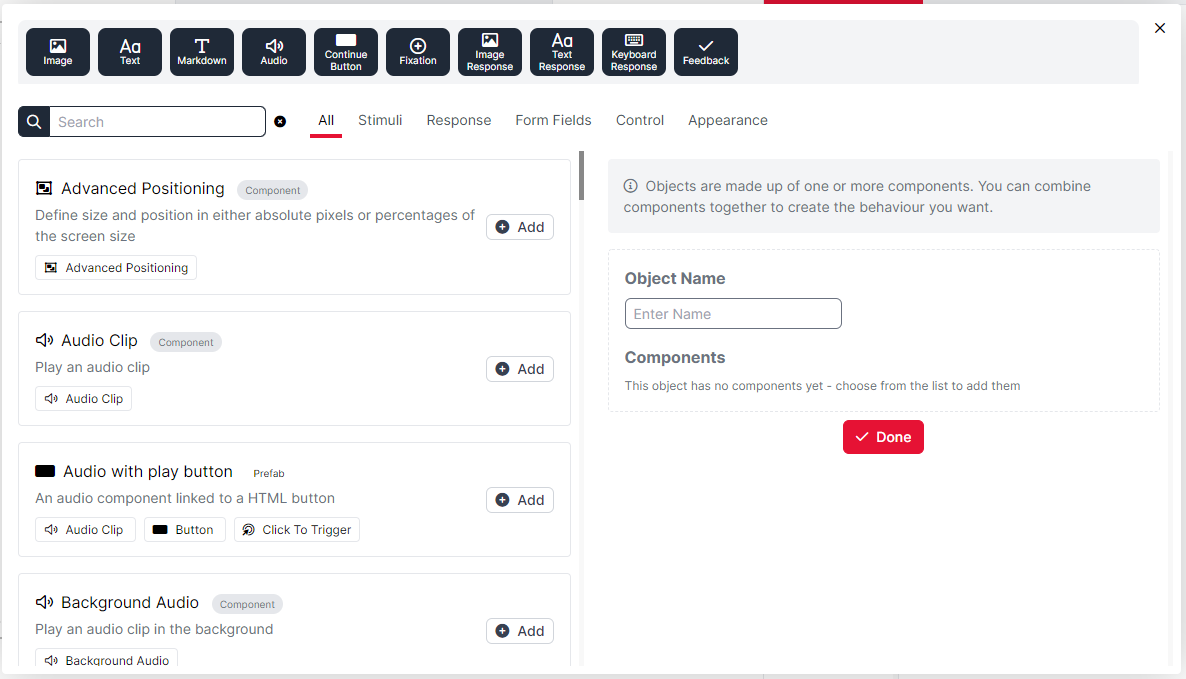
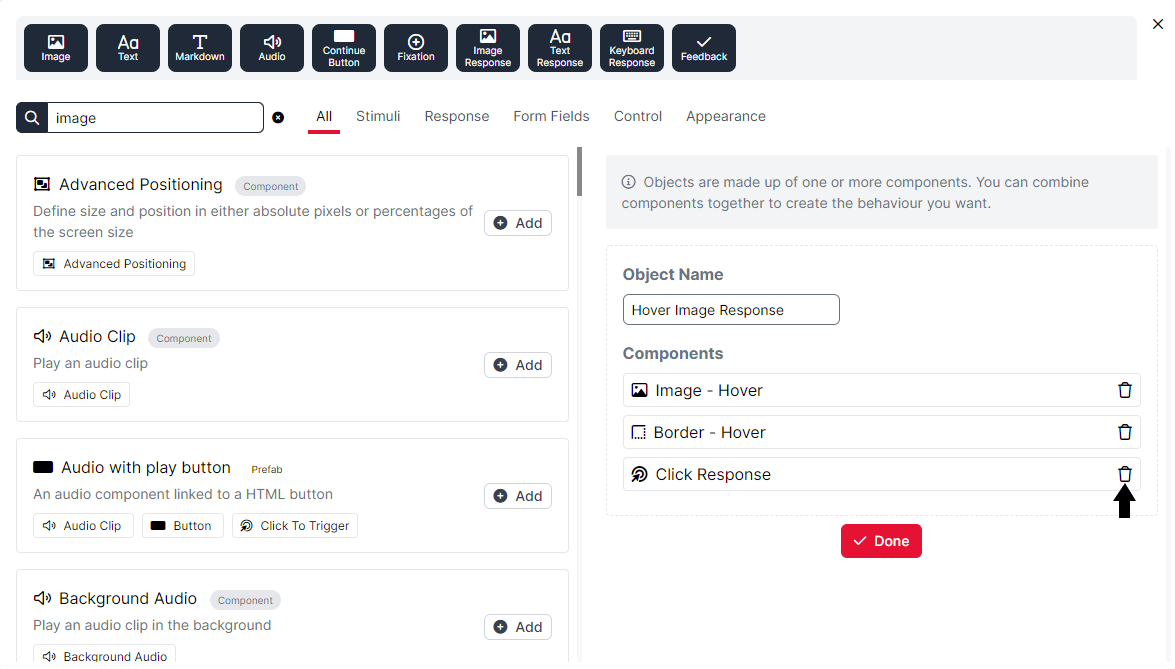
Objects consist of one or more Components. You can combine components together to create the behaviour you want. You can also use Prefabs, such as 'Audio with play button' in the screenshot above. Prefabs are pre-made bundles of 2 or more components that work together to create specific functionality. For example, the Image Response prefab consists of 3 components: Image, Click Response, and Border - Hover. These work together to display an image which produces a response when clicked on, with a border whose colour changes when the image is hovered over. Read more about how the Object-Component System enables greater flexibility when implementing your tasks.
Use the search box on the top left of the Object Builder to search for components and prefabs to add to your object. You can also browse the categories to the right of the search box (Stimuli, Response, etc.) to bring up lists of relevant components and prefabs. Finally, clicking one of the dark buttons at the top of the Object Builder will immediately create an object that fulfils a frequently used function (e.g., Image, Continue Button, Fixation, etc.). For a full list of components and their settings, see the Task Builder 2 Components Guide.
You can combine prefabs and components flexibly to create the functionality you want. For example, you could start with an Image Response prefab, then swap in an Image - Hover component to turn this into an Image Response Button where the image changes when hovered over:
Note: One restriction to combining components is that each object can contain only one visual component (e.g. Image, Button, Text). If you try to add a visual component (or a prefab containing a visual component) to an object that already contains a visual component, the Object Builder will swap in the new visual component and swap out the old one. For example, in the video above, the original Image component is swapped out for the Image - Hover component. If you need to combine multiple visual components (e.g. an Image with some Text), you will have to add these to your screen as separate objects.
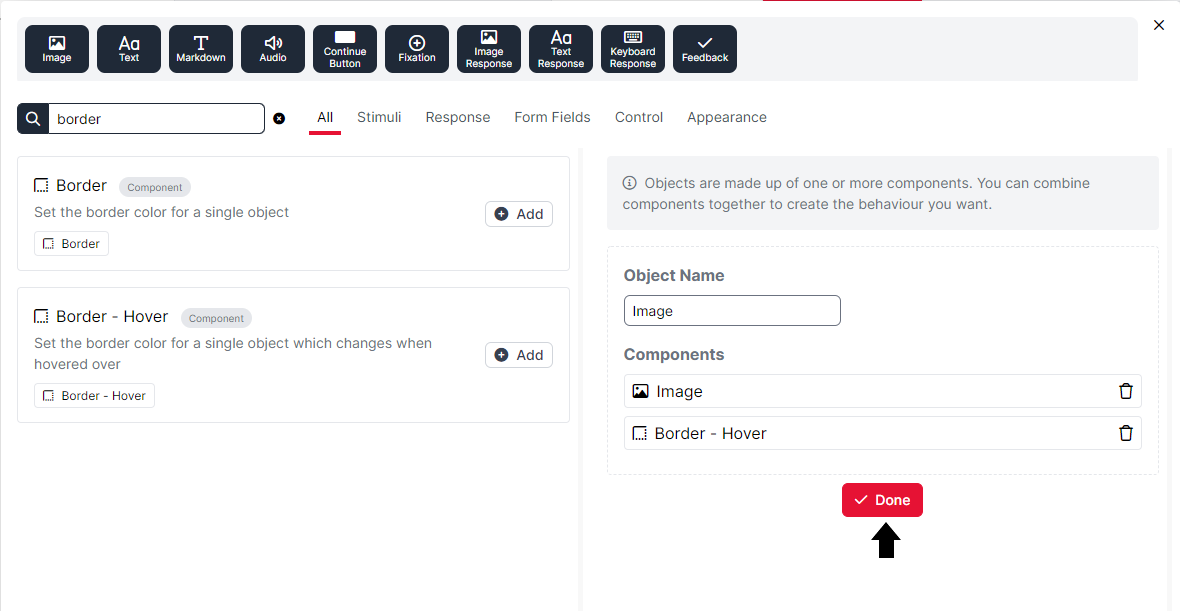
In the Object panel on the right of the Object Builder, you can rename your object using the Object Name field. You can also remove components by clicking the bin icon on the right of each component:
Once you are happy with the object you have built, click 'Done'. This will return you to the Screen Editor. Your new object will now appear in the Object List, and its components and configuration settings will appear in the Object Editor on the right.
Sometimes, the order in which you add different objects to one screen matters. For objects with visual components, their top-to-bottom order determines the back-to-front order in which they will be displayed on the screen. For an example, have a look at the Hotspot component. For Screen components, their top-to-bottom order determines the sequential order in which they will be executed, with components higher in the list being executed earlier (with some constraints - see our Response Processing Guide for more information).
If your object includes a visual component, it will be placed by default in the centre of the screen. You can move it by clicking and dragging, or by changing the x and y Position values under the visual component in the Object Editor. By default, these Position values refer to positions in the grid where the centre is x = 0 and y = 0. To control placement in pixels or percentage of available space, add an Advanced Positioning component. For more information on positioning your objects, see our Task Builder 2 Positioning and Layout Guide.
You can create a copy of an object by clicking the Duplicate button at the top-right of the Object Editor:
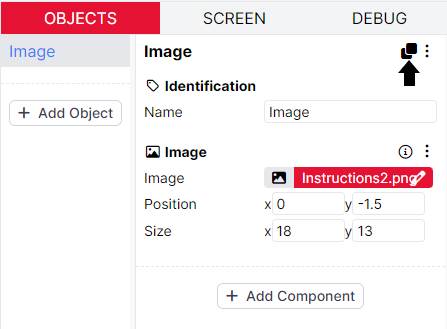
You can also copy and paste an object's properties and components into another existing object by using the three-dots menus in the Object Editor. On the object you want to copy, click the three-dots menu and select 'Copy'. Then click on the object you want to paste into, and select 'Paste' from the three-dots menu. Note that this will overwrite any existing components and settings on that Object.
You can even copy and paste objects across tasks! Simply open each task in a separate tab, use the three-dots menu to copy the object you want to copy, and then paste in the copied object using the three-dots menu on the object you want to replace.
Click on an object in the Object List to configure its components:
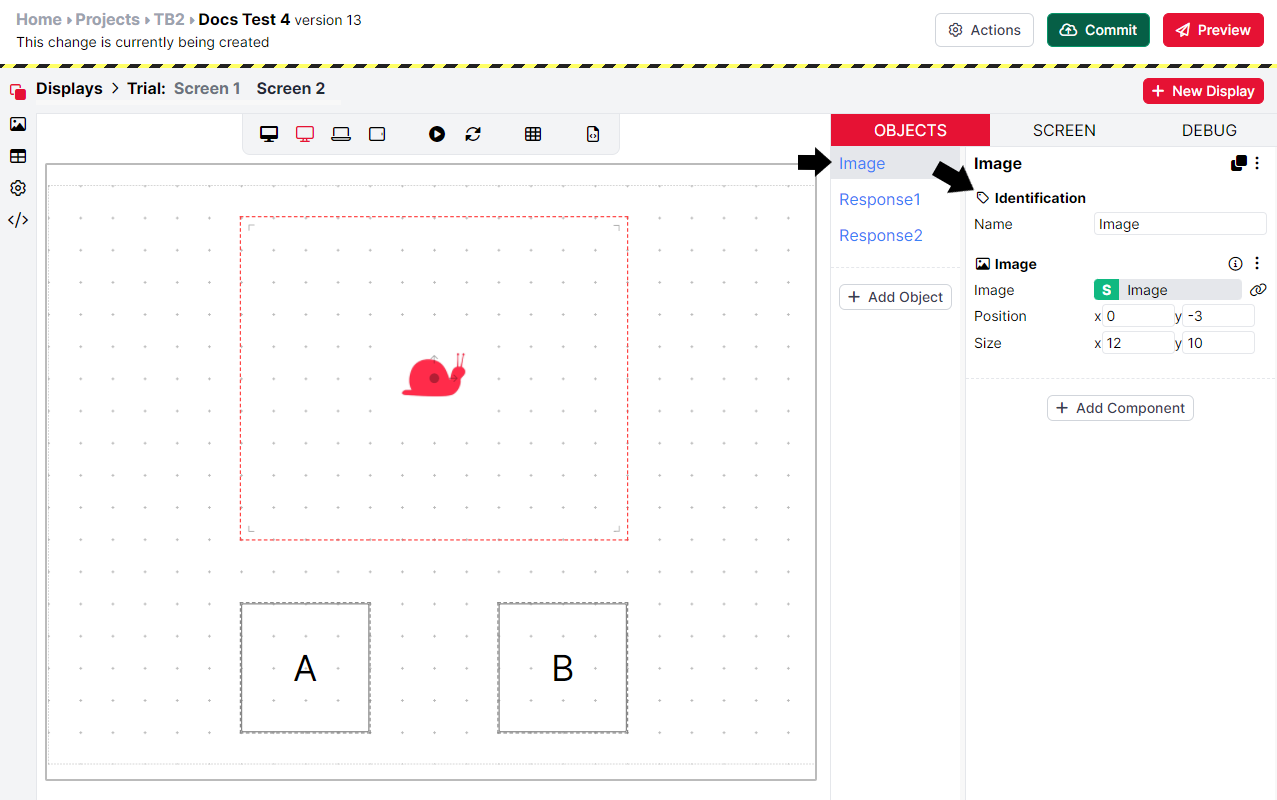
The settings available will depend on the components that the object has. You can find a full list of components and their settings in the Task Builder 2 Components Guide.
Click the Add Component button to add a component to an object:
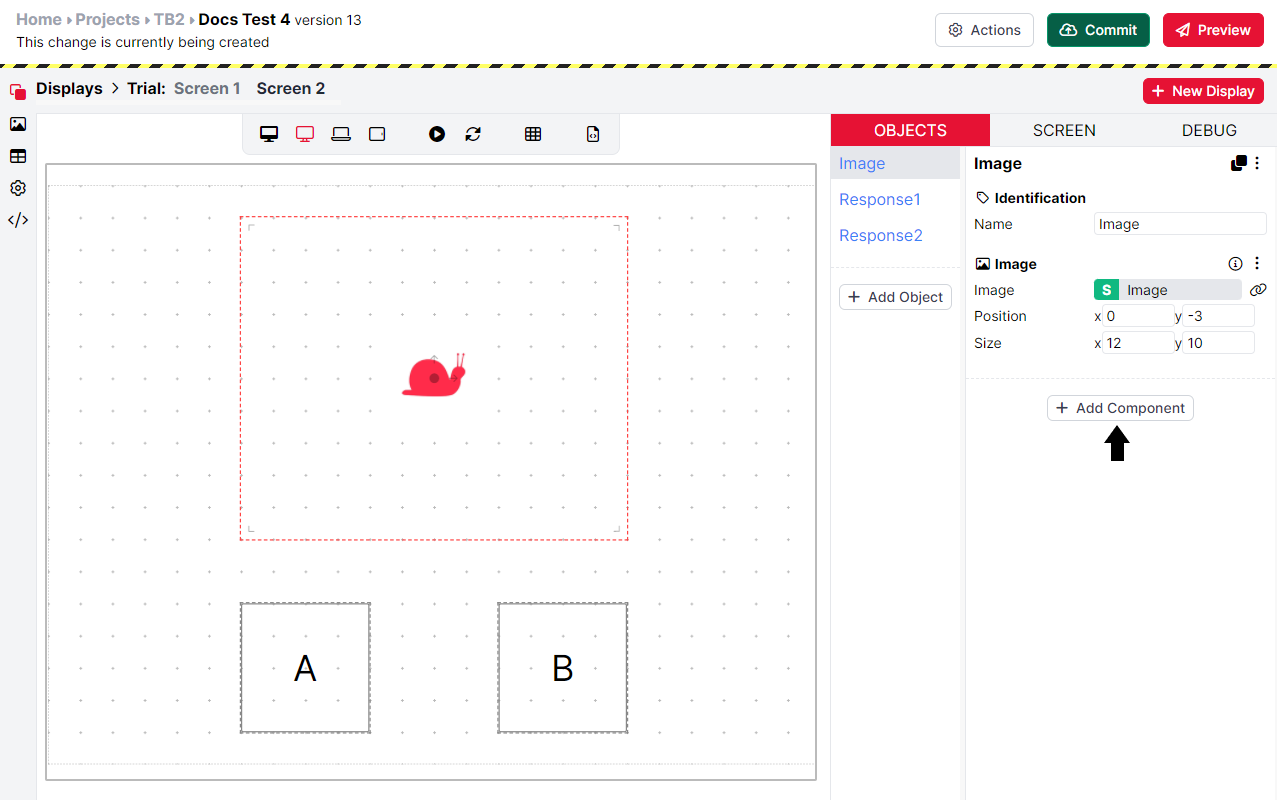
This will reopen the Object Builder. Search or browse for a component, and then click Add to add it to your object. Click Done when you are happy with the component(s) you have added:
To remove a component, go to the three-dots menu at the top right of the component and select 'Remove Component':
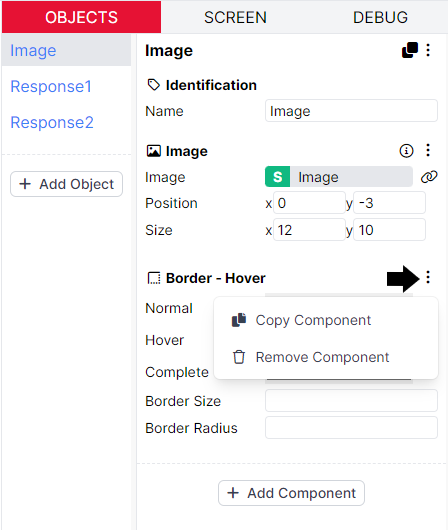
You can also use the three-dots menu to copy a component by selecting 'Copy Component'. Click the object where you want to paste your copied component and select 'Paste' from the three-dots menu at the top of the object:
The exact effect this has will vary depending on the components the object already has. If the object already has a component of the same type (e.g., you are pasting a Markdown Text component into an object that already has a Markdown Text component), then the settings from the pasted component (e.g. text) will overwrite the settings of the existing component. If the object already has a component that is not the same type, but fulfils the same function (e.g., you are pasting an Image component into an object that already has a visual component, such as Text), then the pasted component will replace the existing component. Otherwise, the pasted component will simply be added to the object's list of components, as in the video example above.
In the Object List, drag objects up and down the list to reorder them. This controls the back-to-front display ordering of visual components. Visual components of objects that are lower in the Object List will be displayed in front of visual components of objects that are higher in the Object List:
Similarly, you can drag components within an object up and down to reorder them. This has no effect beyond visually organising your components in an order that makes sense to you.
In Gorilla, the Spreadsheet drives the task. Consequently, you will always need a spreadsheet even for the simplest task.
For a step-by-step walkthrough of how to use the Spreadsheet, try our Spreadsheet Walkthrough!
The order that your displays are shown to participants in is defined in the spreadsheet. Each row represents a time step in the task. One column specifies the display that participants should see, and the remaining columns define the stimuli and other settings that are used in that display. The task will progress through each row in the spreadsheet one after the other until the task is complete.
For example, consider the task storyboard from earlier:

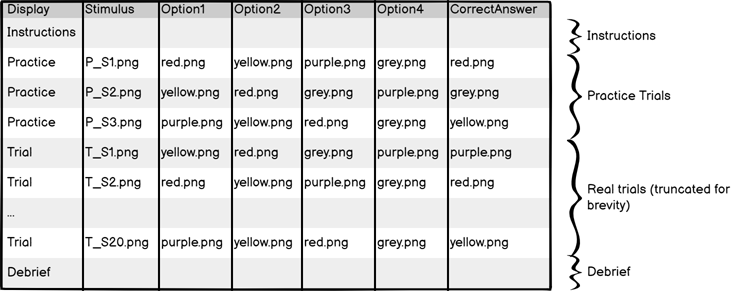
When defining your screens, there are many configuration settings (e.g. which image to display or what the correct answer is) which you can set to be controlled by a specific spreadsheet column. We call this process binding - you bind certain settings to the spreadsheet so that they take their value from the row that we're currently on. You can find more information about how to do this in the Binding to the spreadsheet section.
To create a spreadsheet, click the New Spreadsheet button:

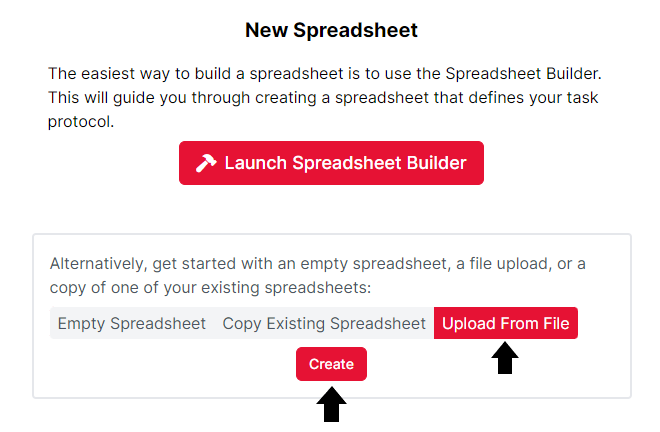
Enter a name and click Create. You will then have the choice of launching the Spreadsheet Builder, or alternatively starting with an empty spreadsheet, a file upload, or copying one of your existing spreadsheets:
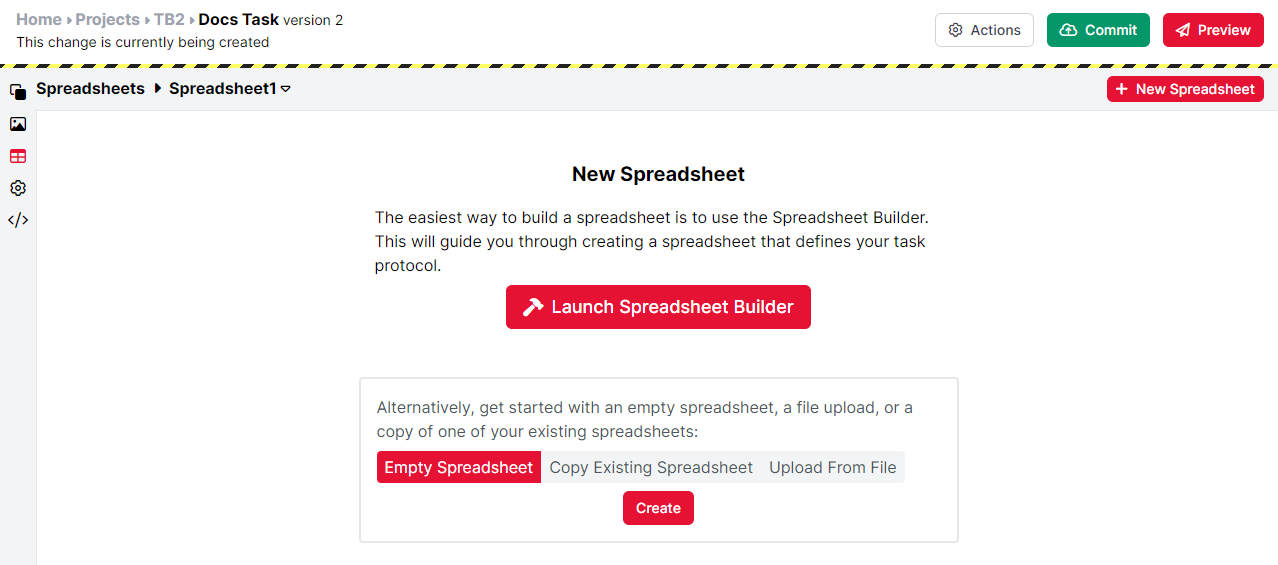
If you create an empty spreadsheet, by default it will contain only a single column, which is the display.
Use the corner menu to reorder existing columns or add a new column. You can also use either this menu or the '+ Add Row' button at the bottom of the spreadsheet to add a new row:
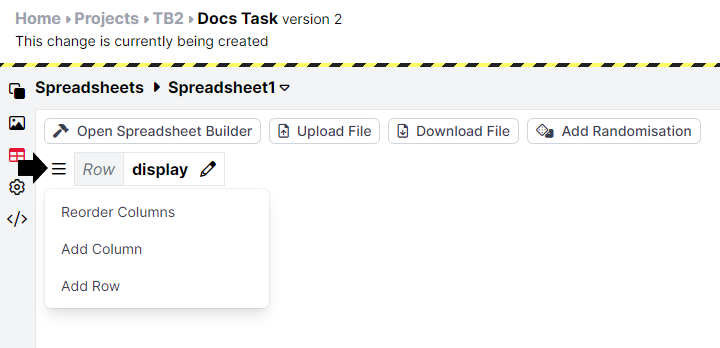
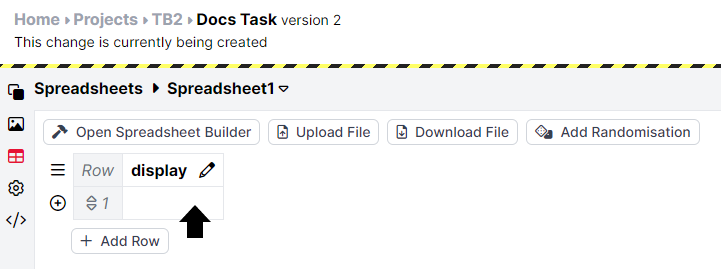
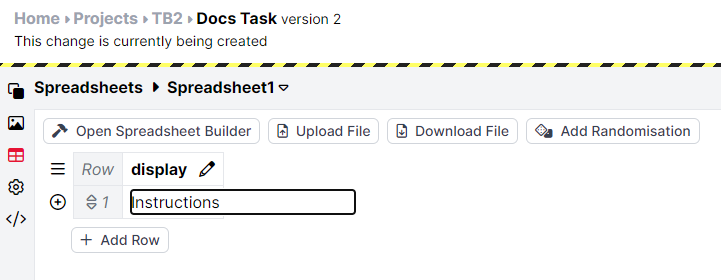
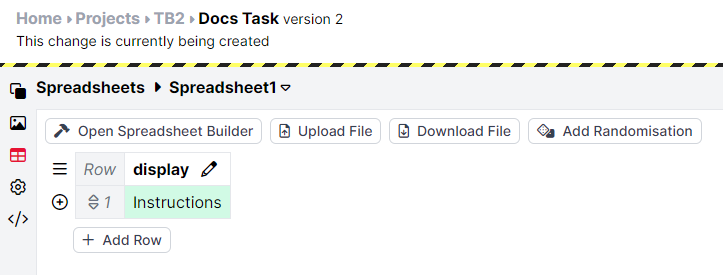
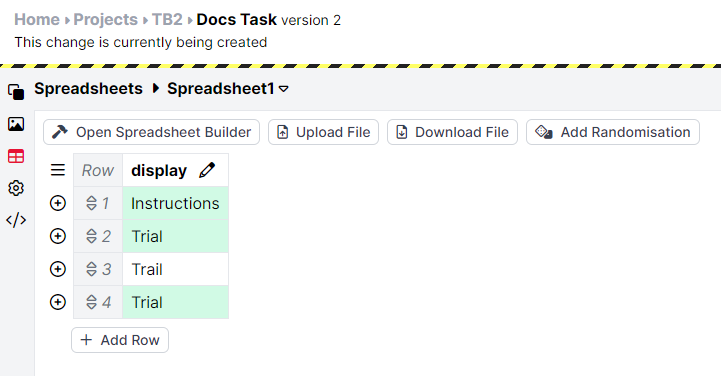
The spreadsheet editor is useful for quick adjustments or fixing individual cells!
For larger-scale edits, you can use the spreadsheet builder to create the basic structure of your spreadsheet. Then, download it and make further edits in your preferred spreadsheet editor (e.g., Excel).
To use the Spreadsheet Builder, click 'Launch Spreadsheet Builder' from the New Spreadsheet screen, or click the 'Open Spreadsheet Builder' button at the top of the spreadsheet tab:
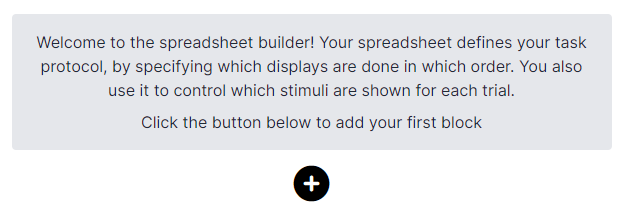
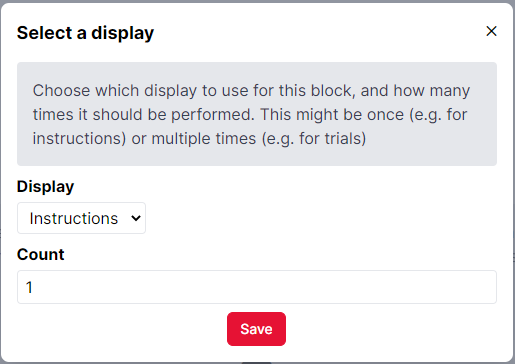
For example, if you want to add a block of 10 trials to your task, you should select the Trial display and enter 10 in the Count box.
If you have already set up binding to the spreadsheet on any screens in this display, the Spreadsheet Builder will detect this and display the relevant rows and columns for you to fill in. In this example, the Trial display includes a screen that binds an Image component to the Stimulus column in the spreadsheet:
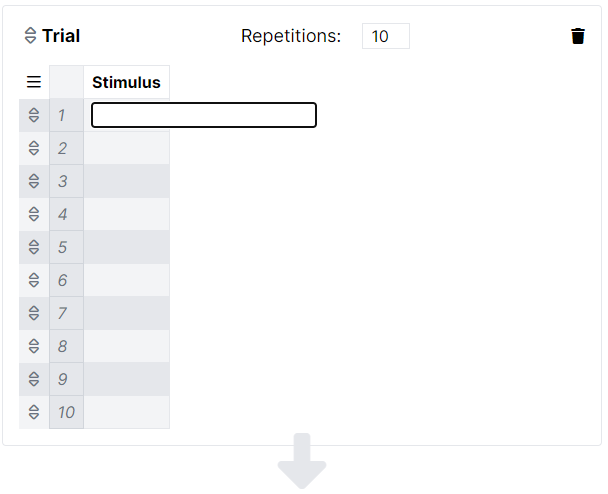
You can either fill in the relevant details here, or finish blocking out your spreadsheet in the Spreadsheet Builder and then download the spreadsheet to fill in offline and re-upload.
Once you have finished adding blocks to your spreadsheet, click 'Done' at the top right.
To upload a pre-made spreadsheet, click 'Upload from File' and then 'Create' from the New Spreadsheet screen:
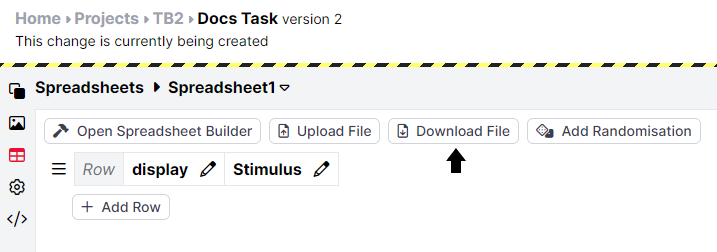
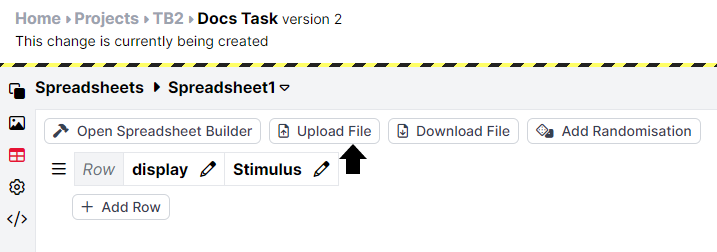
To rename or remove a column in your spreadsheet, click the pencil button in the column header:

To add a column to your spreadsheet, use the corner menu at the top-left of the spreadsheet and select 'Add Column'. A column will automatically be added whenever you bind a setting on one of your screens to the spreadsheet (see binding to the spreadsheet section of this guide). You can also add columns by downloading your spreadsheet, adding the column in Excel or similar, and re-uploading your spreadsheet. This is the best way to add metadata columns, such as information about trial types that is useful for analysis but not required for the functioning of the task itself.
If you want to use Multiple Spreadsheets, you don't need to upload them individually. Instead, you can upload them all at once! Just click the upload button and select all the spreadsheets you want to upload.
Binding to the spreadsheet allows you to change the content presented on a screen on a trial-by-trial basis. For example, if you want participants to complete 20 trials of your task, rather than creating 20 displays or 20 screens within a display, you should only need to create the display once. Then, you can change the content presented in each trial by binding the components to the spreadsheet. Gorilla will display whatever content is listed in the specified spreadsheet column. There is a helpful video to demonstrate this below:
When you set up your Screens, you have the option to bind certain settings - for example, images, text, and correct answers - to the spreadsheet. This means that this information will be populated from the spreadsheet. This is useful for things that you want to vary from trial to trial.
Bindable settings will have a link button - click this to open the binding window:
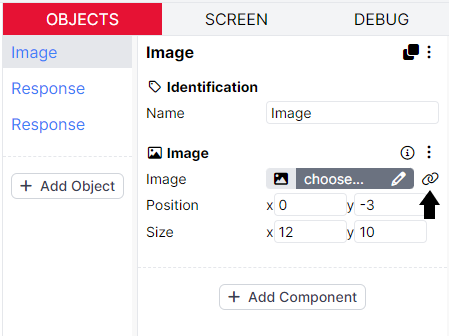
You can bind settings to various different sources, as explained in our Binding Guide, but most of the time you'll be using the spreadsheet. Ensure Spreadsheet is selected at the top of the binding window. Then pick the column you want to bind to. Early on you'll likely be creating new columns, but once created, they'll appear in the dropdown list:
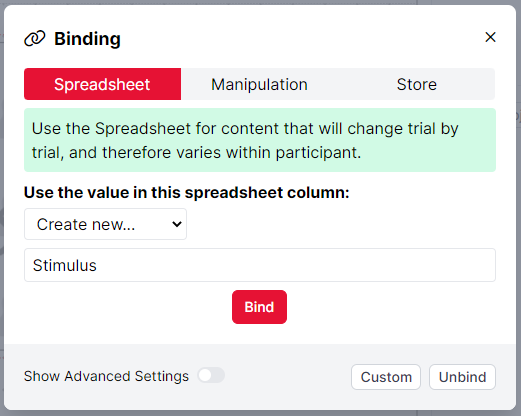
Click Bind to apply the binding. Your setting will change to show that it's now bound - the green S indicates that it is bound to the spreadsheet:
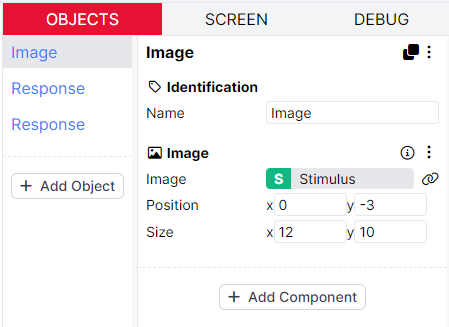
To change your binding, click the link button again. You can then unbind the setting, or change it to be bound to a different value.
Instead of using the binding icon, you can also use the notation ${spreadsheet:myColumn} within a Markdown Text component. You just need to replace 'myColumn' with the relevant name of the spreadsheet column.
Finally, if you go back to the spreadsheet tab, you'll see that your new column now appears:

You would then fill in this column with the appropriate data: for example, filenames of the stimuli that you want your bound component to display on each trial. You can see an example of this at the end of the Stimuli section of this guide.
For more information about binding to the spreadsheet, we have our Binding Guide!
To apply different types of randomisation to your task, you can add spreadsheet randomisation components. You can include as many randomisation components as you wish and combine them for more complex randomisations. For a list of available randomisation components, along with documentation and samples, see the Components Guide.
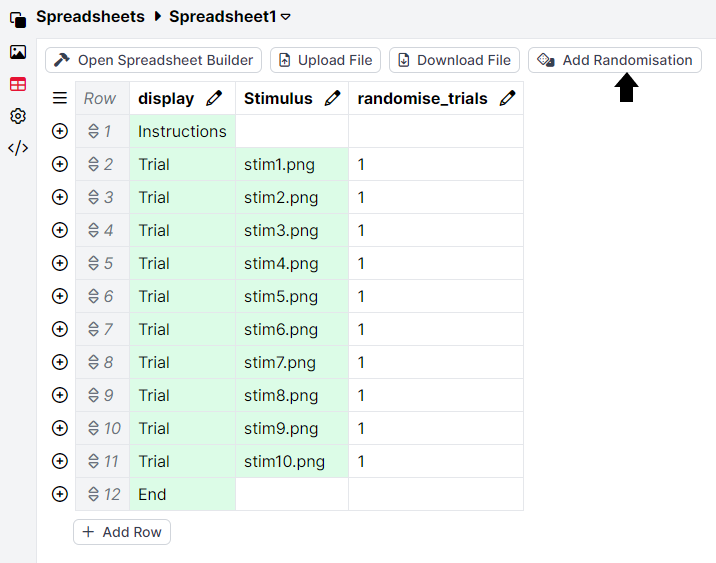
To add randomisation to your spreadsheet, click the 'Add Randomisation' button at the top of the spreadsheet tab:
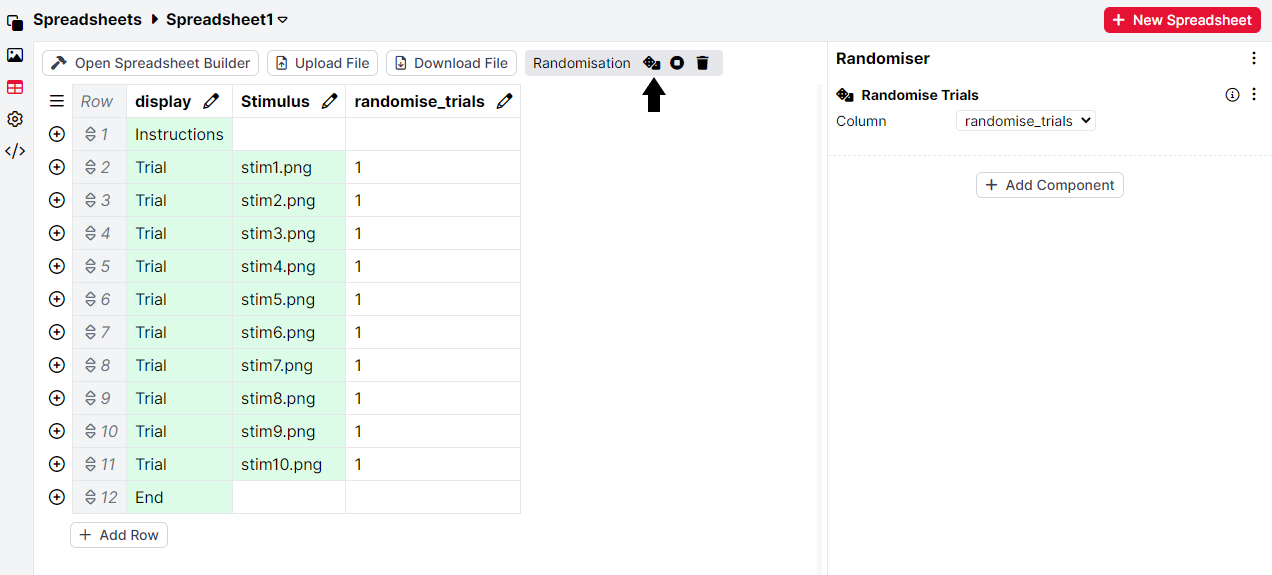
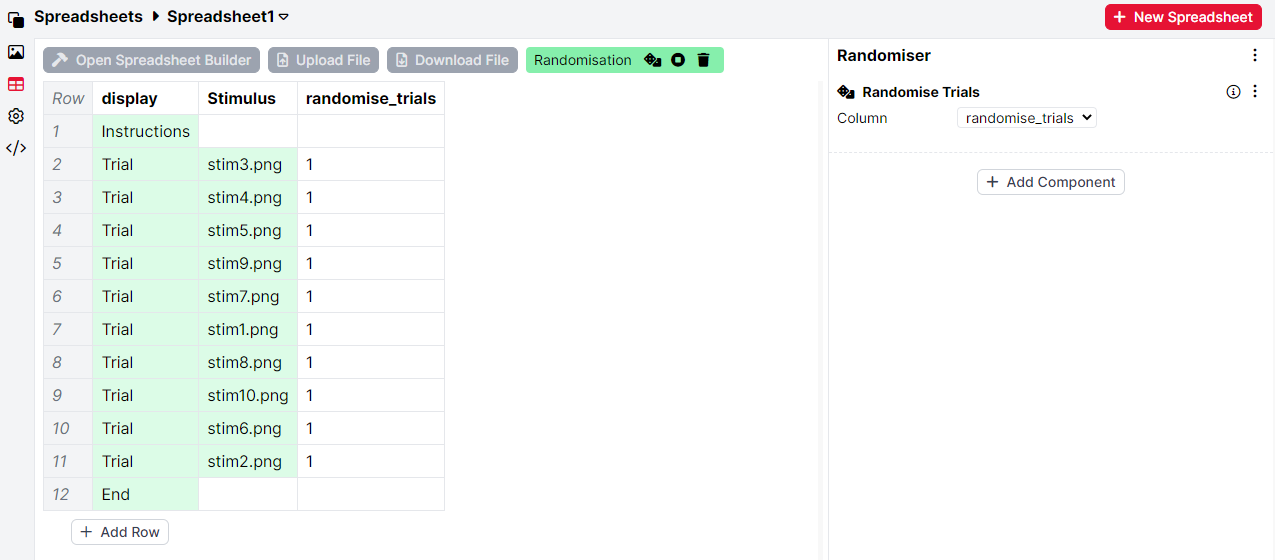
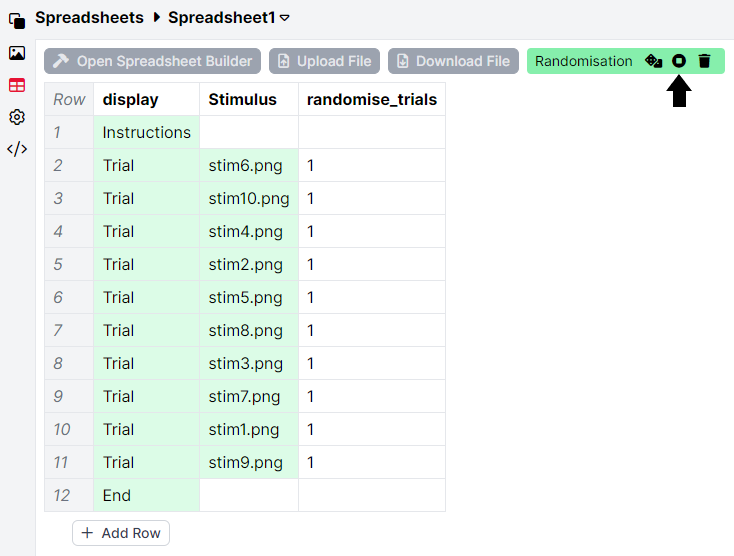
You can view more possible randomised versions by repeatedly clicking the Preview Randomisation button. When you have finished previewing, click the Stop Randomisation Preview button to return to displaying your original spreadsheet:
To copy a randomisation component, click the three-dots menu to the right of the specific component and select Copy Component:
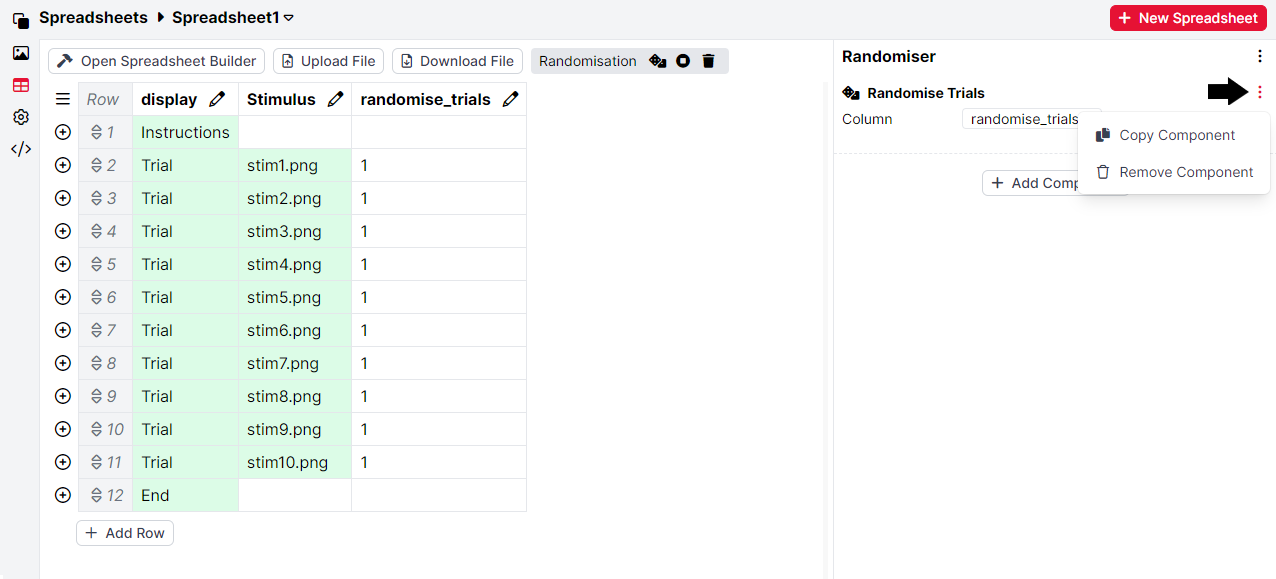
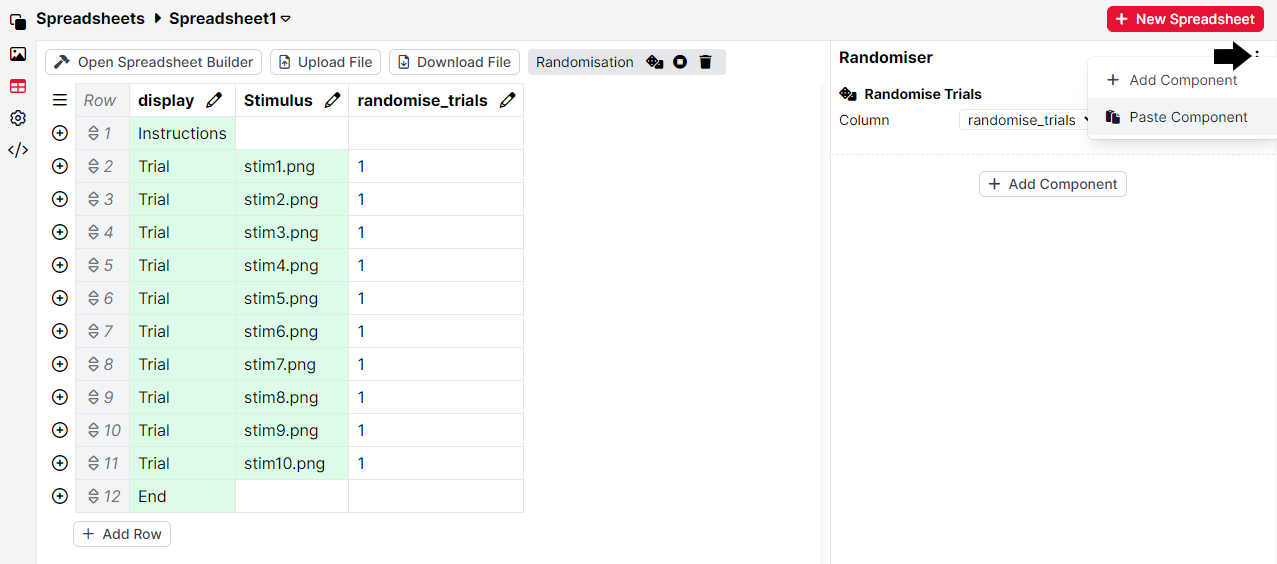
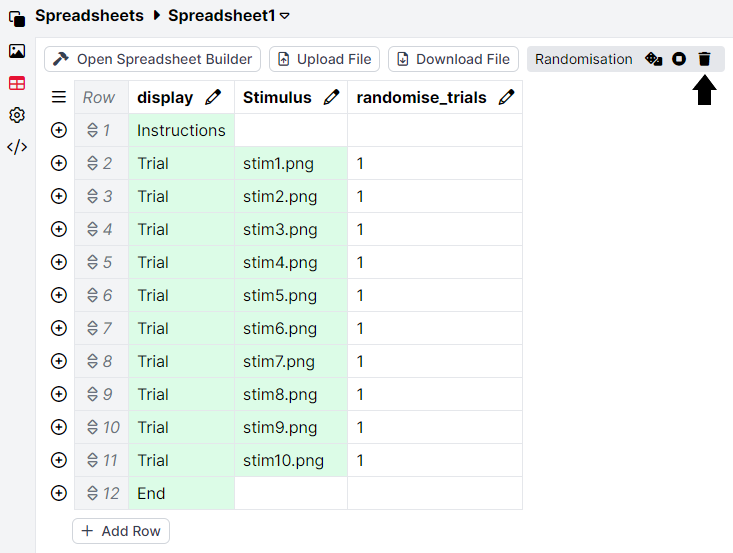
Order matters when you have multiple randomisation components!
Randomisations are applied from the top of the list to the bottom, meaning the component listed first will be applied first. Therefore, when using Randomise Blocks and Randomise Trials, the former should precede the latter.
For a step-by-step walkthrough of types of spreadsheet randomisation, try our Randomisation Walkthrough.
If your spreadsheet randomisation isn't working, check out our Troubleshooting Guide!
The Randomise Trials component will shuffle all the rows in your spreadsheet that share the same value in the selected column.
To set up this type of randomisation, add an extra column to your spreadsheet. Leave this column blank for any rows you do not want to randomise. For the rows you want to randomise, enter matching values in this column.
For example, in the setup below, we selected the "randomise_trials" column in the Randomise Trials component. Then, we entered "1" in the column for the rows we wanted to include in the randomisation.
Clicking the Preview Randomisation button shows one possible randomisation of the spreadsheet under these constraints:

Additionally, the Randomise Trials component can be used when the selected column contains multiple values.
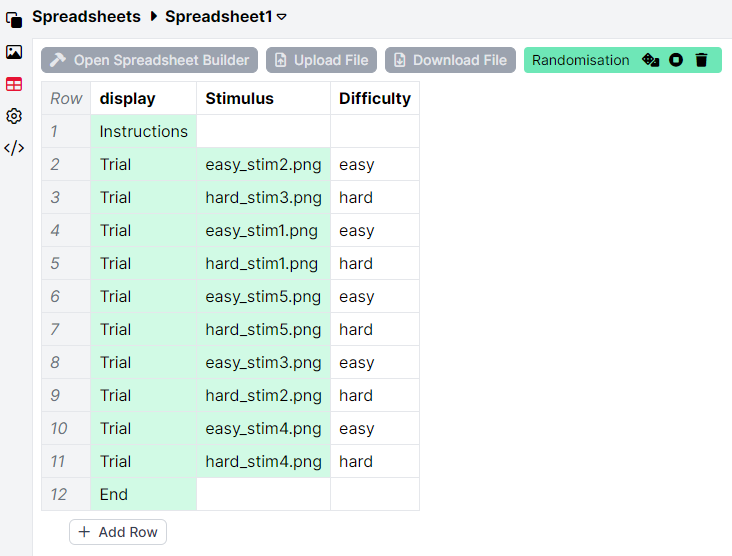
For instance, we want to present participants with alternating easy and hard trials, where Trial 1 is always easy, Trial 2 is always hard, Trial 3 is easy, and so on. However, we want the order of the specific easy and hard trials to be randomised within this alternating presentation.
To set up this type of randomisation, create a column that defines these trial types, entering one value in all rows that belong to easy trials (e.g., 'easy') and a different value in all rows that belong to hard trials (e.g., 'hard'). Then, select this column in the dropdown when you configure your randomisation component.
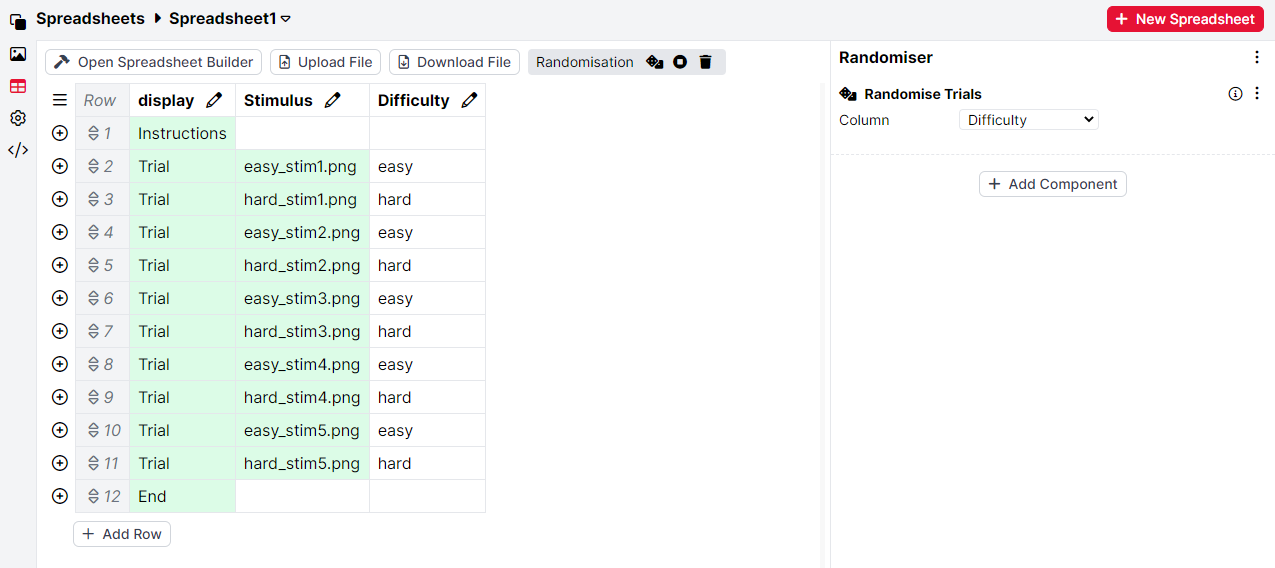
Clicking the Preview Randomisation button shows one possible randomisation of the spreadsheet under these constraints:
You can see an example of using Randomise Trials in the Audio Transcription Task in our Task Builder 2 Samples Project.
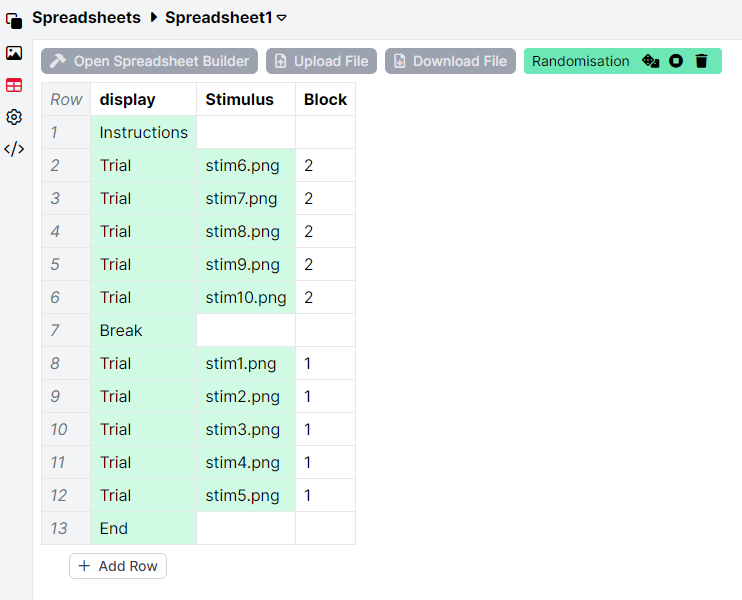
The Randomise Blocks component will randomise the order of trial blocks in your spreadsheet while preserving the order of trials within each block. This component is useful for counterbalancing, ensuring that the same block is not always presented first to participants.
To apply this type of randomisation, you need to create a column that will define your blocks. In this column, fill in the same number for all rows within the same block. Then, when configuring your randomisation component, select this column from the dropdown menu.
For example, fill in a "1" for all rows in Block 1, a "2" for all rows in Block 2, a "3" for all rows in Block 3, etc. Then, select the "Block" column when configuring the component.
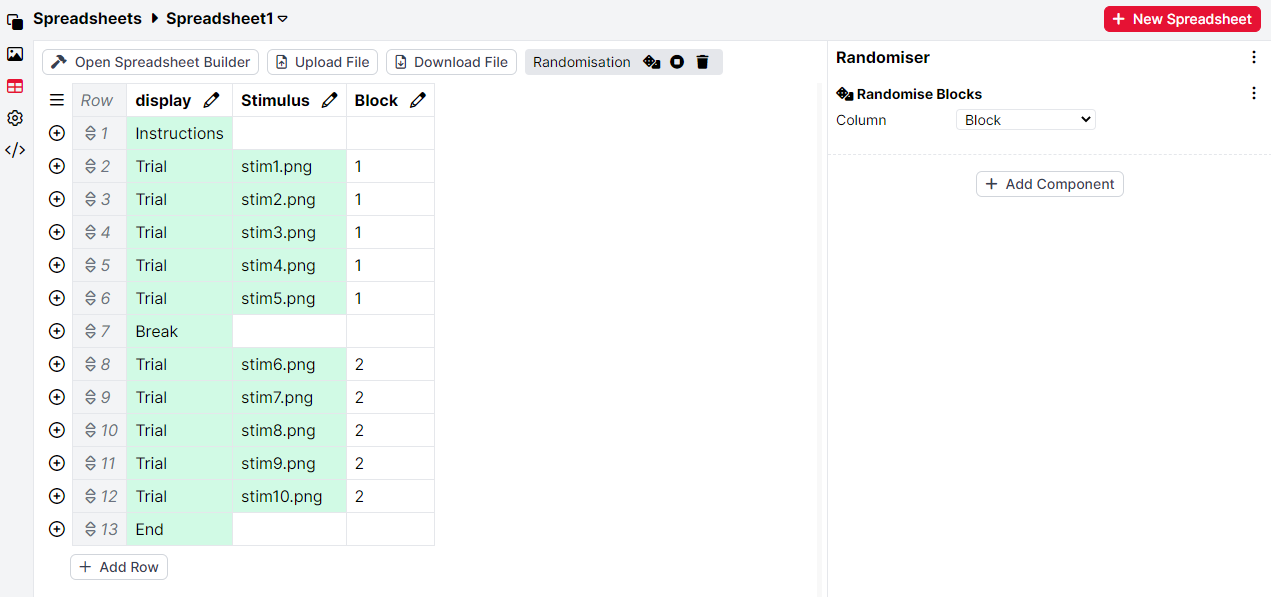
Clicking the Preview Randomisation button shows one possible randomisation of the spreadsheet under these settings:
You can use the Randomise Trials and the Randomise Blocks components to randomise the order of trial blocks in your spreadsheet, and then randomise the order of trials within each block.
To set up this type of randomisation, first, follow up the steps listed above to set up the Randomise Block component.
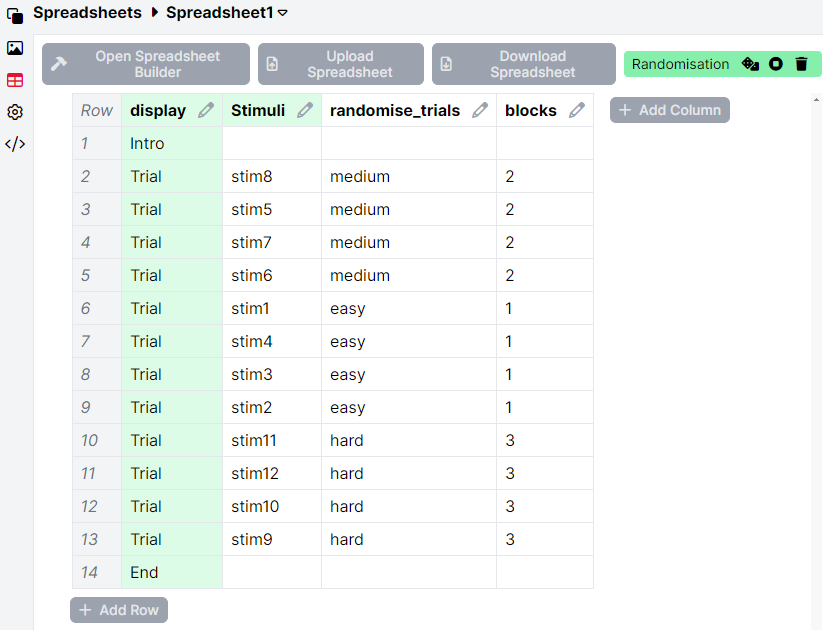
Next, to randomise the trials within each block, create a new column in your spreadsheet (e.g., "randomise_trials"). Leave this column blank for any row you don't want to randomise, such as an instruction row. Then, enter matching values in this column for the rows you want to randomise within each block.
In our example:
Then, add a Randomise Trials component to the Randomiser, and select the "randomise_trials" column in the dropdown.
This way, you will have three randomised blocks with randomised trials within those blocks.
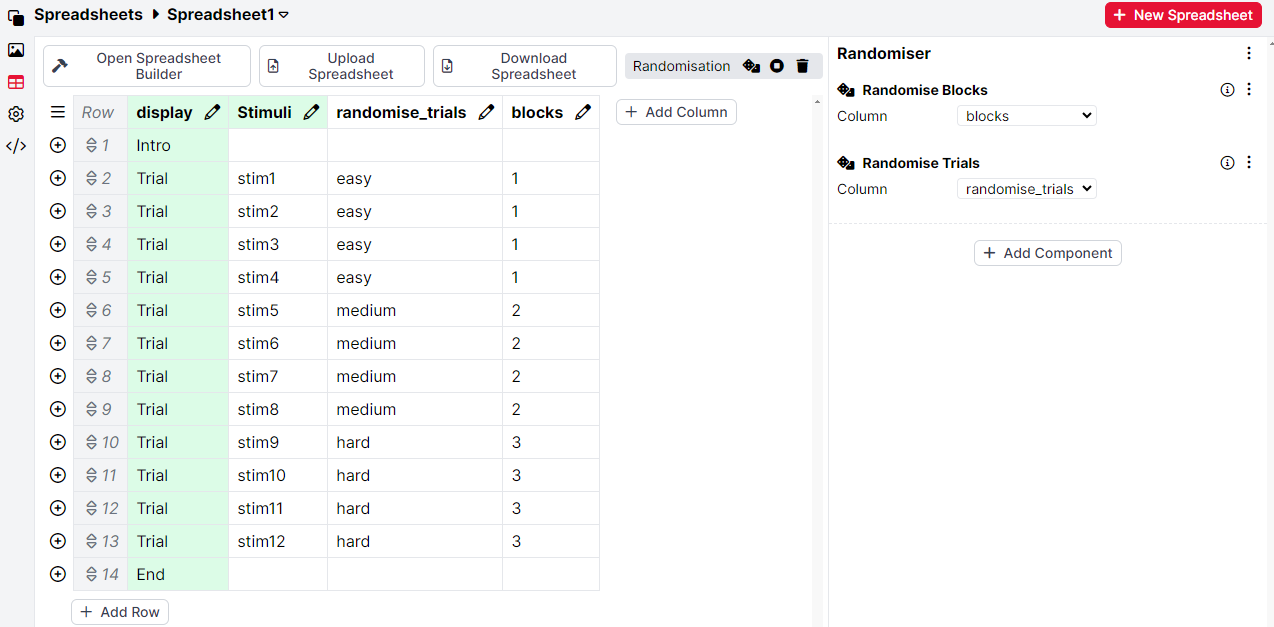
Clicking the Preview Randomisation button shows one possible randomisation of the spreadsheet under these settings:
The Randomise Within Column component will randomise the contents of a single column independently of all other columns.
For example, applying this to the "Stimulus" column will randomise the assignment of stimuli to trials while keeping all other trial information unchanged from the original spreadsheet.

Clicking the Preview Randomisation button shows one possible randomisation of the spreadsheet under these constraints:

You can see an example of using Randomise Within Column in the Picture Superiority Effect task in our Task Builder 2 Samples Project.
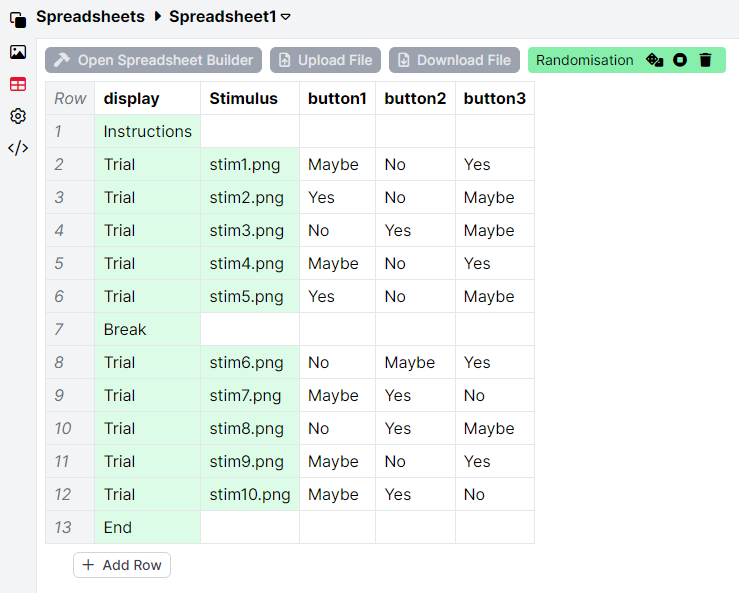
The Randomise Between Columns component will randomise content between two or more columns, on a per-row basis.
For example, if you have three consistent response button options across your trials, but want to randomise the order in which these appear from trial to trial, you could do this using the following setup:
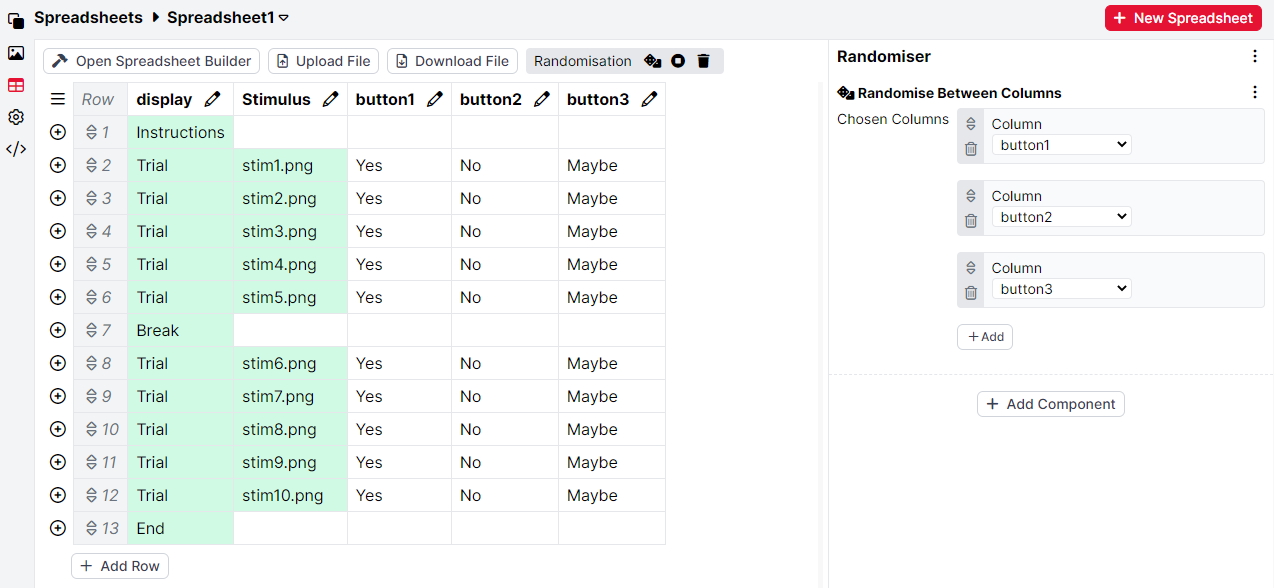
Clicking the Preview Randomisation button shows one possible randomisation of the spreadsheet under these constraints:
If you wish to randomise content between multiple sets of columns, e.g. randomise content between columns A and B, and between columns C and D, then use a variation of this component - Randomise Between Columns (Multi).
You can see an example of using Randomise Between Columns in the 2D Mental Rotation task in our Task Builder 2 Samples Project.
For a step-by-step walkthrough of types of spreadsheet randomisation, try our Randomisation Walkthrough.
If your spreadsheet randomisation isn't working, check out our Troubleshooting Guide!
The Select Randomised Subset component will select a randomised subset of rows in the spreadsheet, based on constraints you define.
For example, imagine your spreadsheet contains a total of 5 easy and 5 hard trials, but you only want to present a random subset of 3 easy and 3 hard trials to each participant.
To do this, you would add two subsets: Column = Difficulty, Value = easy, Number = 3; and Column = Difficult, Value = hard, Number = 3, as shown in the following screenshot:
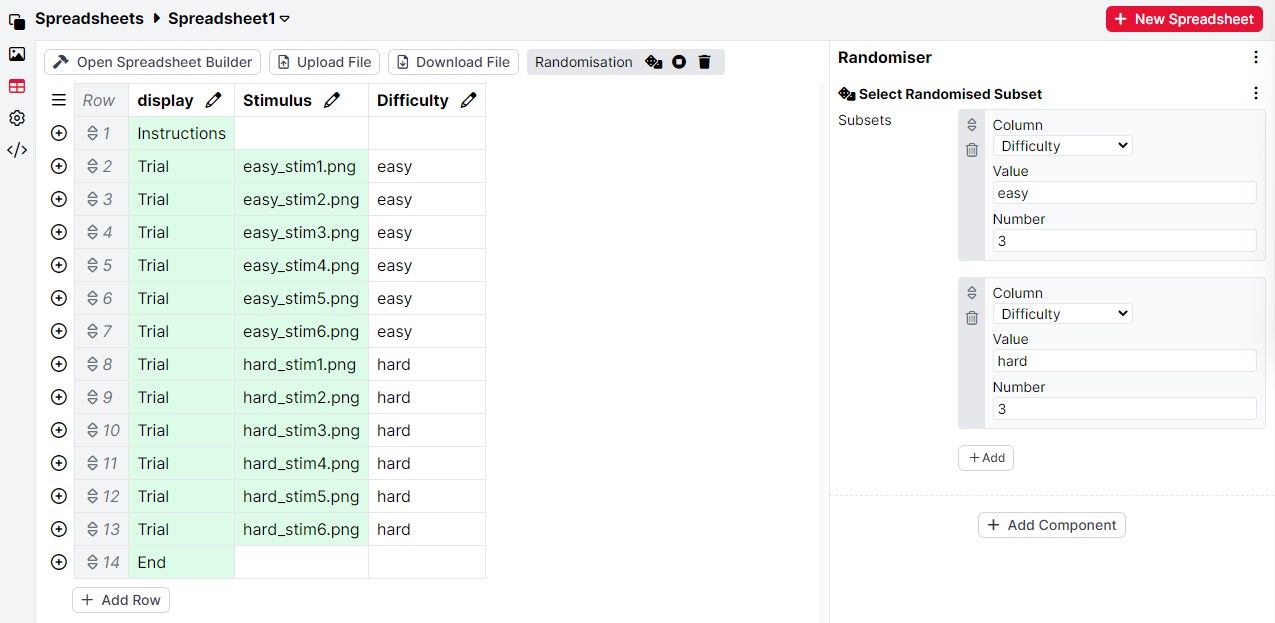
Clicking the Preview Randomisation button shows one possible randomisation of the spreadsheet under these constraints:
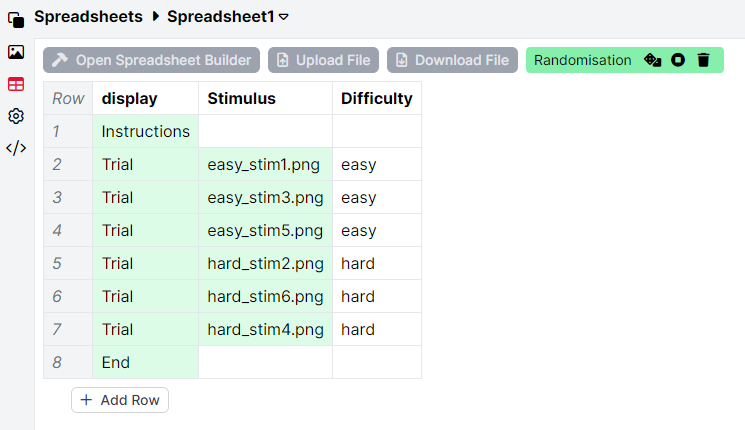
You can see an example of using Select Randomised Subset in the Navon Global Precedence task in our Task Builder 2 Samples Project.
To map or not to map?
The Choose Spreadsheet - Public ID component and the Choose Spreadsheet - Public ID (Map) component both assign specific participants to specific spreadsheets, but they work in different ways. Here's our quick guide to which to use for your study:
In tasks with multiple spreadsheets, the Choose Spreadsheet Public ID component will allow you to assign participants to a spreadsheet based on their Public ID.
This randomisation is designed to work with recruitment policies that allow you to define a set of participant Public IDs, such as Email Shot, Email ID and Supervised.
For example, in the Prisoner's Dilemma task, there are three different spreadsheets that we would like to use.
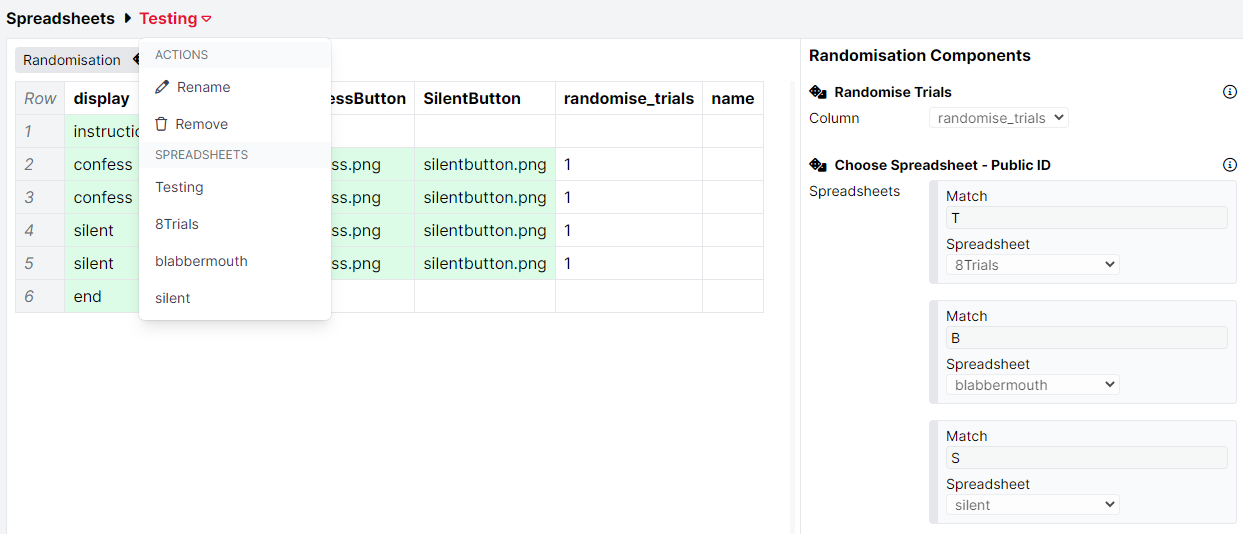
Based on the configuration of the Choose Spreadsheet - Public ID component, any participants with a Public ID that contains a 'T' will be assigned to the 8Trials spreadsheet; participants with Public IDs that contain a 'B' will be assigned to the blabbermouth spreadsheet; public IDs that contain an 'S' will be assigned to the silent spreadsheet.
You can see an example of how this has been set up in the experiment when using Supervised recruitment in the screenshot below:
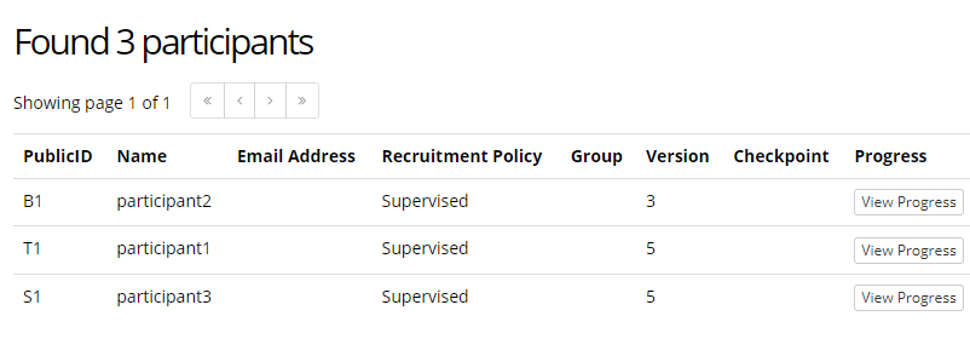
You can see an example of using Choose Spreadsheet - Public ID in the Prisoner's Dilemma task in our Task Builder 2 Samples Project.
To map or not to map?
The Choose Spreadsheet - Public ID component and the Choose Spreadsheet - Public ID (Map) component both assign specific participants to specific spreadsheets, but they work in different ways. Here's our quick guide to which to use for your study:
In tasks with multiple spreadsheets, the Choose Spreadsheet Public ID (Map) component assigns participants to a spreadsheet based on a set of mappings you have provided between participants' Public IDs and the names of spreadsheets in your task.
This randomisation is designed to work with recruitment policies that allow you to define a set of participant Public IDs, such as Email Shot, Email ID and Supervised.
Imagine a task where we have three spreadsheets: a Condition1 spreadsheet, a Condition2 spreadsheet, and a Condition3 spreadsheet. To use the Choose Spreadsheet Public ID (Map) component, we create an additional 'mapping' spreadsheet that contains participant IDs in one column, and the names of the spreadsheets we want to assign in the other:
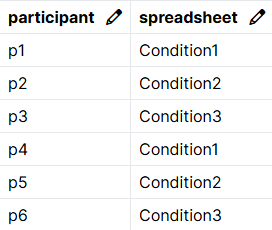
We then upload this mapping spreadsheet to our task and add a Choose Spreadsheet - Public ID (Map) component. From the Mapping Spreadsheet dropdown, select the spreadsheet you want to use as the mapping spreadsheet. From the Participant Column and Spreadsheet Column dropdowns, select the columns in the mapping spreadsheet that contain the participant IDs and the spreadsheet names respectively.

When you add this task to an experiment, participants will now be assigned to the spreadsheet specified in the 'spreadsheet' column in the row that contains their PublicID in the 'participant' column.
The Random Assignment Per Trial component allows you to fill a column or columns in your spreadsheet with values based on probabilities you define.
For example, imagine your task is a game where you want a 25% probability of winning on each trial. You could set this up by adding an assignment set for the game trials that fills in the value 'Win' 25% of the time and 'Lose' 75% of the time.
You can also bind these values and percentages to Manipulations, enabling you to assign participants to different win/lose probabilities at the experiment level.
You can see this setup in the following screenshot:
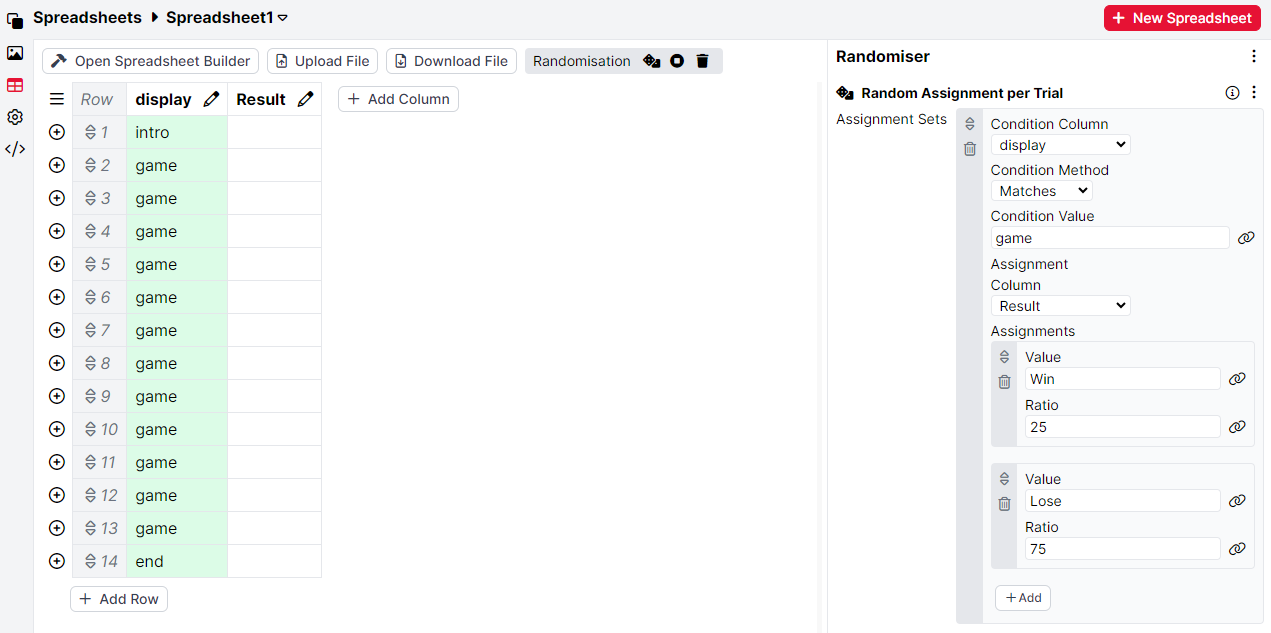
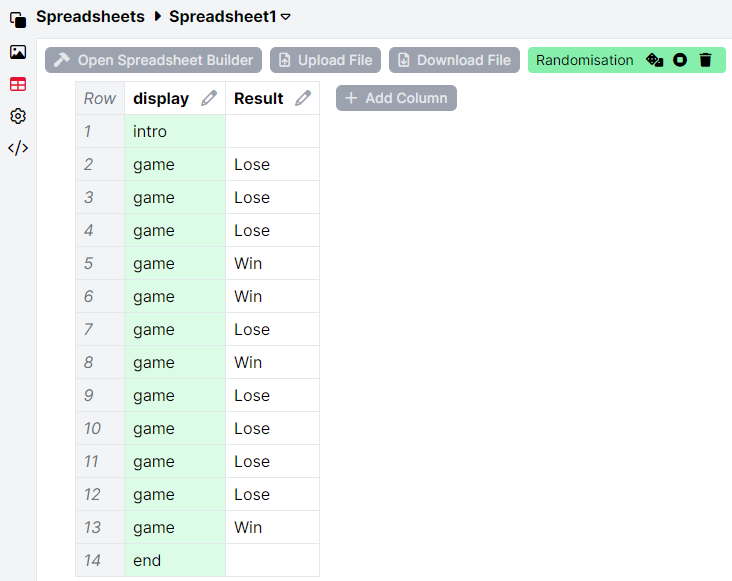
Clicking the Preview Randomisation button shows one possible version of the spreadsheet under these constraints. The exact number of Win versus Lose trials is probabilistic and will vary between participants - for example, in the screenshot below, there are 2 Win trials and 10 Lose trials. If you need an exact number of Win versus Lose trials, use the Randomise Within Column component instead.
You can see an example of using Random Assignment Per Trial in the Utility task in our Task Builder 2 Samples Project.
You can add as many spreadsheets to your task as needed.
To add a new spreadsheet, click the 'New Spreadsheet' button at the top-right of the spreadsheet tab. Enter a name for your new spreadsheet, and click Create. You can then launch the Spreadsheet Builder, start with an empty spreadsheet, copy an existing spreadsheet, or upload a file.
If you're using multiple spreadsheets, you don't need to upload them individually. Instead, you can upload them all at once! Just click the upload button and select all the spreadsheets you want to upload.
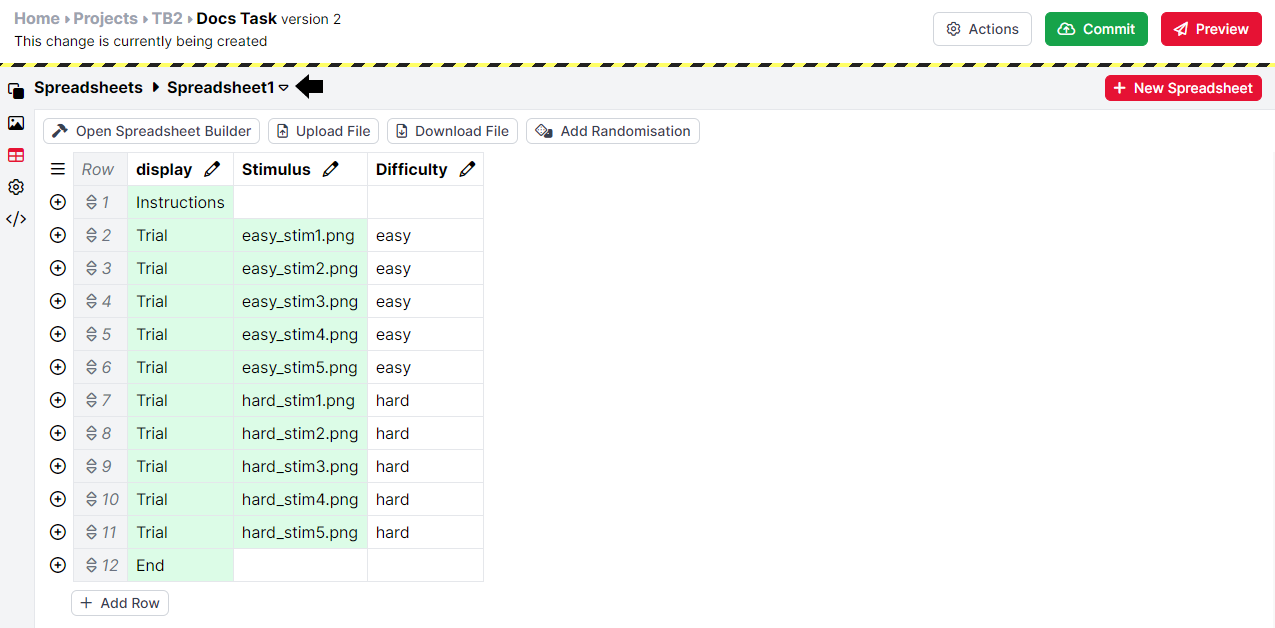
The name of the spreadsheet you are currently viewing is displayed at the top of the Spreadsheets tab:
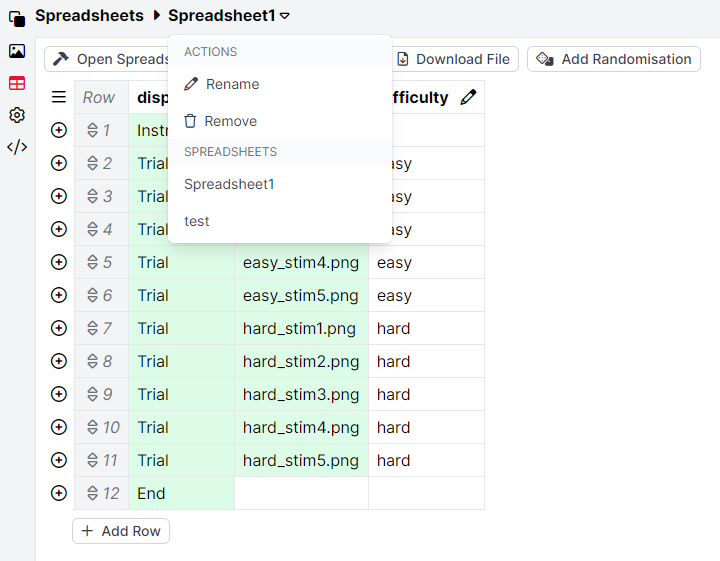
You can also use this menu to rename or remove the spreadsheet you are currently viewing.
When you preview your task, you can select which spreadsheet you want to use. Simply click Preview at the top-right of the Task Builder 2 window and select the spreadsheet you want to use from the dropdown menu:
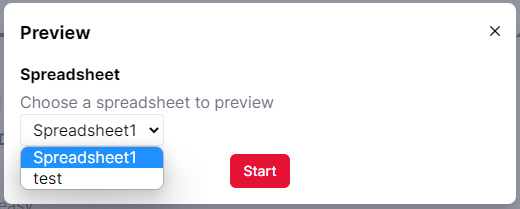
For more information on cases where you might want to use multiple spreadsheets, see our Task Builder 1 page on multiple spreadsheets.
When you add a Task node to ane experiment, you can select which spreadsheet should be used from the Spreadsheet dropdown:
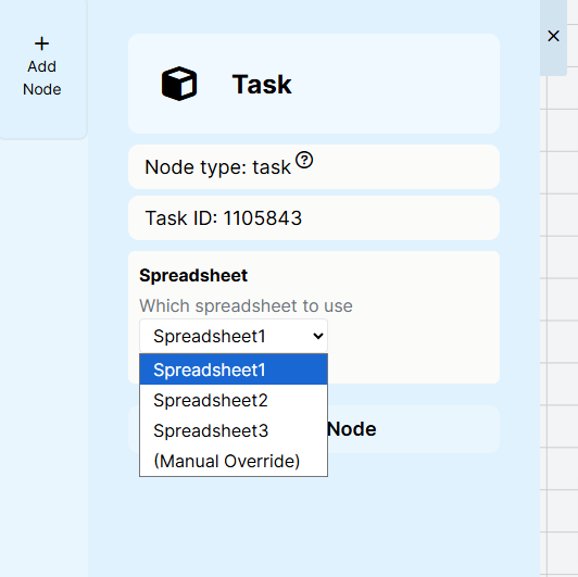
If you have multiple instances of the same task, each using a different spreadsheet, the spreadsheet name is shown in the task node:
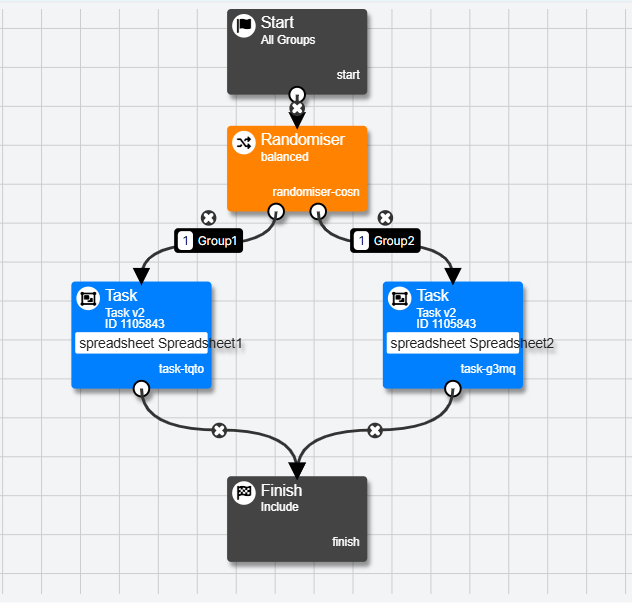
These screenshots show the new Experiment Builder interface. If you’re still using the classic interface, it will appear slightly different.
You can choose to assign participants to one of the spreadsheets via a Counterbalance node, Randomiser node or Allocator node.
Gorilla requires content for the columns that components are bound to in the task, but you can also include additional Metadata in the spreadsheet. This could be information about trial types that is useful for analysis but not required for the functioning of the task itself. There is no limit to how many columns of metadata can be added to a task. The only restriction is that each column must have a different name, and contain content in at least one row. There are a couple of different use cases for metadata:
The first use case for metadata columns is to help make data analysis easier once the experiment is complete. For example, have a look at the spreadsheet in the Thatcher Sample Task. Here, you can see the Orientation column in the spreadsheet. This column is not bound to any components in the task, it is there for purely informative purposes. In this case, it helps to identify the type of image presented to participants on each trial.
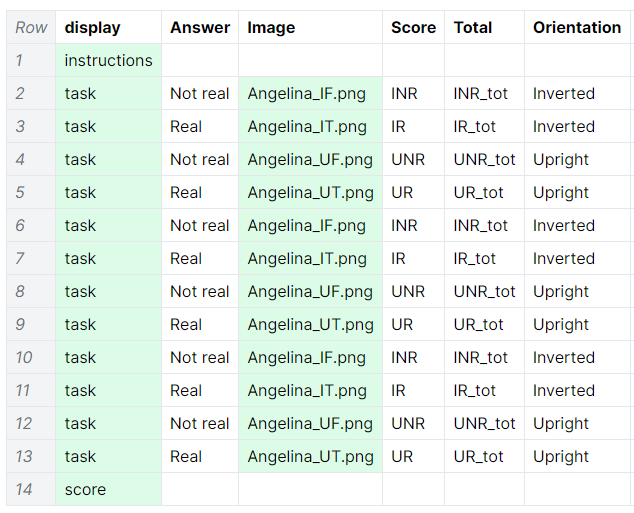
The second use case for metadata columns is for spreadsheet manipulation configuration. As an example, have a look at the Misinformation Effect Task where a spreadsheet manipulation has been set up. Here, there are three spreadsheet columns containing different text.

The Text component has been bound to a spreadsheet manipulation as shown below:
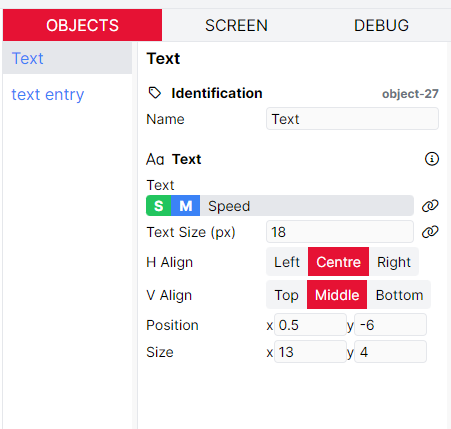
When the manipulations have been configured in the experiment tree, the content from the manipulation column will be shown to the participants. As the content from only one column will be shown, the other columns, by default, are metadata columns.
Read more about analysing Gorilla Task Data in our Data Guide. You can view an example of using metadata columns in the context of a real experiment in this Gorilla Academy case study.
It is common in many tasks to score responses given by participants as correct or incorrect. In Task Builder 2, a Scorer component is required to do this. With the Scorer component, you'll be able to see whether participants responded correctly or incorrectly in the Correct column of your data.
When creating a new screen in your display, there is an option to add Scoring directly from the Screen Template window. By clicking the 'Add Scoring' checkbox, a Scorer component will be added to the screen automatically.
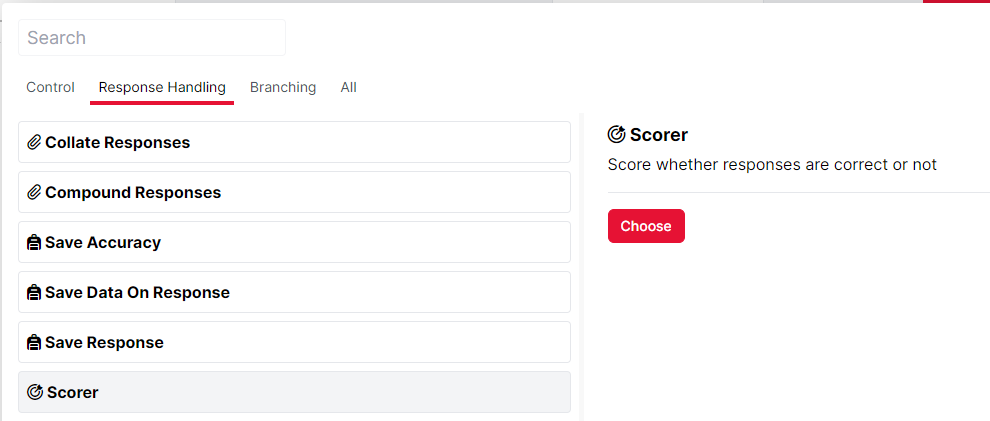
You can also manually add a Scorer component in the Screen Tab. The Scorer can be found under Response Handling components:
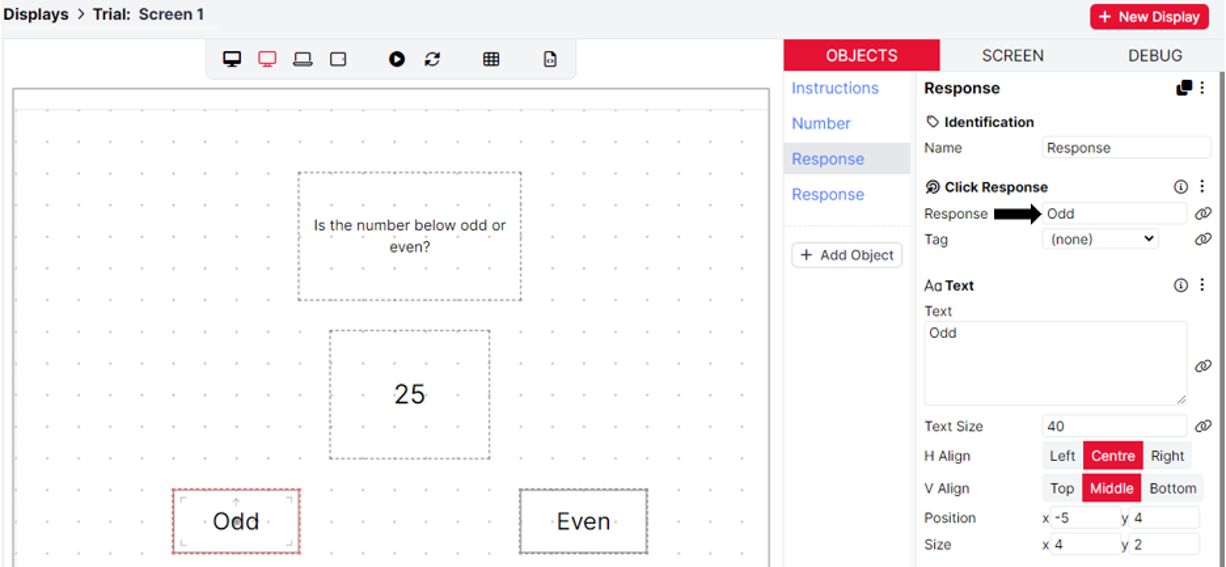
In order to record responses as correct, the object must contain a Response Component such as Click Response or Keyboard Response. To record the response, the Response field of the component needs to be defined. In this example, we use a Click Response to choose whether a presented number is odd or even. The image below shows that when the word 'Odd' is clicked, the response will be recorded as Odd:
This response name is then used to configure the correct answers in the Scorer settings. If you would like the correct answer to remain the same for all trials with this screen, you can simply type the correct answer into the Correct Answer field, as shown below:
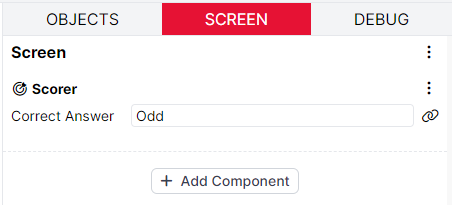
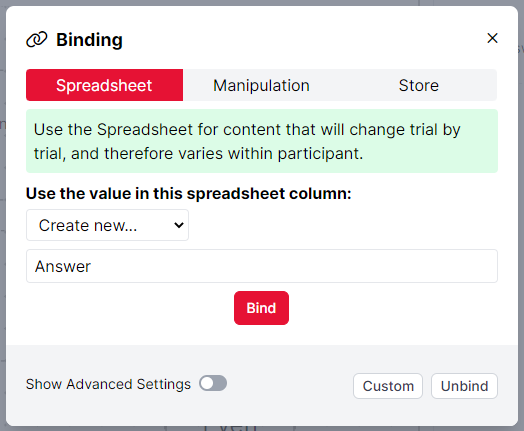
In the example above, when the response Odd is given it will always be marked as correct. However, if you would like the correct answer to vary dynamically trial-by-trial, click the link icon on the right and you can bind the correct answer to a column in the spreadsheet:
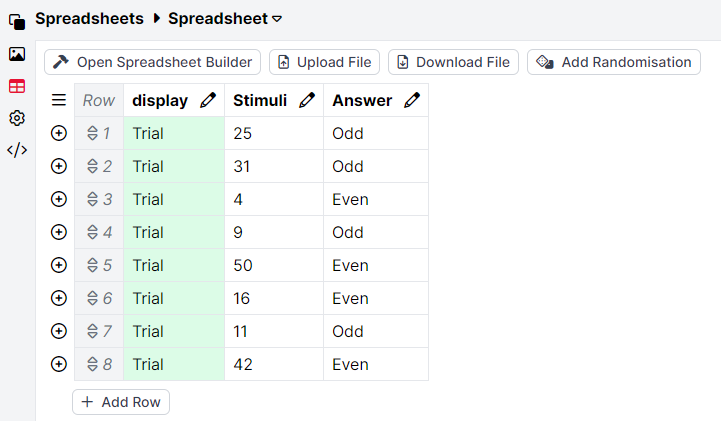
Next, fill in the specified column in the spreadsheet with the correct answers for each trial:
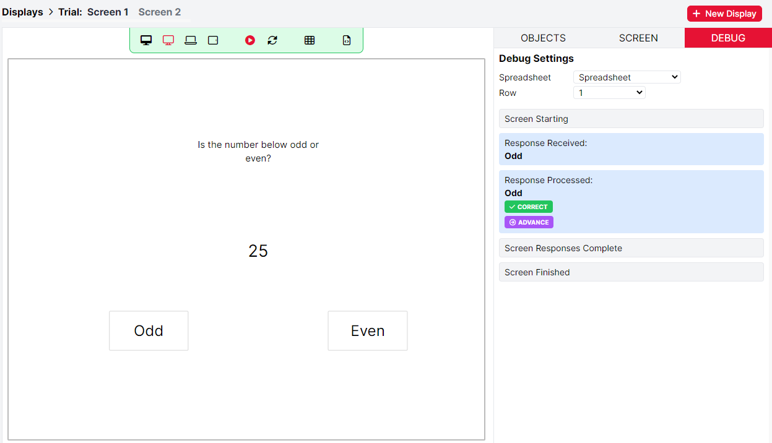
Finally, use the screen preview button and the debug window to check that responses are being recorded as correct and incorrect appropriately:
You can read more about how to save correct answers to the Store later on in this guide.
Stimuli are any media files (images, audio, video, etc.) which you will present to participants during your task.
You can add, delete, and manage stimuli on the Stimuli tab. To access the Stimuli tab, click the image icon in the left sidebar of the Task Builder. To add stimuli, click Add Stimuli at the top right:

Browse to the files on your computer and select the stimuli you want to add. Once the stimuli have uploaded, you will see a preview of each stimulus. Stimuli are shown 10 to a page. To navigate between pages, use the arrows at the top of the Stimuli tab. Click 'Remove' next to a stimulus to delete it from your task:

You can search for specific stimuli by typing part of the filename in the Search box at the top left. You can also filter stimuli by type (image, audio, video, and document) using the Filter icons at the top of the Stimuli tab. Active filters are displayed in red, while inactive filters are displayed in black. Toggle whether a filter is active or inactive by clicking it.
There are two main ways to incorporate stimuli in your task. If you need the same stimulus to display for all trials and for all participants (e.g., on an instructions screen), create an object on that screen with the appropriate component (e.g., an Image component), and then use the 'choose...' dialogue to pick the stimulus you want to display:
If on the other hand you want the stimulus to change trial by trial, you will instead need to bind the component you have created to a column in the spreadsheet. You would then fill in this column with the filenames of the stimuli you want to show on each trial:
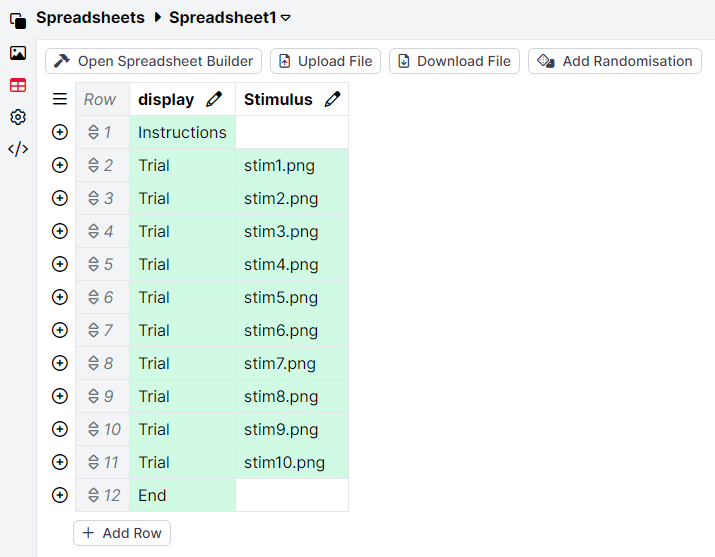
For a step-by-step walkthrough of how to change stimuli in the Spreadsheet, try our Spreadsheet Walkthrough!
Exporting all task stimuli at once
If you want to download all of a task's stimuli at once, export the entire task. The stimuli will then appear in the exported 'assets' folder.
You can instantly preview and debug your setup by clicking the play button above the screen editor. When you do this, the panel on the right will automatically switch to Debug mode.
When in Debug mode, you can preview what will happen in your task when the participant takes certain actions. For example, if you click on the correct answer, the Debug panel will display the recorded response. If you have set up a Scoring component, you can also check whether the recorded response was correct or incorrect. Additionally, from the Debug setting, you can preview how the screen will look based on any row in the spreadsheet by changing the row number via the drop-down. This feature is a powerful way to ensure your stimuli and responses work as intended.
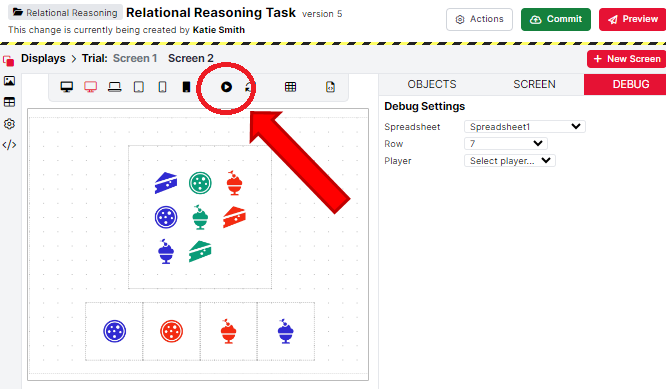
You can also test the entire task by clicking the "Preview" button at the top right of the screen. This will run a preview of the full task based on your spreadsheet setup.
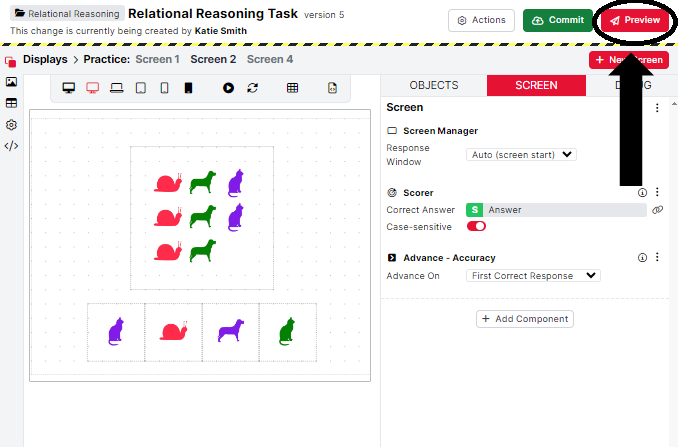
At the end of the preview, you can download your data. Keep in mind that Gorilla does not store preview data, so once you leave the Finish page, the preview data will no longer be accessible. Preview data is available only in CSV format.
If you're not seeing what you expect when you preview your task, check out our Troubleshooting Guide!
Once you have set up the task, you can commit it. Committing means saving a version of the task that you can always go back to. You must commit your task to be able to add it to an experiment and send it to participants.
To do this, click the green 'Commit' button at the top right of the screen. Then, enter a description of your changes in the text box and press Commit to save the new version of the task.
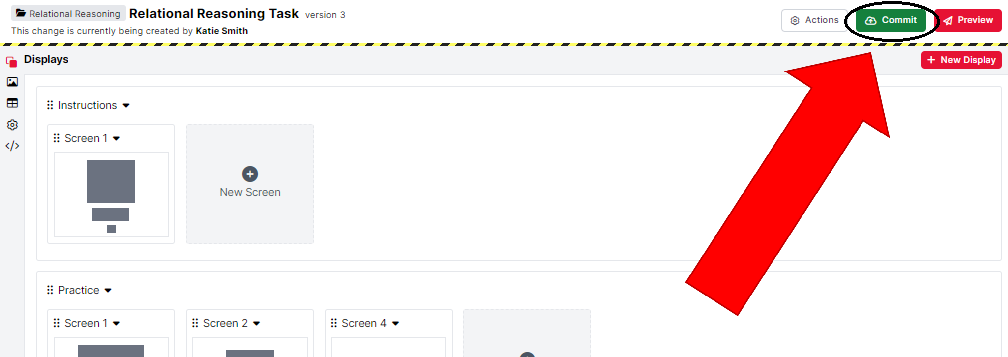
You will know the new task version has been committed when you can no longer edit the task, and the blue 'Edit' button replaces the green 'Commit' button. These changes indicate that you are now viewing the committed version of the task, not editing it.
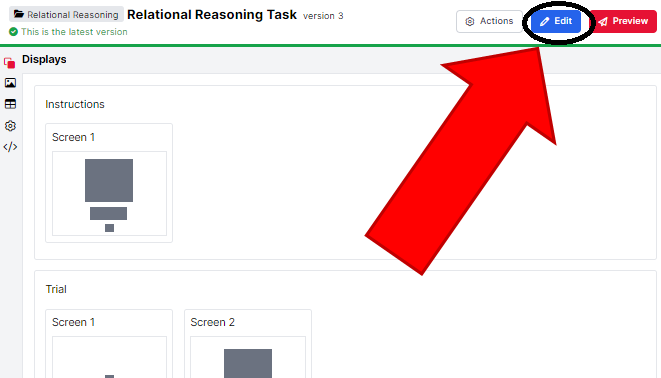
Each time you commit a new version of the task, the version number increases. We can view previous task versions by clicking on the 'Actions' button (to the left of the 'Edit' button), and then History.
From opening this History box, you can view previous task versions. The '(open)' text indicates that this is the version of the task you are currently working on and has not yet been committed.
To go back to a previous version of the task, choose this version from the dropdown and click 'Show this version' to view it. To roll back to this version, choose 'Restore' from the Actions menu.
To send a Task to participants, you need to add it to an Experiment.
The Experiment Tree is where you design your entire experiment, such as adding demographics questionnaires and reaction time tasks into a single experimental flow.
Once you have constructed an Experiment Tree, you’ll want to distribute it to participants. To do this, go to the Recruitment tab in the Experiment builder. In this tab, you can choose a Recruitment policy, which will generate a URL to send to participants. We offer a variety of recruitment policies, all explained in our Recruitment Policy Guide. After selecting a policy, set your Recruitment Target (i.e., how many participants you want to complete your experiment), and apply any Participant Requirements, such as a time limit or specific device types.
As participants begin the experiment, they will appear as Live in the Participants tab. When a participant reaches the Finish node, their status will change to Complete. You can then download the participants' data from the Data tab.
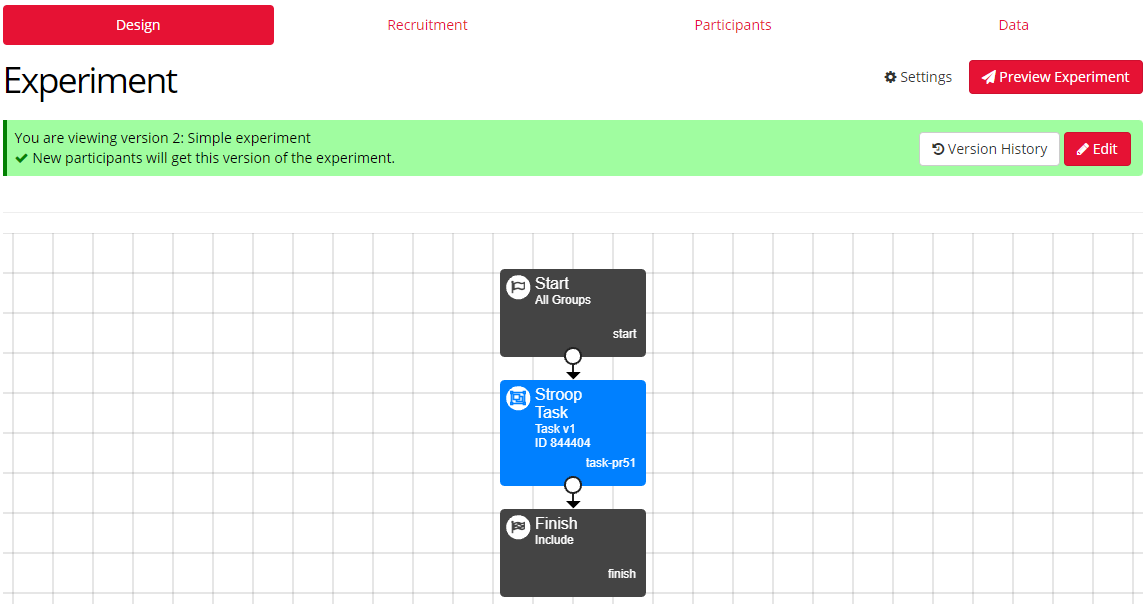
This screenshot shows the new Experiment Builder interface. If you’re still using the classic interface, it will appear slightly different.
You can find out more information on how to design and build your Experiments in our Experiment Builder: How-To guide.
Manipulations allow you to change settings on your task from within the experiment tree. You can use manipulations to implement between-participant conditions in your experiment. They can also be used as Spreadsheet Manipulations, for example, when participants should be assigned a set of stimuli from several possible sets.
Samples that use this feature
Spatial N-Back Task - Uses manipulations
Misinformation Effect Task - Uses spreadsheet manipulations
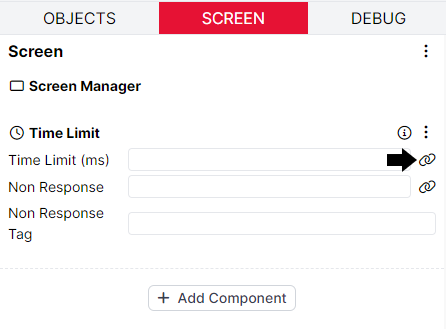
To add a manipulation, navigate to the task setting you want to manipulate. For example, imagine you want to use a manipulation to vary the time limit on a screen between participants. Go to the relevant screen and click the Screen tab to find the Time Limit component. Then click Bind (the link icon to the right of the Time Limit setting):
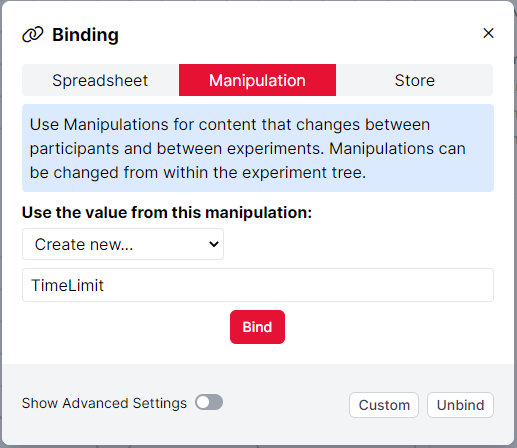
Click Manipulation. From the dropdown menu, select 'Create new...' Type a name for your manipulation into the box that appears:
Click Bind to apply the binding. Your setting will change to show that it's now bound - the blue M indicates that it is bound to a manipulation:
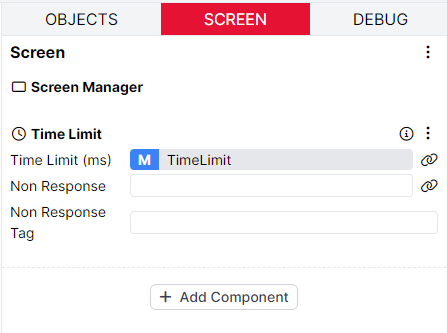
You can find more information about binding to manipulations, including how to configure manipulations in the Experiment Tree, in our Binding Guide.
To view all manipulations set up on your task, go to the Settings tab on the left and click Manipulations. Here, you can delete any manipulations you are no longer using by clicking the bin icon on the left of each manipulation. You can also add a description for your manipulation, set its Label and Key, define Options, and set up a default value.
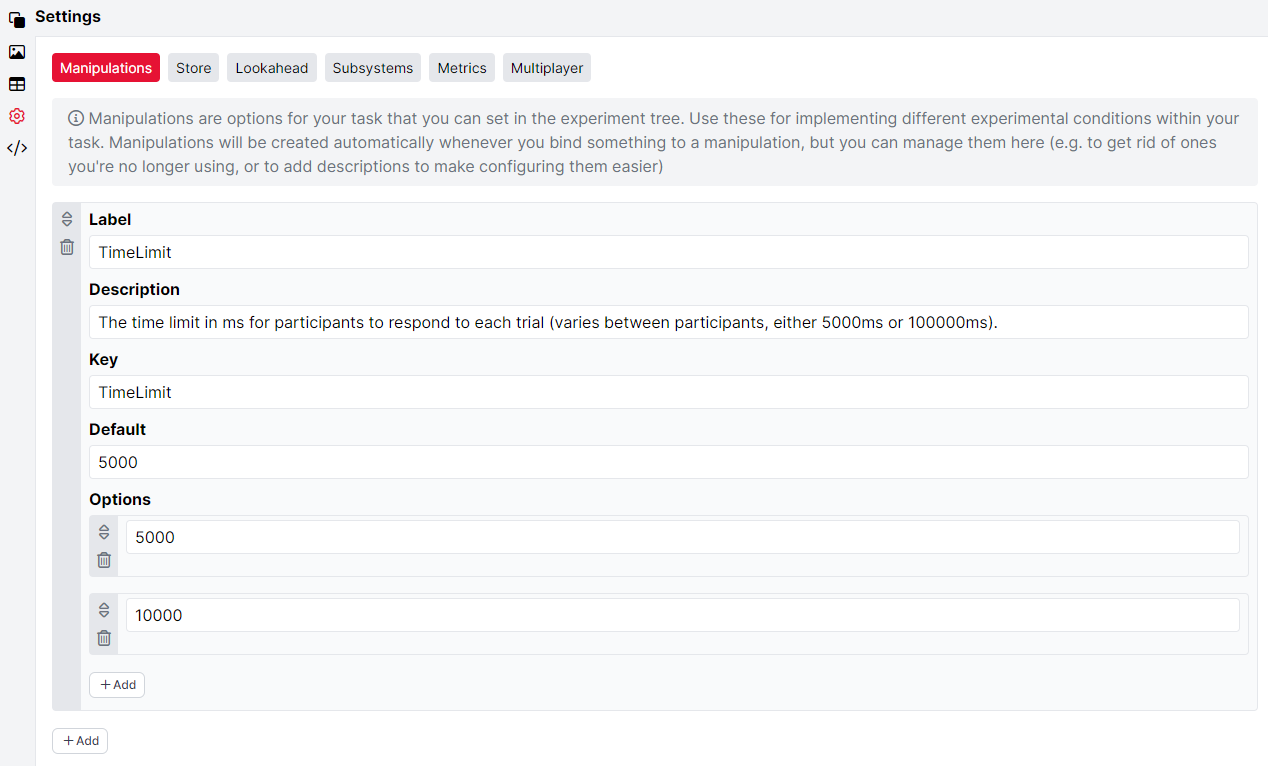
Label: This is the name of your manipulation, as it will appear in all configuration menus.
Description: Use this to add a description of your manipulation and its possible values.
Key: This is the name of your manipulation, as it will be referred to in Gorilla's underlying code. By default, the Key is identical to the Label. You will need to use the Key if you refer to your manipulation within a script.
Default: Use this to set a default value for your manipulation. This value will be used if you do not set a value manually within the Experiment Tree.
Options: Here, you can define options for the values of your manipulation. If you define options, these options will show up as a dropdown menu when you set up your Task in the Experiment Tree. If you do not define options, then you will enter the value of the manipulation in a free text field when you set up your Task in the Experiment Tree.
Spreadsheet Manipulations are useful when you want to show participants different sets of stimuli. For example, if you want to show half of your participants one set of image stimuli and the other half a different set of images, you can use a spreadsheet manipulation to set this up. First, you need to open up the binding menu for the Image object, select Manipulation, toggle the Advanced Settings to be on, and then set the dropdown to 'Look for a spreadsheet column with that name'.
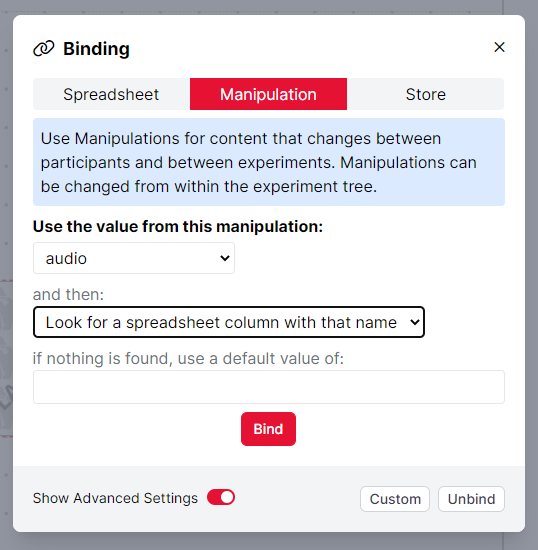
In your Objects tab, you will see that you are using a Spreadsheet Manipulation when the green S and blue M are appearing in front of the Image setting.
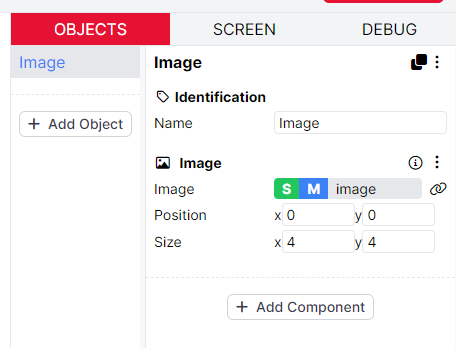
Now, you just need to finish setting up your manipulation in the Settings tab, as explained in Manipulations.
The Store is a place to save participant data that you want to use later in the task or the experiment: for example, task responses and accuracy scores. Each piece of data that you save in the Store will be saved in a named Field, so that you can retrieve it and use it later. If you're already familiar with Task Builder 1, this is analogous to what was previously called embedded data.
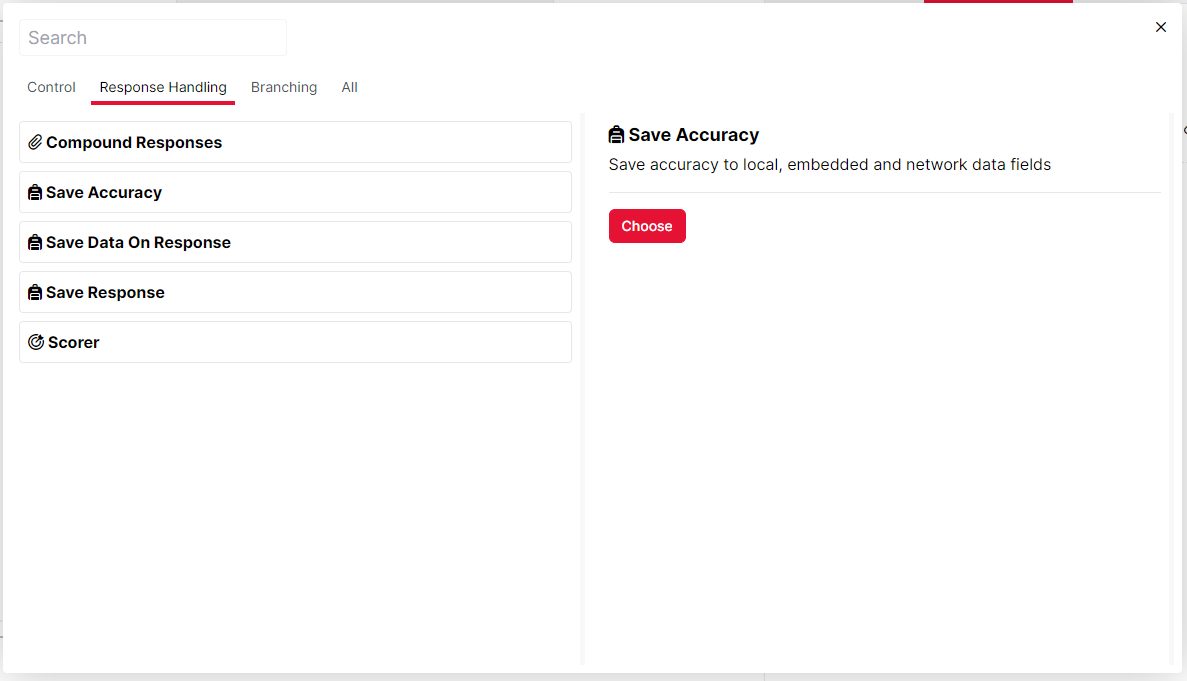
For example, imagine that you want to save participants' number of correct responses during a task. Navigate to the screen where you collect participants' responses and click the Screen tab. The first step would be to set up a Scorer component so that participants' responses can be marked as correct or incorrect. Once your Scorer component is set up with the correct answers, click Add Component, select Save Accuracy (under Response Handling), and click 'Choose':
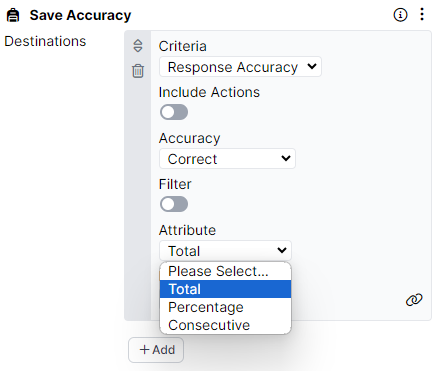
Click +Add next to Destinations. Use the Criteria and Attribute dropdown menus to select which aspect of participant accuracy you want to save. For example, to save the total number of correct answers, select Criteria = Response Accuracy, Accuracy = Correct, and Attribute = Total:
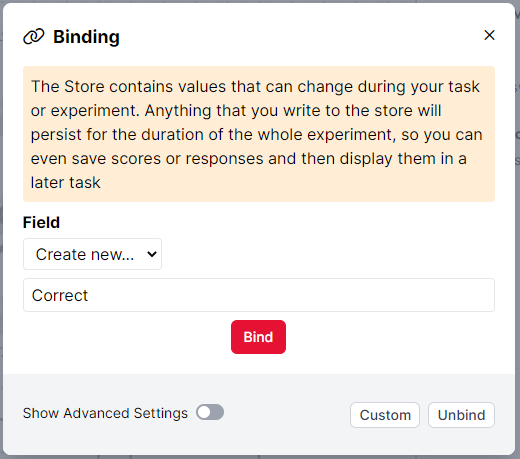
When you have selected an attribute, under 'Field', click 'Set...' Create a new Field, give it a name, and click 'Bind':
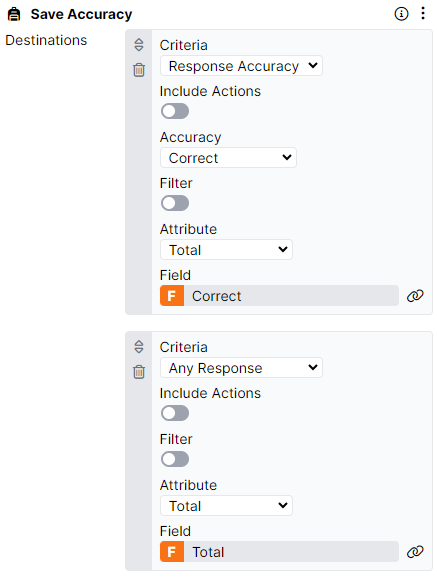
Repeat this for any other attributes of accuracy you want to save. In the screenshot below, the Save Accuracy component is set up to save the participant's number of correct responses in the Store field 'Correct', and the participant's total number of trials in the Store field 'Total' - the orange F indicates that each is bound to a field in the Store:
Now, navigate to the screen where you want to retrieve and display the values of these Store fields.
There are two ways to retrieve fields from the Store and display their values on your task screen:
Directly bind a component to a Store field. You can find how to do this in the Binding Guide.
Incorporate Store fields within a Markdown text component. This is the easiest way to show participants their scores in a task. We explain how to do this below:
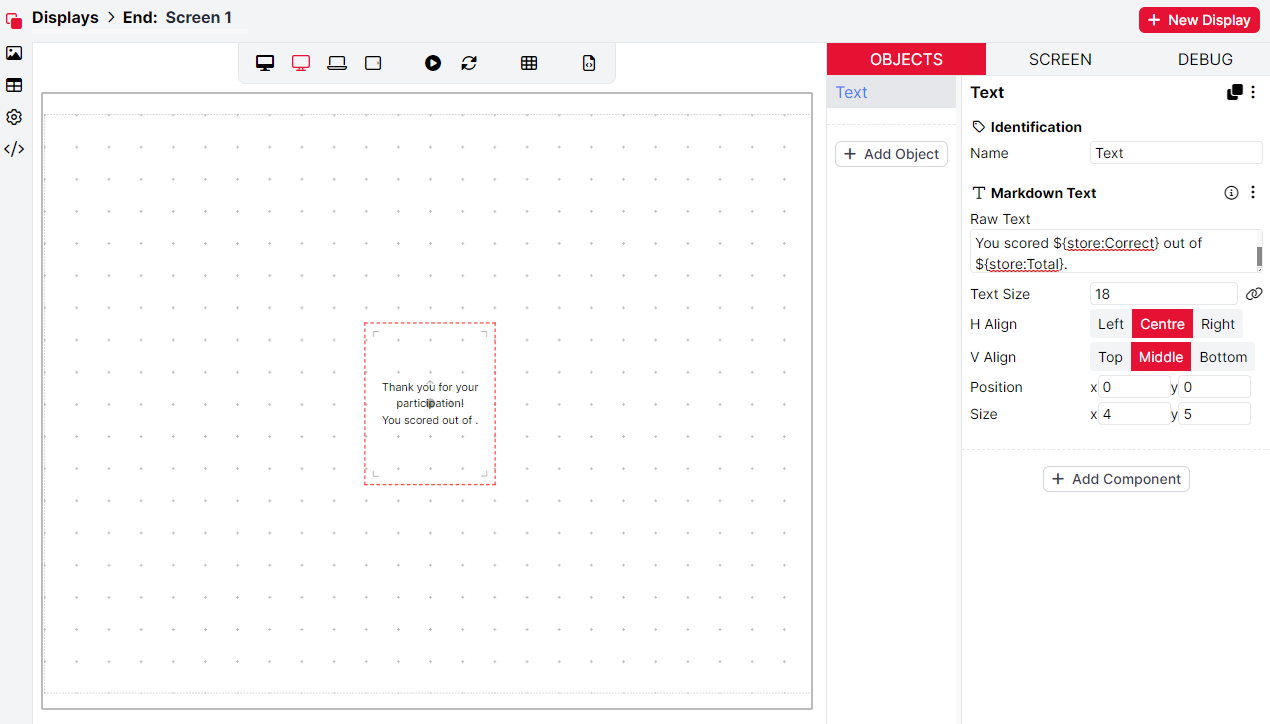
Add an object to your screen containing a Markdown Text component. In the component's Raw Text field, type the text you want to display to the participant. To incorporate a Store field, use the syntax ${store:myField}. For example, 'You scored ${store:Correct} out of ${store:Total}':
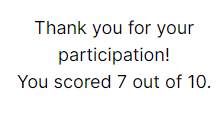
If you preview the task, you can see how this will display to a specific participant:
To view all Store fields currently being saved in your task, go to the Settings tab on the left and click Store in the top bar:
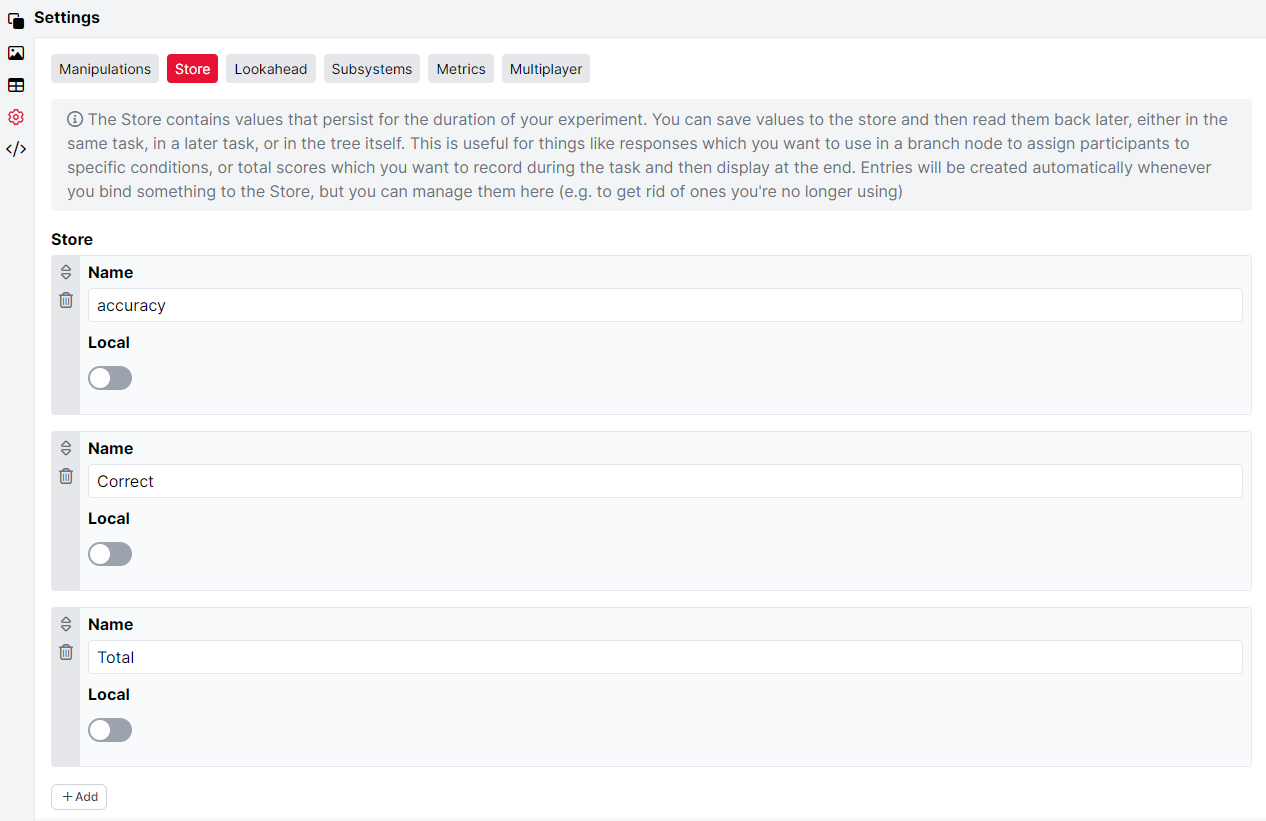
Here, you can view and change the names of your Store fields. You can also delete any Store fields you are no longer using by clicking the bin icon on the left of each one. Finally, you can toggle whether fields are stored locally to the task, or globally to the experiment. This distinction matters if you are using the same Task node multiple times within an Experiment Tree. If you want accuracy to be counted up separately for each version of the task, then you should select 'Local' for the relevant Store fields. By default, all fields are stored globally. This setting is appropriate for most cases.
You can see an example of saving participant accuracy to the Store and displaying it at the end of the task in the Digit Span Text Entry task in our Task Builder 2 Samples Project.
As well as saving and displaying accuracy, you can also save and display participants' actual responses. For more information, see our Showing Previous Responses walkthrough, and our Response Recap tutorial.
You can find more information about binding to the Store in our Binding Guide.
The Lookahead tab lets you control how much of your task is pre-loaded at any one time.
By default, only the next few trials will be pre-loaded. This strikes a balance between ensuring that the task does not take an unreasonable time to load at the start, and keeping loading time between trials to a minimum.
If you prefer, you can opt to pre-load more of your task in advance. This will result in a longer loading time at the start. Usually, this will not be necessary, but you may want to consider this option for tasks with very fast trial presentations or with relatively few stimuli.
Progressive: This is the default setting. Stimuli will be loaded a few trials in advance of when they will be displayed.
Spreadsheet: All stimuli listed in the current spreadsheet will be pre-loaded at the start of the task. Note that if any stimuli do not appear in the spreadsheet (e.g. they are bound to Store fields), they will be loaded a few trials in advance of when they will be displayed, as per the default.
The most common use case for this setting is in a task where you have multiple spreadsheets. Using this setting will pre-load all stimuli in the spreadsheet being used by the current participant, but will not slow down the task unduly by attempting to pre-load all stimuli from all spreadsheets.
Stimuli loading will run before any spreadsheet randomisation is applied. In tasks where the Select Randomised Subset component has been added, Gorilla will load the stimuli for the entire spreadsheet, then subset randomisation will be applied after.
Full: All stimuli uploaded to the task will be pre-loaded at the start, whether or not they are used in the task and/or listed in the current spreadsheet.
Progressive: This is the default setting. Task screens will be loaded a few trials in advance of when they will be displayed.
Full: All screens for the task will be pre-loaded at the start.
The subsystems tab shows which subsystems are enabled in your task.
Subsystems are features that use browser hardware, such as audio, microphone, camera, fullscreen, and screen sharing. These features require the user's permission to activate (e.g., pressing F11 to enter fullscreen mode). By enabling a subsystem, we ensure that all necessary permissions are granted and the feature is initialised before the participant starts the task.
Subsystem checks now run only once per participant within an experiment. Previously, these checks would run again if the page reloaded or before any other tasks that required the subsystem. Now, the initial subsystem check occurs only at the beginning of the first task where that subsystem is enabled. Gorilla performs subsequent checks silently in the background when the participant enters another task or reloads the page. If these checks are successful, the participant will not have to repeat the full subsystem check.
For an example of a task with the Audio subsystem enabled, see the Audio Transcription task in our Task Builder 2 Samples Project.
Update (July 2024): Based on your feedback, we have improved our microphone and camera subsystems and developed a new recording subsystem.
In the microphone subsystem, participants can select their preferred microphone for audio input and view the estimated volume level of the chosen microphone.
Similarly, in the camera subsystem, participants can select their preferred camera for visual input during the subsequent task. If both the camera and microphone subsystems are enabled, we will now run a single test that checks both inputs. The assessment also displays the estimated microphone volume, similar to the microphone subsystem.
The recording element is now its own subsystem. If you have either the microphone or camera subsystem enabled, (magically) the recording subsystem will appear! This new subsystem allows participants to test-record their audio and/or video input, review the recording, and confirm that it was recorded correctly. This recording subsystem will be automatically enabled if you add an Audio Recording or Video Recording component to your task.
For participants using the Safari browser, the fullscreen subsystem sometimes does not recognise when the participant has entered fullscreen mode. This means there is no way to progress the task beyond the initial screen when this subsystem is enabled. We are investigating this issue; in the meantime, we advise that you test your fullscreen task thoroughly across browsers, and consider either screening out participants using affected browsers or asking participants to trigger fullscreen mode manually.
When you add a component involving one of these subsystems to your task, Gorilla will automatically enable the corresponding check. You can disable this check by going to the Subsystems tab and toggling it off.
For example, when you add an audio object to a task, the audio check is automatically activated. However, if you change your mind and remove all the audio objects from the task, the audio check will remain on. Since there is no longer any audio content to present to participants, the audio check is no longer necessary. In this case, you should go into the subsystem settings and turn off the audio subsystem.
You can also visit this tab to manually activate a subsystem. For example, if you are using a Screen Recording component and also want to record audio from the participant's microphone, you can do this by toggling on the Microphone subsystem.
The Metrics tab can only be used in conjunction with scripting. Find out more in our guide to scripting in Task Builder 2.
The Customisation settings allow you to change the base layout of your task. You can choose from the different Layout options to tailor the object positioning to certain device types.
There are four different Layouts you can choose from:
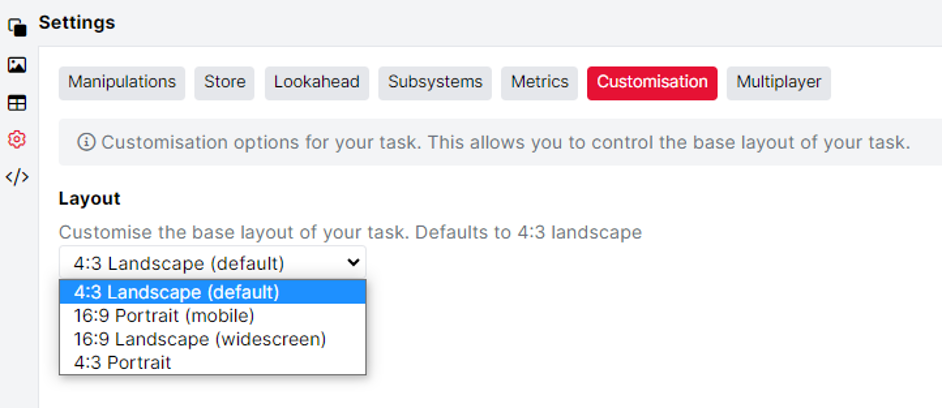
When you have selected a Layout setting, you will see the updated layout in the task structure. Have a look at the image below, which shows the difference between the 4:3 Default layout and the 16:9 Portrait Layout in Mobile Screen Preview:
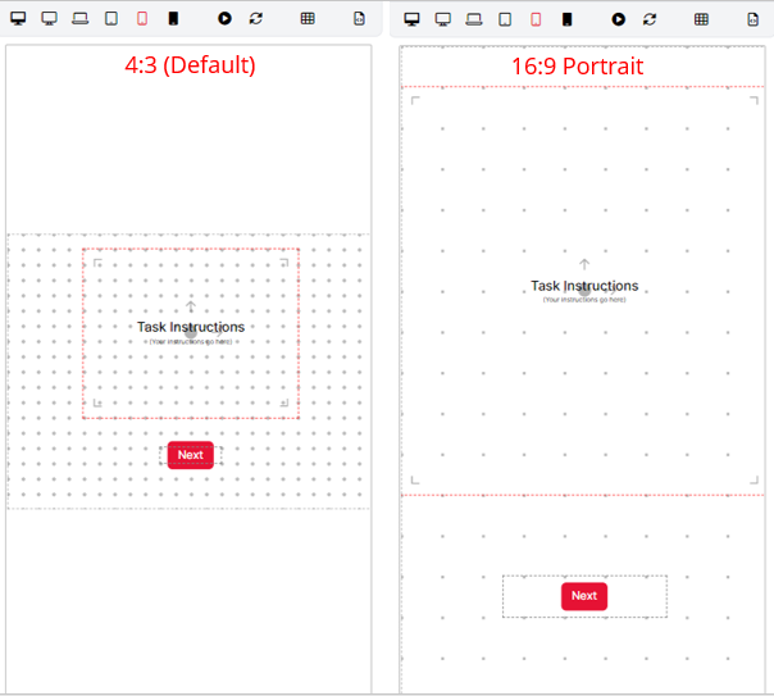
You can see a task set up with mobile portrait layout in our Semantic Priming Task - Mobile Version. You can also consult our guide to creating responsive task layouts for more information on why and how to ensure participants see a version of your task that's optimised for their device.
This is where you can activate Multiplayer mode in your tasks, allowing several participants to take part interactively. Read more about Multiplayer in our Multiplayer Guide.
To enable Multiplayer on a task, tick the 'Enable Multiplayer' box. In the box that appears below, enter the number of players the task is designed for:

You will then be able to configure aspects of your task to display for one player or another by using the Multiplayer component. You can also use other Multiplayer-specific components, for example to manage how data are saved on the network. For more information, see our Multiplayer guide.
AI components are available by request as a premium add-on to any Gorilla subscription. To get access, email subscriptions@gorilla.sc.
If you don't have a subscription but would like to inquire about access to the AI components, email info@gorilla.sc.
If you are using AI components in your task, the AI tab in Settings is where you can set a system prompt. Use this for core instructions, background information, or safeguarding rails that should be used by every AI component in your task.

The prompt you enter will be used by every AI in your task by default.
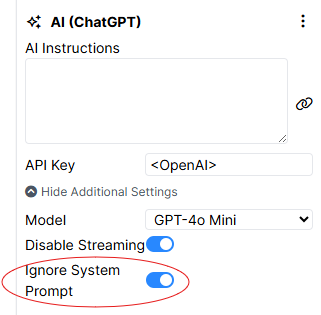
To disable the system prompt for a specific AI (ChatGPT) or AI (Gemini) component, open Additional Settings on the component and toggle on the 'Ignore System Prompt' setting:
In many Tasks you will want something to happen within one screen. This event could be triggered by some time elapsing or a participant interacting with your Task.
Trigger components can dynamically make various actions happen within the current screen. For example, they can make a stimulus invisible then visible, make a participant wait before being able to respond, or help with advancing the screen after a certain number of responses.
There are multiple Trigger components:
Find the use case below that is closest to what you want to achieve and see if you should use a Trigger Component and, if so, which one.
While Trigger components can be very useful, they are not always needed!
They should only be used when you need to make something happen within one screen. Even then, in some cases, such as displaying Feedback, you could use a Trigger component, but the Feedback component does the work for you, instead!
If something is happening over two screens or more, such as displaying scores, then you likely don't need a Trigger component. Similarly, if you just need to record a response, you don't need a Trigger component.
Yes, you should use a Trigger Component!
By default, an object, like an Image component, is visible. This means there are two steps to making an object appear: first, make it start invisible, and then, make it visible at the time you specify.
To set this up:
The final set-up should look something like this:

Yes, you should use a Trigger Component!
By default, an object, like an Image component, is visible. This means there are two steps to making an object appear: first, make it start invisible, and then, make it visible after the action you specify, such as a participant response.
The below steps show how to have a participant click the space key to reveal an image:
The final set-up should look something like this:
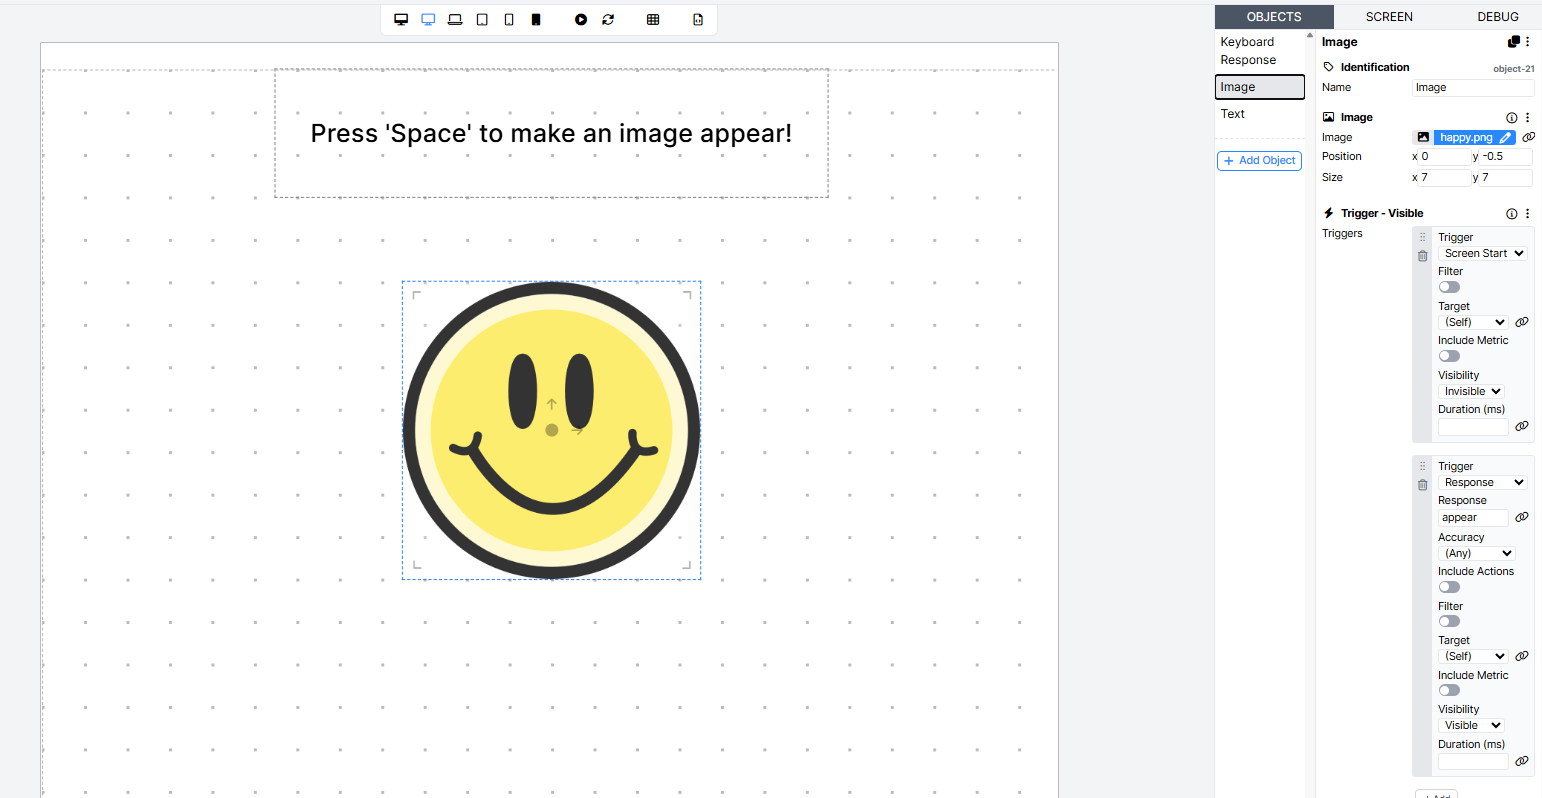
You can edit this to be from any response, such as a Click Response component, by swapping that component for the Keyboard response component.
For times where you don't know what the participant's response will be, such as with a Text or Number Entry component, you should instead use Response Tags.
To set this up:
The above steps will also work if you want a participant to click any one of multiple objects to make something else become visible. You would add the same Tag to each object a participant could click and then use this Tag in the Trigger - Visible component.
Yes, you can use a Trigger Component!
The Video and Audio components can be controlled in a variety of ways.
We have a dedicated tutorial on making videos play which includes the use of the Trigger - Active component. The same steps described in the tutorial can also be used with the Audio Component.
If you're having any issues getting these files to play, check out our Troubleshooting Guide.
Yes, you should use a Trigger Component!
The steps are the same for an Audio or Video component. To set this up:
Once the video finishes, the Continue button will become visible allowing the participant to advance to the next screen.
You can use Trigger components but multiple screens may be easier!
While components like the Trigger - Visible component can be used to control what content is shown on one screen, it's best used when you want to make specific small changes to the screen. For example, having an image appear after a participant has clicked a button.
In cases where you wish to change a screen's content more significantly, it can often be easier to have multiple screens. A good example of this is a fixation cross followed by your trial screen. While you could set this up on one screen and use Trigger components, it's much easier to split this across two screens: one for the fixation cross and one for the trial content. Our Stop Signal Task sample is a good example of how to set this up!
You can use the Spreadsheet to control trial-by-trial variation!
Trial order is controlled by the Spreadsheet in your Gorilla Task. This means, if you want to show participants lots of different stimuli or different questions across trials, you don't need lots of Triggers, but simply to fill in your Spreadsheet.
See our Spreadsheet Walkthrough for more guidance on how to get the most out of the Spreadsheet!
Yes, you should use a Trigger Component!
There are three options to achieve this:
The first option works best if you want to change the screen layout, such as a participant clicking a 'ready' button before answering. The second option works best if you want to keep the screen looking the same, such as a word search task. And the third option works best if you don't want to start counting reaction times while, for example, an image or text is displayed.
Yes, you should use a Trigger Component!
There are two options to achieve this:
The first option works best if you want to change the screen layout, such as a participant clicking a 'play' button before seeing how they can respond. The second option works best if you want to keep the screen looking the same, such as a word search task.
If you want a participant to respond after a video or audio file has finished playing, see the steps under 'I want to make a stimulus or another object to appear after a video or audio file has finished'.
Yes, you should use a Trigger Component!
There are two options to achieve this:
The first option works best if you want to change the screen layout, such as a participant clicking a 'play' button. The second option works best if you want to keep the screen looking the same, such as a word search task.
Yes, you should use a Trigger Component!
This set up can be useful for designs like searching Tasks or more interactive designs where you want to limit the number of clicks a participant can make.
The below steps show how to have a participant click on three Text objects before advancing the screen automatically:
All together this means we track how many times a participant interacts with a response option, and then once they've done it enough times, we emit a response that causes the screen to advance. The Visual Search Click on Location Task is a good example of this in practice - check out the Task_multiple display!
The above steps allow the participant to click each Text Button Response multiple times. If you want a participant to only click a response once per screen, can use the Trigger - Enabled component. Add this component to each response option (step 1). Select the Trigger as Click, or Response - Tag and the Tag from from step 2 if participants aren't clicking this object. Set the Action as Disable. Now when a participant clicks this object, they won't be able to click it again. You can also add Background Color - Hover component to grey-out the object after it has been disabled.
The Auto-Advance toggle is best here!
Video and Audio components both have the option to 'Auto-advance' after the file is finished. If you toggle this option on, as soon as the file is done, the screen will progress, so you don't need to use Trigger - Components!
Each Trigger Component needs to have a specified trigger. This is the action or event that causes the desired behaviour to happen. The options for this are:
Additional triggers are available only when the Trigger component is added to an object that includes an Audio or Video component:
Which trigger to use depends on your specific use case. The Screen Start trigger is best when you want something to happen right away when a participant goes to a screen in your Task, whereas, the Response trigger only works when a response is generated from elsewhere.
Sending participants to different screens based on their performance/response is a common requirement in behavioural experiments. In Gorilla's Task Builder 2, you can do this with our Branch screen component. For more in-depth information on how to achieve this, take a look at the Screen Branching tutorial.
You can add eye tracking to your task by using the Eye Tracking (Webgazer) component. Check out our guide to eye tracking in Task Builder 2.