This guide will tell you more about how participants' responses are processed in Task Builder 2 and Game Builder, and help you better understand the order in which events happen on each screen. Check out the list of topics in the menu to find out more.
In both Task Builder 2 and Game Builder, each individual screen follows the same basic sequence of events:

Once the screen starts, we wait for responses from the participant. When one is received it, we process it - this might be marking it as correct or incorrect, or combining it with other responses - and then decide whether we should advance to the next screen or wait for more responses.
When you preview your task using the Play button in the Screen Editor, you can see a log of these events happening in the Debug tab:
When pressing the play button, a log of events is shown in the Debug tab.
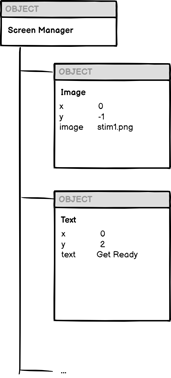
Each screen is made up of a hierarchy of objects, each with components that control their behaviour. There is always a single screen object that is considered the 'parent' of the screen. This screen object always has a special component called the Screen Manager, which controls the sequence of events on the screen. All the objects that you can actually see on the screen - stimuli images, response buttons, instructions text and so on - are then child objects of the screen object:
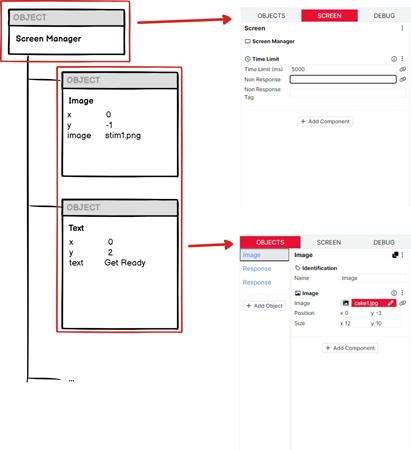
The objects that you see on the screen are the ones you configure on the OBJECTS tab, and the screen is what you configure on the SCREEN tab:
When a response is triggered, it is sent to the screen object. Most of the time, responses are triggered by objects on the screen that contain response components (Click Response, Keyboard Response etc). There are some special cases where the screen object itself might trigger a response (usually if the screen has a Time Limit component) - in this case, it simply sends the response to itself. Either way, the response is sent up the hierarchy to the screen object:
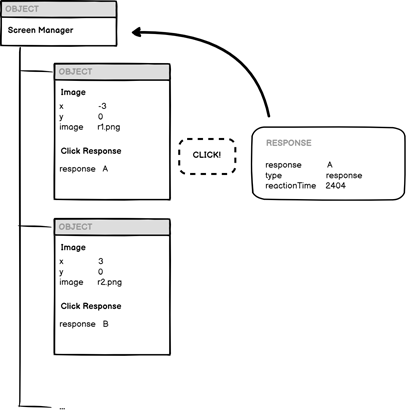
When a response is first triggered by an object on the screen, it contains three parameters:
The response itself - this is where you set the response that is recorded when a particular button or key is pressed. In a two-way forced-choice task you might simply label them A and B. If you are using image response buttons, you might want to name them after the images themselves. When scoring responses, this is the value that will be compared to the correct answer to establish whether it was accurate.
the reaction time - this is the time, in ms, between the start of the screen and when the response was received
the type - this will be one of the following:
response |
Most responses use the |
action |
The |
continue |
The |
timed_out |
the |
For Go/No-Go-style paradigms, where a non-response is also considered a legitimate response, you can toggle on 'Treat As Response' in your Time Limit component on the Screen tab. This will cause the time limit to generate a response with the response type rather than the timed_out type, allowing you to treat it as a regular response.
The setup below will end the screen after 5 seconds and generate a timed_out response:

The setup below will end the screen after 5 seconds and generate a response with the type response and the value NoGo:

When a response is received by the screen object, it is then processed. Every component that you add to your screen object has the opportunity to either augment the response with more information, or respond to it in some way. For example, a Scorer component might compare the response to the correct answer to establish whether the response was correct, and a Save Response component might save the value of the response to the Store:
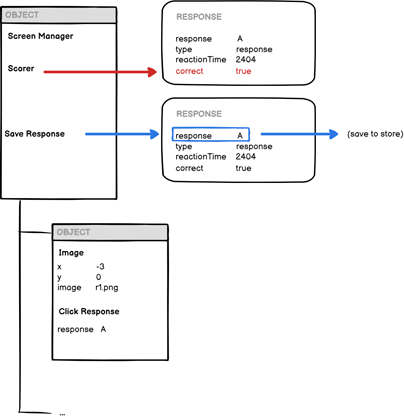
Once all the processing is complete, the response is then saved as a metric - it will appear in your downloaded experimental data.
Finally, the screen object decides whether or not to advance to the next screen. The default behaviour is to always advance on the first response, but there are components such as Advance - Accuracy (which allows you to only advance on a correct or incorrect response) or Advance - Response (which allows you to only advance on a particular response) that you can use to change this.
We often refer to responses that are triggered through clicks or keyboard presses as active responses - we wait for the participant to respond and capture both the response itself and the reaction time. However, sometimes we also want to capture responses using input methods that aren't a single click - sliders, text entry boxes, Likert scales and so on. We call these passive responses, because something else (e.g. a continue button or a screen timelimit) has to trigger the response to actually be submitted and processed.
Passive responses are only collected once the screen is ready to advance. The most common way to set this up is to add your passive response components to objects on the screen, and then add a Continue Button to trigger the screen to advance. In this way, the screen behaves similarly to a regular form or questionnaire. Alternatively, you could use a Time Limit component on the screen itself to give participants a limited amount of time to enter their responses. Either way, once the screen advance has been triggered, the screen finds all the passive responses and triggers them to submit their responses. These responses then go through the same process described above - they are all sent to the screen object, processed, and stored as metrics.
When configuring an object that can trigger responses (such as an object containing a Click Response or Keyboard Response component), you also have the option of setting a tag. The main use case for Response Tags is for screens where you have more than one response. For example, consider a task which asks the participant to choose between two options, and also use a slider on a scale of 0-100 to indicate their confidence in their choice:
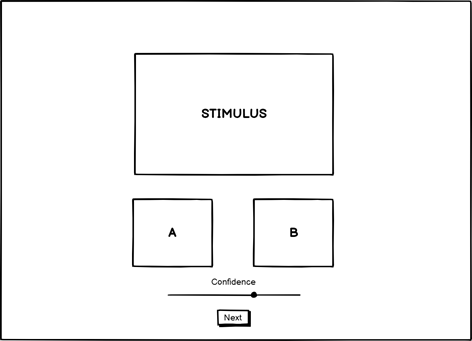
If we want to save both the choice and the confidence rating to the Store, we need some way of telling Gorilla which one is which. We can't use the value of the response itself - the slider could be any of 101 different values - and we can't base it on the object whose component triggered the response, because the choice could be set by either button.
This is where Response Tags come in! We would tag the response buttons with one value (e.g. button) and the slider with a different value (e.g. slider). In our Save Response component, we can then configure it to save the button response to one field, called 'choice', and the slider response to another field, called 'confidence':
You can also optionally define different correct answers associated with different response tags. Add a Scorer (Multi) component to the Screen tab of the screen where you collect your responses. In the Correct Answer field, define the correct answer for one of your responses, and under 'And includes Tag', select the tag of this response. You can then add further Correct Answers for each of your other responses, in each case selecting the appropriate tag in the 'And includes Tag' dropdown. The Correct column in your data will then indicate whether each individual response on the screen was correct or incorrect. You can see an example of this in our Cloze Task sample.