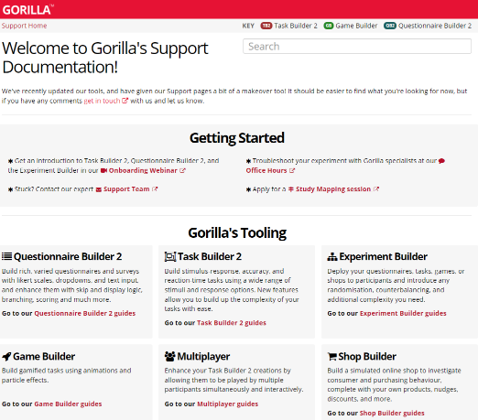
Getting Started Guide
- Getting Started Webinar
- Creating a Task
- Creating a Questionnaire
- Creating an Experiment
- Sending, Collaborating, Cloning
- Formatting
- Advanced Techniques
- Citing and Publications
Overview
Gorilla is an online experiment builder. We provide an easy-to-use graphical interface which allows you to create complex studies in an intuitive way. Check out our video introduction to see what's possible:
To read about some of the fantastic research that's already been conducted using Gorilla, check out our Spotlights page.
This guide will walk you through how to get started and create your first Gorilla experiment! Browse the list of topics in the menu to find out more.
If you're new to Gorilla, we recommend you start by watching our Getting Started Webinar videos. This will give you an introduction to Gorilla as well as some practical tips for getting started.
After that, the next step is to get stuck in! We've created Gorilla to be as flexible as possible, which means that it's possible to create most experiments using our existing tooling. We're proud of how much Gorilla can do, but it can feel like there's a lot to learn. It's okay if you don't immediately know how to create everything you want - get started on creating what you can and you should pick up more as you go!
Finding Your Way Around Gorilla
The place you'll probably spend most time on Gorilla is in your Projects. This is where you'll create your experiments.
If you get stuck, we have extensive support documentation. Our search tool is great - if there's some information you're looking for, try typing key words into our search bar. If you're still struggling, contact our Support Desk - they're super friendly and happy to help. We also have a Gorilla Facebook Group, where you can get help from our community of Gorilla users.
Other resources to check out are our Samples, which contain tasks that have already been created in Gorilla - copying these can save you a lot of time in creating your own tasks! Once you have a Gorilla account, you can use our searchable samples database and our community-created Open Materials to find exactly what you need.
To change your personal information and preferences, head to your My Account page.
Gorilla pricing works on a pay-per-participant basis. Signing up for an account, creating your experiment and accessing our tools are all completely free - you only pay for the data you collect. To learn more about purchasing participant tokens and Gorilla Pricing see our Pricing FAQ page.
As you navigate around Gorilla, you will often come across little icons - click these to get more support information!
Creating Your First Project
The first thing you'll need to create is a project. Projects are like folders - keeping all your questionnaires, tasks and experiments organised in one place. You can include as many tasks, questionnaires and experiments as you want within one project.
To create a project, just go to My Projects, either from the homepage menu or from the menu in the top right corner of any Gorilla page. Then, click Create New Project and name your project.
Next, you'll need to add some content!
Gorilla takes a modular approach to experiment creation. You should create all the tasks and questionnaires you want separately (within your project folder). Then, put them together using our Experiment Tree.
We recommend getting started by creating a task or questionnaire. It's easier to create your Experiment Tree once you have a first draft of your tasks and questionnaires.
However, maybe you want to create a broad overview of the structure of your experiment first. In this case, you can start by creating an experiment. Our Experiment Tree provides an intuitive graphical interface for you to design your experiment flow. You'll need to create a placeholder questionnaire or task (or both) to put in the tree. Just a questionnaire or task with one page will do the job and allow you to create the overall flow of your study.
This screenshot shows the new Experiment Builder interface. If you're still using the classic interface, it will appear slightly different.
It is not possible to delete a Task/Questionnaire/Experiment/Project on Gorilla... instead you can Archive it!
Gorilla Glossary
This page includes a glossary to key terms used throughout the Gorilla tooling.
General
| Gorilla term | Definition |
| Clone | You can re-use your own tasks, questionnaires, or experiments - or those that have been shared by others - by simply copying a version into your own project. It's a huge time-saver, helping you build and share with ease. Have a look at our Cloning guide for more information. |
| Commit | Committing saves a version of your task, questionnaire, or experiment that you can return to anytime. This helps to track progress and prepare for testing or sharing. Tasks and questionnaires need to be committed to be added to experiments, and experiments need to be committed for participants to take part in it. |
| Experiment | The Experiment Builder is where you bring together tasks and questionnaires into an experiment participants can take part in. Here, you can visually lay out your experiment design, including randomisation, counterbalancing and more. All studies need to have an experiment built in the Experiment Builder as this is where you configure your participant recruitment and data collection. |
| Open Materials | Gorilla Open Materials is our contribution to Open Science. It's an open-access repository within Gorilla where you can publish your experiments, tasks and questionnaires. If you find relevant materials, you can clone them, edit them, and use them in your experiment. |
| Preview | Previewing allows you to view your task, questionnaire or experiment from a participant's perspective. It's a chance to ensure everything functions correctly. At the end of each preview, you can download the data to confirm your data are recorded as expected. Previewing is a simple but crucial step to ensure your experiment is ready to launch. |
| Project | Projects are where you build all of your tasks, questionnaires and experiments in Gorilla. You can think of each Project like a folder to keep your research materials organised. |
| Questionnaire | Use the Questionnaire Builder 2 to create surveys and questionnaires with multiple choice questions, rating scales, dropdown menus and more. If you need to control the timing or collect reaction time data, use the Task Builder tool instead. |
| Sample | Our Samples demonstrate how classic psychological tasks can be built in Gorilla. When logged in to your Gorilla account, you can access a searchable database of Samples to find exactly what you need. If a Sample fits your research, you can clone it into your own Project, edit it, and use it within your experiment. |
| Store | The Store is where participant scores and responses, can be saved for later use in the task, questionnaire or experiment. It enables branching of participants, rejecting low scores, redisplaying prior responses (piped text) and more! Our older tools and other platforms refer to this as embedded data. |
| Task | Use the Task Builder 2 tool to create stimulus-response, accuracy and reaction-time tasks using a wide range of stimuli and response options. Reaction time data is automatically saved to the data output! |
| Token | Gorilla charges one token per participant per experiment. The token represents the data that can be downloaded from an experiment. Find out more in our Pricing FAQs. |
| Version | A version is created when you commit a task, questionnaire, or experiment, capturing your progress as you build, test and share. You can use specific versions of tasks and questionnaires in experiments. New participants will complete the latest version of your experiment. |
Task Builder 2
| Gorilla term | Definition |
| Component | Components are the building blocks of an object. Each component has a unique function, allowing you to combine multiple components to create objects with custom functionality. As a simple example, you could combine an Image component and a Click Response component to create a clickable image object. See our Components guide for more information. |
| Display | Displays define your task's overall structure. A display is a group of one or more screens. For example, a Trial display might consist of three screens: a fixation cross, a stimulus screen, and a response screen. Listing the Trial display multiple times in the spreadsheet creates multiple trials. You can control which stimulus is shown on each trial by binding to the spreadsheet. |
| Object | An object is made up of one or more components working together. Combine components flexibly to achieve exactly the behaviour you want. |
| Screen | A screen is like a PowerPoint slide, where you present content and/or collect responses from your participants. By adding multiple screens within the same display (such as a fixation screen, a stimulus screen, and a response screen), you can create a sequence of events within a task. You can then reuse that sequence by listing the display multiple times in the spreadsheet. |
| Screen components | Screen components are components that function in the background of the screen, like scoring correct answers or setting time limits. You can find a full list of Screen components in the Screen section of the Components guide. |
| Spreadsheet | The spreadsheet is the driving force of tasks in Gorilla, controlling the order and repetition of displays. Each time a display is listed, all of its screens are shown in order. You can change content within a display on a trial-by-trial basis by binding components to the spreadsheet. You can also randomise the order trials are presented in by adding one of the spreadsheet randomisation components. |
Questionnaire Builder 2
| Gorilla term | Definition |
| Conditional Logic | Conditional Logic lets you control when a question appears in Questionnaire Builder 2. For example, you can show a follow-up question only if a participant gives a specific response. It ensures participants only see questions relevant to their answers. In other tools, this is often referred to as Skip Logic, or Display logic. Our Conditional Logic guide provides details on how this can be configured. |
| Object | In Questionnaire Builder 2, an object is the building block for creating questions or displaying content (such as images or audio). Each question type or block of content is a unique object. To ask participants a question, simply add the relevant Object to your page. Check out the available question types in our Objects guide. |
| Page | Each questionnaire is made up of one or more pages. On each page, add objects to ask participants questions. Participants move to the next page using the Next button, which is added to every page automatically. |
Experiment Builder
| Gorilla term | Definition |
| Experiment Tree | The Experiment Tree is where you visually lay out your experiment design, controlling the order of the experiment by connecting tasks and questionnaires together. |
| Node | Nodes are the building blocks of your experiment. Each task or questionnaire added to an experiment is an individual node. Every experiment begins with a Start node and ends with a Finish node. Control nodes are available to to easily add complex randomisation, counterbalancing and more to your experiment. A full list of the available nodes can be found in our Tree Nodes guide. |
| Recruitment Policy | Your Recruitment Policy determines how participants will be able to access your experiment. Options range from a Simple Link that can be shared on social media, email-based recruitment, or integrations with third-party recruitment platforms. Explore the Recruitment Policy guide to view all available options. |
| Recruitment Target | The Recruitment Target specifies how many participants you want to take part in your experiment. Each participant requires a token, so the Recruitment Target will also define the number of tokens allocated to your experiment. |
Premium tooling
As with all of the Gorilla tools, it is free to build your games, multiplayer tasks and shops. However, you will need a Standard subscription if you would like to collect data using one of the premium tools. Have a look at our Subscription guides to find out more!
| Gorilla term | Definition |
| Game Builder | The Game Builder tool allows you to build gamified tasks using animations and particle effects. Find out more in our Game Builder guides! |
| Multiplayer | The Multiplayer tool is a premium add-on with Task Builder 2. Multiplayer allows multiple participants to complete your task simultaneously and interactively using Text or Video chat to communicate. Find out more in our Multiplayer guides! |
| Shop Builder | The Shop Builder tool allows you to build simulated online shops to investigate consumer and purchasing behaviour, complete with your own product list, nudges, discounts and more! Find out more in our Shop Builder guides! |
Getting Started Webinar: Introduction
To help you get started with Gorilla, we've recorded our Getting Started Webinar. This webinar is split into eight parts on each of the pages in this section. The webinar is designed to give both an introduction to Gorilla and some practical steps to getting started with the tools, particularly the Task Builder.
Before watching the following videos, watch the video in the Overview section if you'd like an introduction to what's possible in Gorilla.
Mental Model of Gorilla
If you've just watched the video in the Overview section of this guide, you should now understand what's possible in Gorilla. The next step is to give you an overview of how Gorilla works:
The Task Builder
Now you're familiar with the overall process, let's have a look at how to build a task using the Task Builder:
Experiments
Once you've created your tasks, the next stage is to link them together as a complete study using the Experiment Builder:
Recruiting Participants
When you have an experiment ready to launch, it's time to recruit participants!
Downloading Data
Once you have collected data from participants, learn how to download your data:
Support
Watch the video below for more information about the support available when you build your study using Gorilla:
Open Science
Learn more about how you can reuse and share tasks and experiments built in Gorilla using our Samples and Open Materials repository.
Data Security
Finally, learn how Gorilla is both secure and extensible:
For a more detailed walkthrough of how to get your first experiment up and running in Gorilla, check out a recording of our onboarding webinar.
Understanding and Adapting Sample Tasks
Understanding Sample tasks
Watch the video below to learn how to understand how any Sample task is built in Gorilla, using four key skills.
You can find a public list of some Gorilla samples on our Samples page. When logged in to your Gorilla account, you can also access a searchable database of all our Samples and our Open Materials repository.
Adapting Sample tasks
Watch the video below to understand how to clone one of Gorilla's Sample Tasks, understand its structure and adapt it for your own research. in the video below, we clone and adapt a Relational Reasoning task.
Cloning a Task: Samples and Open Materials
Often, the easiest way to create a task in Gorilla is to clone it from an existing task.
If you don't yet have a Gorilla account, check out our public Samples page for a selection of the tasks we have available. If you already have a Gorilla account, use our full searchable Samples database to find what you need.
You can clone them straight into your own project, then make any changes needed for the task to do exactly what you want.
It's worth having a look through before deciding to create a task from scratch: you may find someone has already created something very similar to the task you want!
Depending on the tool you are using, you can either clone or export & import a task into your own project. You can follow our Cloning Guide for more information on how to do this.
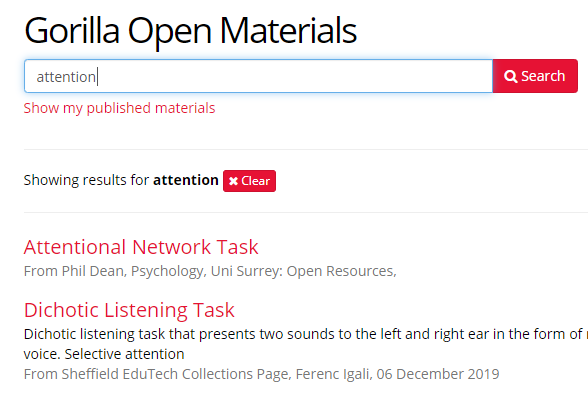
We also have our Gorilla Open Materials: a fantastic resource with shared materials from other researchers. Open Materials are often in folders which contain multiple tasks, questionnaires or experiments shared by the same Gorilla user. Try putting key words into the search bar to help you find a task that's similar to yours!
See our full documentation on how to clone tasks in our How To: Cloning guide.
Creating a New Task
Creating reaction-time tasks in Gorilla doesn't require you to do any coding! We have created a powerful and intuitive Task Builder that allows you to create tasks for your experiment using all sorts of stimuli. Participants' responses can be collected in a variety of ways, including touch, mouse and keyboard. There are also advanced options that allow you to provide feedback to your participants, on both accuracy and reaction times, during a task. Respondents' reaction time data is stored automatically and ready for your analysis!
To create your own task, open the project you want to create the task in, scroll down to Tasks & Questionnaires, and click Create New. In the window that appears, click Task Builder.
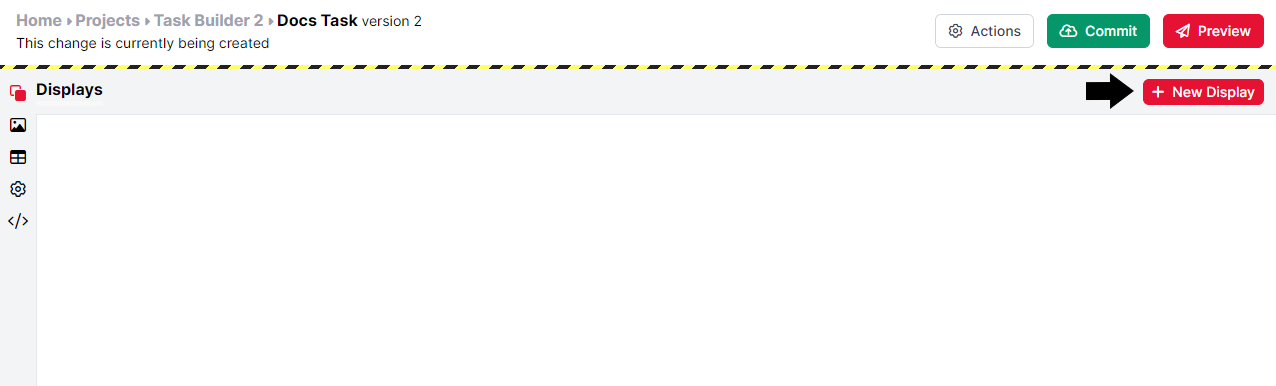
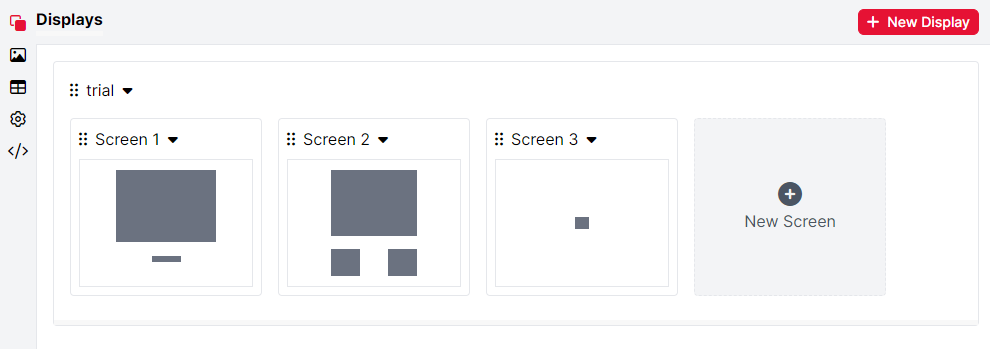
Tasks in Gorilla are made up of displays, which in turn are made up of screens. To add a new display, click the +New Display button (shown in the image below). You will then be prompted to name your display.
To add a new screen to your display, click the '+New Screen' button to the right of existing screens inside the display. You will be prompted to choose a template for your new screen: the simplest option is a blank screen, or you can use one of our pre-made templates as a base. You can fully edit any template, so don't worry that you'll get stuck with a format you want to change!
Typically, a display would contain the entirety of one type of trial in your task. For instance, if you have a series of trials that are each made up of a fixation cross presentation, followed by an image presentation, followed by a keyboard response, you would contain that trial within one display, but multiple screens. In Gorilla, you can present one display multiple times, with slight changes to the content (for example, to present a different image) each time. This will make more sense once you become familiar with how Gorilla Tasks allow you to order and repeat your displays - keep reading this walkthrough to learn how to do this using task spreadsheets!
Gorilla automatically saves your work as you go. However, when you have completed a significant amount of work on your task, you should also commit it. Questionnaires and Tasks need to be commited before they can be added to an Experiment.

Committing also gives you a form of version control: if you decide you want to return to an earlier version of your task, you can restore any of your previous commits.
To read our full support page on creating tasks, see our How To: Task Builder guide.
An Introduction to Task Objects
Components are the building blocks of Gorilla task screens. You can add multiple components together to create an Object.
A component is what we call any piece of content or any feature in the task builder. They vary from simple Stimuli components (text, images), to Response components (text entry, a button), all the way through to more advanced components (canvas painting, mousetracking).
You can find a full list of the components available in Gorilla in the Task Builder Components Guide, with information on how to use each one. To add an object to a screen, click Add Object. Then, you can choose from the list of components. To add more components to your Object, click the Add Component button. When you add an object to a screen, you should position it in the location you want it to appear to your participants.
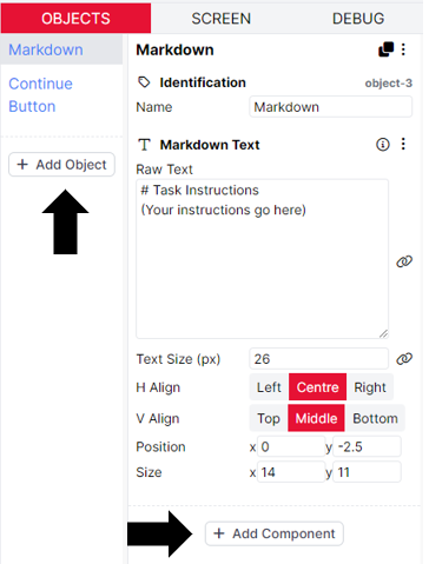
Then, you will need to configure the components. You may need to choose which content you wish to show to your participants. This could be an image, some text, a video, depending on the component. For example, you may need to choose the Image you wish to display to participants from your uploaded Stimuli.
To add text, just type in the text you want. If you are using a Markdown Text component, you can use markdown or HTML to change the appearance of the text.
Alternatively, you can bind content to the spreadsheet, to change stimuli on a trial-by-trial basis.
For more information on the different configuration settings of the component you are using, have a look at our Components Guide.
Creating a Task Spreadsheet
In Gorilla, the spreadsheet drives the task. Consequently, you will always need a spreadsheet even for the simplest task.
You can think of the displays you create as the units of your task. The spreadsheet tells Gorilla what order to display those units in. You can reuse a display as many times as you want, giving you multiple similar trials. For instance, you could start with a display which contains your instructions, then present your trial display 4 times to give your participants 4 trials.

Spreadsheets are also used for adding in information that changes. This could be a piece of content, such as having a different image presented on each trial. It could also be an answer, for instance if you ask your participants a maths question and you want to enter the correct answer to compare against.
You can add rows and to your Gorilla task inside Gorilla, in the Spreadsheet tab. However, if you want to add lots of content to your spreadsheet at once, it's usually easier to download a copy of the spreadsheet, make the changes in your favourite spreadsheet software (such as Excel), and then reupload the new version to Gorilla.
If you want to randomise your trials, you can choose one of our Spreadsheet Randomisation components.
Practical Example: Relational Reasoning
We have created a short walkthrough on how to build a classic Relational Reasoning Task in Gorilla! To view the walkthrough visit the Step-by-Step guide.
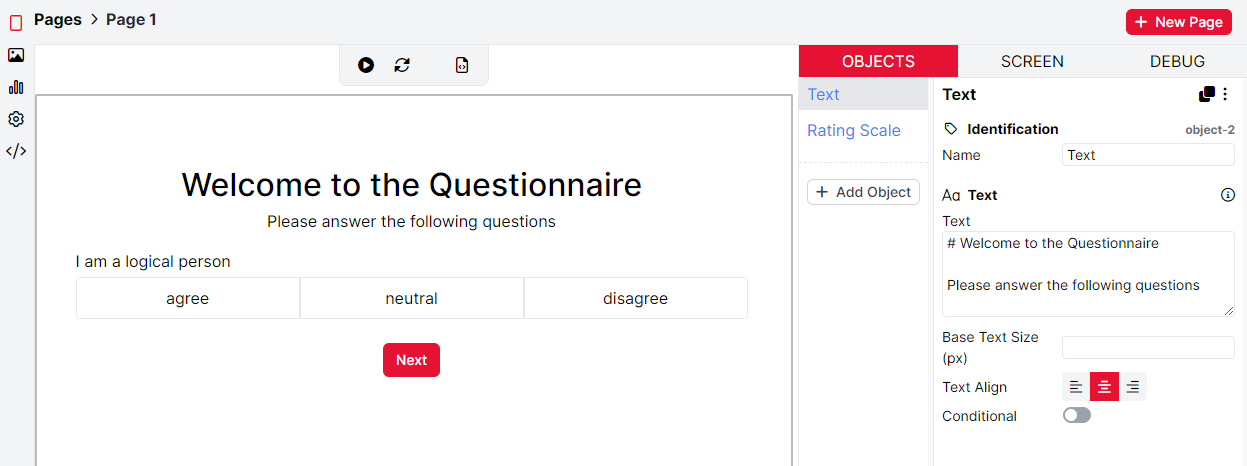
Creating a Questionnaire
The Questionnaire Builder is the ideal tool for creating consent forms, demographic questionnaires, surveys, or providing additional information to participants outside of the task itself.
Questionnaires are also made up of different objects. An object is normally a type of question, such as a text entry box or a Likert scale. It can also be a piece of content: some text or an image. To find out more about Questionnaire objects, check out our Questionnaire Objects guide.
Sometimes, you might want to use the answer a participant provides in a questionnaire to change the content they see later in your experiment, or to reject them from your experiment altogether. This is where Gorilla's Store comes in. To learn more about this, check out our Store guide.
Gorilla automatically saves your work as you go. However, when you have completed a significant amount of work on your questionnaire, you should also commit it. Questionnaires and Tasks need to be commited before they can be added to an Experiment. Committing also gives you a form of version control: if you decide you want to return to an earlier version of your questionnaire, you can restore any of your previous commits.
To read our full support page on building questionnaires, see our How To: Questionnaire Builder guide.
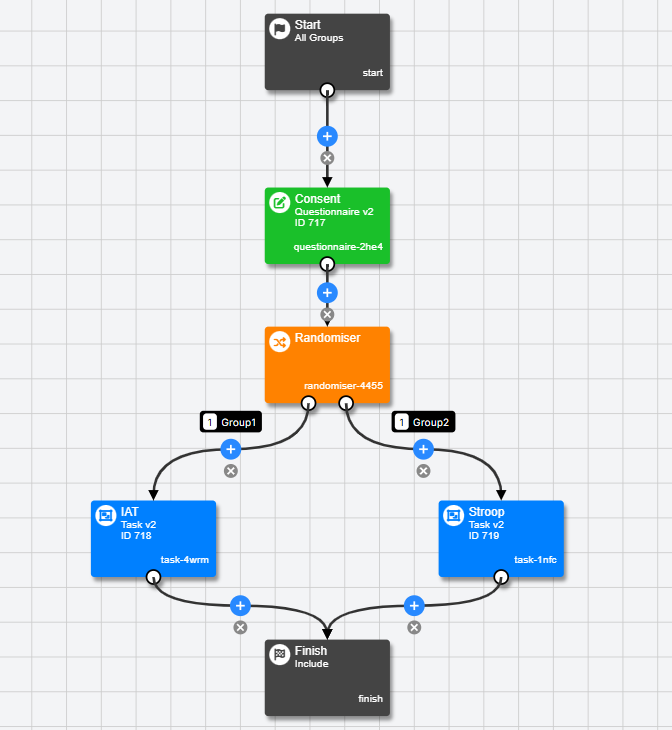
Creating an Experiment - Design Tab
In Gorilla, the Experiment Builder allows you to design and control every aspect of your study: from experimental design and participant recruitment, to secure data storage and protection.
The Design tab is where you'll create the flow of your Gorilla experiment.
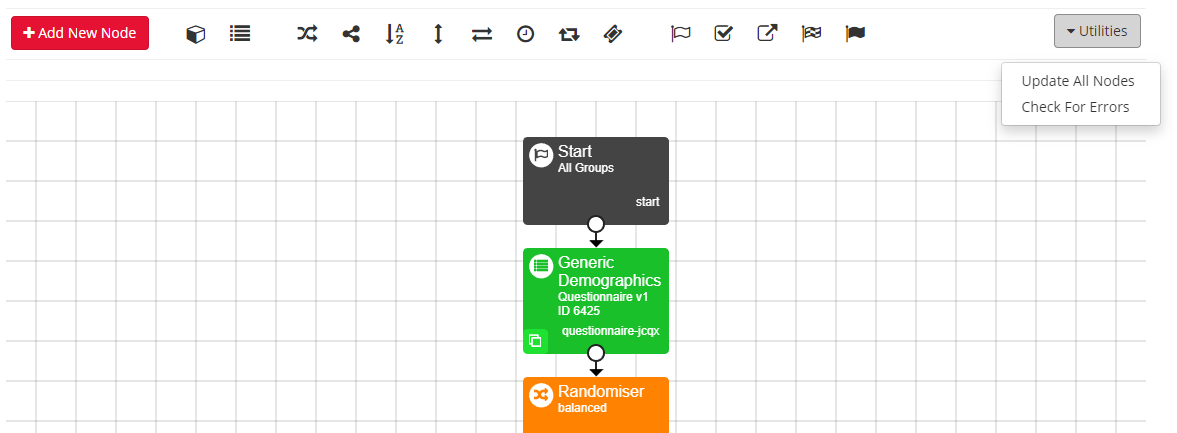
The component parts of a Gorilla experiment are known as Nodes. Every experiment starts with a Start node (or occasionally several) and ends with a Finish node. In between, you will put task and questionnaire nodes, containing the tasks and questionnaires you have created.
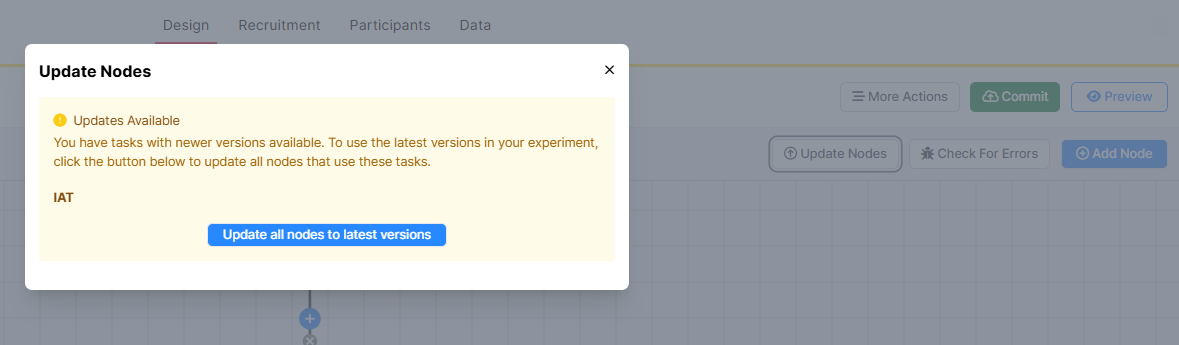
If you make changes to your tasks and questionnaires after adding them to your experiment, you will need to update the nodes to use the latest versions.
The screenshots below show New Experiment Builder. If you are still using Classic Experiment Builder, open the expandable section.
In Classic Experiment Builder, you can easily update the version of a task or questionnaire node that is used in an experiment by clicking the Utilities Button, then selecting Update All Nodes.
In New Experiment Builder, click the Update Nodes button. Gorilla will give a summary of the nodes that can be updated in a panel. To confirm the update of the listed nodes, click Update all nodes to latest versions.
You will also see a yellow icon with two upward arrows on any nodes in your experiment that can be updated to the latest version. You can click on that node and update this node individually, as well.
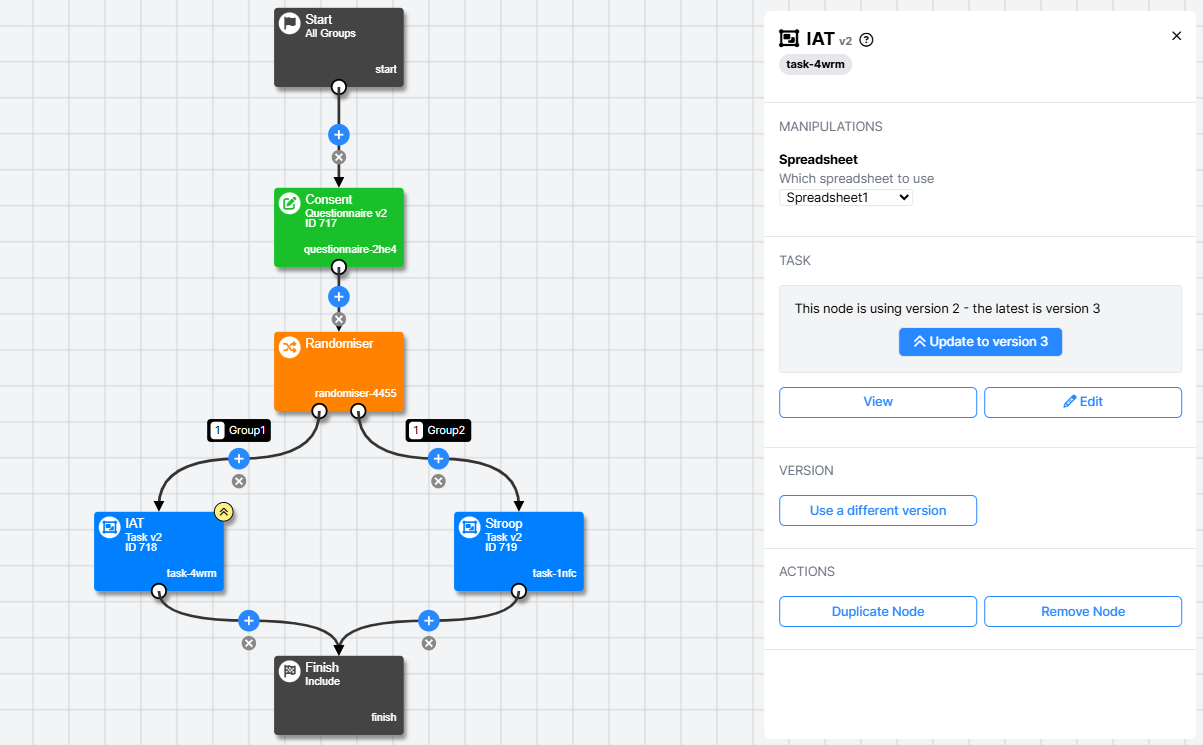
For most experiments, you will also want to add some Control Nodes! We have a complete listing of the nodes available on Gorilla in the Experiment Tree Nodes Tooling Reference Guide. They allow you to randomise your experimental conditions, to branch your participants based on their previous answers, and even to create multi-day experiments by including a timed delay!
Gorilla automatically saves your work as you go. However, when you have completed a significant amount of work on your experiment, you should also commit it. Experiments need to be committed before you can start participant recruitment. Committing also gives you a form of version control: if you decide you want to return to an earlier version of your experiment, you can restore any of your previous commits. The commit version that each participant experienced will be recorded, so you can re-commit your experiment partway through recruitment.
To read our full support page on creating experiments, see our How To: Experiment Builder guide.
Creating an Experiment - Recruitment
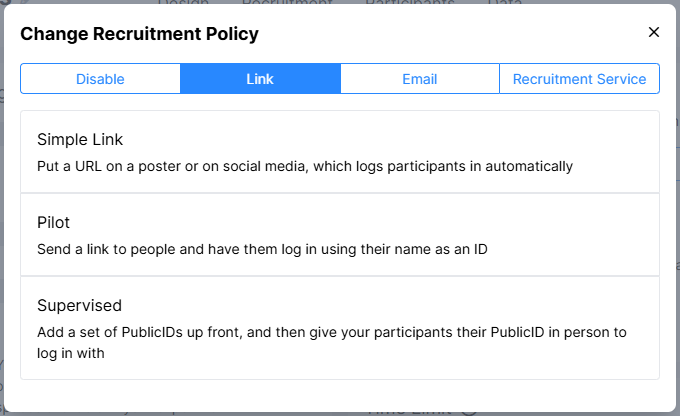
This is where you can decide how to recruit participants. The easiest method is a simple link - Gorilla will provide a link to your experiment, which you can then distribute. There are also other recruitment methods which allow you greater control over the participants who access your experiment.
This screenshot shows the new Experiment Builder interface. If you’re still using the classic interface, it will appear slightly different.
The recruitment tab is also where you set the number of participants you would like to enter your experiment. To recruit participants, you will need participant tokens. If you are already a member of a Gorilla subscription, you should do this by requesting tokens from your subscription. If you are not on a subscription, you can purchase pay-as-you-go participant tokens from the Recruitment tab. You could also look into purchasing a Gorilla subscription - for our subscription pricing information, see our Pricing FAQ.
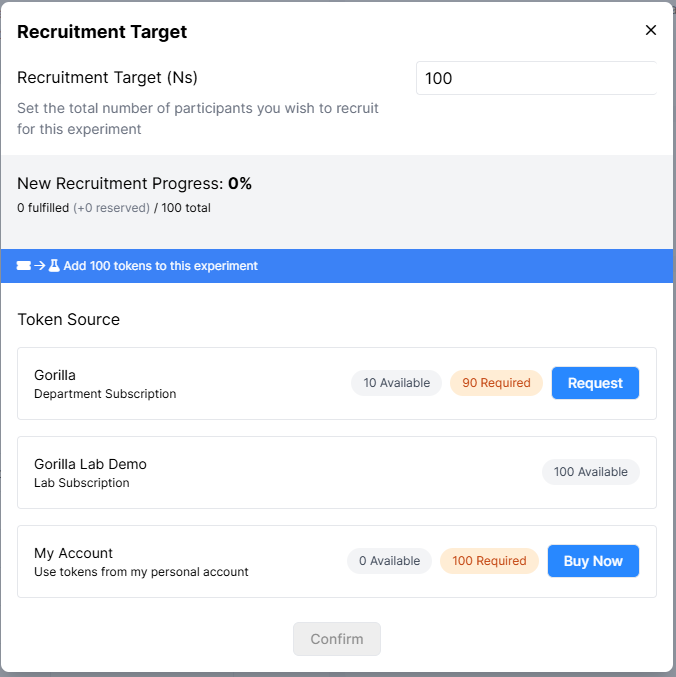
Alongside the multiple recruitment policy options available, you can also specify participant location, browser, device type and even minimum connection speed to ensure you recruit the exact participants you need.
Gorilla experiments are hosted on the Gorilla site and all participant data is stored securely on our servers. Participants do not need to download anything to create a Gorilla account - all they need is access to the internet and a browser. If you'd like more information about how we ensure data privacy and security, visit our Due Diligence support page.
It is worth noting here that Gorilla is not a recruitment service. That's a very different kind of service - which requires very different skills - and so we leave that to expert participant recruitment services. Gorilla does work with any good participant recruitment services. We have a support page with information on some of the recruitment services that tend to be favoured by behavioural scientists.
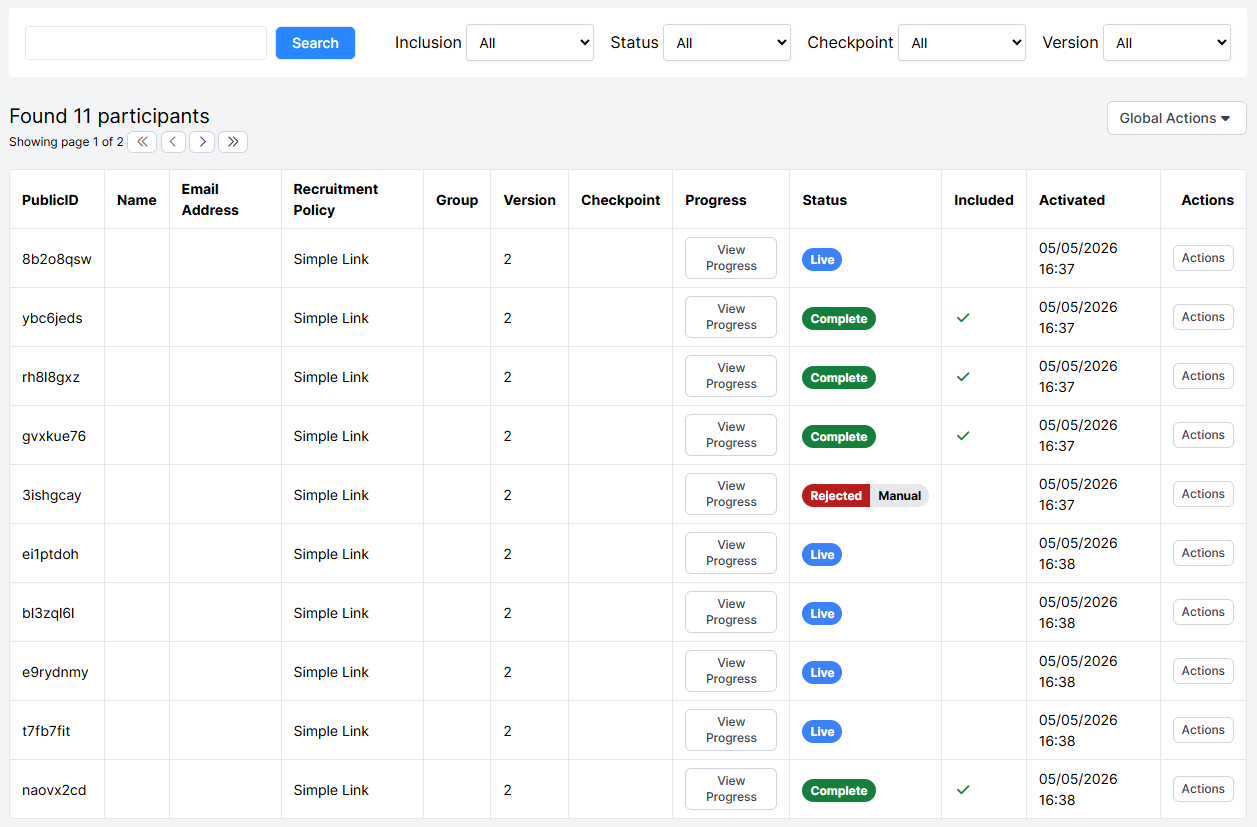
Creating an Experiment - Participants Tab
In the experiment tree, your Participants tab will display all of the participants who have entered your experiment. You can filter your participants by their experiment progress, by their inclusion status, and by the experiment version they completed.
From here, you can manually reject participants whose data you don't want to include in your study:
- If you reject a participant before they reach a Finish node, their token will not be consumed.
- If you reject them after they have completed the experiment, their token has already been consumed, but they will no longer be included when you download your data.
You can find some more information about this in our Participants guide.
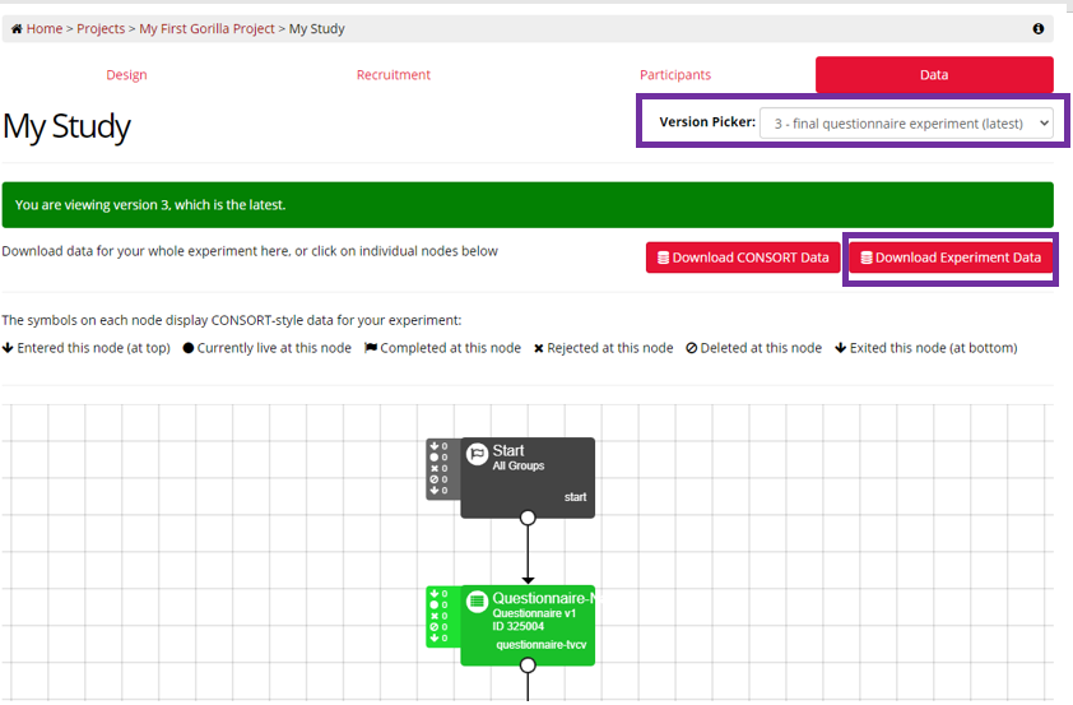
Creating an Experiment - Data Tab
The Data tab is where you can download your experiment data.
The screenshots below show New Experiment Builder. If you are still using Classic Experiment Builder, open the expandable section.
In Classic Experiment Builder, select the version of your experiment you want from the Version Picker and click Download Experiment Data to access your data:
In New Experiment Builder, the data generation panel is open by default.
If this is the first time downloading your data, you will first need to generate your data, by clicking on the Generate Data button.
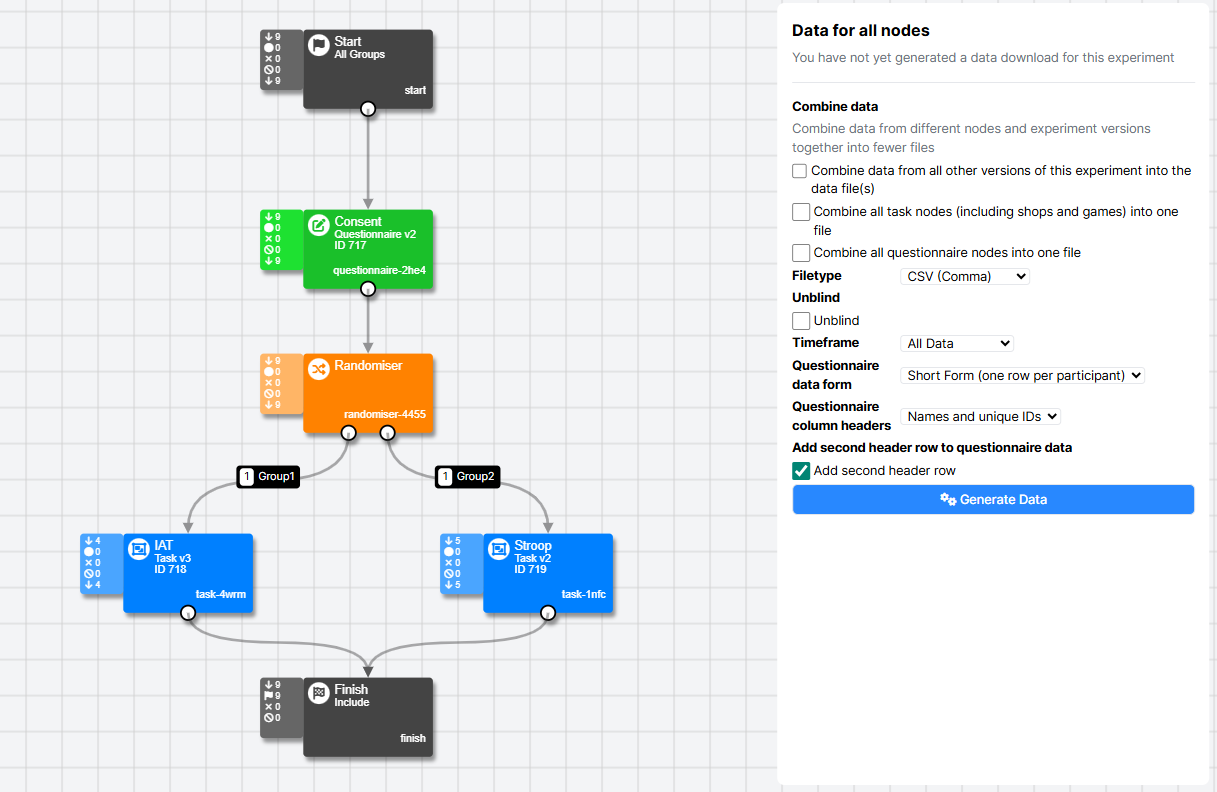
Once your data have generated, click on the Download Data button.
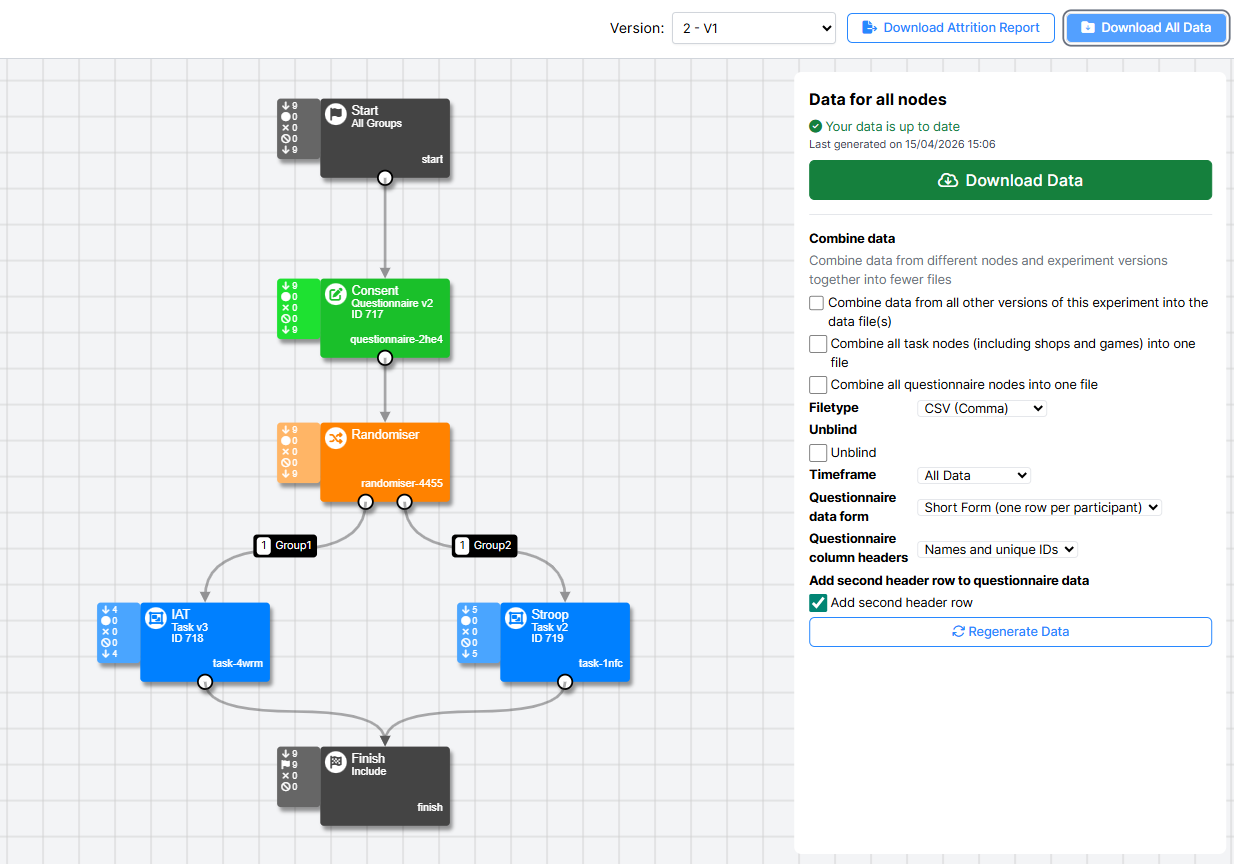
To download data from a specific task or questionnaire, click the task or questionnaire node in the experiment tree in the Data tab.
If you have collected new participants since the last time you downloaded your data, you will need to regenerate your data before downloading it. You can do this by clicking the Regenerate Data button.
By default, Gorilla will generate a separate file for each node, for the currently selected version of your experiment only. You can override this default and combine data across task or questionnaire nodes and/or across versions using the options in the Data for all Nodes panel. For more information on data generation options, see our guide on generating data.
Note: Your raw data files will contain a lot of metrics. Please don't be overwhelmed by this: there are some easy ways to filter out only the data you are interested in. We have a Data Analysis Guide to help you with your Gorilla data.
Sharing and Cloning
Collaboration, review and replication are important aspects in all research projects, big or small. That's why we've made sharing your Gorilla creations and collaborating on your research with others easy and free for all Gorilla users.
If you want your experiments, tasks and questionnaires to be openly available on Gorilla, look into using our open materials repository.
If you want to share your Gorilla creations with specific researchers and colleagues, Gorilla has built in ways to make collaborating, reviewing and replication as simple and as straightforward as possble. Not sure which option is for you? Read our Sharing and Cloning guide to find out more!
Open Materials
Gorilla Open Materials is our contribution to Open Science. It will allow researchers to view and try out each others' experiments (for free!), making it incredibly easy to communicate experimental designs.
You can also use Open Materials to quickly create your own study, by cloning an existing experiment, or by cloning tasks from several different researchers to use as templates.
Head to our announcement page to find out more about Gorilla Open Materials, or check out the repository for yourself.
Markdown
Markdown is used throughout Gorilla in the Task Builder and Questionnaire Builder to add styling and to format text.
It is a very simple 'markup' language that can be used to format sections of text, providing a similar set of functionality to text editors such as Word. For example, you can create titles, embolden or italicise text or create numbered/bullet-pointed lists, among many other things.
The other key feature of Markdown is that you can include regular HTML code.
Below is a guide for common formatting in Markdown:
| Markdown Syntax: | What it looks like when displayed: |
| Creating Titles | |
|---|---|
|
# My Title |
My Title |
|
## My Subtitle |
My Subtitle |
|
### My Subtitle |
My Subtitle |
|
#### My Subtitle |
My Subtitle |
|
This is a my paragraph of text. |
This is a my paragraph of text. |
| Styling and formatting Text | |
|
You can also make text **bold** |
You can also make text bold |
|
and use *italics* |
and use italics |
| Inserting Line Breaks (Task Builder 2/Questionnaire Builder 2) | |
|
You can easily create separate paragraphs. <br/><br/>Just insert two <br/> tags between the lines! |
You can easily create separate paragraphs. Just insert two <br/> tags between the lines! |
| Inserting Line Breaks (Task Builder 1/Questionnaire Builder 1) | |
|
You can easily create separate paragraphs. Just press return and leave a clear new line! |
You can easily create separate paragraphs. Just press return and leave a clear new line! |
| Adding in Links to other web-pages | |
|
Adding in a [Link](https://gorilla.sc/support) is nice and neat! |
Adding in a Link is nice and neat! |
| Creating Lists | |
|
You can use bullet points:
|
You can use lists, which will be numbered automatically
|
|
You can use bullet points:
|
And lists, which will be numbered automatically:
|
| Using HTML within Markdown | |
|
You can use HTML within markdown and it will usually work pretty well: <img src='/support/images/gorilla_logo_red.png'> Just be sure to use single ' quotation marks within your html code. If you use double quotation marks in your html it may not always work! |
You can use HTML within markdown and it will usually work pretty well:
Just be sure to use single ' quotation marks within your html code. If you use double quotation marks in your html it may not always work! |
HTML
HTML, like Markdown, can be used to format sections of text within your Questionnaires or Tasks. HTML, or HyperText Markup Language, is an 'extensive language' which is used by all websites to communicate how information on a web page should be displayed within a browser.
In Gorilla HTML can be used instead of markdown to add styling to text, such as to embolden, italicise, colour or text alignment. Create titles, numbered/bullet-pointed lists and tables. It can also be used to link to external pages or embed images or videos.
When writing HTML 'elements' we must always use what is known as an opening tag (e.g. <p>) and a closing tag (e.g. </p>).
Markdown is a simpler language for formatting text content. However, you may wish to use HTML if you are more familiar with it, or if you need more flexibility in formatting things in a way Markdown can’t, such as adding colour to text.
Below is a guide to basic formatting in HTML:
| HTML code elements: | What it looks like when displayed: | |||||||||
| Creating Titles and Text Blocks | ||||||||||
|---|---|---|---|---|---|---|---|---|---|---|
|
<h1>My Title</h1> |
My Title |
|||||||||
|
<h2>My Subtitle</h2> |
My Subtitle |
|||||||||
|
<h3>My Subtitle</h3> |
My Subtitle |
|||||||||
|
<h4>My Subtitle</h4> |
My Subtitle |
|||||||||
|
<p>My paragraph would go here if I were writing one</p> |
My paragraph would go here if I were writing one. |
|||||||||
| Styling and formatting Text | ||||||||||
|
<p>You can create <strong>bold</strong> text.</p> |
You can create bold text. |
|||||||||
|
<p>Using <em>Italics</em> text is fun!</p> |
Using italics is fun! |
|||||||||
|
<p>Sometimes you will want to <u>underline</u> you text.</p> |
Sometimes you will want to underline your text. |
|||||||||
|
<p style="color: blue;">You can change the colour of your text by naming colours</p> <p>Or specify the colour using
<p>Alternatively you can use <span style="color: #1b9513;">
|
You can change the colour of all your text by naming colours Or specify the colour using 'decimal code' (R,G,B). Alternatively you can use Hex Code to pick a colour. |
|||||||||
|
<p style="font-size: 150%;">You can change the font size by %</p> <p style="font-size: 16px;">Or specify the number of pixels (px) for your new font size.</p> |
You can change the font size by % Or specify the number of pixels (px) for your new font size. |
|||||||||
|
<p style="font-family: courier, sans-serif;">
|
You can also change the font style. Note: If you use a font that the participant’s browser/operating system does not support, the text will not appear. Its good practice to add in a backup after your first font style. Separate this back-up font from the first by using a comma. Sans-serif usually works. |
|||||||||
|
<p>You can combine different formatting e.g.
|
You can combine different formatting e.g. colour, font size and style by listing your formatting elements one after another, separated by semi-colons. | |||||||||
| Aligning Text | ||||||||||
|
<p style="text-align: left;">
|
This text is aligned to the left. |
|||||||||
|
<p style="text-align: center;"> This text is centre aligned.</p> |
This text is centre aligned. |
|||||||||
|
<p style="text-align: right;">
|
This text is aligned to the right. |
|||||||||
|
<p style="text-align: justify;"> This text is justified.
|
This text is justified. You may wish to use this when writing longer paragraphs. |
|||||||||
| Adding in Links to other web-pages | ||||||||||
|
<a href="https://gorilla.sc/support/">My Link</a> |
My Link | |||||||||
|
<a href="https://gorilla.sc/support/" target="_blank">
|
Open My Link in a New Tab | |||||||||
| Inserting Line Breaks | ||||||||||
|
<h4>This is how to insert a line break</h4>
|
This is how to insert a line breakbetween other html elements. |
|||||||||
|
<p>Sometimes you want to separate text with a horizontal rule</p>
|
Sometimes you need to separate text with a horizontal rule like this! |
|||||||||
| Creating Lists and Tables | ||||||||||
|
<ul>
|
|
|||||||||
|
<ol>
|
|
|||||||||
|
<h4>This is how to create a score table:</h4> <table class="table border border-gray-300"> <thead> <tr> <th>My Heading</th> <th>Score1</th> <th>Score2</th> </tr> </thead> <tbody> <tr> <th>My Row Label</th> <td>value 1</td> <td>value 2</td> </tr> <tr> <th>My Next Row Label</th> <td>value 3</td> <td>value 4</td> </tr> </tbody> </table> |
This is how to create a score table:
|
|||||||||
Saving Data to the Store
Store data is data collected about a participant's responses that can be used to alter the experiment (in real time) depending on their response. Essentially, store data is information you can ’carry’ from one part of your task or questionnaire to others within the same experiment.
Learn how you can manipulate your experiment using Store Data through our guide to Store Data in the Task Builder and guide to Store Data in the Questionnaire Builder.
Scripting in the Task Builder
Gorilla's scripting tools allow you to fully customise your task by creating and adding new components to the Task Builder. Find out more in our guide to scripting in Task Builder 2.
Gorilla Code Editor
If you are a confident coder and would like to create your task entirely from scratch, you can create a Code Editor task.
To do this, click the +Create button inside a project, check the Show Legacy Tools option, and choose the Code Editor.
You can view a list of sample tasks created in the Code Editor guide.
Localisation
You can customise the language used within Gorilla tasks and questionnaires to localise the content of your experiments. See our Localisation guide for more information.
Randomisation and Attrition
If you're not sure which type of randomisation to use in your experiment, we've got a great guide to Randomisation and Attrition which will walk you through the differences.
Bot Checks
To ensure your participants are real humans and not bots, we have a collection of Sample Bot Check tasks.
You can place any of these tasks in the experiment tree to help reassure you about the quality of the data.
Publications citing Gorilla
You can find a list of publications that cite Gorilla on our Publications page.
Spotlights
We've interviewed Gorilla users about their fascinating research, and how they think online research will change their fields. Read the interviews on our Spotlight page!