How To: Game Builder
- Scenes
- Creating Scenes
- Spreadsheets
- Stimuli
- Putting your Game online
- Settings
- Animation
- Scripts
Overview
The Game Builder allows you to create simple games to use in behavioural research studies. It's designed to support both gamified versions of more 'traditional' cognitive tasks, as well as more open ended experiences. Like Task Builder 2, you can incorporate text, image, video or audio stimuli, and collect participant responses in a variety of ways (mouse, keyboard etc). However, in the Game Builder, we use animation to control how elements appear and move. This allows you to create a much richer and more engaging experience, while maintaining all the rigorous scientific control required for research studies.
Importantly, you do not have to touch a single line of code. All the layout and animation can be designed using visual tools.
Check out the list of topics in the menu to see what each part of the tool does, and follow our step-by-step guide to build your first game and learn the tools quickly.
Getting Access to the Game Builder Tools
The Game Builder is available to all Gorilla users. It's free to start building your Game Builder tasks and preview them. You can create a Game Builder task from inside any of your projects and you can also contact the Support Desk if you have any questions about Game Builder!
To add your Game Builder tasks to an experiment and start collecting data, you'll need a licence. Visit our pricing page for more information.
Creating a new Game
A new Game can be created within a Project by scrolling down to Tasks & Questionnaires, clicking Create New, and selecting Game Builder.
Enter a name for your new Game and press 'Create'. When choosing a name for your Game, try to make it something unique and memorable - a name you would easily associate with the Game contents.
You will use this name to identify your Game in your project. It is also the name people will see if you collaborate or share your Game with someone, so it's important that they would be able to recognise it easily too!
Once created, you will be directed to the Scenes view, where you can start building your scenes.
You can rename your Game at any time, or add a description, by clicking the pencil icon next to the Game's current name at the top left. Descriptions are limited to 1000 characters in length.
Introduction
The Scenes tab is where you configure all the different scenes used in your task. In the Game Builder, there are three different types of scene:
- Scenes represent a single part of your task. This might be an instructions screen, or a trial, or a break screen.
- Backdrop is a special scene that is always visible. Use this to create a background for your task (for example, this could be a forest or a space station).
- Spawnables are special scenes that you can make dynamically appear. Use these for effects such as explosions or puffs of stars.
As an example of how these three might be used together, consider a simple game where the player controls a space rocket that shoots asteroids with its laser:
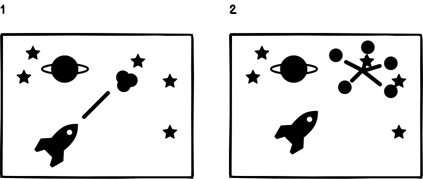
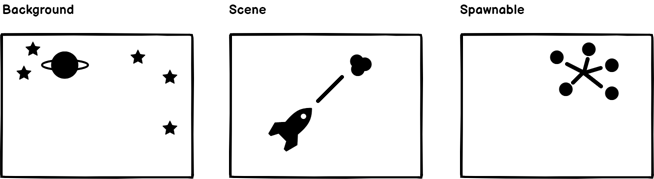
The stars and planet, which are always visible, would be in the Backdrop scene. The main Scene would show the rocket, laser and asteroid. The explosion effect would be a Spawnable, which we would spawn when the asteroid explodes. The image below shows how this example can be broken down into the different types of scenes:
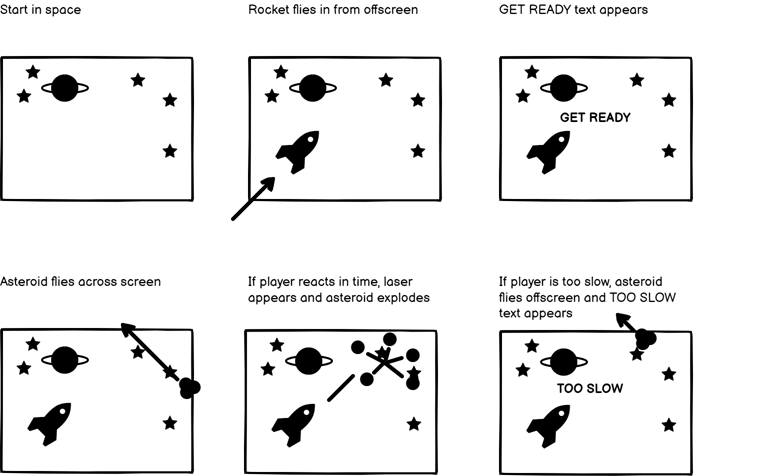
Storyboarding
A good approach to building your game is a process we call storyboarding. This means planning out the different interactions that should happen on the screen. Storyboards can be created on paper, or by using a program such as PowerPoint. For example, a storyboard for our rocket game might look something like this:
The storyboarding phase is a great time to start gathering images you will be using as part of your game. You can find a wide range of free (or very cheap) artwork to use in your games on sites such as Pixabay, Pexels, Unsplash, and Canva.
Once you're happy with the storyboard, you can put each part together within the Game Builder. Most of the time, you'll do this using animation.
Scene Editor
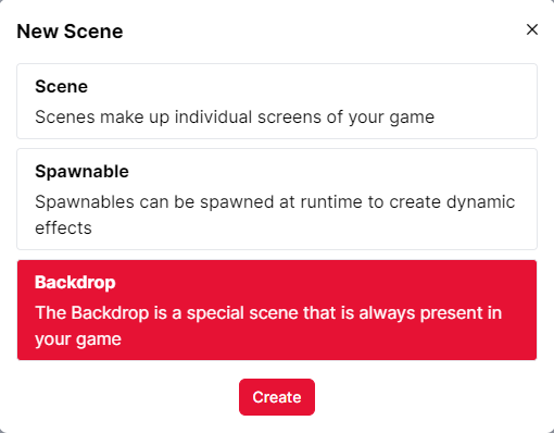
You can create any of the three types of the Scenes by clicking '+ New Scene' on the right:

When you add a new scene, a menu will prompt you to choose either a Scene, Backdrop or Spawnable.
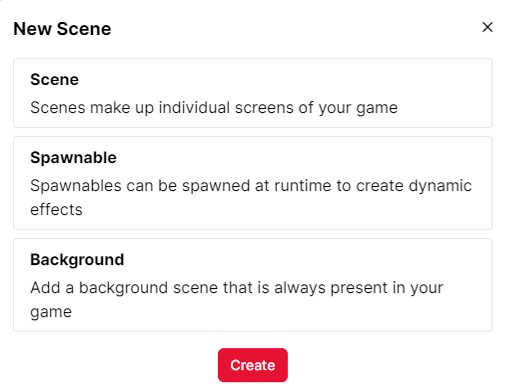
Once you select an option and click Create, you will be taken to the Scene Editor. The scene editor is split into three main sections:
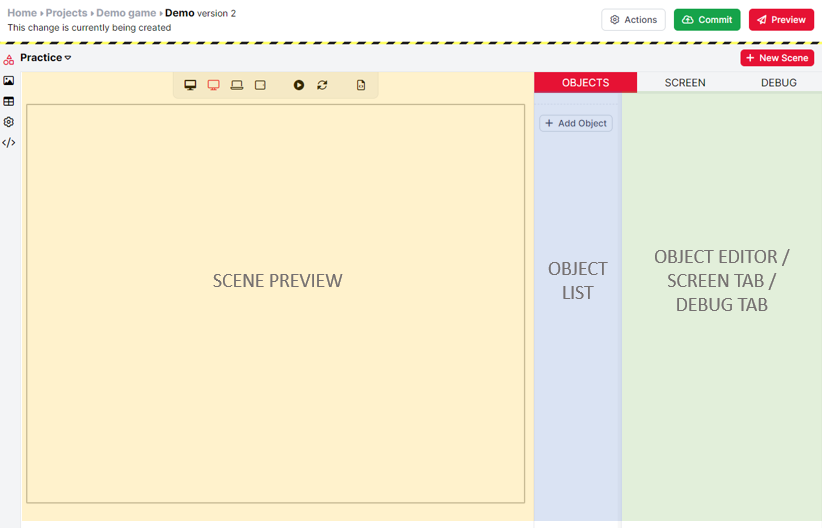
Scene Preview
The Scene Preview panel (the largest section highlighted in yellow above) shows you a live preview of your scene.
In the bar across the top, you can use the first four buttons to click between different screen dimensions to see how your screen will look at those resolutions. Hover over each icon to see what device it represents. The in-editor preview tests four 'common' resolutions: Large Montor (1920 x 1080); Small Monitor (1280 x 1024); Laptop (1440 x 900); Tablet (1024 x 768). These are just the common measurements and won't be indicative of all possible devices. The previews can be used as a guide to make sure things will approximately display correctly. Therefore, for most participants, if it looks okay in these previews it should be okay for them. However, you should continue to test and pilot your experiment across different devices and use all of the available scene space when creating your game. Have a look at this video walkthrough for viewing your game at different screen sizes using the developer tools.
The Play and Reload buttons allow you to preview the sequence of events in your scene from start to finish. Press Play to preview the scene, and Reload to start the preview again from the beginning. Clicking the Play button again will take you back to edit mode, where you can make further changes to your scene.
The final button, View Source, allows you to view the underlying code that controls the objects and their components in the scene. If you prefer, you can edit the source directly to add or edit objects and components as well as adjust their settings, instead of using the graphical user interface. The Source also provides an easy way to way to copy entire scenes between Games. You can copy the Source in a screen from one game and paste this in the Source of another. Clicking 'Back to Tools' at the top-left of the Source will return you to the standard view of the Scene Editor.
Object List
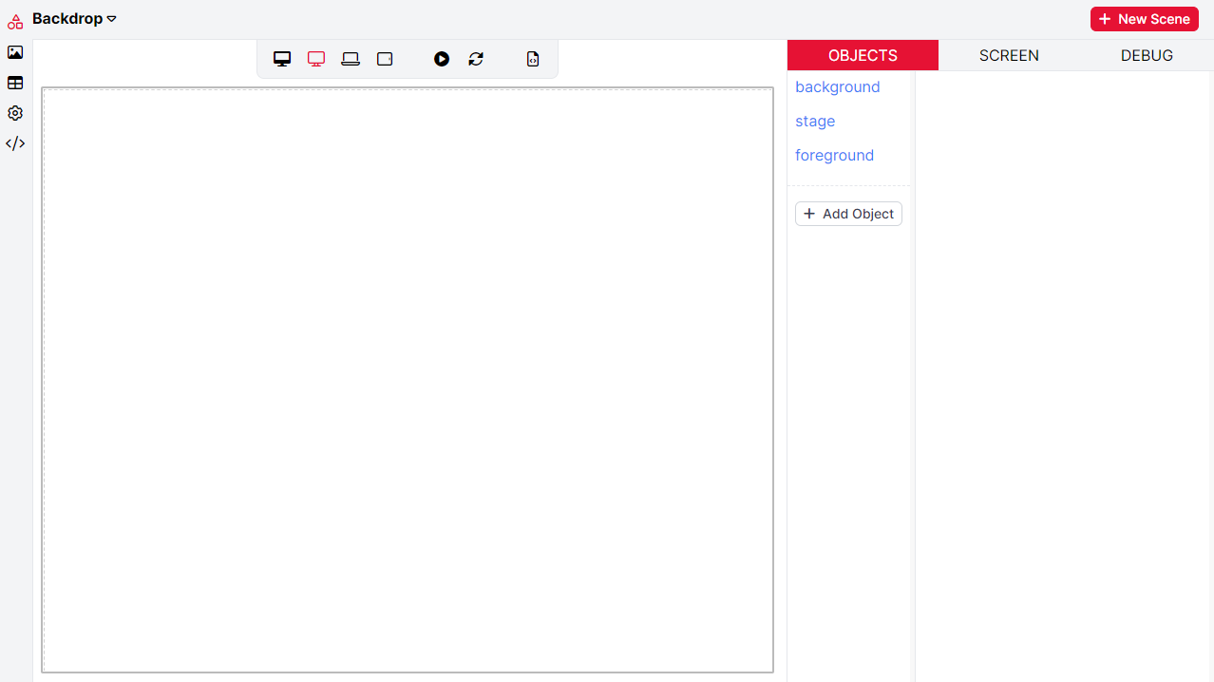
The Object List (shown in blue) shows a list of all the objects on your screen. When you first add a Scene or Spawnable scene, this list will appear empty until objects are added. If you are adding a Backdrop Scene, three objects will appear by default: the background, stage and foreground. You can read more about adding Backdrop scenes later in this guide.
You can reorder objects in the Object List by clicking and dragging them up and down. This is useful for controlling which visual components are displayed in front of or behind other visual components. Here, you can also drag objects diagonally to become children of Containers. You can read more about this in the Positioning Guide.
The panel on the right (highlighted in green) has three functions, depending on which tab above it is highlighted in red: OBJECTS, SCREEN, or DEBUG.' The Object List is only visible when OBJECTS is selected from the panel on the right.
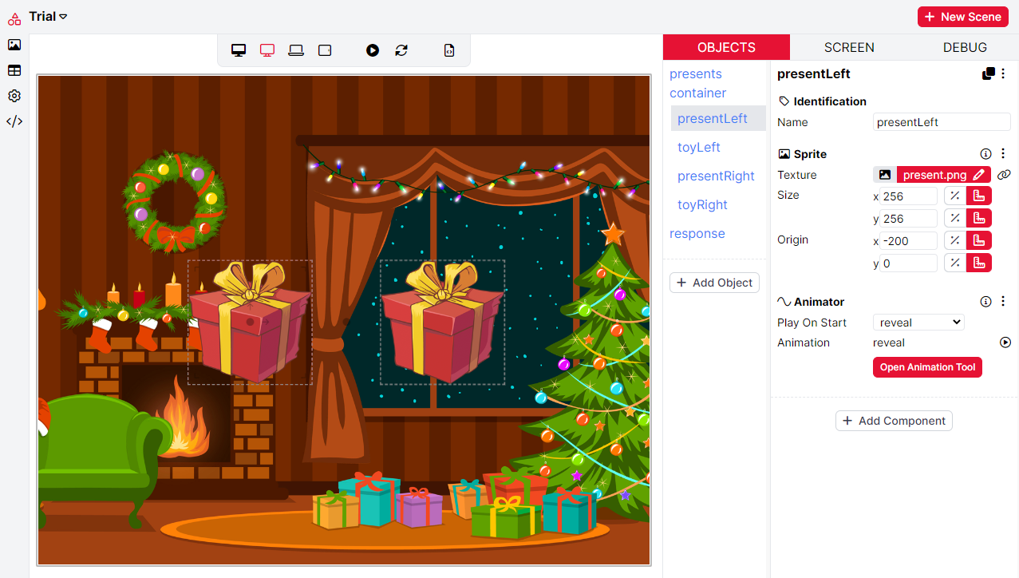
Objects Tab
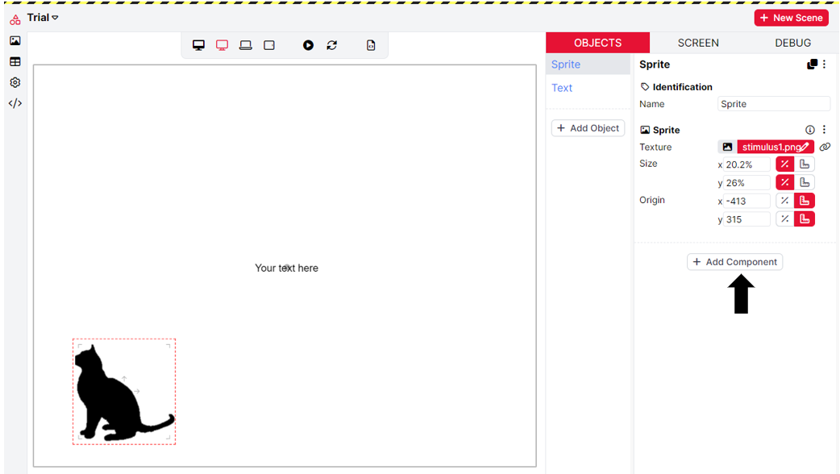
When OBJECTS is selected, this panel functions as the Object Editor. Clicking on an object in the Object List will open its configuration options and components here:
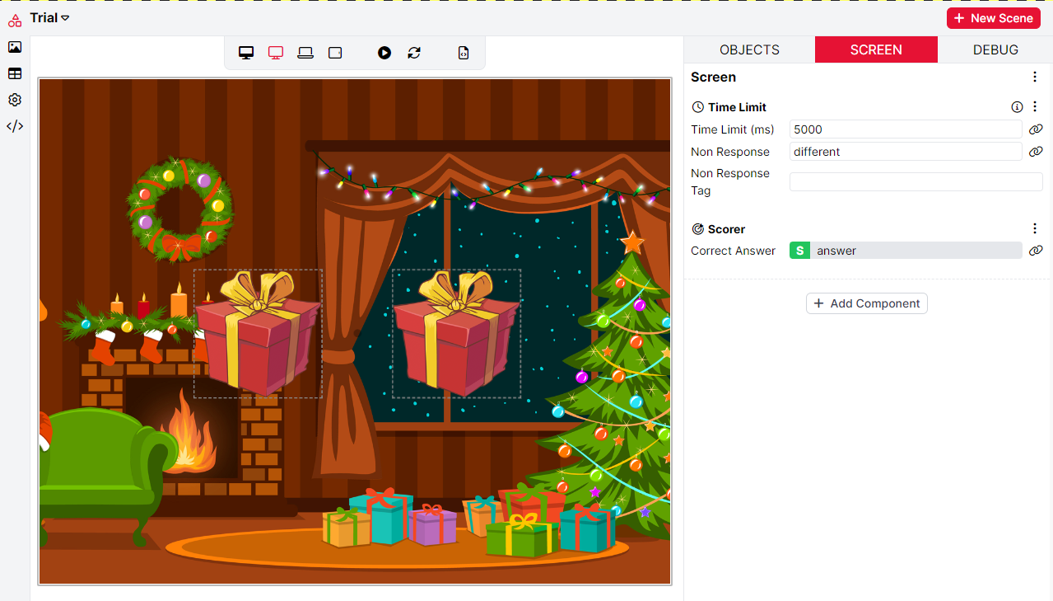
Screen Tab
When SCREEN is selected, this panel functions as the Screen Tab. Here, you can add special components to implement things that apply to the entire screen. For example, adding a timelimit to the screen, accuracy scoring or saving responses to use later in your game or experiment.
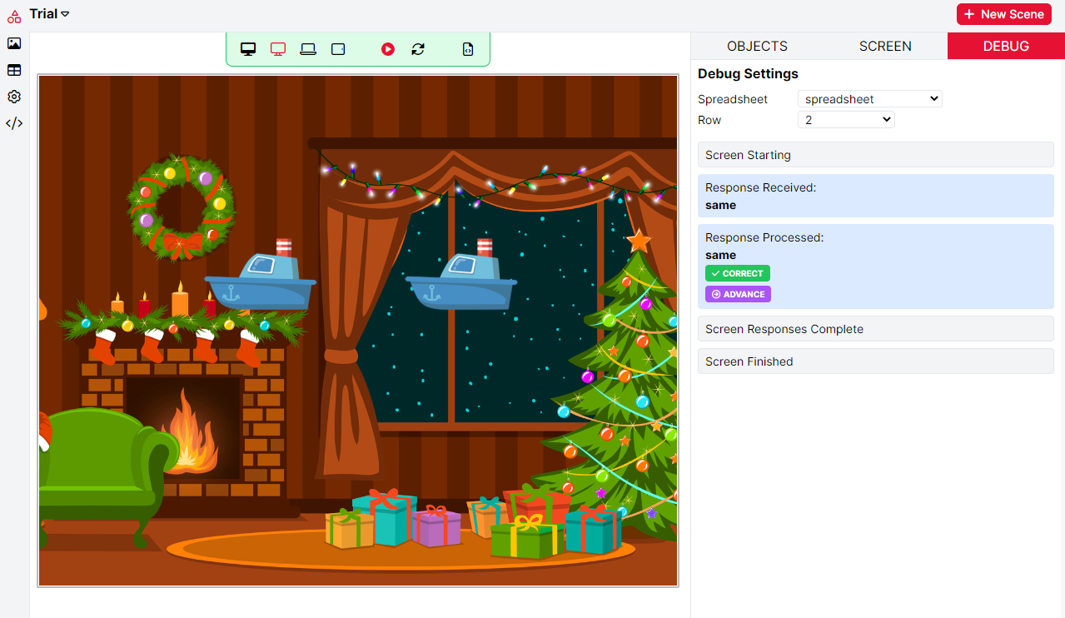
Debug Tab
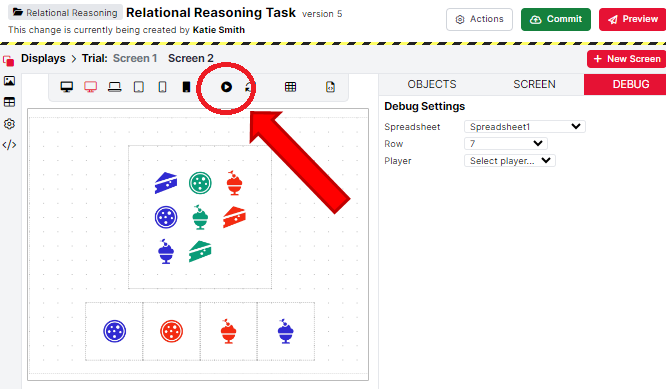
When DEBUG is selected, this panel functions as the Debug Tab. The Debug Tab will automatically open when you press the Play button in the Scene Preview. Here, you can select specific trials from specific spreadsheets to show on the scene preview by using the dropdown menus. Press Play to preview the sequence of events in your scene (including non-visible events like responses).
Adding Objects
Click the Add Object button to add a new object to your scene:

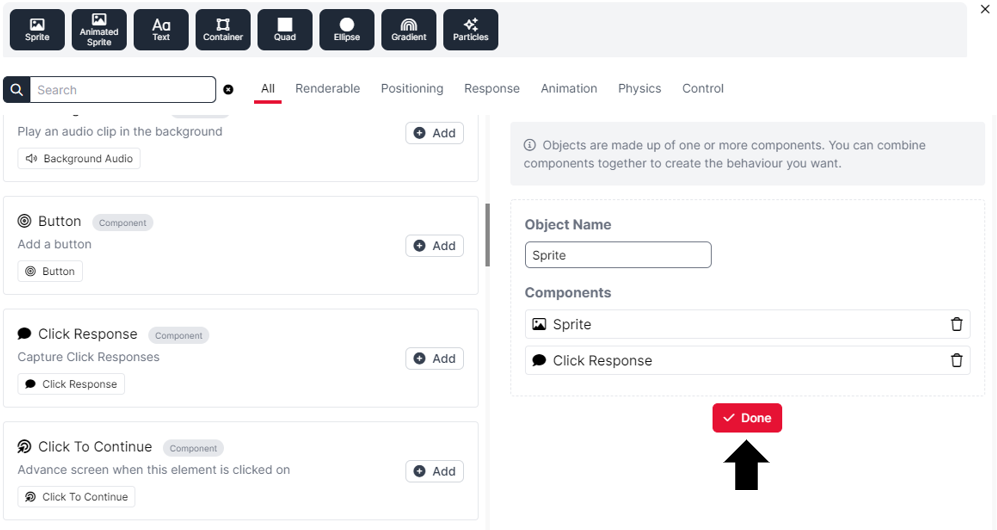
This will open the Object Builder menu, where you can choose the components you would like to add to your object:
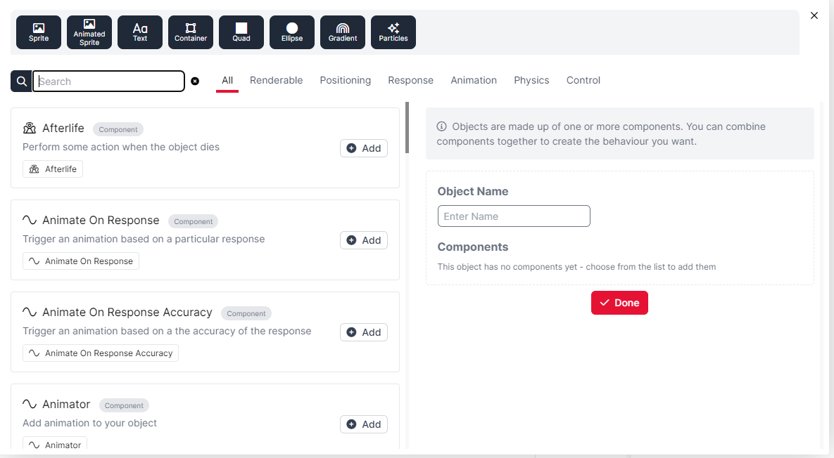
Objects are made up of components, which allows you to combine different bits of behaviour together. You can also use Prefabs, such as 'Animated Sprite'. Prefabs are pre-made bundles of 2 or more components that work together to create specific functionality. For example, the Animated Sprite prefab consists of 2 components: Sprite and Animator. This means you can add your custom animations created within the Animator to the Sprite. Read more about how the Object-Component System enables greater flexibility in your game.
Use the search bar on the top left of the Object Builder to search for components and prefabs to add to your object. You can also browse the categories to the right of the search bar (Renderable, Positioning, Response etc.) to bring up lists of relevant components and prefabs. Finally, clicking one of the dark buttons at the top of the Object Builder will immediately create an object that is frequently used. For a full list of components and their settings, see the Game Builder Components Guide.
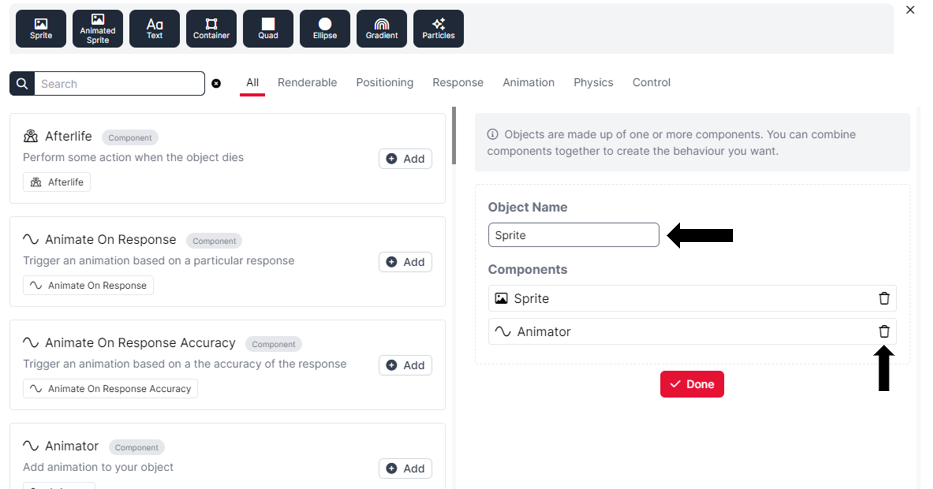
You can combine prefabs and components flexibily to create the functionality you want. For example, you could start with an Animated Sprite then swap the Sprite for some Text to create Animated Text instead:
Note: One restriction to combining components is that each object can only contain one Renderable component. Renderable components are usually visual components that you can see within the scene, for example Sprite, Text and Quad components. The only case where a Renderable component will not be visible, is if you are using a Hotspot component (but the case remains that you can only have one Hotspot per object). If you try to add a Renderable component (or prefab containing a Renderable component) to an object that already contains one, the Object Builder will swap in the new Renderable to replace the old one. For example, in the video above, the original Sprite component is swapped for the new Text component. If you need to combine multiple Renderable components, you will have to add these to your scene as separate objects.
In the Object panel on the right of the Object Builder, you can rename your object using the Object Name field. You can also remove components by clicking the bin icon on the right of each component.
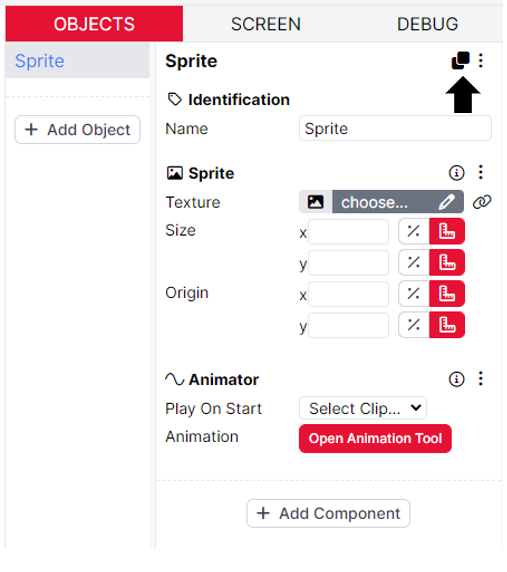
Once you are happy with the object you have built, click Done. This will return you to the Scene Editor. Your new object will now appear in the Object List, and its components and configuration settings will appear in the Object Editor on the right. You can add or change any components in your object by clicking on Add Component, this will open the Object Builder with any existing components in this object.
You can create a copy of an object by clicking the Duplicate button in the top-right of the Object Editor:
You can also copy and paste an object's properties and components into another existing object by using the three-dots menu in the Object Editor. On the object you want to copy, click the three-dots menu and select 'Copy'. Then, click on the object you want to paste into, and select 'Paste' from the three-dots menu. Note: this will overwrite any existing components and settings on that Object.
You can even copy and paste objects across games! Simply open each game in a separate tab, and then copy and paste the objects between the games in the same way as explained above.
Positioning Objects
If you add an Object that contains a visual component, it will be placed by default in the centre of the scene (0,0). You can move it by clicking and dragging around the scene, or by changing the X and Y Position values under the visual component in the Object Editor. For most Renderable components (except Text and Particles), you can choose to specify the position using pixels (the ruler icon), which are the raw coordinates of the screen, or you can define the position as a percentage (the % icon) of the screen size:
You can also control the back-to-front display ordering of these objects by dragging them up and down in the Object List to change their order. Objects that are lower in the Object List will be displayed in front of objects that are higher. Read more about the layout of scenes in the Positioning Guide.
Configuring Components
Click on an object in the Object List to configure its components:
The settings available depend on the components that the object has. You can find a full list of components and their settings in the Game Builder Components Guide.
Click the Add Component button to add a component to an object:
This will then open the Object Builder. Search or browse for a component, and then click Add to add it to your object. Click done when you are happy with the component(s) you have added:
To remove a component, go to the three-dots menu at the top right of the component and select 'Remove Component':
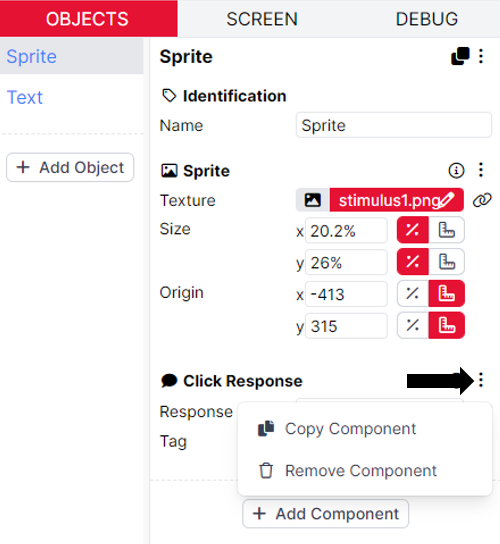
You can also use the three-dots menu to copy a component by selecting 'Copy Component'. Click the object where you want to paste your copied component and select 'Paste' from the three-dots menu at the top of the object:
The exact effect this has will vary depending on the components the object already has. If the object already has a component of the same type (e.g., you are pasting an Animator component into an object that already has an Animator component), then the settings from the pasted component (e.g. animations you have created) will overwrite the settings of the existing component. If the object already has a component that is not the same type, but fulfils the same function (e.g., you are pasting Sprite component into an object that already has a visual component, such as Text), then the pasted component will replace the existing component. Otherwise, the pasted component will simply be added to the object's list of components, as in the video example above.
As you change the settings, the Scene Preview panel will update live:
Adding a Backdrop
Backdrop scenes will be present in all of the other scenes within the game, so you don't have to recreate it every time. To add a Backdrop to your game, click '+ New Scene', select 'Backdrop' from the menu and click Create:
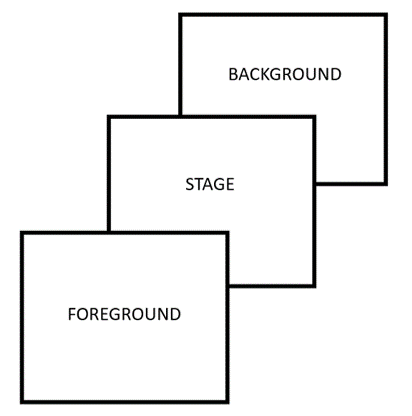
This will take you directly to your new Backdrop scene. There will be three objects pre-populated in your Backdrop scene: background, stage and foreground:
The main scenes created in your game will be added to the stage.
Anything added to the background will be shown behind any scenes added to the stage.
Anything added to the foreground will be shown in front of any scenes you add to the stage.
This creates a layering effect of scenes illustrated below:
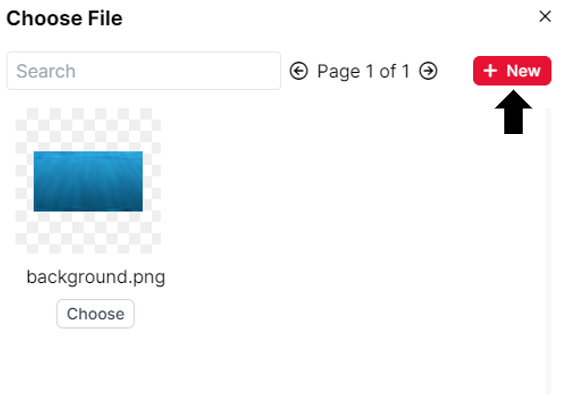
To add an image you would like to use as a background, you should first add an Object to the Scene with a Sprite component. You can set the texture of this Sprite to be the background image you would like to use. This image can be chosen from previously uploaded stimuli, or uploaded directly from your files, by clicking +New:
Set the size of the background to be 100% for both x and y, so that the image will fill the screen regardless of the device type:
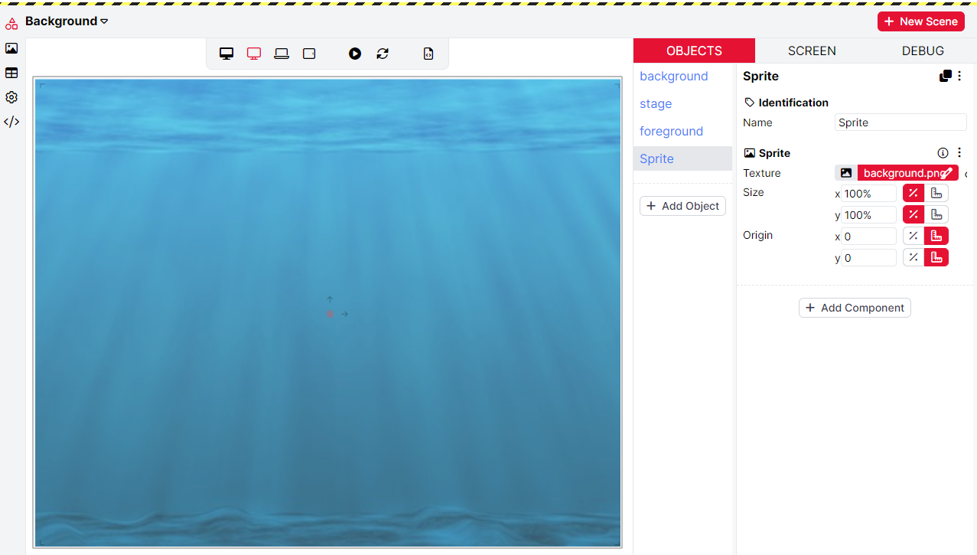
Finally, drag the Sprite to be a child of the background in the Object List. Doing this will ensure the background image appears behind any other scenes you add to your game. Children of objects will appear indented in the Object List:
You can create richer and more complex backdrop scenes by creating Objects to be children of the foreground, too. The backdrop scene created will be displayed in all scenes you create in the game.
Adding Spawnables
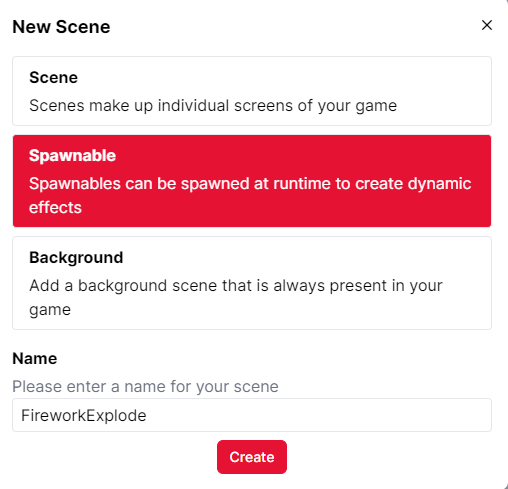
Spawnable Scenes are special scenes that you can trigger to dynamically appear within other scenes of your game. As previously mentioned, they are great for when you would like to create effects within your game. In this example, we will use a Spawnable scene to make a firework explode!
First, you will need to add a new Spawnable scene. Click '+New Scene' and select Spawnable from the menu. Give your spawnable a name, it is best practice to give your spawnables meaningful names so you can later identify them within your scenes. Click Create:
Then, you will need to upload any images you would like to use to the Stimuli Tab.
In this example, the Particle component is used to create the spawnable explosion. You only need to upload a single image, which will be multipled to create the effect. The configuration settings on the right can be adjusted to manipulate the effect created.
Use the Play button in the preview panel to see how your Spawnable will look:
Once you have created a Spawnable you are happy with, use a Spawn animation to trigger the appearance of the Spawnable.
Navigate to the scene where you would like to trigger the Spawnable. Here, there is a Sprite of a firework that we would like to control the appearance of the Spawnable. Add an Animator component to the Sprite object and open the Animation Tool to create an Animation. Add the Spawn animation, and configure the settings by entering the name of your Spawnable scene in the 'Spawn' field and attach it to 'Self'. In this example the Die animation is also added, so that the firework Sprite disappears once the Spawnable has been triggered. You can then preview how your Spawnable appears in the main Preview by setting the animation to Play on Start and using the Play button:
Using a Particle component in a Spawnable Scene is the most common use-case, but they are by no means limited to this! You could create Spawnables that use text and sprites - anything you wish to make dynamically appear within your main scenes.
Spreadsheets
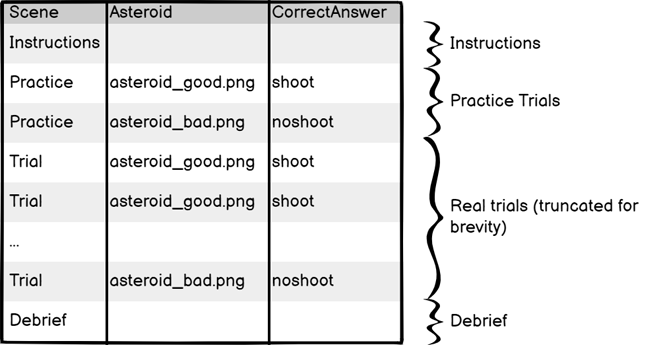
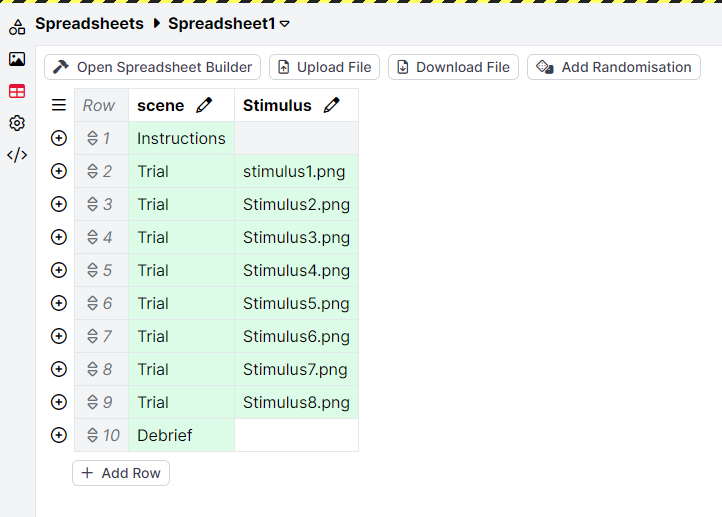
The actual order that your scenes are shown in is defined in a Spreadsheet. Each row represents a time step in the game. One column specifies the scene that participants should see, and the remaining columns define the stimuli and other settings that are used in that scene. The game will progress through each row in the spreadsheet one after the other until the game is complete.
For example, consider the example rocket game from earlier:
Let's say that during each trial, the player has to decide whether or not to shoot the asteroid. We want to show the instructions first, then do two practice trials, twenty real trials, and then the debrief at the end. Each of the practice trials and real trials uses different stimuli. Your spreadsheet may then look like the following:
When defining your scenes, there are many configuration settings (e.g. which image to display or what the correct answer is) which you can set to be controlled by a specific spreadsheet column. We call this process binding - you bind certain settings to the spreadsheet so that they take their value from the row that we're currently on. You can find more information about how to do this in the Binding to the spreadsheet section of this guide.
Editing Spreadsheets
To create a spreadsheet, click the New Spreadsheet button within the Spreadsheet Tab:

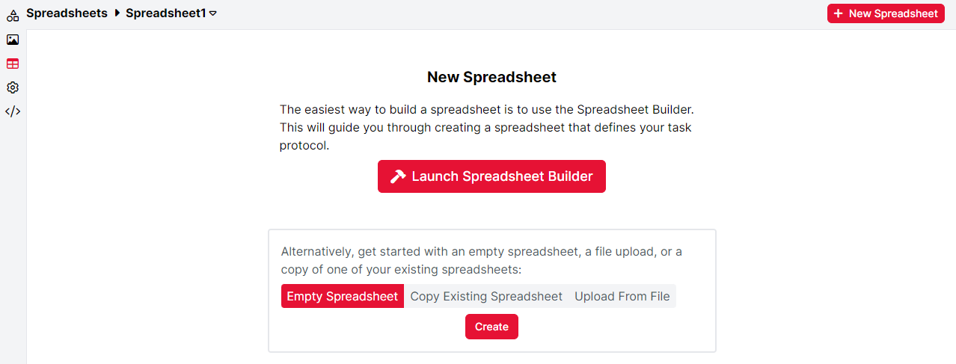
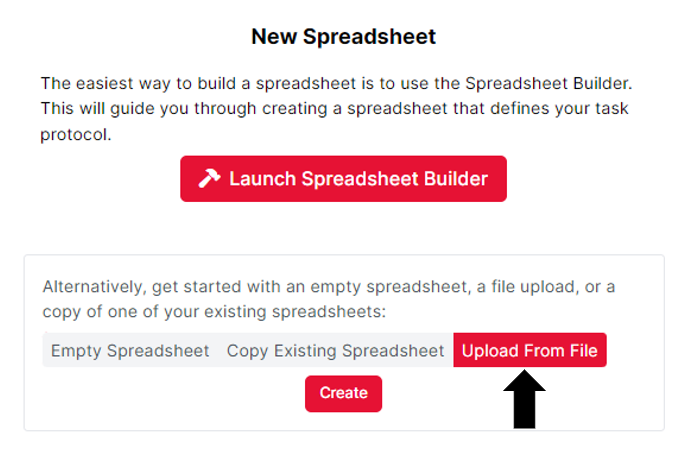
Enter a name for your spreadsheet and click Create. You will then have a choice of launching the Spreadsheet Builder, or alternatively starting with an empty spreadsheet, or file upload, or copying one of your existing spreadsheets:
Creating an empty spreadsheet
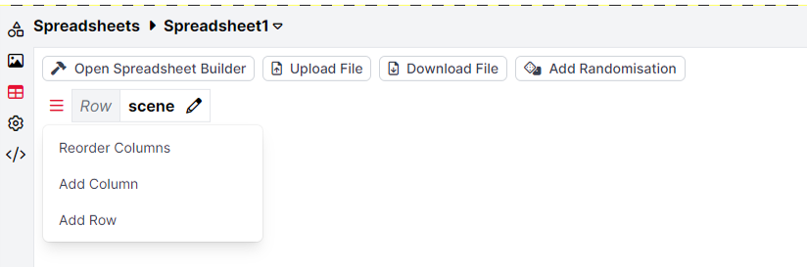
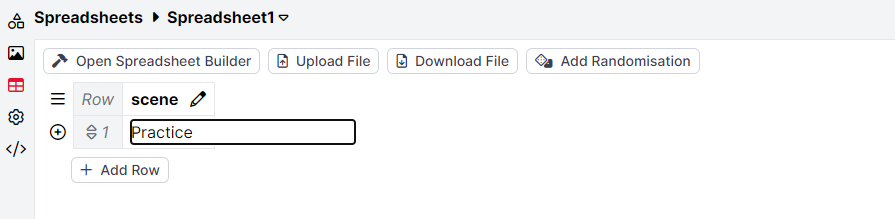
If you create an empty spreadsheet, by default it will contain only a single column, which is the scene.
Use the corner menu to reorder existing columns or add a new column. You can also use either this menu or the +Add Row button at the bottom of the spreadsheet to add a new row:
Click on a spreadsheet cell to edit it. In the scene column, enter the name of one of your scenes:
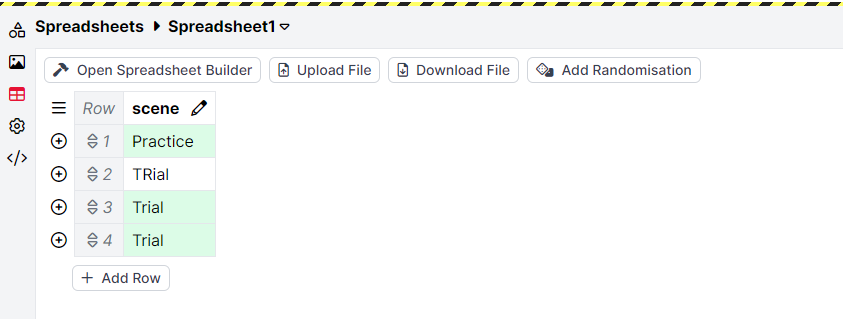
The cell will show a green background if it matches either a scene name, or the name of one of your uploaded stimuli. This makes mistakes easy to spot:
While being able to specify a few rows directly in the spreadsheet editor is useful for stubbing out your game quickly, or fixing individual cells, it is generally easier to download a template spreadsheet and perform larger-scale edits in your spreadsheet editor of choice (e.g. Excel). You might find it helpful to first use the Spreadsheet Builder to create the basic structure of your spreadsheet.
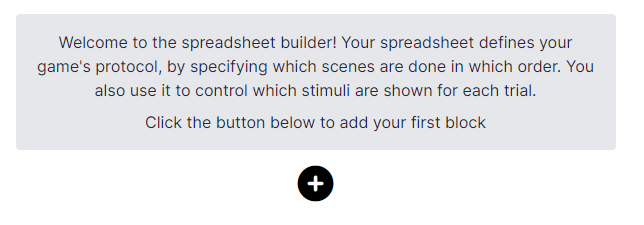
Using the Spreadsheet Builder
To use the Spreadsheet Builder, click the 'Launch Spreadsheet Builder' from the New Spreadsheet screen, or click the 'Open Spreadsheet Builder' button at the top of the spreadsheet tab. When you open the Spreadsheet Builder, click the button to add a block to your game:
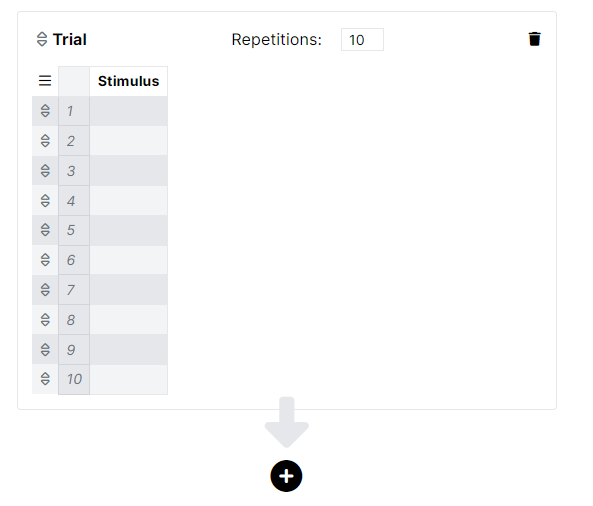
Select a scene and enter the number of times it should be repeated:
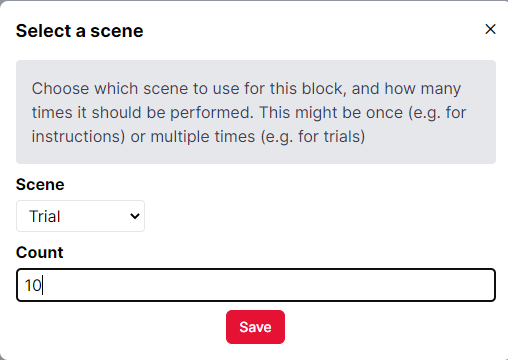
In the example above, the 'Trial' scene will be presented 10 times.
If you have already set up binding to the spreadsheet on any scenes, the Spreadsheet Builder will detect this and display the relevant rows and columns for you to fill in. In this example, in the Trial scene there is a Sprite component that binds to the Stimulus column in the spreadsheet:
You can either fill in the relevant details here, or finish blocking out the spreadsheet within the Spreadsheet Builder and then download the spreadsheet to fill in offline and re-upload it.
Uploading a pre-made spreadsheet
To upload a pre-made spreadsheet, click 'Upload from File' and then 'Create' from the New Spreadsheet screen:
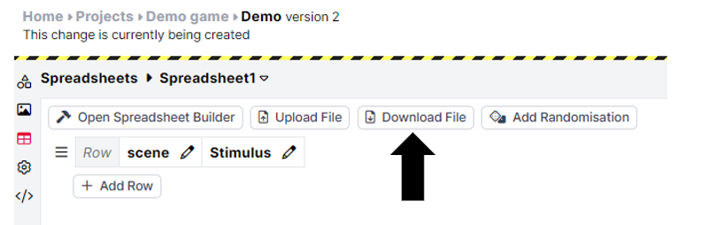
To download a template spreadsheet first, create an empty spreadsheet or use the Spreadsheet Builder, then use the 'Download File' button at the top of the spreadsheet tab:
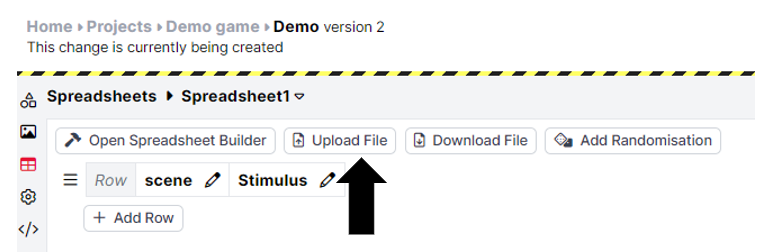
You can then edit the file locally, and then upload it using the Upload File button:
To rename or remove a column in your spreadsheet, click the pencil button in the column header:
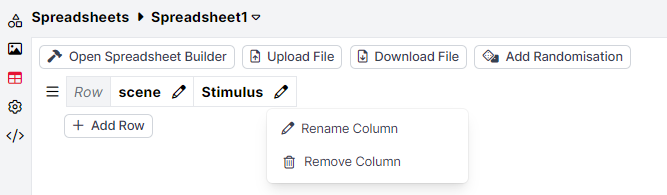
To add a column to your spreadsheet, use the corner menu at the top left of the spreadsheet and select 'Add Column'. A column will automatically be added whenever you bind a setting on one of your scenes to the spreadsheet. You can also add columns by downloading your spreadsheet, adding the column in Excel or similar, and reuploading your spreadsheet. This is the best way to add metadata columns, such as information about trial types that is useful for analysis but not required for the functioning of the game itself.
Binding to the spreadsheet
When you create your scenes, you have the option to bind certain settings - for example, Sprites, text and correct answers - to the spreadsheet. This means that this information will be populated from the spreadsheet, which is useful for things that you want to vary from trial to trial.
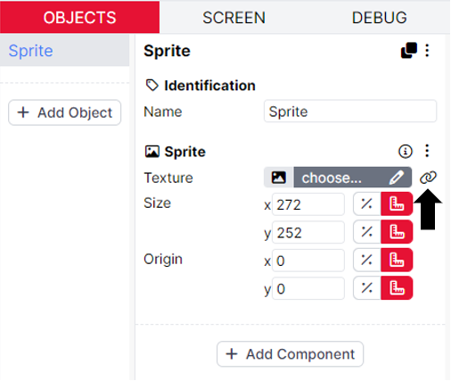
Bindable settings will have a link button - click this to open the binding window:
You can bind settings to various sources, as explained in our Binding Guide, but most of the time you'll be using the spreadsheet. Ensure Spreadsheet is selected at the top of the binding window. Then, pick the column you want to bind to. Early on, you'll likely be creating new columns, but once created they'll appear in the dropdown list:
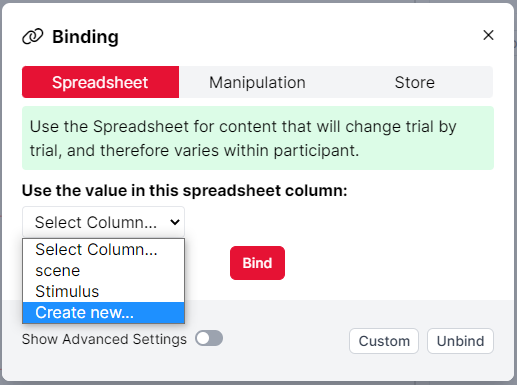
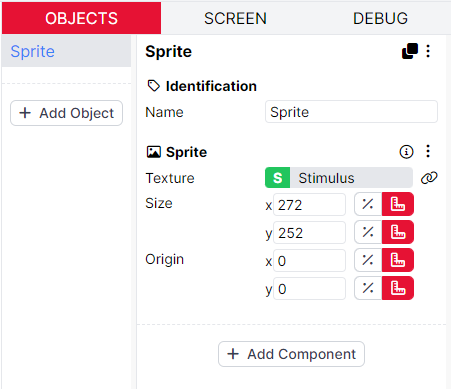
Click Bind to apply the binding. Your setting will change to show that it's now bound - the green S indicates that it is bound to the spreadsheet:
To change your binding, click the link button again. You can then unbind the setting, or change it to be bound to a different value. Finally, if you go back to the spreadsheet tab, you'll see that any new columns now appear.
You would then fill in this column with the appropriate data: for example, filenames of the stimuli that you want your bound component to display on each trial. You can see an example of this at the end of the Stimuli section of this guide.
You can find more information about binding to the spreadsheet in our Binding Guide.
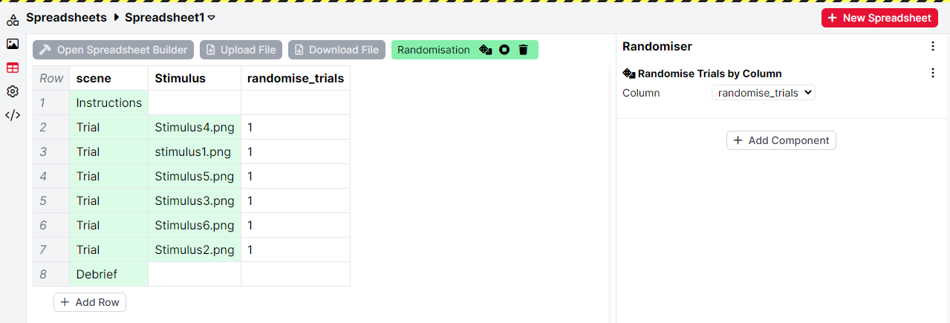
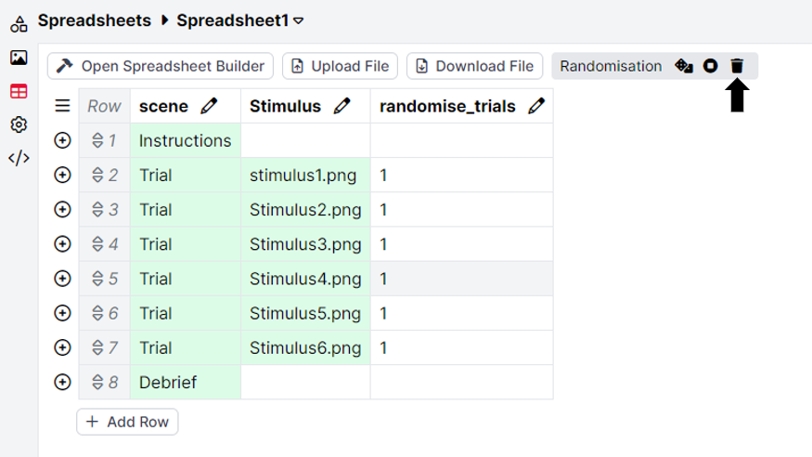
Spreadsheet randomisation
To add randomisation to your spreadsheet, click the 'Add Randomisation' button at the top of the spreadsheet tab:

A randomiser panel will appear on the right. Click 'Add Component' to add a randomisation component.
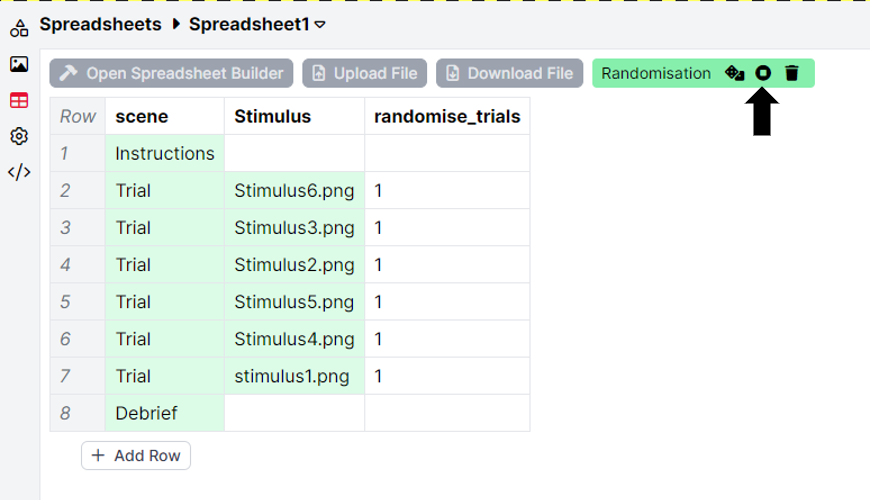
Once you have added your randomisation component(s), you can preview how your randomised spreadsheet might look for one participant by clicking the Preview Randomisation button (eye icon) at the top of the spreadsheet tab:

Gorilla will show you one possible randomised version of the spreadsheet under the constraints you have selected:
You can view more possible randomised versions by repeatedly clicking the Preview Randomisation button. When you have finished previewing, click the 'Stop Randomisation Preview' button to return to displaying your original spreadsheet:
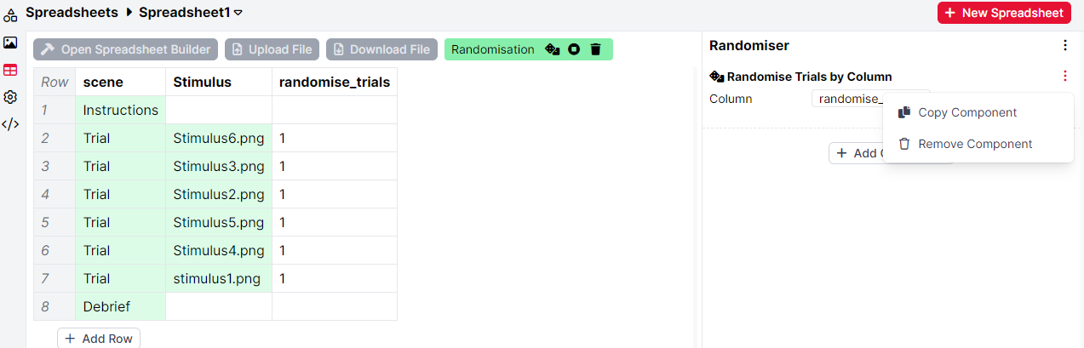
To remove a randomisation component, click the three-dots menu to the right of the specific component and select Remove Component. You can also use the menu to copy a randomisation component:
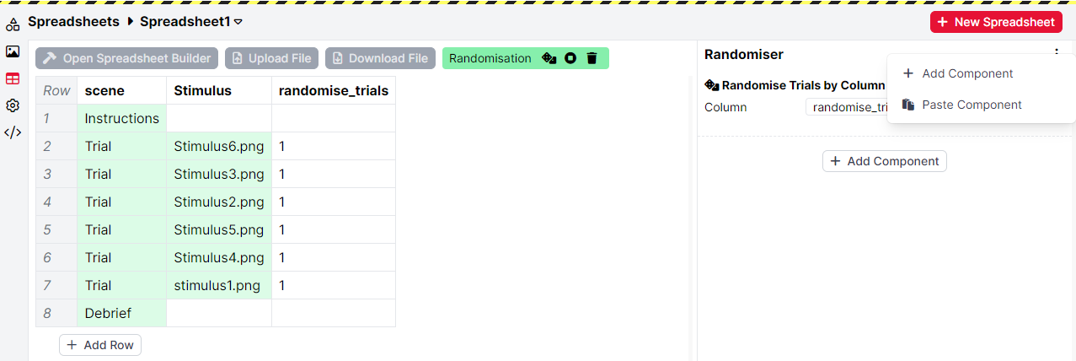
To paste a randomisation component, click the three dots menu at the top of the randomiser tab and select 'Paste Component'. This enables you to copy randomisation settings from one game to another:
To remove all randomisation from your spreadsheet, click the 'Remove Randomisation' button (bin icon) at the top of the spreadsheet tab:
For more guidance on how to add different types of randomisation to your spreadsheet, see the Task Builder 2 guides to Simple Spreadsheet Randomisations and Advanced Spreadsheet Randomisations. Spreadsheet randomisation works the same way in Task Builder 2 and Game Builder!
Using multiple spreadsheets
You can add as many spreadsheets to your game as you wish. To add a new spreadsheet, click the 'New Spreadsheet' button at the top-right of the spreadsheet tab. Enter a name for your new spreadsheet, and click 'Create'. You can then launch the Spreadsheet Builder, start with an empty spreadsheet, copy an existing spreadsheet, or upload a file.
The name of the spreadsheet you are currently viewing is displayed at the top of the Spreadsheet Tab:
To toggle which spreadsheet you are viewing, click the name of the current spreadsheet. This will open a dropdown menu containing all your spreadsheets for this game. Select the spreadsheet you want to view:
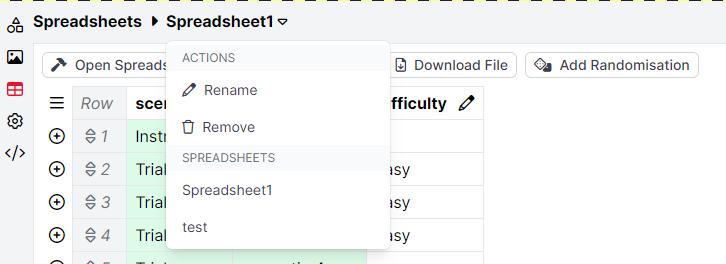
You can also use this menu to rename or remove the spreadsheet you are currently viewing.
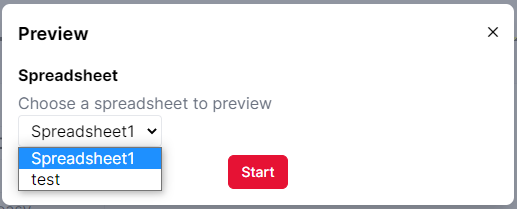
When you preview your game, you can select which spreadsheet you want to use. Simply click Preview at the top-right of the Game Builder window and select the spreadsheet you want to use from the dropdown menu:
Stimuli
Stimuli are any media files (images, audio, videos, etc.) which you will present to participants during your game.
You can add, delete, and manage stimuli in the Stimuli tab. To add stimuli, click Add Stimuli at the top right:

Browse the files on your computer and select the stimuli you want to upload. Once the stimuli have uploaded, you will see a preview of each stimulus. Stimuli are shown 10 to a page. To navigate between pages, use the arrows at the top of the Stimuli tab. Click 'Remove' next to a stimulus to delete it from your task:

You can search for specific stimuli by typing part of the filename in the Search box in the top-left. You can also filter stimuli by type (image, audio, video, and document) using the Filter icons at the top of the Stimuli Tab. Active Filters are displayed in red, while inactive filters are displayed in black. Toggle whether a filter is active or inactive by clicking it.
There are two main ways to incorporate stimuli in your game. If you need the same stimulus to display for all trials and for all participants (e.g. in an instructions scene), create an object in that screen with the appropriate component (e.g. Sprite component), and then 'choose...' dialogue to pick the stimulus you want to display:
If on the other hand, you want the stimulus to change trial by trial, you will instead need to bind the component you have created to a column in the spreadsheet. You would then fill in this column with the filenames of the stimuli you want to show on each trial:
Preview and Debug the Game
You can instantly preview and debug your setup by clicking the play button above the screen editor. When you do this, the panel on the right will automatically switch to Debug mode.
When in Debug mode, you can preview what will happen in your game when the participant makes certain actions. For example, if you click on the correct answer, the Debug panel will display the recorded response. If you have set up a Scoring component, you can also check whether the recorded response was correct or incorrect. Additionally, from the Debug setting, you can preview how the screen will look based on any row in the spreadsheet by changing the row number via the drop-down. This feature is a powerful way to ensure your stimuli and responses work as intended.
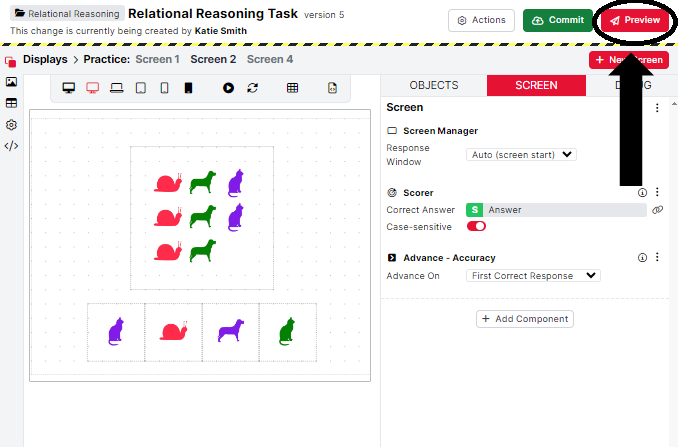
Preview Game Flow
You can also test the entire game by clicking the "Preview" button at the top right of the screen. This will run a preview of the full game based on your spreadsheet setup.
At the end of the preview, you can download your data. Keep in mind that Gorilla does not store preview data, so once you leave the Finish page, the preview data will no longer be accessible. Preview data is available only in CSV format.
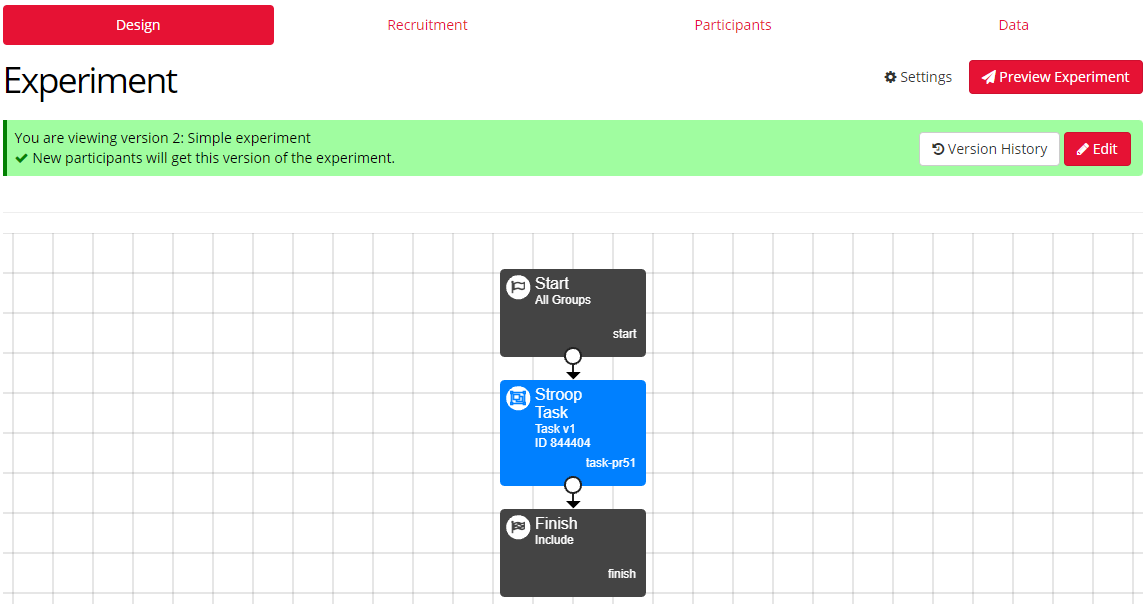
Commit the Game
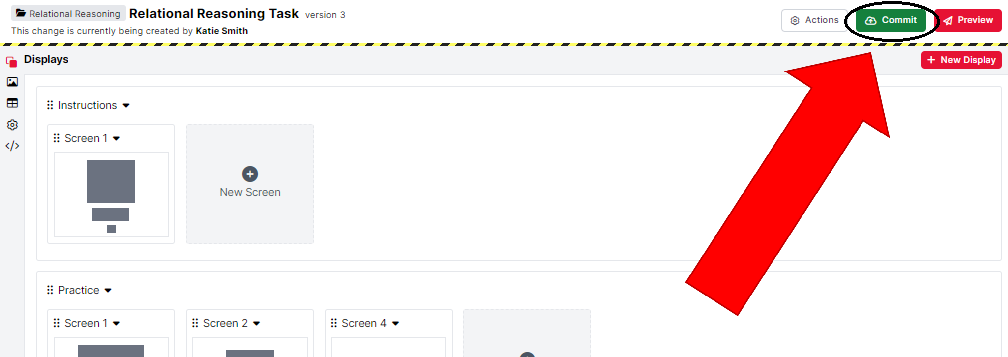
Once you have set up the game, you can commit it. Committing means saving a version of the game that you can always go back to. You must commit your game to be able to add it to an experiment and send it to participants.
To do this, click the green 'Commit' button at the top right of the screen. Then, enter a description of your changes in the text box and press Commit to save the new version of the game.
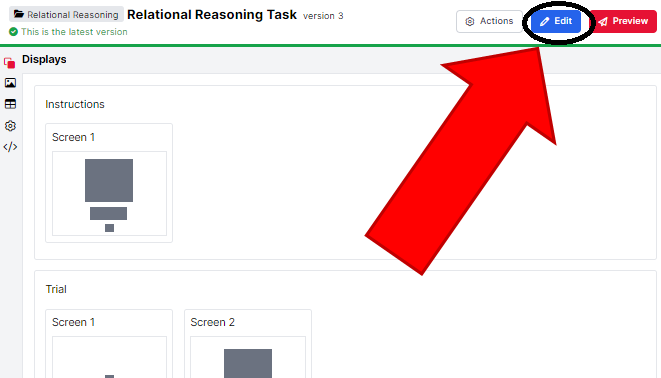
You will know the new game version has been committed when you can no longer edit the game, and the blue 'Edit' button replaces the green 'Commit' button. These changes indicate that you are now viewing the committed version of the game, not editing it.
Viewing Previous Versions of a Game
Each time you commit a new version of the game, the version number increases. We can view previous game versions by clicking on the 'More Actions' button (to the left of the 'Edit' button), and then History.
From opening this History box, you can view previous game versions. The '(open)' text indicates that this is the version of the game you are currently working on and has not yet been committed.
To go back to a previous version of the game, choose this version from the dropdown and click 'Show this version' to view it. To roll back to this version, choose 'Restore' from the More Actions menu.
Sending a Game link to participants
To send a game to participants, you need to add it to an Experiment.
The Experiment Tree is where you design your entire experiment, such as adding demographics questionnaires and reaction time tasks into a single experimental flow.
Once you have constructed an Experiment Tree, you’ll want to distribute it to participants. To do this, go to the Recruitment tab in the Experiment builder. In this tab, you can choose a Recruitment policy, which will generate a URL to send to participants. We offer a variety of recruitment policies, all explained in our Recruitment Policy Guide. After selecting a policy, set your Recruitment Target (i.e., how many participants you want to complete your experiment), and apply any Participant Requirements, such as a time limit or specific device types.
As participants begin the experiment, they will appear as Live in the Participants tab. When a participant reaches the Finish node, their status will change to Complete. You can then download the participants' data from the Data tab.
This screenshot shows the new Experiment Builder interface. If you’re still using the classic interface, it will appear slightly different.
You can find out more information on how to design and build your Experiments in our Experiment Builder: How-To guide.
Manipulations
Manipulations allow you to change setting on your game from within the experiment tree. You can use manipulations to implement between-participant conditions in your experiment.
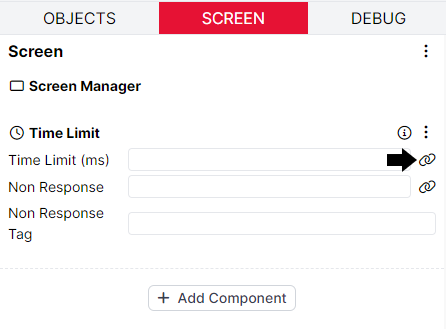
To add a manipulation, navigate to the task setting you want to manipulate. For example, imagine you want to use a manipulation to vary the time limit on a scene between participants. Go to the relevant scene and click the Screen tab to find the Time Limit component. Then click Bind :
Click Manipulation. From the dropdown menu, select 'Create new...' Type a name for your manipulation into the box that appears:
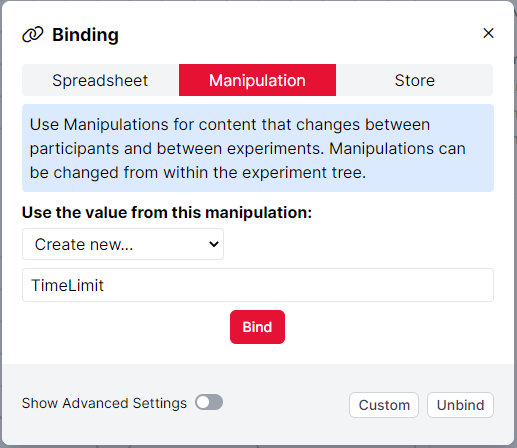
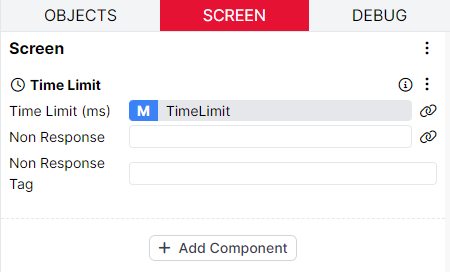
Click Bind to apply the binding. Your setting will change to show that it's now bound - the blue M indicates that it is bound to a manipulation:
You can find more information about binding to manipulations, including how to configure manipulations in the Experiment Tree, in our Binding Guide.
To view all manipulations set up on your game, go to the Settings tab on the left and click Manipulations. Here, you can delete any manipulations you are no longer using by clicking the bin icon on the left of each manipulation. You can also add a description for your manipulation, set its Label and Key, define Options, and set up a default value.
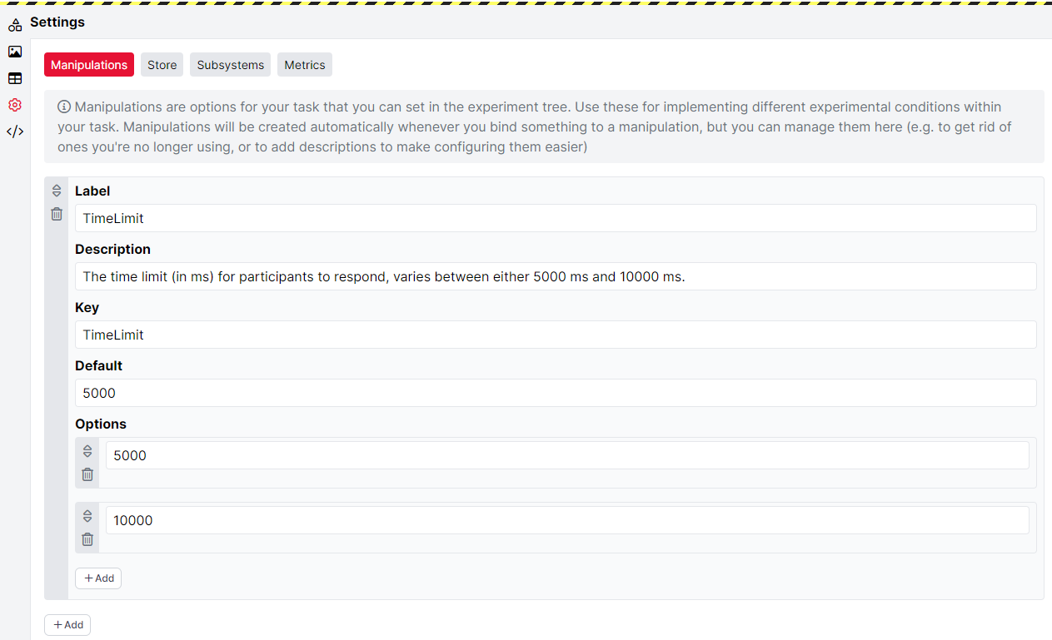
Label: This is the name of your manipulation, as it will appear in all configuration menus.
Description: Use this to add a description of your manipulation and its possible values.
Key: This is the name of your manipulation, as it will be referred to in Gorilla's underlying code. By default, the Key is identical to the Label. You will need to use the Key if you refer to your manipulation within a script.
Default: Use this to set a default value for your manipulation. This value will be used if you do not set a value manually within the Experiment Tree.
Options: Here, you can define options for the values of your manipulation. If you define options, these options will show up as a dropdown menu when you set up your Game in the Experiment Tree. If you do not define options, then you will enter the value of the manipulation in a free text field when you set up your Game in the Experiment Tree.
Store
The Store is a place to save participant data that you want to use later in the game or the experiment: for example, responses and accuracy scores. Each piece of data that you save in the Store will be saved in a named Field, so that you can retrieve it and use it later. If you're already familiar with Gorilla's older tools, this is analogous to what was previously called embedded data.
Saving data to the Store
For example, imagine that you want to save participants' number of correct responses during a game. Navigate to the scene where you collect participants' responses and click the Screen tab. The first step would be to set up a Scorer component so that participants' responses can be marked as correct or incorrect. Once your Scorer component is set up with the correct answers, click Add Component, select Save Accuracy (under Response Handling), and click 'Choose'. Click +Add next to Destinations. Under Attribute, select which aspect of participant accuracy you want to save. In this case, the accuracy of Correct responses are stored. When you have selected an attribute, under 'Field', click 'Set...' Create a new Field, give it a name, and click 'Bind'. Repeat this for any other attributes of accuracy you want to save. In the screenshot below, the Save Accuracy component is set up to save the participant's number of correct responses in the Store field 'Correct', and the participant's total number of trials in the Store field 'Total' - the orange F indicates that each is bound to a field in the Store.
In the example above, we have left the Tag fields blank. Tags are most useful when you have scenes with more than one response. You can read more about Response Tagging in the Response Processing guide.
Retrieving data from the Store
Now, navigate to the scene where you want to retrieve and display the values of these Store fields. You can directly bind a component to a Store field. You can see another example of how to do this in the Binding Guide.
In the example below, a series of Text components have been used to show participants the number of trials they got correct:
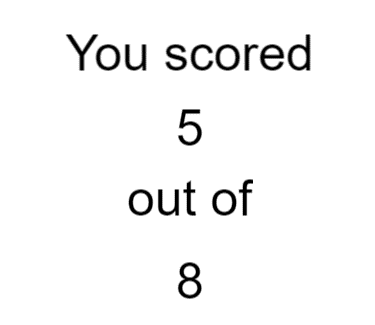
If you preview the task, you can see how this will display to a specific participant:
To view all Store fields currently being saved in your game, go to the Settings tab on the left and click Store in the top bar:
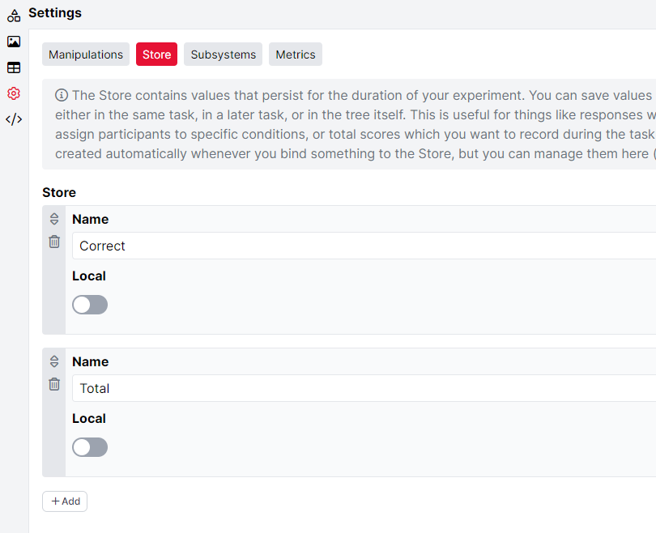
Here, you can view and change the names of your Store fields. You can also delete any Store fields you are no longer using by clicking the bin icon on the left of each one. Finally, you can toggle whether fields are stored locally to the game, or globally to the experiment. This distinction matters if you are using the same Game node multiple times within an Experiment Tree. If you want accuracy to be counted up separately for each version of the game, then you should select 'Local' for the relevant Store fields. By default, all fields are stored globally. This setting is appropriate for most cases.
You can find more information about binding to the Store in our Binding Guide.
Subsystems
The subsystems tab shows which subsystems are enabled in your game. Subsystems are features that use browser hardware, such as audio. These features require the user's permission to activate (e.g., the participants grant Gorilla access to their speakers). By enabling a subsystem, we ensure that all necessary permissions are granted and the feature is initialised before the participant starts the game.
For an example of a task with the Audio subsystem enabled, see our Audio Transcription task sample.
Update (Jan 2024): Subsystem checks now run only once per participant within an experiment. Previously, these checks would run again if the page reloaded or before any other tasks that required the subsystem. Now, the initial subsystem check occurs only at the beginning of the first task where that subsystem is enabled. Gorilla performs subsequent checks silently in the background when the participant enters another task or reloads the page. If these checks are successful, the participant will not have to repeat the full subsystem check.
Turning On/Off the Audio Subsystem
When you add certain components to your game, Gorilla will automatically enable the corresponding check. You can disable this check by going to the Subsystems tab and toggling it off. You can also visit this tab to manually activate a check.
For example, when you add an audio object to a game, the audio check is automatically activated. However, if you change your mind and remove all the audio objects from the game, the audio check will remain on. Since there is no longer any audio content to present to participants, the audio check is no longer necessary. In this case, you should go into the subsystem settings and turn off the audio subsystem.
Metrics
The Metrics tab can only be used in conjunction with scripting. A guide to scripting in Game Builder is forthcoming.
Multiplayer
Multiplayer is not yet available for Game Builder - find out more about using Multiplayer in Task Builder 2
This is where you can activate Multiplayer mode in your game, allowing several participants to take part interactively. Read more about Multiplayer in our Multiplayer Guides.
Animation Tool
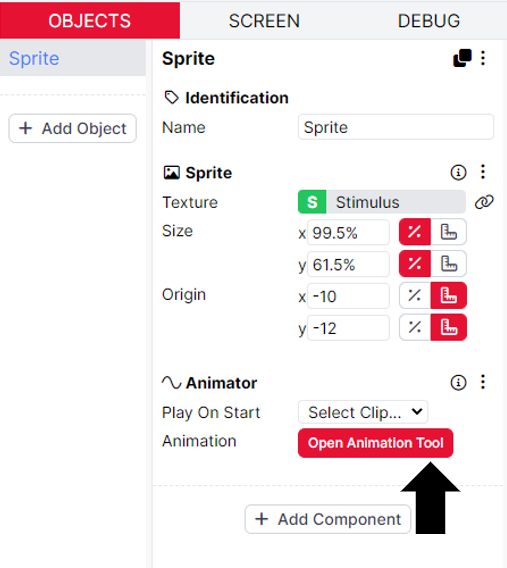
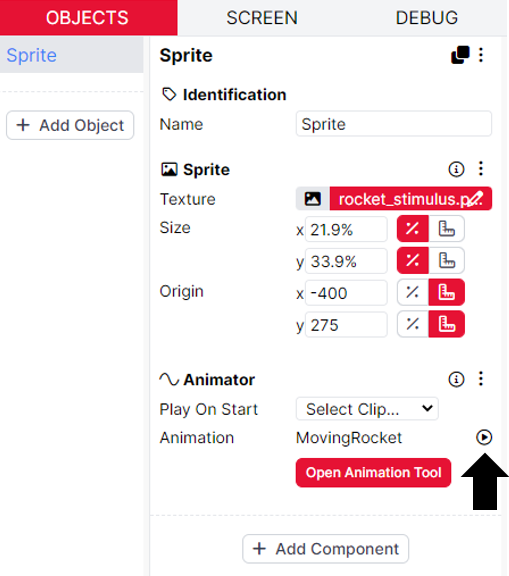
Animation is the main way to create movement in the Game Builder. You can animate any objects in the Game Builder that have an Animator component added to them. The Animator component can be found in the Object Builder Menu under the 'Animation tab', or by using the search bar:

Once the Animator component has been added to an Object, you can start creating animations by clicking 'Open Animation Tool':
The animation tool is divided into three sections:
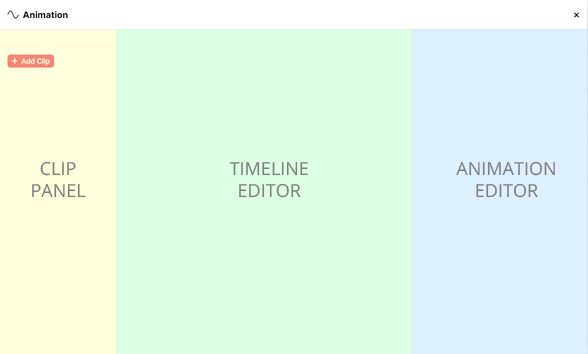
Clip Panel
The Clip Panel highlighted in yellow above shows your list of clips. You can also add new clips to your Animations by clicking the '+ Add Clip' button in this panel. The selected clip will be highlighted in red:

Timeline Editor
The Timeline Editor, the green section above, shows all the Animation Channels and individual Animations that make up the selected clip. To add more animations, click the '+ Add Animation' button in this panel. These animations are arranged in a timeline, which show the sequence of animated events. Within the Timeline editor, you can rearrange the position of the individual animations within the timeline. To do this, click and drag the grey section of the animation you would like to move. You can also add Channels here, which allow multiple animations to play simultaneously. To delete Animations or Channels, click the bin icon. These features are shown in the video below:
Note the grey bars beneath each animation. These are visual representations of the duration of the animations; animations will be laid out horizontally according to their duration. This is particularly useful if you have multiple channels, making it easier to visualise if each animation lines up correctly. Read more about animations with multiple channels in the Creating Animation section of this guide. You can change the duration of animations in the Animation Editor panel.
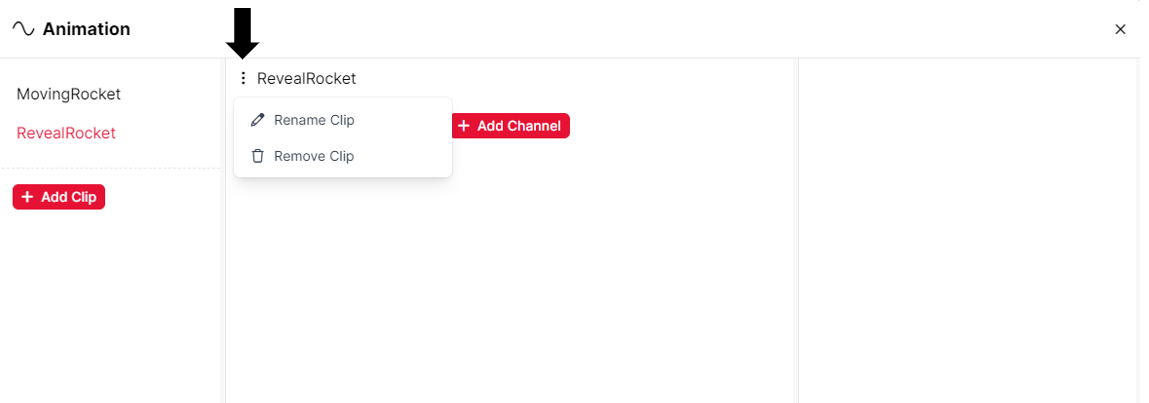
To remove an entire clip from the Animation Tool, click the three-dots menu next to the animation name. You can also rename clips in this way, too:
Animation Editor
The Animation Editor is highlighted in blue at the top of this page. Here, you can configure the currently selected animation. Choosing an animation from the Timeline Editor will bring up its configuration options in this panel. You can read more about how to configure the Animations in the Animation Guide.
Creating Animation
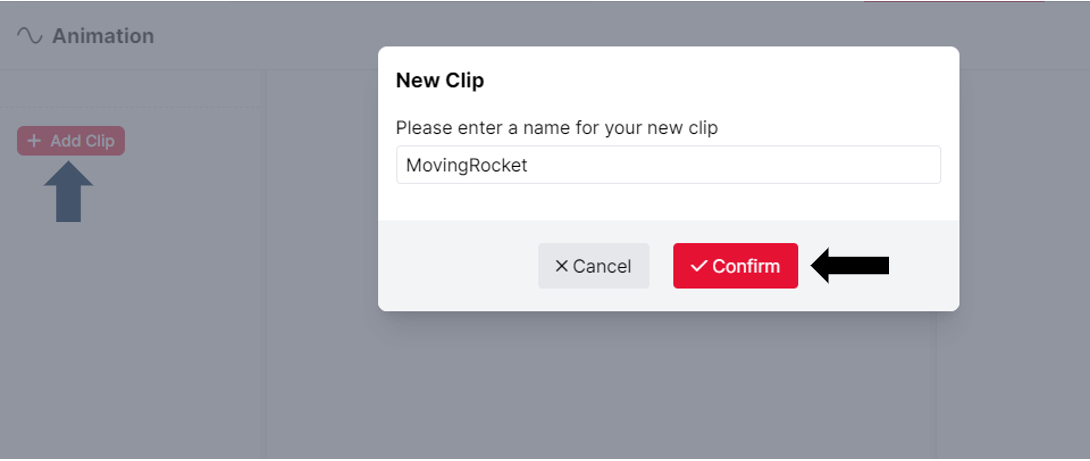
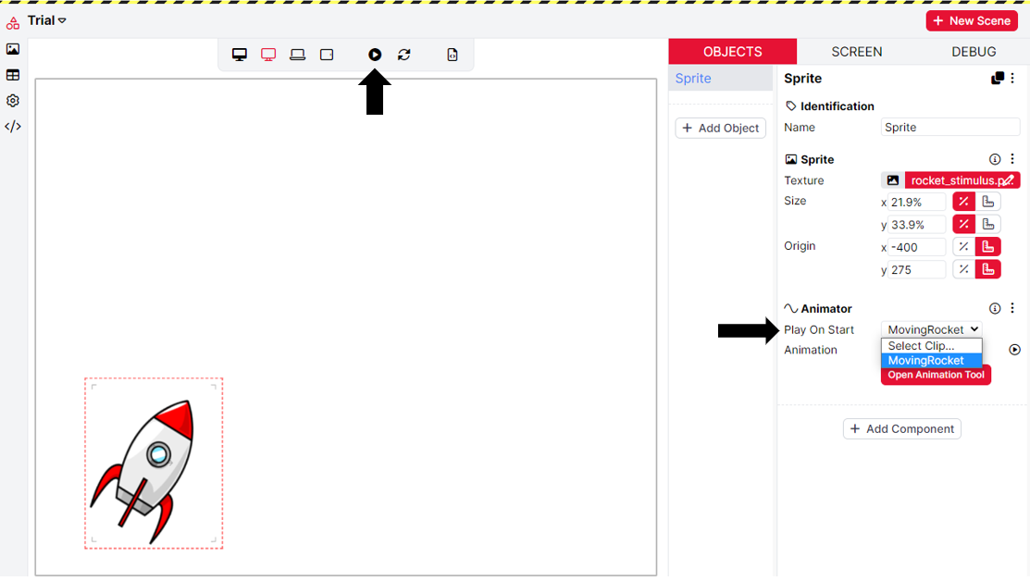
Animation is organised into clips, where each clip is a sequence of individual animations. To start creating a new clip, open the Animation Tool, click '+ Add Clip' and type a name for the animation. In this example, the animation will be called 'MovingRocket'. It is good practice to give your animations meaningful names, so you can easily identify different animations you create. Click Confirm to start adding animations:
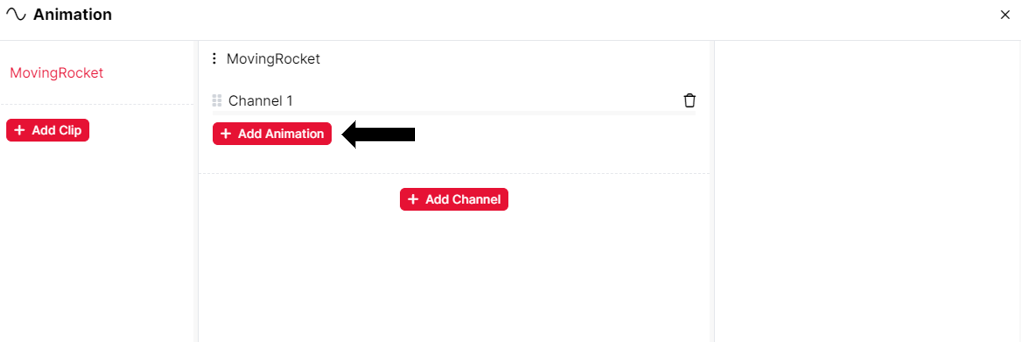
Then, you can start building your animation by clicking '+ Add Animation':
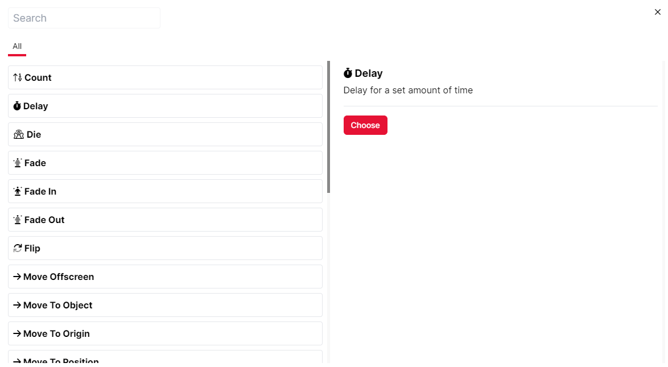
A scrollable window will then show you all the available animations within the Game Builder. When an animation is clicked on, a short description of the animation appears on the right-hand side. Once you have found an animation you would like to use, click Choose:
When you have choosen the animation, it will appear in the Animation Tool.
In this example, an animation is created that makes the rocket sprite Delay, then Move to a Position in the scene, and then Pulse in size. Once these animations have been added and configured, you can view the sequence of events in the Animation Tool:
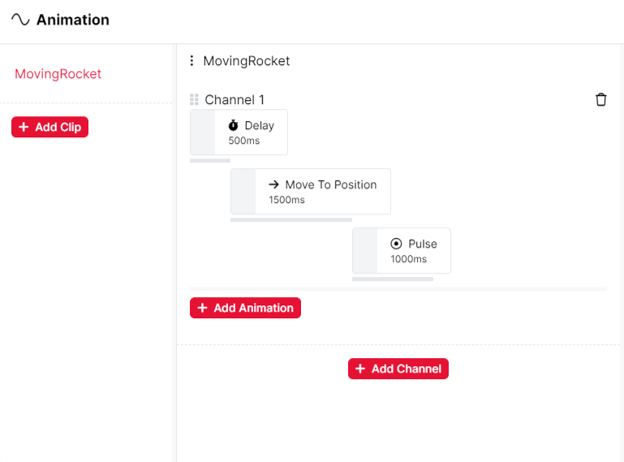
When previewed, the above animation will look like this:
Using Multiple Channels
A clip can contain multiple channels which will be played simultaneously - this is useful if you want multiple animations to take place at the same time. In this example, we would like the Sprite to move and spin at the same time. To do this, click the 'Add Channel' button in the Animation Tool and add your second channel of animations:
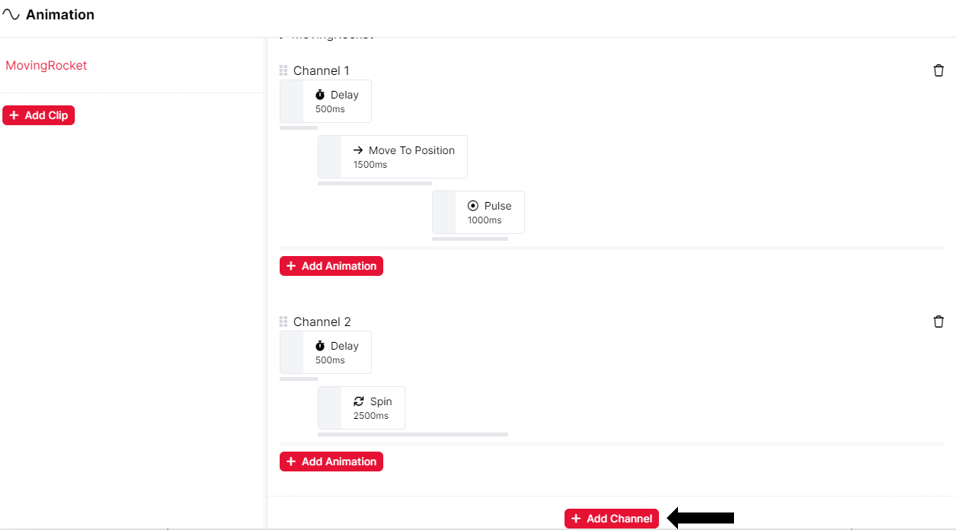
The above animation with multiple channels will look like this in the Game Builder:
Previewing Clips
Once you have created a clip, close the Animation Tool and click the little Play button in the Object Editor. This will trigger the animation to play.
To make changes, open the Animation Tool again, tweak, and then preview the animation again to see your changes.
You can also preview the entire scene, including animations by selecting the animation to 'Play on Start' from the dropdown menu within the Object Editor. Then, you can use the Play button in the Screen preview to view the entire scene:
Triggering Animations
There are several ways to trigger animations in the Game Builder:
On Start
All Animator components have a 'Play on Start' setting. You can select the name of a clip here from the dropdown menu. In doing this, the animation will play as soon as the screen starts.

Using Trigger - Animate
Using the Trigger - Animate component component, you can trigger an animation to play
- after a specified amount of time has elapsed
- when the participant clicks on the object this trigger is attached to
- when the participant submits a specific response or a response with a specific tag
- when the participant submits a correct or incorrect response
- when the participant responds within a specific reaction time range
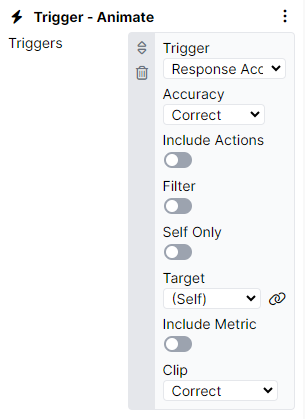
Add a Trigger - Animate component to an object with an Animator. Add a Trigger, and set up the conditions you want to trigger the animation. The screenshot below shows a Trigger set up to play the clip 'Correct' when the participant submits a correct response.
When triggered by another animation
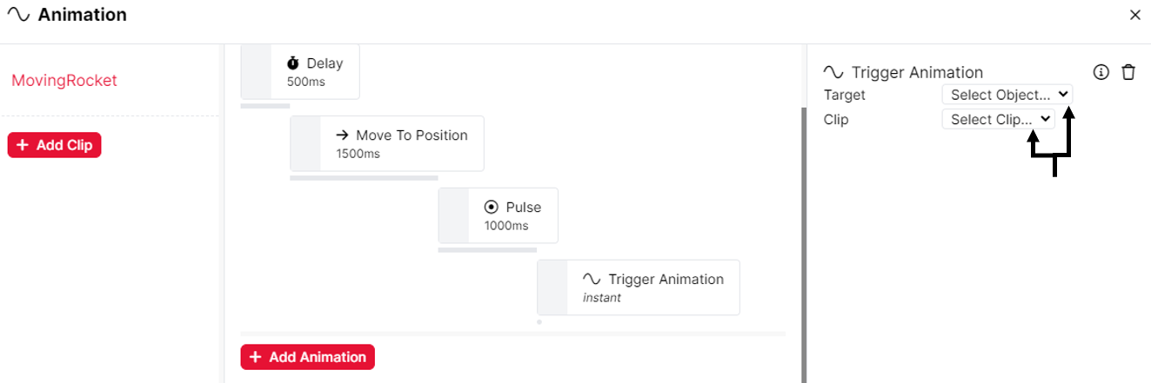
You can also trigger an animation clip on a different object from the one that is currently animating. Use this to 'daisy-chain' animations together, so that one object animation can trigger the animation of another. Unlike the previous ways of triggering animations, this method is controlled from within the Animation Tool, rather than by additional components. To create a 'chain' of reactions in this way, open the Animation Tool and add a 'Trigger Animation' animation. In the example below, another animation will be triggered once the Pulse animation has finished. From the 'Target' dropdown, you can select which Object in the scene you would like to animate, and use the 'Clip' dropdown to choose the animation. Please note that the dropdown menu will only present Objects with an Animator component of their own, and clips that have been created in these Animators.
There is also an animation called Delay which you can use to insert time delays in your animation sequences. This is often useful to choreograph animations to work together, or to simply space out sequences.