Game Building Positioning Guide
- Layout
- Examples
Overview
The guide explains how positioning works in the Game Builder, and how you can arrange the objects in your scenes to create the layout you want.
Browse the list of topics in the menu for more information.
Coordinates
In Game Builder, everything is centered by default. The coordinates (0, 0) (written as (x, y)) are the centre of the screen, and +x is to the right and +y is downward. Text and images are always centered around the coordinates they are positioned at. So an image placed at (0, 0) will be perfectly centered in the middle of the screen, and an image placed at (100, 100) will be 100 pixels to the right and down:

This is because for most research games, we generally want to place our stimuli and response options relative to the centre of the screen - we want to start in the centre of the screen and build outwards from there. Other coordinate systems that place the origin at the top left or bottom left of the screen are unhelpful, because they make centering things hard.
Percentages
When defining positions or sizes in Game Builder, you can choose to express them in pixels or percentages. Pixels are essentially raw coordinates - they are a fixed size and will be constant regardless of the size of the screen. Percentages allow you to define a size as a percentage of the screen size. This allows you to make your layout adaptable to different screen sizes, and use more of the available space on larger screens while ensuring that things don't get cut off on smaller ones.
An image at (200, 0) will always be placed 200 pixels to the right of the centre, regardless of the screen size. An image at (25%, 0) will always be centered in the right half of the screen, on any screen size:
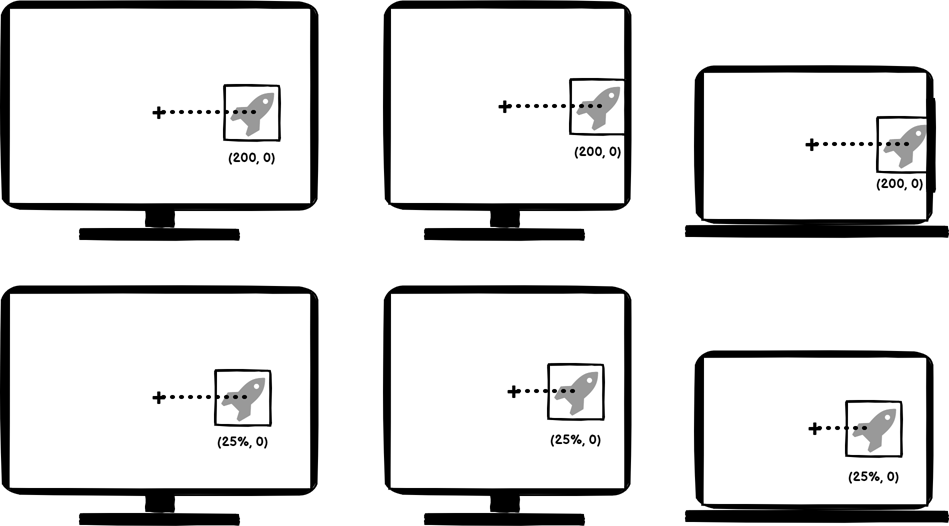
It's often useful to use percentages for positions, because they allow your layout to adapt to the size of the participant's screen. Similarly, when using Quads or Gradients for backdrops, it's often useful to set their width and/or height to 100% to ensure they cover the whole screen, regardless of its size.
Hierarchies
Unlike Task Builder 2, Game Builder allows you to create hierarchies - an Object can be the child of another Object. When configured in this way, the child object follows these rules:
- When the parent Object moves, the child Object moves with it
- The child Object's position is relative to the centre of its parent Object, not the centre of the screen
- When using percentages for position or size as described above, the child Object's coordinates are a percentage of their parent, not the screen
The most common use-case for this is to group several Objects together so that you can animate them as one. The key to this is the Container component - this doesn't display anything, but allows you to add child Objects and position them relative to the parent Object. A Container can have zero size, in which case it is effectively treated as a point, or it can have a non-zero size set in which case it is treated as a rectangle, and child Objects can be positioned relative to its dimensions.
There are three main use-cases for creating a Container-Child hierarchy:
Positioning things relative to a shared origin position. For example, it may be tricky arranging a thicket of trees or a pile of treasure where each object is positioned relative to another. It's much easier to create a Container to represent the 'centre' of the trees. You can then add each tree as a child and just adjust its position relative to the centre. In this case, the Container needs not have a size; it is simply a position in space that child objects are positioned relative to.
Positioning things within a specific screen area. Containers can optionally specify a size which can be in pixels or as a percentage of their parent's size (if they're at the top level, this is the screen's size). If you give your container a size, you can then position the child objects within it using percentages of the container size. This is useful when you want e.g. three response buttons to be placed in a row such that the spaces between them are consistent, but want the space to grow and shrink with the size of their container.
Moving or animating groups of objects. If you move the container, the child objects will move with it. This is probably the most common use-case, as it allows you to create larger objects made up of several objects (e.g. a sprite with a text label) and animate them as if they were one.
You can read more about the Container component here:
In this example, the parent Object with a Container (shown in red) is placed below the centre of the screen at (0,100). It then has a child Object with a Sprite that is placed at (200,0). As the Sprite is a child of the Container, it is directly to the right of its parent, and inherits the parent's position below the centre:

To see this in action, see how we add both rockets to a container and then move the container - both rockets move with it:
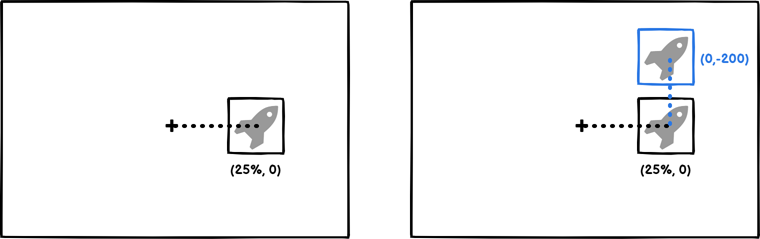
Positions and Origins
When you position an Object in the editor, you are setting the Object's origin. This is essentially the starting point for this Object when the screen starts, and is relative to the centre of the screen or its parent Object, if it has one.
In addition to the origin, Objects also have a position. This is essentially a local offset from the Object's origin, and is used to implement movement and animations. An Object with a position of (0, 0) is therefore at its origin, and an object with a position of (100, 0) is therefore 100 pixels to the right of its origin. To calculate an Object's full position at any point in time, we simply calculate:
(parent origin + parent position) + (own origin + own position)
An Object's origin never changes, but the position is what we use to move or animate Objects around. The distinction is useful, because it allows us to define animations which will behave the same even if we move the Object around afterwards, and additionally it makes it simple to animate an Object back to its starting point, which is a common use-case.
In this example, the rocket's origin is at (25%, 0). We then specify an animation (shown in blue) which makes the rocket rise up by 200 pixels. The origin stays the same, but the local position of the rocket goes from (0,0) (at its origin) to (0,-200) (200 pixels above its origin):
Backdrops
An easy way to make a backdrop for your task is to use two Gradients - one for the ground and one for the sky. You make the width of both gradients 100% - so they span the full width of the screen - and then overlay them so that the ground overlaps the sky. You can then place Sprites in the foreground to compose your scene:
Starting Offscreen
A common use-case is to have Objects start offscreen and then animate on. If we implement this literally, we would place the Object such that its origin is offscreen, and then create an animation to animate it on. However, in practice, this makes laying the screen out very difficult, as we can't see the most important elements.
Instead, it's much easier to lay out the scene so that the Objects are in their 'onscreen' positions, and then add components and animations to configure them to start offscreen and then animate 'back' to their (onscreen) origins:
Groups
Containers don't display anything themselves, but allow you to group together other components which do. A common use-case for Containers is to create elements for your game that are composed of more than one Object. For example, you might want to have a sprite with some text superimposed on top, and for them to slide onscreen together. Containers allow you to add child Objects for the different parts, and then you can move them together by animating the parent Container: