Game Builder Step-by-step
Overview
The best way to get started with the Game Builder is to build a real task. This guide will walk you through the process of creating a Same/Different task that is dressed up as a Christmas-themed game. Participants will see two presents and have to press the spacebar if they match and do nothing if they are different - essentially a go / no-go paradigm.
We suggest you have two tabs open - one with this walkthrough, and one to create the task in. You will also need the stimuli used in this task - you can download them here:
The finished task will look like this:
Create a new task
First, create a new project and then create a new Game Builder task inside it by choosing 'Game Builder' from the Create menu.
Background
The first thing we want to create is a Christmassy scene to serve as our background. The background will be present in all of the scenes in our game, so we don't have to recreate it every time. We're just going to use a single image, but you could create a rich scene here made up of lots of different elements, if you choose.
When you create the background scene, you'll see it already has three objects in it - the background, stage and foreground.
- The main scenes in your game will be added to the stage.
- Anything added to the background will be shown behind any scenes you add to the stage.
- Anything added to the foreground will be shown in front of any scenes you add to the stage.
Most of the time when creating a background, you can probably leave the stage and foreground as they are and just add things to the background that should always be present.
- Click New Scene Background Create
- Click Add Object Sprite Done
- Click the choose button in the Texture field to bring up the file menu
- Click New and choose the background image from your files to upload
- Drag the new sprite to be a child of the background
You should now see the background appear in the preview panel.
Create the present
The next step is to create the presents and add animation to them. We'll use the same graphic for each, and place them on either side of the screen. We do this by first creating a container to hold them in, which we position in the centre of the scene. Containers can have child objects. These allow you to create a Positioning Hierarchy, where each child is positioned relative to its parent.
In this case, we want to position our present sprites relative to the centre. In other words, we're using the Container to position our sprites relative to a shared position. You can read more use cases for the Positioning hierarchy in the Positioning Guide.
- Click New Scene
- Choose 'Scene' as the type, and call it 'Trial' Create.
- Click Add Object, and choose Container and name it 'presents container'
- Leave the size of the container as zero.
- Click Add Object, and choose Sprite, name this Sprite 'presentLeft'
- Click the Choose button in the Texture field to bring up the file menu
- Click New and choose the present image from your files to upload
- Drag the new sprite to be a child of the container
- Set the origin x coordinate to be -200, and the y coordinate to 0
Your present should now be visible on the screen.
Animate the present
We now want to animate the present so that it shakes a little and then bursts open. We'll implement the shaking with an animation, and then make a burst effect using a particle system later. At the end, we want the present object to disappear from the screen and show a toy in its place. We achieve this by making the present die at the end of its animation. You could instead simply hide the present by using the Visibility animation, but it's often better practice to remove things completely so that you don't end up with a screen cluttered with obsolete objects.
In this case, we will add a short initial delay, and then the shake effect. The shake effect works by allowing you to specify a magnitude (how far to move, in pixels, with each shake) along each axis as well as a duration (how long each shake should last). The main duration field then controls how long the whole shake animation should last.
- Click Add Component within the presentLeft Object, choose Animator, and then click Open Animation Tool
- Click Add Clip, and name it 'reveal'
- Click Add Animation Delay Choose
- Set the duration to 1000 (one second)
- Click Add Animation Shake Choose
- Set the X magnitude to 40 and the duration to 300, and set the main animation duration to 750
- Close the animation tool
- Preview your animation by clicking the play button within the Animator component.
Create particle effect
We can now create a particle effect to use when the present opens. The idea is to show a burst of wrapping paper to mask the present's disappearance, which will quickly fade to show the toy. Particles are essentially a single object that emits lots of small sprites. As such, they are ideal for creating effects such as fire, smoke, explosions, rain, snow, and so on.
In this case, we're going to use a single image of a small scrap of wrapping paper to create a burst of wrapping paper which signifies the present being revealed. We're going to create this as a Spawnable scene, which is a scene that we can make dynamically appear on demand. Spawnable scenes are useful for effects or other temporary objects which you might want to make appear at certain points in your screen.
- Click New Scene Spawnable, and name it 'wrapping'
- Click Add Object Particles, name it 'wrapping particle'
- Click the choose button in the Image field, and upload the wrapping paper image from your files by clicking 'New'
- Set the minimum and maximum size to 1
- Set Speed to 400
- Set Duration to 750
- Set Fade to 0.5
- Set Spin to 2
- Set Rate to 75
- Set Burst to 500
- Change the Origin to percentage and set it to 50% in X and Y
- Click the Play button to see the particle system in action
Create toy
We can now finish the full effect, where we spawn the particles, set the present to die, and reveal the toy. The toy will be another sprite that starts out hidden, and at the end of the present's animation, we will trigger an animation on the toy that makes it appear and rise up into the air a little. They key concept here is that not all animation steps need actually animate the object; you can also use animations to spawn other objects or trigger animations elsewhere. This allows you to create rich 'chain reactions' by simply daisy-chaining animation sequences together.
We also make use of the Play button, which allows us to preview the whole trial directly in the editor. This allows you to test out all the logic and animations directly in the tools, rather than having to preview the whole task.
We will start out by creating the toy, which will start out hidden, but have an animation that causes it to appear. The present then triggers the appear animation on the toy, spawns the wrapping paper effect, and then dies.
- Click Add Object Animated Sprite and 'Start Invisible' components.
- Name this Object 'toyLeft'.
- Click the choose button, and upload the ball image from your files
- Drag this Object to be another child of the presents container.
- Set the X origin to -200 and the Y to 0 (to match the present sprite)
- Now open the animation tool
- Add a new animation, and call it 'appear'
- Click Add Animation Visible and set Visible to on
- Click Add Animation Move to Position and set Y to -100 and Duration to 750
- Close the animation tool
- Select the present, open the animation tool, and click on the 'reveal' animation
- Click Add Animation Spawn, and set spawn to 'wrapping' and attach it to Self
- Click Add Animation Trigger Animation
- Set Target to toyLeft, and select the Clip 'appear'
- Click Add Animation Die
- Close the animation tool
- Set Play On Start to 'reveal'
- Click the Play button to preview the scene
You should now be able to see the whole effect from start to finish!
Second present and toy
Now that our animations are set up, we can duplicate the present and toy to make the second one of each. We set the positions and ensure that each present is triggering the correct toy.
- Select presentLeft, and duplicate it (either with the Duplicate button with Copy + Paste)
- Rename the new present to 'presentRight'
- Set its X origin to 200.
- Select toyLeft and duplicate it
- Rename the new toy to 'toyRight'
- Set its X origin to 200.
- Select presentRight and open the animation tool
- Select the 'reveal' animation, and then select the Trigger Animation animation and change the target to 'toyRight'
- Close the animation tool and click the Play button to see the animations in action
Spreadsheet and stimuli
So far, we've been stubbing out our task by just using one specific stimulus. However, we want to run several trials and have different toys in each one. We will configure these in a spreadsheet, and then bind the toys in our scene to specific spreadsheet columns, so that they use whichever image has been specified for that trial.
We will also specify the correct answer ('same' or 'different') for each trial, so that we can score it automatically.
- Go to the Stimuli tab. You should see the background image and other stimuli you have already uploaded.
- Click Add Stimuli, and select the remaining stimuli from your files to upload (blocks, boat, bus, horse, rocket)
- Go to the Spreadsheets tab
- Click New Spreadsheet, and name it 'spreadsheet' Create
- Here, we create the spreadsheet from scratch. Alternatively, you could launch the Spreadsheet Builder to get started.
- Add three columns - 'toyLeft', 'toyRight', 'answer'
- Add two rows.
- In the scene column, add 'Trial'
- In the toyLeft and toyRight columns, specify which images you would like to be shown.
- In the answer column, state whether the trial is same or different.
Next: Binding and Response Handling
Binding and Response Handling
To connect everything together, we first want to bind the two toys to their respective spreadsheet columns, so that for each trial they use the images defined in the spreadsheet. You can read more about spreadsheet binding in our Binding Guide. We then want to set up the response handling. In this task, the participant should press the spacebar if the two toys are the same, and do nothing if they are different - essentially a go/no-go paradigm. We implement this by adding a keyboard response that listens for the spacebar and, if pressed, submits a response called 'same'. We then also set up a time limit for the screen, which when reached, submits a response called 'different'.
- Select toyLeft
- On the Sprite, click the binding button in the Texture field
- Choose Spreadsheet Column 'toyLeft' Bind
- Select toyRight and bind it to 'toyRight' in the same way
- Add a new Object and name it 'response'
- Add the Keyboard Response Component to this Object
- Under Mappings, click Add, and set the Key to 'space' and the Response to 'same', and set the Once checkbox. This allows participants to only press the spacebar once before moving onto the next trial.
- Select the Screen tab.
- Click Add Component Time Limit
- Set the Time Limit to 5000 and Non Response to 'different'
- Click Add Component Scorer
- Bind Correct Answer to the Spreadsheet Column 'answer'
- From the Debug tab, select 'spreadsheet' and row '2' to see how this will look.
- Press the Play button, and see how the responses are recorded in the Debug window.
Instructions
Finally, we can put in a simple instructions screen, which will be three lines of text and a continue button.
- Click New Scene, and call it 'Instructions'
- Click Add Object Container, call it 'frame', and set its size to zero
- Click Add Object Text, call it 'instructions1'
- Drag this to be a child of the 'frame' container.
- Add the first line of instructions text.
- Set the colour to white, the size to 60, the stroke to black and the stroke thickness to 8
- Duplicate this Object for 'instructions2' and 'instructions3'
- Add the next two lines of instructions text and position these beneath each other by dragging the text in the scene preview.
- Add a new object with a Quad component
- Adjust the size and positioning of the Quad, and set the colour using the colour picker tool.
- Click Add Component Click To Continue
- Add a final text object with the text 'Start'. Set the text size and colour as before.
- Position this text on top of the Quad to create a button label.
- Play the scene and verify that the screen advance is triggered when clicked.
Preview
The last thing we need to do is to add the instructions screen to our spreadsheet, and then we can preview our task.
- Go to the Spreadsheets tab
- Add a row at the top, and enter 'Instructions' in the Scene column
- Preview the task - press space for the first trial and do not respond to the second trial.
- Download your data and verify that both responses were scored as correct
- Preview a few more times and give different responses to verify that everything is working

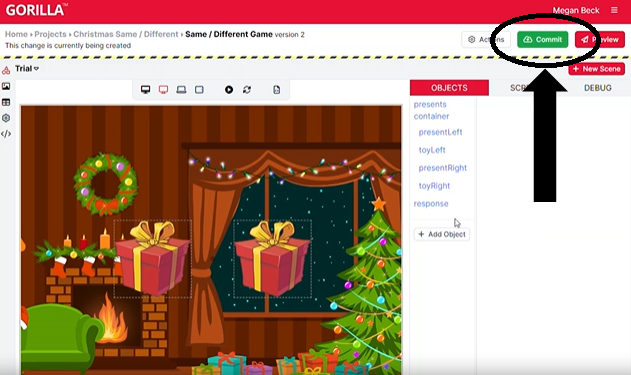
Commit
Now that we have set up and previewed the game, we can commit it. Committing means saving a version of the game that you can always go back to. You must commit your game to be able to add it to an experiment.
To do this, click the green 'Commit' button at the top right of the screen. Then, enter a description of your changes in the text box and press Commit to save the new version of the game.
You will know the game version is committed when you can no longer edit the game, and the blue 'Edit' button replaces the green 'Commit' button. These changes indicate that we are now viewing the committed version of the game, not editing it.