Welcome to the Shop Builder 'How To' guide
Economic psychologists and consumer behaviour scientists - welcome home! The Shop Builder allows you to easily create an online shop within minutes and use it as an interactive task where participants can browse through the products and choose which ones they would like to purchase - just like in a real online shop!
To your participants Gorilla Shop Builder looks like a normal online shop, but behind the scenes you wield a powerful research tool to liberate your lab.
With Gorilla Shop Builder you can:
- Test a wide range of consumer decision making hypotheses in a realistic online shop.
- Create your own powerful and easy-to-use Shop Builder tool designed for behavioural research.
- Connect your shopping task with an IAT or personality questionnaire, all in the Gorilla Ecosystem.
- Join a community of researchers engaging in translational studies.
In this guide you will find all relevant information about how to use the Shop Builder. Look through each feature section in the menu to explore available options.
Pro Tip
Initial Set-Up
Watch the video below for a step-by-step guide on how to set up basic Shop Builder's features!
Shop Builder
Products
Product Images
Assets
Appearance
Length (mins): 3:28
Products
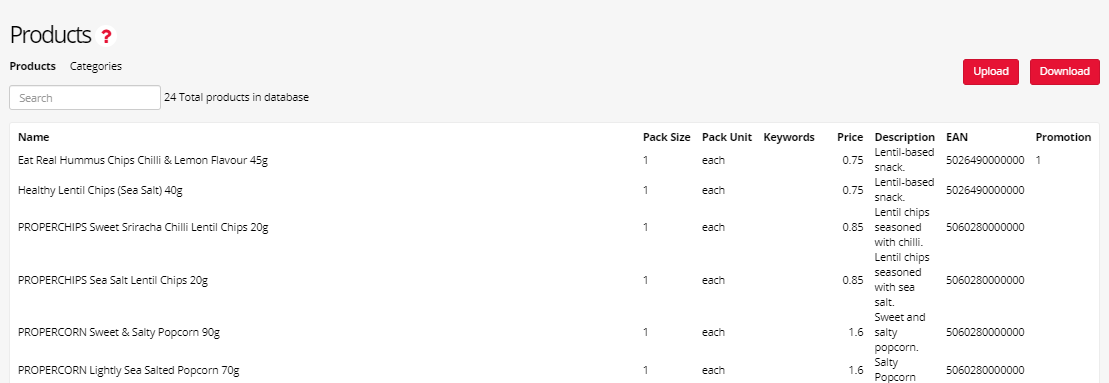
The Products tab is where you will specify the products that participants can browse and 'buy' in your shop. Similarly to the Task Builder, the Shop Builder will recognise the products - like 'stimuli' - from an uploaded spreadsheet.
To add products to your shop, create a CSV or XLSX file that contains the list of the products. Your spreadsheet should have at least these six columns for Gorilla Shop Builder to recognise the products:
- Category
- Product
- Image
- Price
- PackSize
- PackUnit
You can add extra columns to the mandatory ones to create custom properties that you can use in your various manipulations. You can download an example spreadsheet with the default columns to fill in by clicking the Upload Button and Download an Example in the top right corner of the Products Tab.
You can also edit or change the product prices by downloading the spreadsheet and reuploading the edited version.
Categories
In many cases, you will want to divide your products into categories. These can be nested (e.g. Department -> Aisle -> Shelf) and are simply specified in your product spreadsheet as extra columns.
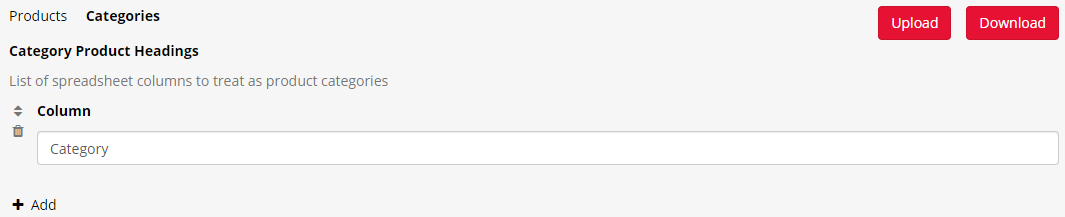
In the Products tab, go to Categories and specify the name of the column of your spreadsheet that categorises the products in your shop. See the examples below:
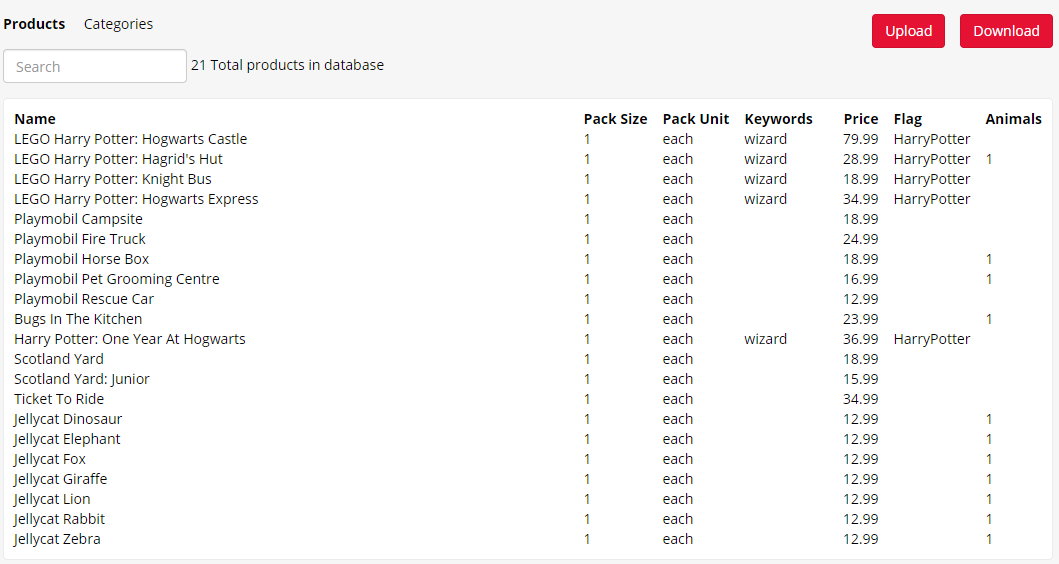
Then upload your CSV or XLSX file with the products into the Products tab by clicking Upload in the top right corner. See the examplar spreadsheet with products below:
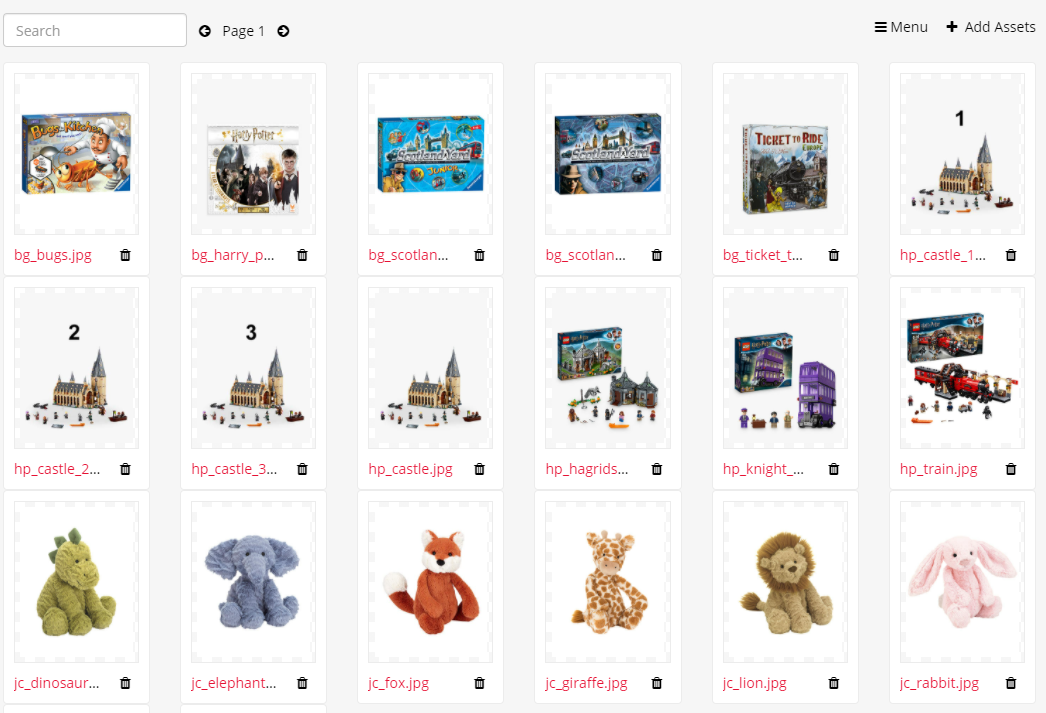
Product Images
The Product Images tab is where you add the images of the products from your shop that will be displayed to your participants - similarly to the stimuli that you display to participants in your Task Builder. You can upload multiple images for each product. The primary image should be listed in the Image column of the Products spreadsheet. Any additional images should be listed in separate columns named Image2, Image3, and so on. Participants can then cycle through all images when the Product is clicked on.
Recommended size for Product Images: The Shop Builder page is flexible to allow participants to complete the task on different screen sizes. It is possible to upload larger product images (in px) to the Shop Builder as these can be scaled down. When participants click on the product, the product detail screen is shown, and the image will appear larger on this page. However, images that are larger in size (px) may also increase the loading speed of the task. Please refer to our Technical Checklist for more guidance on recommended file sizes.
Pro Tip
To upload your product images, click on '+ Add Assets' in the top right corner of the page.
Watch the video below for more information on how to download the Product Images:
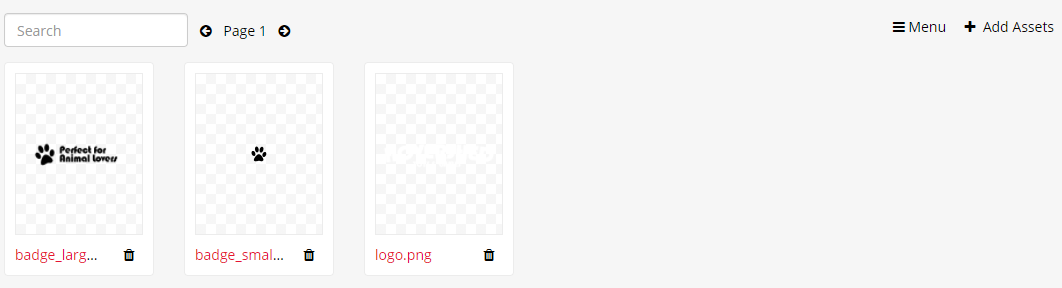
Assets
The Assets tab is where you will put your 'company' assets, such as logo that you want to be displayed on your virtual shop page, as well as images for any custom labels that you want to use later.
To add assets, click '+ Add Assets' in the top right corner of the page.
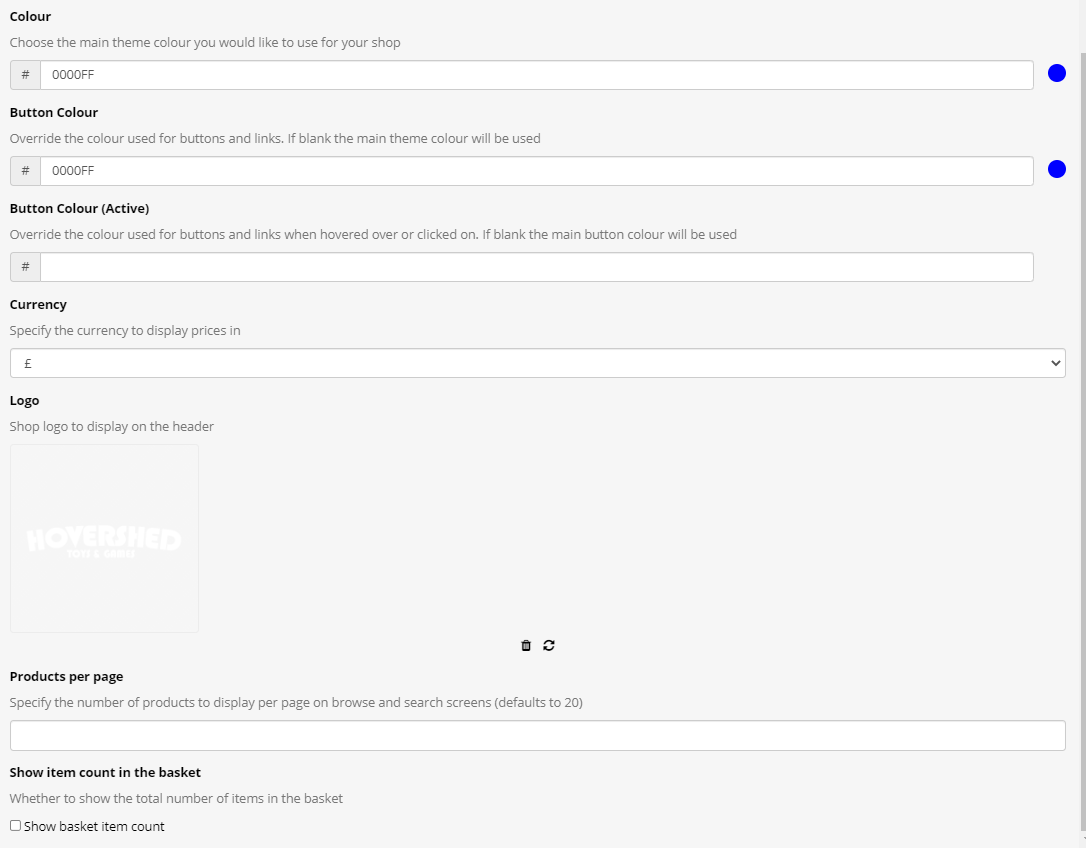
Appearance
The Appearance tab is where you can personalise your shop - from colour to logo, to the number of products displayed on each page and currency you want the prices to be shown in.
The Colours of the theme and buttons in your shop can be specified using
HTML Colour Picker
that allows you to choose from all existing shades! The colour prview will be available on the right hand side of the colour tab.
When the Hide All Prices setting is checked, product prices will be hidden from everywhere within the shop.
From the Currency dropdown, select a currency to use in the shop. Default options include: £, $, € or Custom. When Custom is selected, you must then define both the Major and Minor currency symbols.
You can also specify the currency decimal separator. If this setting is left blank, a default will be used based on the selected currency symbol above. If Custom is selected in the Currency dropdown, a decimal separator must be defined.
The Logo should be earlier uploaded to your Assets and can then be picked from there.
By checking Inline Header, the logo and search bar will be combined, rather than stacked vertically.
Products per page is where you will specify the number of products to display per page on browse and search screens (defaults to 20).
Show item count in the basket is a setting that allows participants to see how many items they currently have in their shopping basket. Tick the setting off if you want to activate it.
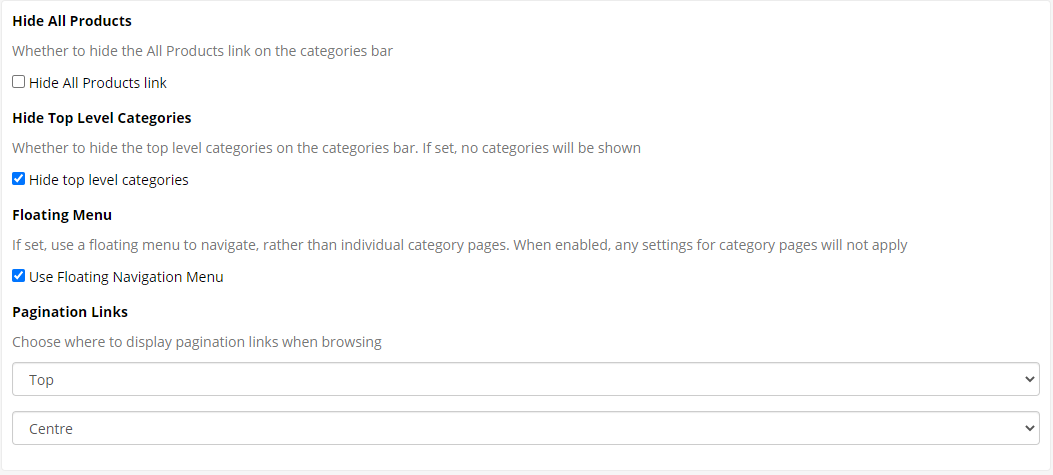
Navigation
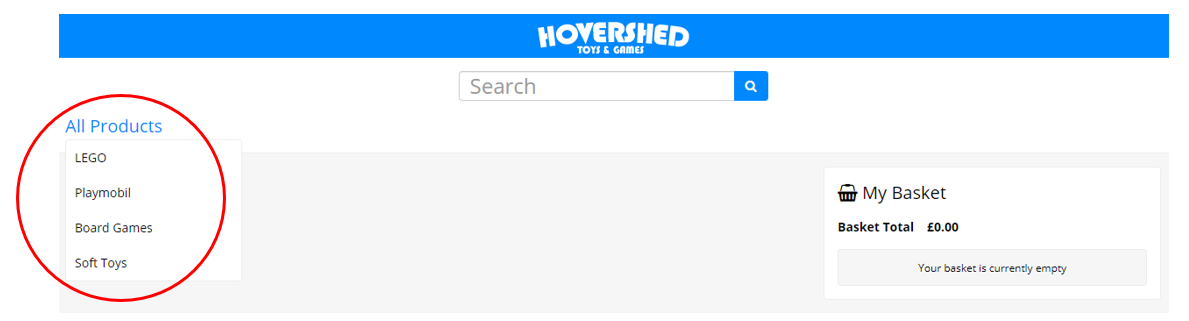
The Navigation tab is where you can decide on whether participants will see the 'All Products' and 'Top Level Categories' while they shop or not by ticking the hide buttons accordingly.
You can also choose whether to use a floating menu to navigate rather than individual category pages, and where to display the pagination links.
For example, the above settings hides Top Level Categories and uses the Floating Menu instead. The image below shows how this will look within the Shop:
Conditions
The following configuration options are all implemented as conditions. In each case, you can create a self-contained configuration, called a condition, which can then be selected as a manipulation when configuring the experiment. This means that if in your experiment you wanted to have two groups of participants, one group who sees one set of labels and another who sees a different set of labels, you don't have to create two separate Shop Builder tasks.
Instead, you simply need to create two Label conditions, and then set your task manipulations to use the appropriate condition when setting up your experiment.
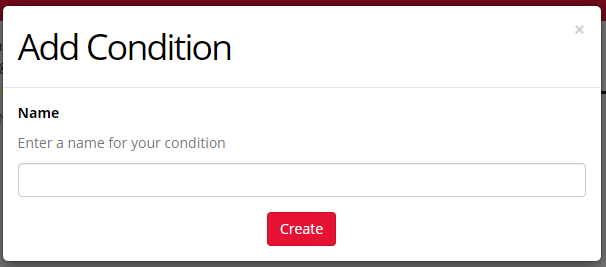
To create a new condition, click the '+ Add Conditions' in the top right corner of the page.

Next, enter a name for your condition - this will become the manipulation option to choose this condition:
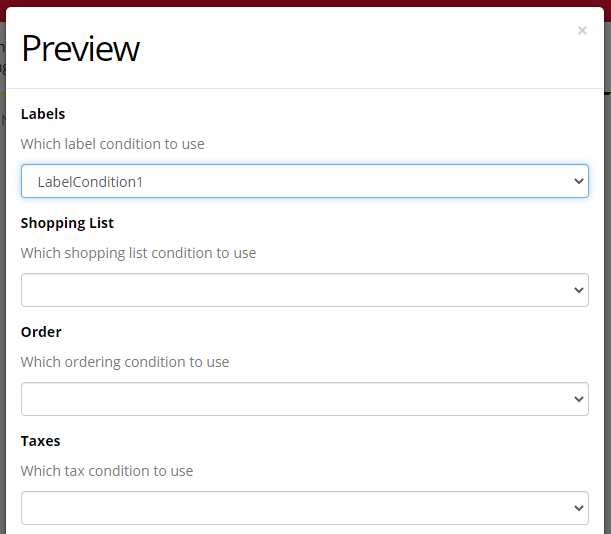
When you preview your shop, you can then choose the conditions you want from the Preview menu. These options will also be available in the Experiment Tree:
Landing Page Products
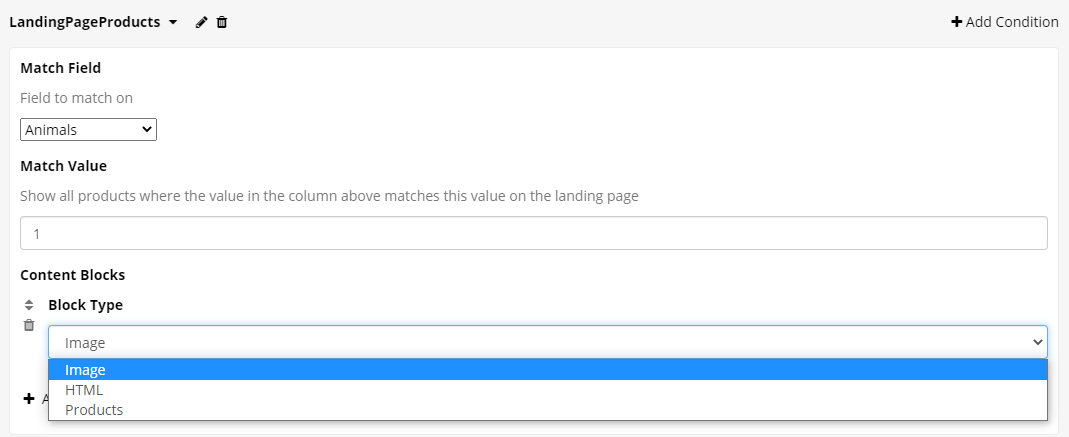
The Landing Page Products allows you to set up which products should show on the first page participants will see when they enter your online shop.
In the Match Field section, you can select which field (column in your Products tab) the landing page products will be taken from.
In the Match Value section, you will decide what value should the landing products match to. In the example below, we choose Animals field and value of 1 - this way, all the products labelled with 1 in the Animal column of our Products will be displayed on the landing page.
You can add Content Blocks that will be anchored to the landing page as well. Here, you can choose from an Image, HTML or Products to display.
Tutorials that use this condition
Landing Page Products
A Worked Example:
In this example, animal-related products are displayed on the landing page, the following HTML will highlight these products to potential animal-lovers. See the images below to see how this can be set-up and what this will look like in the Shop!

This is how the above HTML will appear in the Shop:
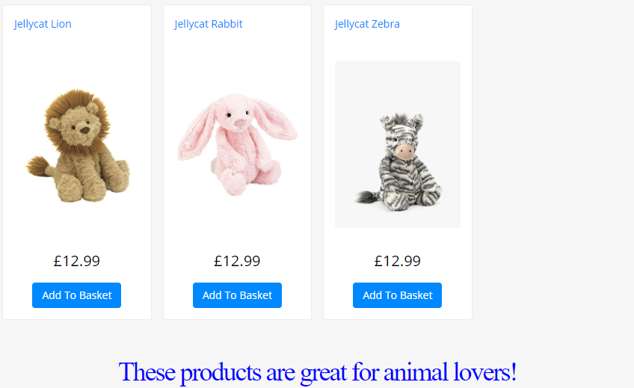
Copy and paste the HTML below to achieve the formatting shown above
<h1 style="text-align: center; color: blue; font-family: Script;" > These products are great for animal lovers! </h1>
You can learn more about formatting text in the HTML guide
Order
By default, products will appear in their categories in the order that they are specified in the spreadsheet.
In the Order tab you can override this to order products based on the value of a particular column.
To specify the Order, click the '+ Add Conditions' in the top right corner of the page.
You can randomise the order products are displayed in by ticking 'Randomise Product Order'
In the Ordering Field, you can specify which column from the spreadsheet you want to order your products by. You can learn more about the spreadsheet in the Products tab.
From the Direction dropdown menu, you can decide whether you would like your products to be ordered in ascending, or decsending order.
You are able to control the order that products appear in when using the search function of the Shop, in the Search Ordering settings.
A Worked Example:
In the example below, a column called 'CheapestProduct' has been added to the spreadsheet, where the products have been labelled according to their price.
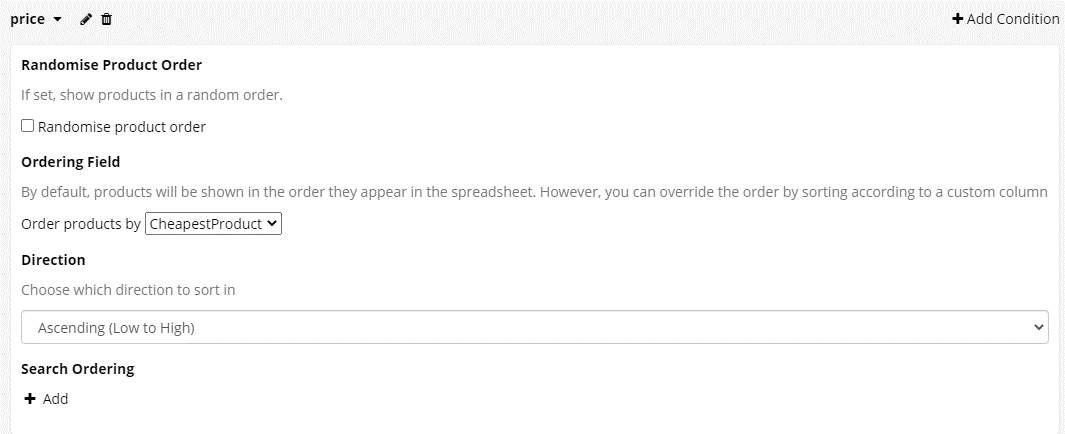
Using the settings shown above the cheapest products will be shown first, rather than in the order products appear in the spreadsheet.
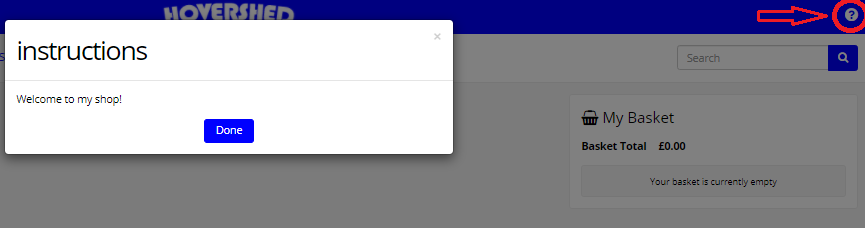
Instructions
The Instructions tab is where you can type in instructions for the participants.
To add the Instructions, click the '+ Add Conditions' in the top right corner of the page.

The instructions will pop up on participant's screen while they shop when they click on the '?' in the top right corner of your shop. See the examplar instructions below:
Content
The Content tab is where you can add any additional content to be displayed in your shop.
For example, if you are building a grocery store, you can include nutritional information under every product. This can be added either as an image, or written as a simple code in html.
Content blocks can be added as HTML or Images.
If you are adding images to the Content tab, these should first be uploaded to your Assets.
You can choose which element to attach the content block to.
The options are:
- Banner
- Landing page
- Product page
- Product page - Under Button
- Product page - Beside Labels
- Category page
- Search page
- Basket Panel
- Swap base
- Swap option.
If you choose Banner, Category Page, Search Page, or Basket Panel, you can then specify the category name.
Tutorials that use this condition
HTML Content Block
A Worked Example:
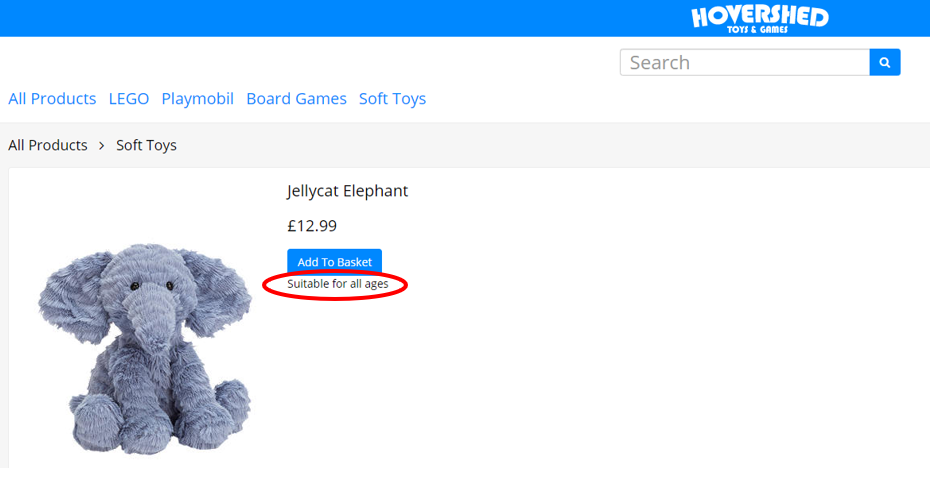
In the example below, information about the suitable age range of products has been added to a spreadsheet column called 'AgeRange'. You can learn more about the spreadsheet in the Products tab.
Using the HTML Content Block, this information can be drawn from the spreadsheet by using double curly brackets {{}} and then displayed under the button on the product page.
To add the Content, click the '+ Add Conditions' in the top right corner of the page.

The settings above will look like this on the Products Page when previewing the Shop:
Filter Items
The Filter Items tab allows you to specify products that you do not want to appear in the shop. You specify these by matching a custom field in your product spreadsheet to a particular value.
To add a Filter Items condition, click the '+ Add Conditions' button in the top right corner of the page.
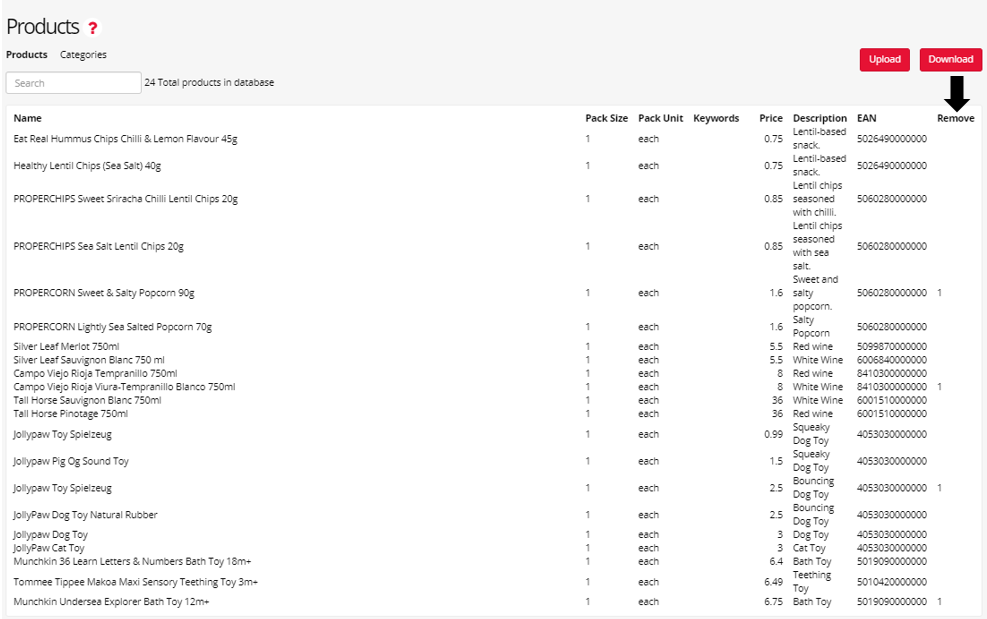
To filter items from appearing in the shop, you will need to create a new column in your Products spreadsheet to tell Gorilla which products should be filtered.
Once you have created this column and flagged the products, select this column from the dropdown in the Match Field setting. Then, in the Match Value setting, define the value that products should match in this column in order to be filtered out. Any products that match this condition will not appear in the shop.
If you also have a Swap condition configured, you can choose to still include the filtered items in swaps by checking the Include in swaps setting.
A Worked Example:
In the example below, one product from each category will not appear in the shop. To do this, the column 'Remove' has been added to the Products spreadsheet. All items that should be filtered have been flagged with '1' in this column.
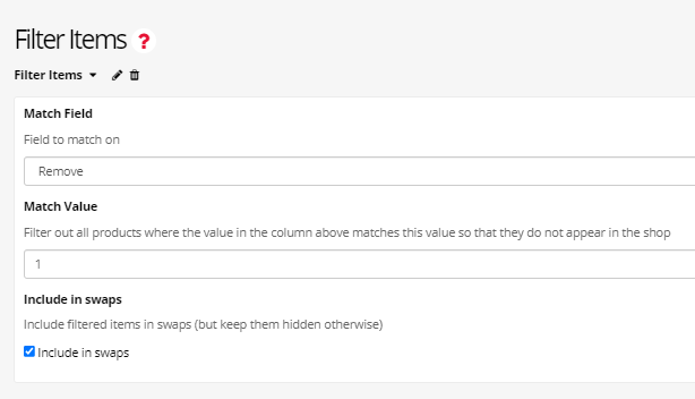
Then, in the Filter Items condition, any items with the Value 1 in the Remove column will be filtered from the shop:
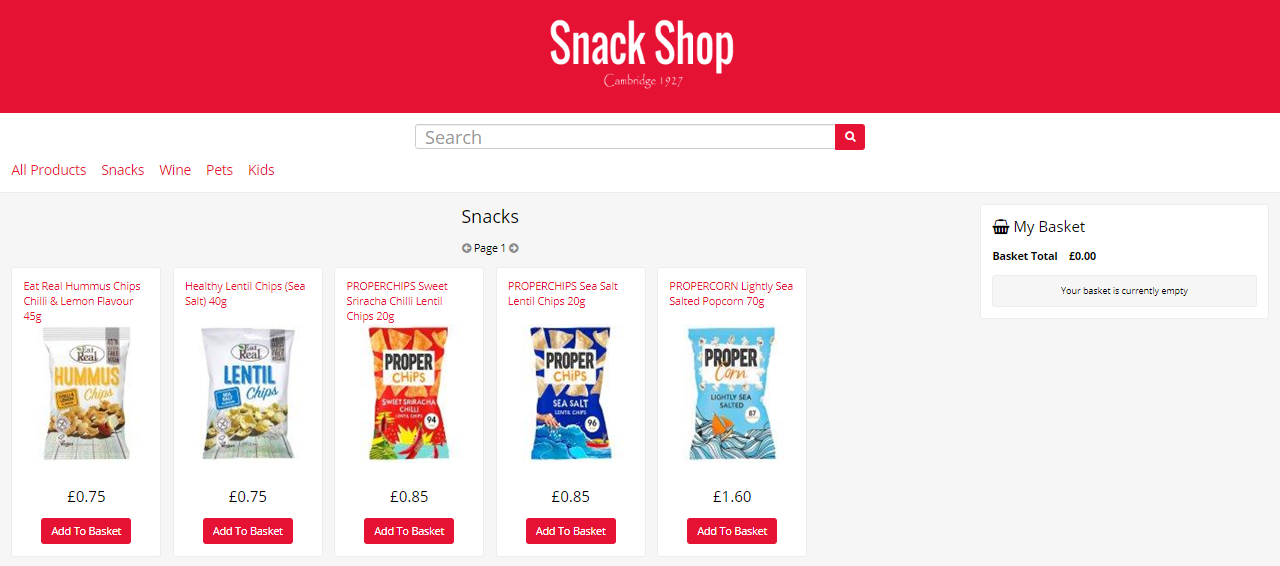
When we preview the shop with the Filter Item condition, these items no longer appear.
As the 'Include in swaps' setting has been checked, when the swap criteria is met, the filtered product still appears as part of the offered swap.
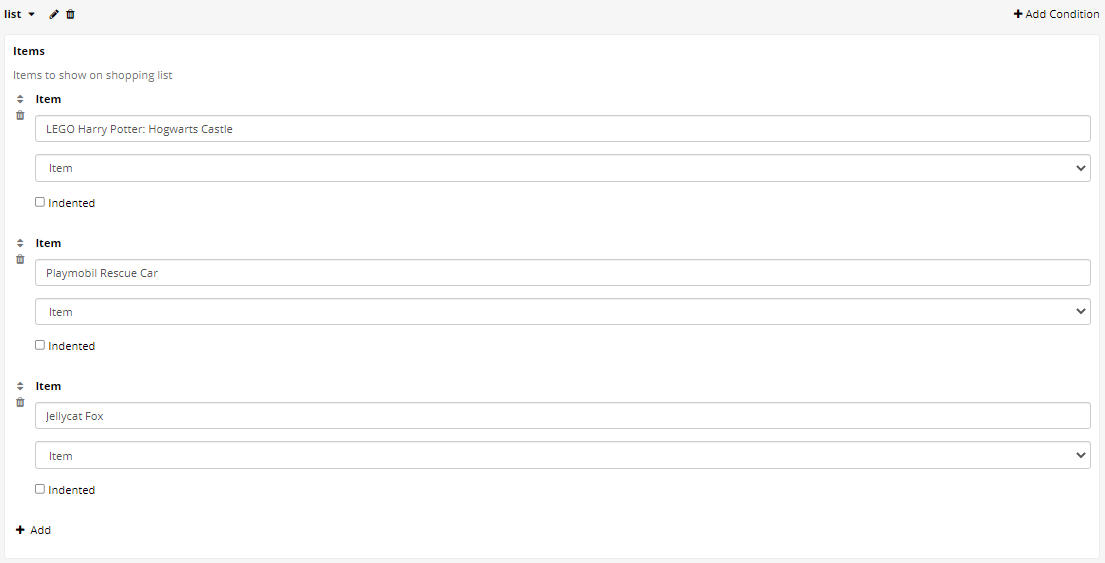
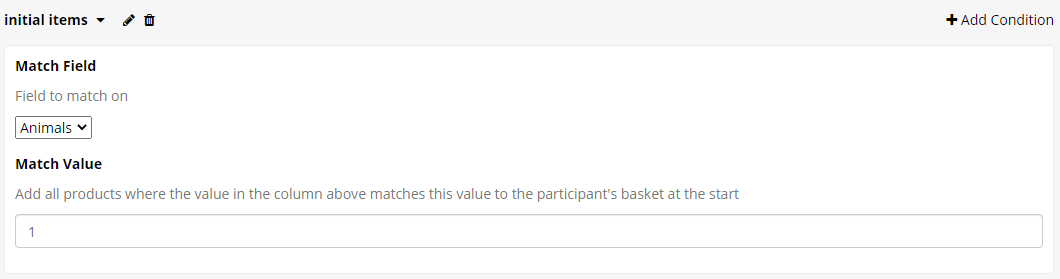
Initial Items
The Initial Items tab allows you to specify items which should start pre-added into a participant's basket. You specify these by matching a custom field in your product spreadsheet to a particular value.
In the Toy Shop, to add all products with the Animals flag to a participant's basket at the start, set the field to 'Animals' and the value to '1'.
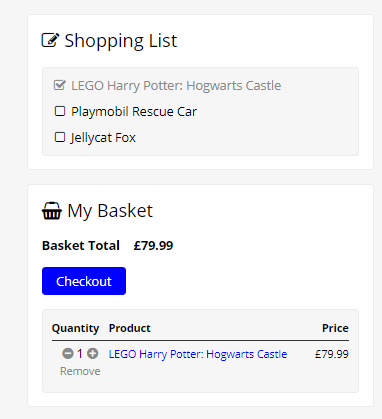
With the Initial Items set as above, participants' baskets will look like this when they enter the Shop:

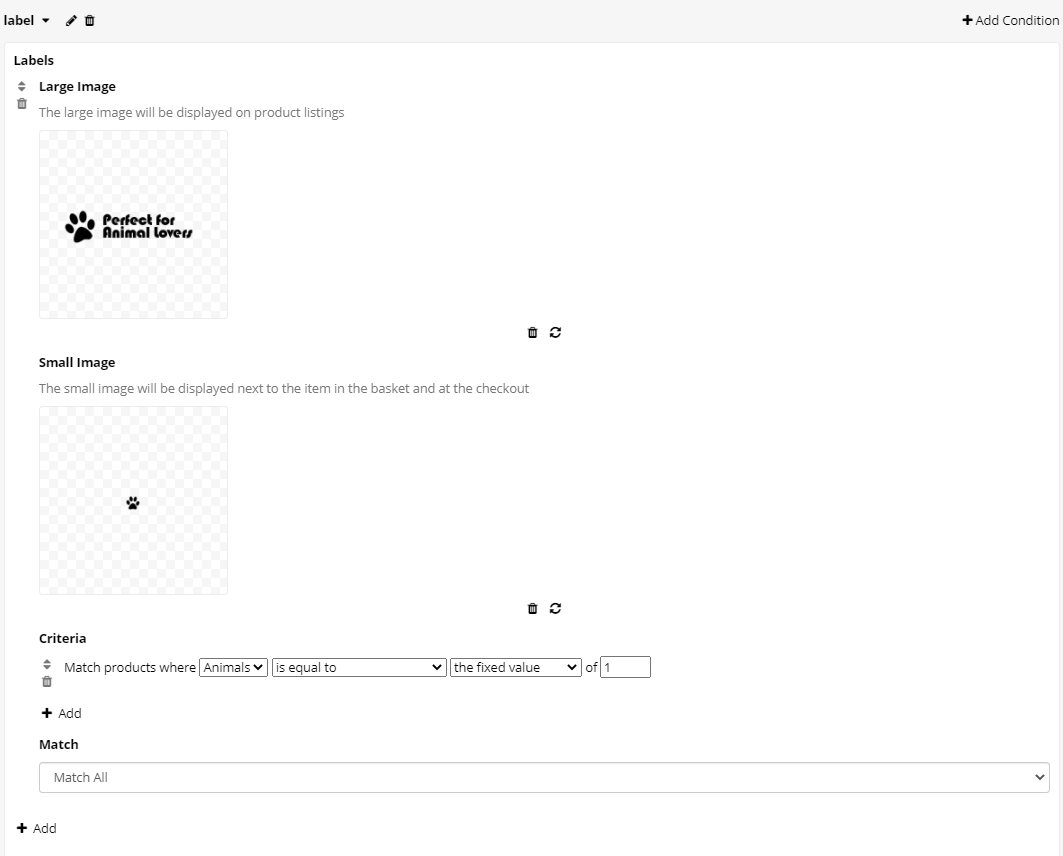
Labels
The Labels tab is where you can add labels to your products.
For example, you can label the products that will be recommended for animal lovers, or products that are environmental-friendly, newly added to your shop, vegan etc.
Your labels should be added as images: a bigger image to be displayed next to the products, and a smaller image to be displayed as a symbol reminding participants about the labelling of the products they have added to their shopping basket. The images that you are adding to your Labels should first be uploaded to your Assets.
To add the Labels, click the '+ Add Conditions' in the top right corner of the page.
To set the Criteria for the label, you would need to tell Gorilla Shop Builder which category you are referring to by specifying the column from your spreadsheet, uploaded in the Products. The products that meet the criteria you specify will be displayed with the labels.
Tutorials that use this condition
Adding Labels
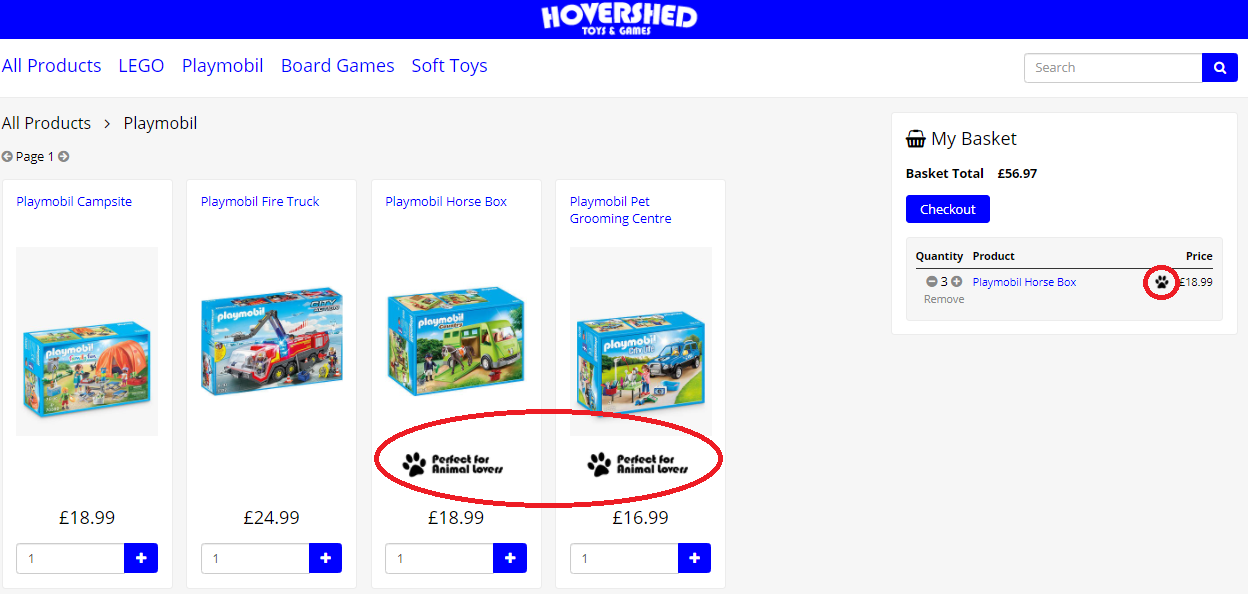
A Worked Example:
See the example of the big labels next to the products and small labels in the shopping basket below:
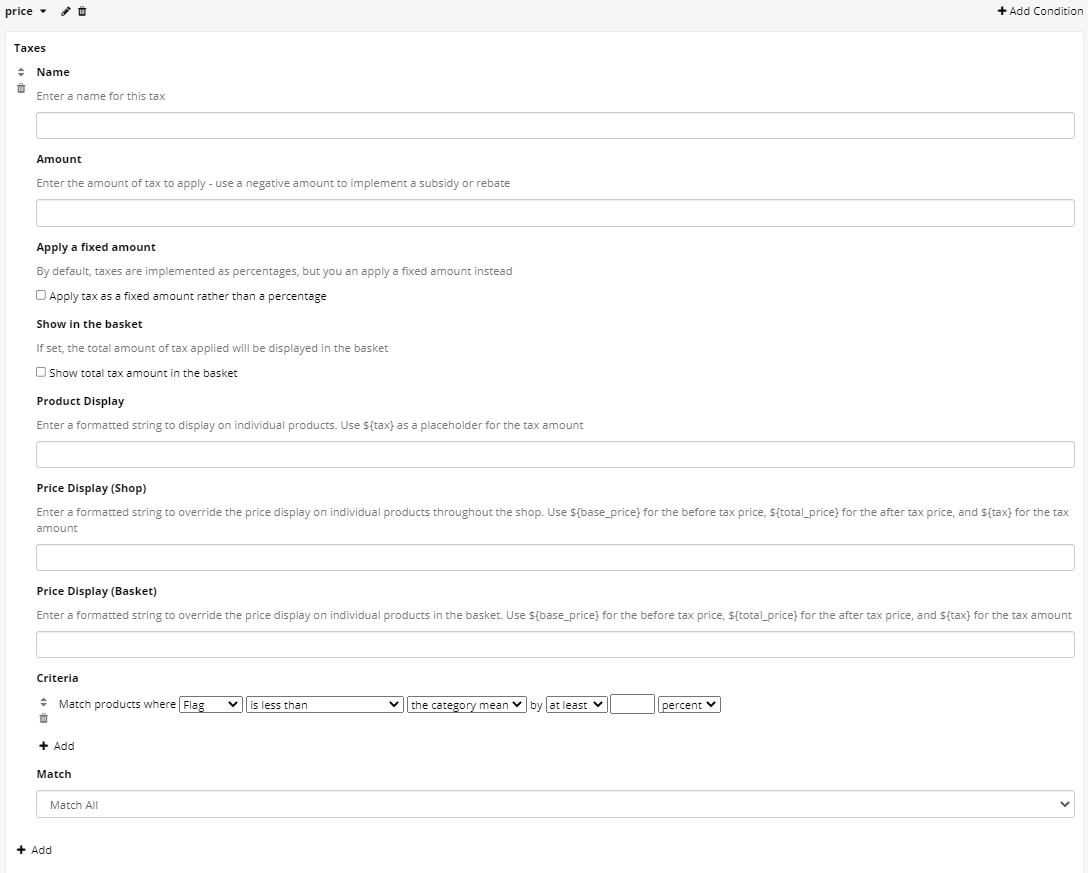
Taxes
The Taxes tab is where you can set the taxes for your products.
For example, you might want to add sugar taxes for products that have high sugar content.
To add the Taxes, click the '+ Add Conditions' in the top right corner of the page.
You can choose the name of the tax as well as the amount, and whether to apply the tax as a percentage or a fixed amount.
There is an option to show the total tax in the basket. You can further specify three options for displaying the tax on the products with formatted text, using HTML. You can choose how to display the tax on the products in the shop, override the price on the products in the shop, and override the price on the products in the basket.
Using the following placeholders will help to display the taxed prices:
${tax} will show how much tax will be applied
${base_price} will show the price of the product before tax
${total_price} will show the price after tax has been applied
To set the Criteria for the taxes, you would need to tell Gorilla Shop Builder which category you are referring to by specifying the column from your spreadsheet, uploaded in the Products. Any Products that match these Criteria will have the Tax condition applied to them.
Tutorials that use this condition
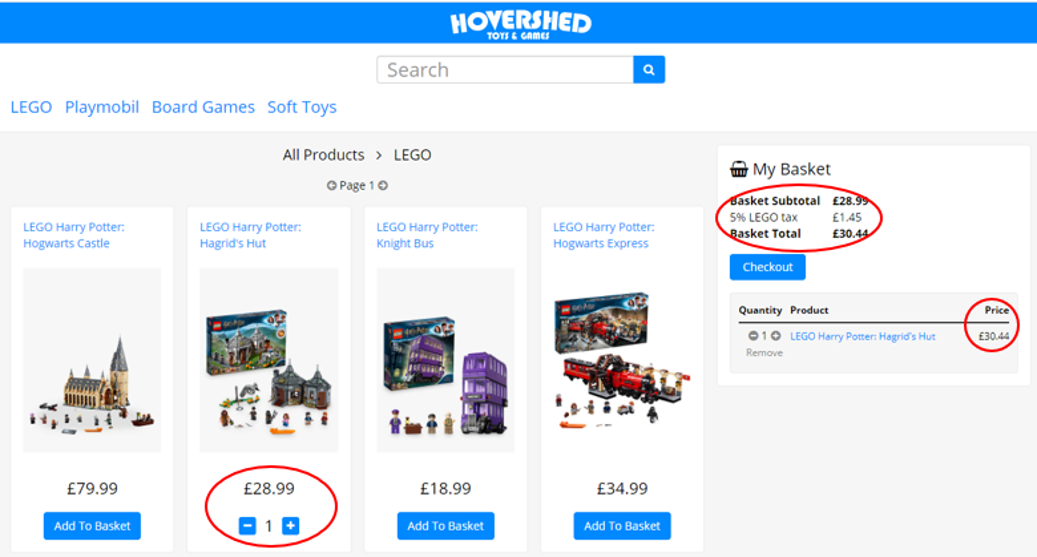
Product Taxes
A Worked Example:
The example below shows how to add a 5 percent tax to all LEGO products in the Toy Shop.
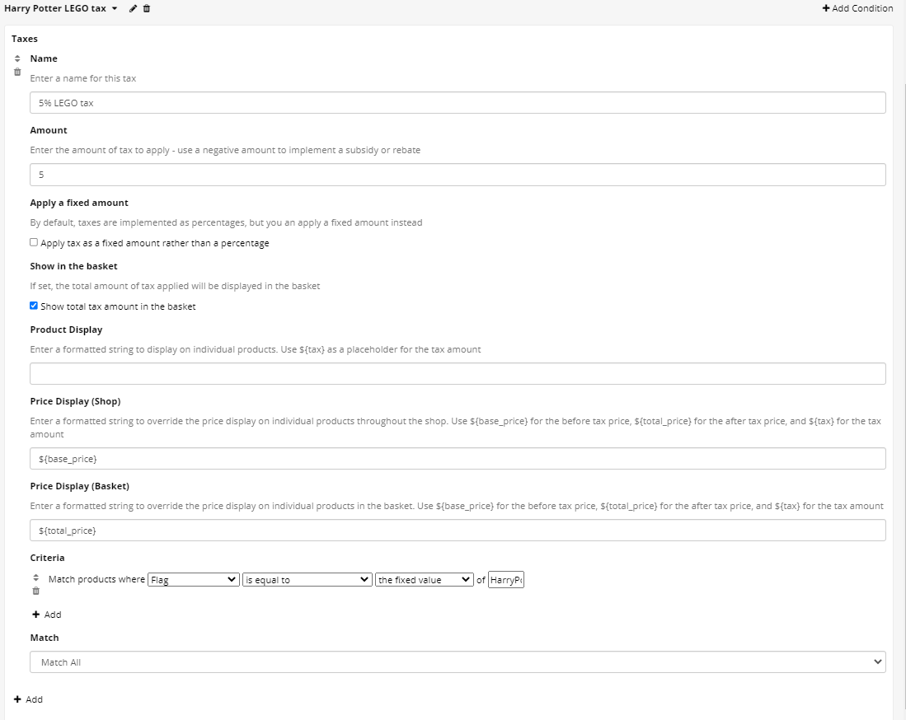
Using the settings above, products that will be taxed in the Shop, will look like this:
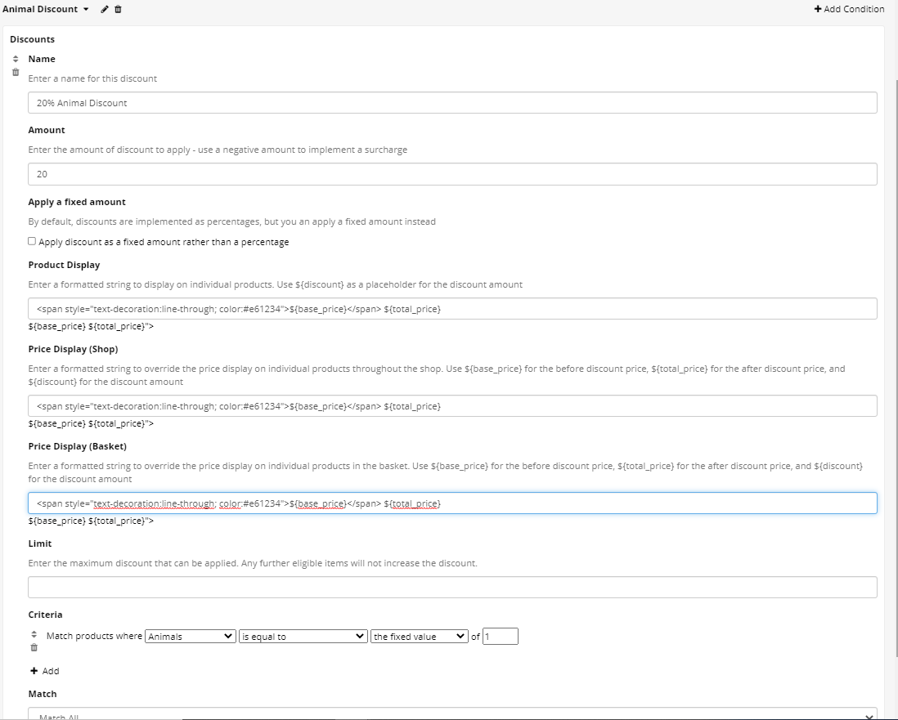
Discounts
The Discounts tab is where you can set the discounts for your products.
You can choose the name of the discount as well as the amount, and whether discounts are applied as a percentage or fixed amount.
Discounts work similar to taxes but operate at the basket level rather than the product level. You can apply discounts to products in the same way as taxes, e.g. as a proportion of their price, but you can add a Limit to the total amount of discount you can claim. Once this limit is reached any further eligible items will not be discounted.
Using the following placeholders will help to display discounted prices:
${discount} will show how much has been discounted
${base_price} will show the price before discount
${total_price} will show the price after discount
Tutorials that use this condition
Discounts
A Worked Example:
In the example below, a 20 percent discount is applied to all Animal products. The string in this example has been formatted using HTML. You can learn more about this in the HTML guide.
You can copy-and-paste this HTML string to acheieve the same format for Discounts, as below:
<span style='text-decoration:line-through; color:#e61234'>${base_price}</span> ${total_price}
Using the settings above, the animal discount in the Shop looks like this:
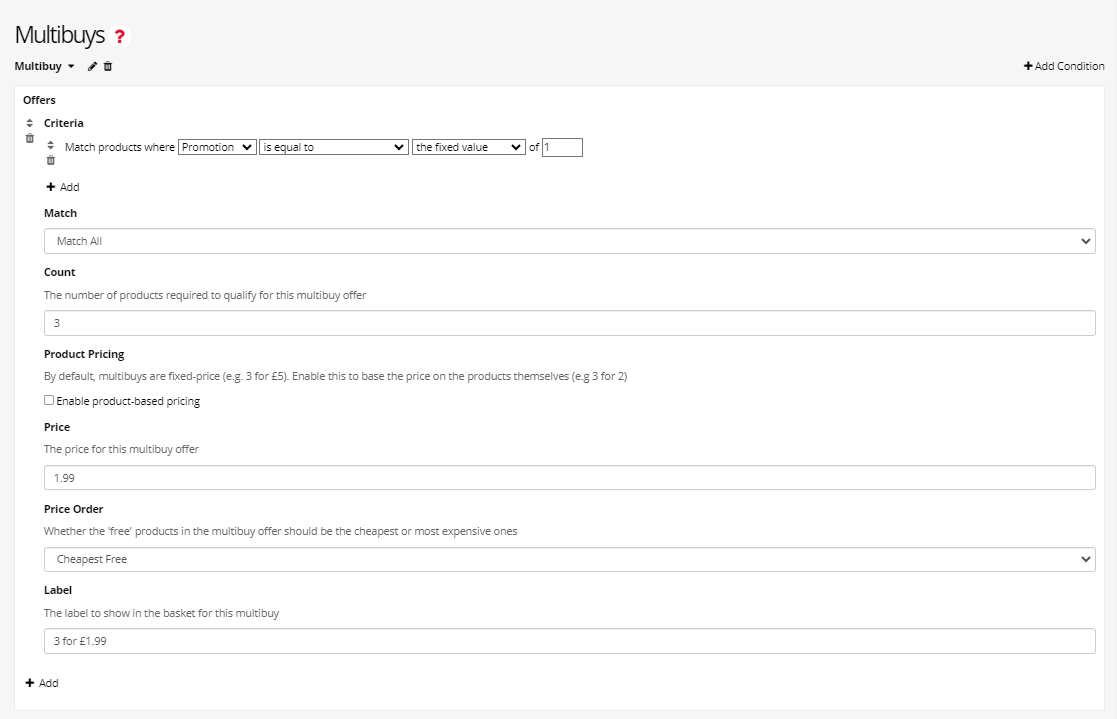
Multibuy
In the Multibuy tab, you can set up specific offers for groups of products purchased. You can create fixed-price multibuy offers such as 3 for £5, or product-based multibuy offers such as 3 products for the price of 2.
To add Multibuy, click the '+ Add Condition' button in the top right corner of the page.
To set the Criteria for the the Multibuy, you need to tell Gorilla which products the Multibuy should apply to. You will need to create a column in the Products spreadsheet and define the products to include in the Multibuy condition. Select this column from the dropdown. Any products that match these criteria will be included in the Multibuy condition.
In the Count setting, you can then define the number of products that must be added to the basket in order to qualify for the Multibuy promotion.
By default, the Product Pricing is set to apply the Multibuy discount at a fixed-price. You can enable product-based pricing by checking this setting. This is useful if you would like to offer a Multibuy discount of '3 for 2', rather than '3 for £5', for example.
Finally, use the Price setting to define the price of the multibuy promotion and the Price Order setting to choose whether the cheapest or most expensive product should be offered for free.
If you would like to display a label for the Multibuy promotion in the basket, you can do this via the Label setting.
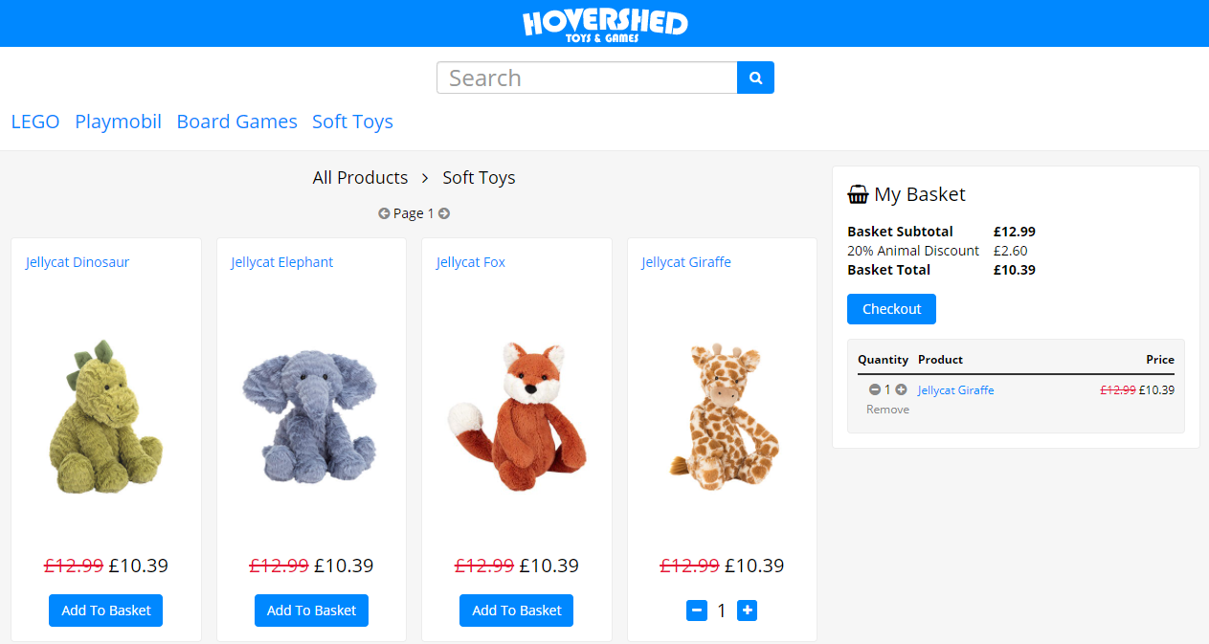
A Worked Example:
In this example, we offer a Multibuy promotion for one of the snack products in the shop. In this case, we offer a 3 for £1.99 Multibuy promotion. To do this, a new column in the Products spreadsheet has been created, called 'Promotion'. In this column, the product we would like to include in the offer has been defined with a '1'.
Then in the Multibuy condition, we match all products where the value in the Promotion column is equal to 1. In this example, we want to offer participants a price of £1.99 when 3 of these products are added to the basket.
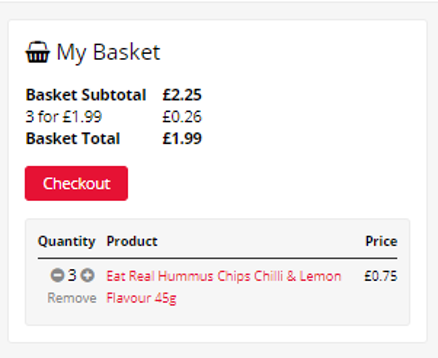
Then, when we preview the shop and the criteria of the Multibuy condition are met, the discount is offered within the basket panel:
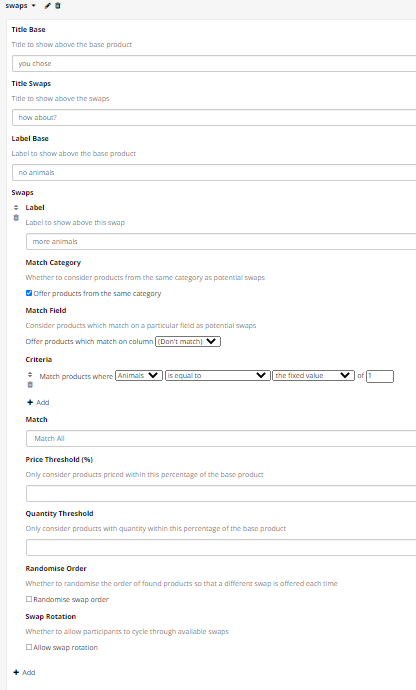
Swaps
In the Swaps tab you can create a swap conditions for chosen products to suggest an alternative product to the participant based on the criteria you choose.
For example, if a product is high in sugar you might want to offer participant to swap for a healthier option that contains less sugar.
Tutorials that use this condition
Offering Swaps
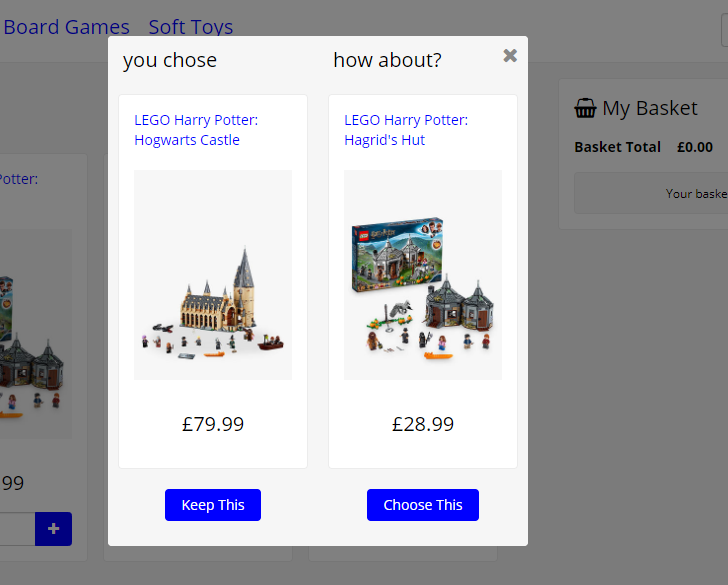
You can set Titles & Labels to the Base products and the Swap products, to show participants why they are being offered the Swaps.
To set the Criteria for the swap, you need to tell Gorilla Shop Builder which category you are referring to by specifying the column from your spreadsheet, uploaded in the Products. This Criteria will specify which products will be offered as the Swaps.
Price & Quantity Thresholds can be set to ensure that offered Swaps are a resonable alternative to the original product.
Randomise Swap Order if you have multipe swaps set up, setting this will randomise the order that these Swaps are shown.
Randomise Product Order will randomise the order that Swap products will appear. By default, the Swaps will appear in the order they are listed within the spreadsheet.
Swap Rotation allows participants to switch which Swap they are shown by clicking 'Show me Another'. Shop Builder will cycle through other Swap products that meet the criteria.
For more advanced Swaps:
Priority Criteria will restrict swaps to products that match both this and the basic criteria (above). If none are found, swaps will respond to basic criteria alone.
Exclude Criteria: Products that match these criteria will not be offered a Swap when added to participant's basket.
Filter Criteria: Products that match these criteria will not be offered to participants as potential Swaps.
Ordering Field can change the order that Swaps are shown in, by using a custom column from the Products spreadsheet. By default, Swaps will be shown in the order they appear in the spreadsheet, unless Randomise Order selected. You can also set which Direction you would like these to be sorted in (Ascending or Descending).
Follow Up if multiple Swaps are set up, you can use this setting to show a second Swap option, if the first had not been accepted.
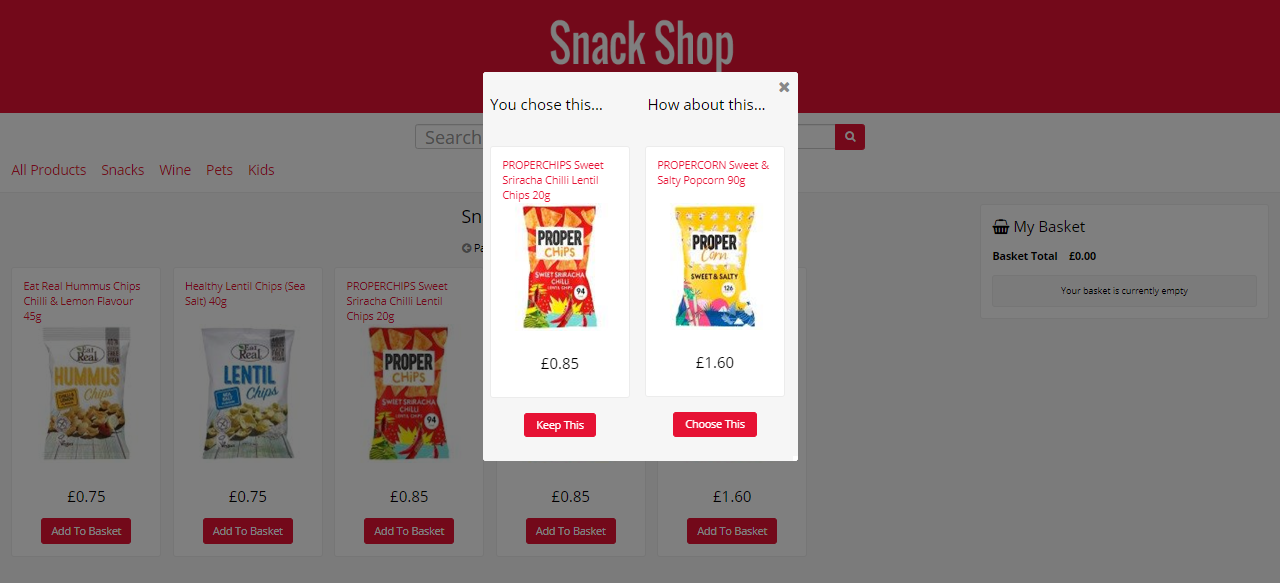
A Worked Example
To add the Swap, click the '+ Add Conditions' in the top right corner of the page.
The swap option will pop up on participant's screen when they choose the product that did not meet the criteria you set up in the Swaps tab, and an alternative product that meet the criteria will be displayed as an alternative option they can choose instead. See the examplar swap below:
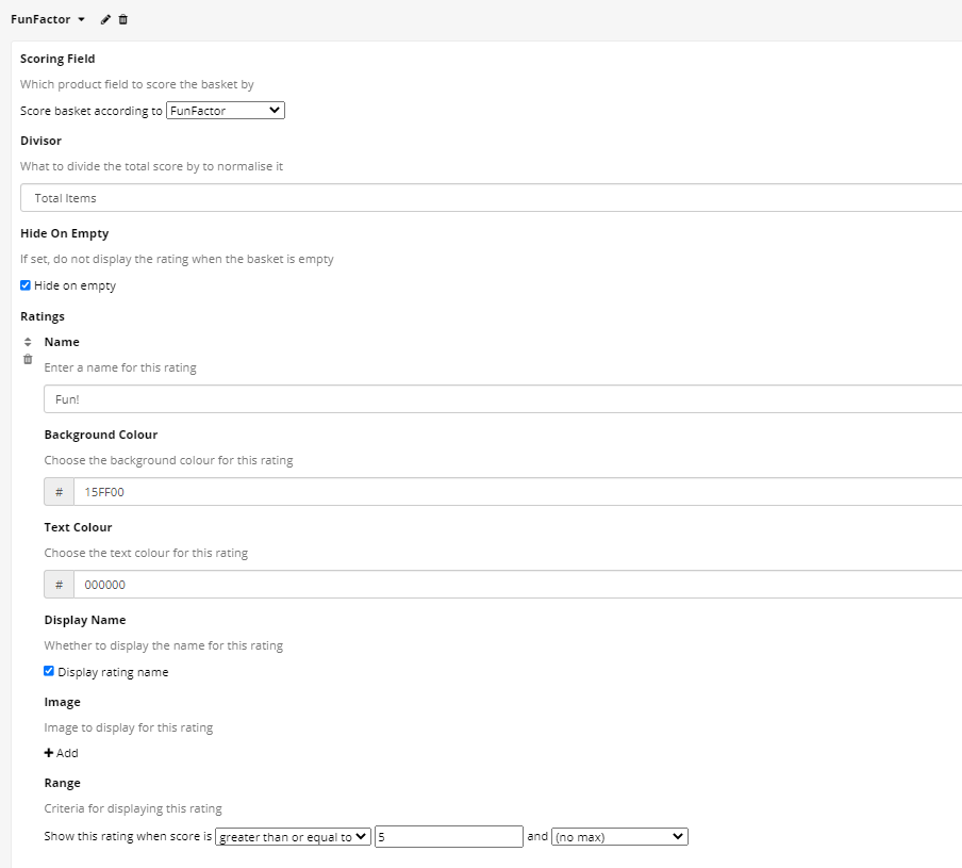
Basket Rating
In the Basket Rating tab you can set the rating criteria for the products that participants have added to their shopping basket.
Using the Divisor setting, you can choose whether the rating is based on how much money the participant spends (Total Price) or by how many items they have bought (Total Items).
Hide on Empty, when ticked will hide the Basket Rating when the basket is empty.
You can customize the Basket Rating by adding a Rating Name (you can choose whether to dsplay this name) an Rating Image
Use this HTML Colour Picker
to set Background and Text Colours for your Rating.
The Range is where you set the criteria for your Basket Rating. When the basket matches this range, the Rating will be displayed in their basket.
Tutorials that use this condition
Basket Rating
A Worked Example:
To add the Backet Rating, click the '+ Add Conditions' in the top right corner of the page.
In this example,an additional column was added to the Products, where the 'Fun Factor' of the items has been defined.
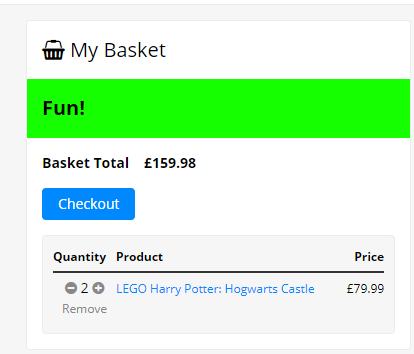
When baskets achieve a rating of 5 or more, the basket will look like this:
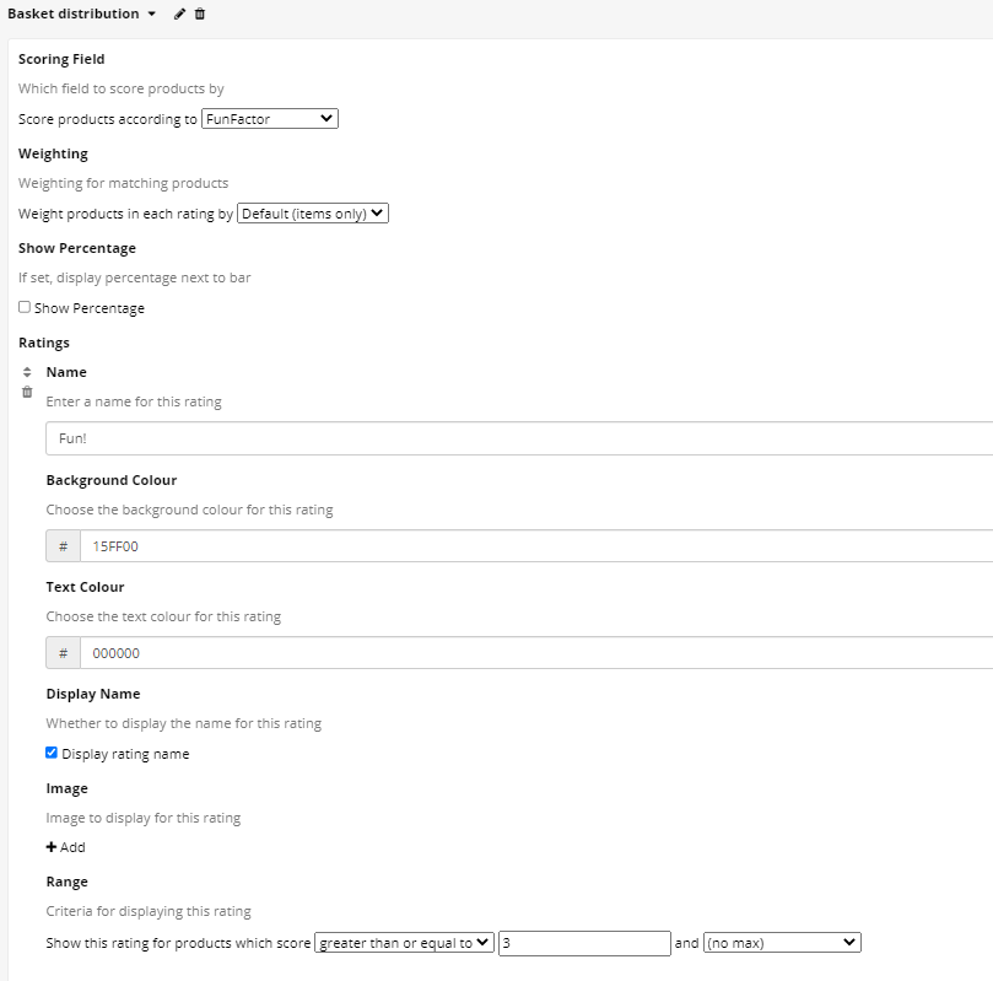
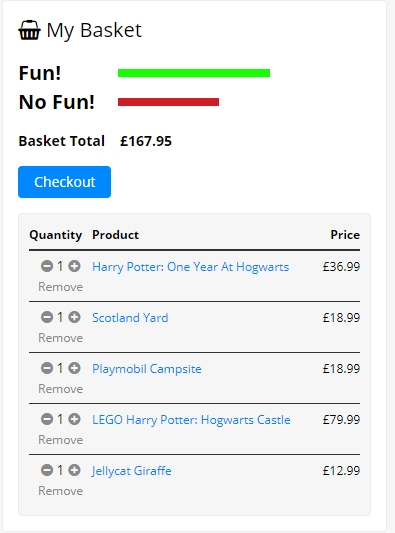
Basket Distribution
In the Basket Distribution tab you can assign a rating criteria to each item in the participant's basket and then display what proportion of their basket falls into each criteria.
For example, we may want to rate the basket as to how 'Fun' it is.
To configure this, you need to pick a single product field to score by, and add a series of ratings.
Each product will count towards the rating that it falls within, and this can be weighted either by the number of products (so two fun products and one not-fun product would provide a distribution of 2:1), the total price, which would mean that products of higher value affect the rating by more (so with one fun product and one not-fun product, if the not-fun product costs 50% more than the healthy one, you would get a distribution of 2:3).
You can also weight by category.
You can customize the Basket Distribution Ratings by adding a Name (you can choose whether to display this name) and an Image to display next to the ratings.
Use this HTML Colour Picker
to set Background and Text Colours for your Ratings.
The Range is where you set the criteria for your Distribution. When a product matches this range, it will contribute to this Basket Distribution Label.
Tutorials that use this condition
Basket Distribution
A Worked Example:
The example below uses a 'Fun Factor' column in the Products spreadsheet to give each item a rating of funness. This can then be used to show how the products in the basket are distributed across Fun / Not Fun.
Using the settings above, the Basket Distribution looks like this in the Shop:
Checkout
The Checkout tab is where you can set the requirements for the shopping that participants need to fulfill in order to complete the task. You can specify a minimum and maximum number of products that participants may buy, as well as a minimum and maximum budget they must spend.
You can save the items purchased in the shop by ticking the Save cart checkbox. You can then display the purchased products as a receipt in a Task Builder 2 task by using the Display Receipt component in Task Builder 2. We have also created a Displaying Receipt Tutorial which walks through how to set this up.
Warning
Saving the entire cart to embedded data is specifically designed to work with the Display Receipt component. Since the embedded data saved from this process is very large, it cannot be used in other parts of the experiment tree, such as Branch and Finish nodes, like other embedded data values can.
By checking the Save cart total setting, the total amount spent in the shop will be saved to embedded data. This is helpful if you would like to use a Branch node to separate your participants into 'high-spend' and 'low spend' groups in the experiment, for example.
If you would like to enforce participants to purchase products that meet specific criteria, use the Require Products setting. If participants do not purchase a product that meets these criteria, they will be prevented from checking out of the shop.
If participants do not meet the criteria you have configured in the Checkout condition, they will be prompted to make changes to their order. For example, if you specify that they need to choose at least 5 products and they try to go to checkout with less products in their basket, they will receive a reminder like the one below:
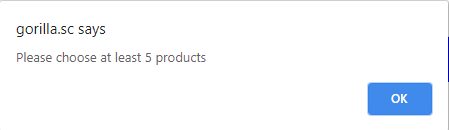
The specific message that participants will be shown can be defined in the various Message settings for the criteria.
Pro Tip
Limiting products by category
To require participants to choose one product per category:
- Add a new column to your Products spreadsheet that mirrors your Categories values (the Categories column itself can't be used in Require Products).
- In Checkout, set Max Products to the number of categories in your shop.
- In Require Products, require at least one product from each category using your duplicate column.
Localisation
The Localisation tab is where you can customise the language used across your shop.
In order to change the language in your shop, you should Download the example spreadsheet and add an extra column with the language you would want to include. In the new column, put the translation of the labels from column English, matching the Identifier column.

In the example above, we gave Polish equivalents to Search, Done, My Basket and Checkout. During the preview, you will be able to choose the language you wish to display your shop in. When we preview this example and select Polish language, you will see some of the functions are renamed to Polish words now.
Getting Access to the Shop Builder Tools
The Shop Builder is available to all Gorilla users. It's free to start building your Shop Builder tasks and preview them. You can create a Shop Builder task from inside any of
your Projects
and you can also contact the Support Desk if you have any questions about Shop Builder!
To add your Shop Builder tasks to an experiment and start collecting data, you'll need a licence. Visit our
Pricing page
for more information.
Shop Builder Publications
The following published studies have used Shop Builder or its predecessor Woods supermarket to carry out their research - please let us know if you have published or are writing up a manuscript!
Forwood, S. E., Ahern, A. L., Marteau, T. M. et al. (2015). Offering within-category food swaps to reduce energy density of food purchases: a study using an experimental online supermarket. International Journal of Behavioral Nutrition and Physical Activity, 12 (85). https://doi.org/10.1186/s12966-015-0241-1
Harrington, R. A., Adhikari, V., Rayner, M., & Scarborough, P. (2019). Nutrient composition databases in the age of big data: foodDB, a comprehensive, real-time database infrastructure. BMJ open, 9 (6), e026652. https://doi.org/10.1136/bmjopen-2018-026652
Koutoukidis, D. A., Jebb, S. A., Ordóñez-Mena, J. M. et al. (2019). Prominent positioning and food swaps are effective interventions to reduce the saturated fat content of the shopping basket in an experimental online supermarket: a randomized controlled trial. International Journal of Behavioral Nutrition and Physical Activity, 16 (50). https://doi.org/10.1186/s12966-019-0810-9
Rummo, P. E., Higgins, I., Chauvenet, C., Vesely, A., Jaacks, L. M., & Taillie, L. (2021). A standardized guide to developing an online grocery store for testing nutrition-related policies and interventions in an online setting. International Journal of Environmental Research and Public Health, 18 (9), 4527. MDPI AG. http://dx.doi.org/10.3390/ijerph18094527
Schruff-Lim, E-M., Van Loo, E. J., van der Lans, I. A., & van Trijp, H. C. M. (2024). Impact of food swap recommendations on dietary choices in an online supermarket: A randomized controlled trial. Appetite, 194, 107158. https://doi.org/10.1016/j.appet.2023.107158
Zizzo, D. J., Parravano, M., Nakamura, R., Forwood, S., & Suhrcke, M. (2021). The impact of taxation and signposting on diet: an online field study with breakfast cereals and soft drinks. Experimental Economics, 24 (4), 1294-1324. https://doi.org/10.1007/s10683-020-09698-0