HOW TO: Experiment Tree
- Design Tab
- Putting your Experiment online
- Recruitment Tab
- Participants Tab
- Data Tab
- Advanced Techniques
- Troubleshooting
Welcome to the Experiment 'How To' Guide
This guide explains how to use the Experiment Builder tool in Gorilla to design and manage your experiments. The Experiment Builder is where you combine all of the tasks and questionnaires you have created into a single flow for participants to complete.
- The Design Tab is where you create the visual layout of your experiment. Here, you can add the tasks and questionnaires you've created as Nodes. You can also include Control Nodes to add additional randomisation, counterbalancing or other complexity to your experiment design. For more details about the different types of nodes, visit the What are Nodes? page in this guide.
- The Recruitment Tab is where you set the number of participants you would like to recruit and choose how to recruit them. While Gorilla doesn't recruit participants directly, you can connect your experiment to an external recruitment service. For a full list of the available recruitment options, refer to our Recruitment Policies guide.
- The Participants Tab allows you to monitor and manage participants at every stage of your experiments. You can see participants that have been invited, who is currently completing the experiment, and review the progress of those who have finished.
- The Data Tab is where you generate and download data from participants who have completed your experiment.
For a walkthrough on creating experiments in Gorilla, check out our Step-by-Step guide.
If you can't find an answer to your question in the topics in the menu, please get in touch with us via our contact form. We are always happy to help! Simply tell us a little about what you are trying to achieve and where you are getting stuck.
What is the Experiment Tree?
In Gorilla you create Experiments using the Experiment Tree.
Gorilla uses a graphical drag-and-drop interface to represent your Experiments, which take the form of a tree or flowchart.
You create Experiments by combining together your Questionnaires and Tasks as 'Nodes' which you link together to form your experiment tree.
A simple experiment may consist of a consent Questionnaire, a demographics Questionnaire and a test Task.
For a more advanced experiment, there are also powerful Control Nodes such as the Randomiser Node, Branch Node, and Order Node, that support complex experimental designs, all without touching a single line of code!
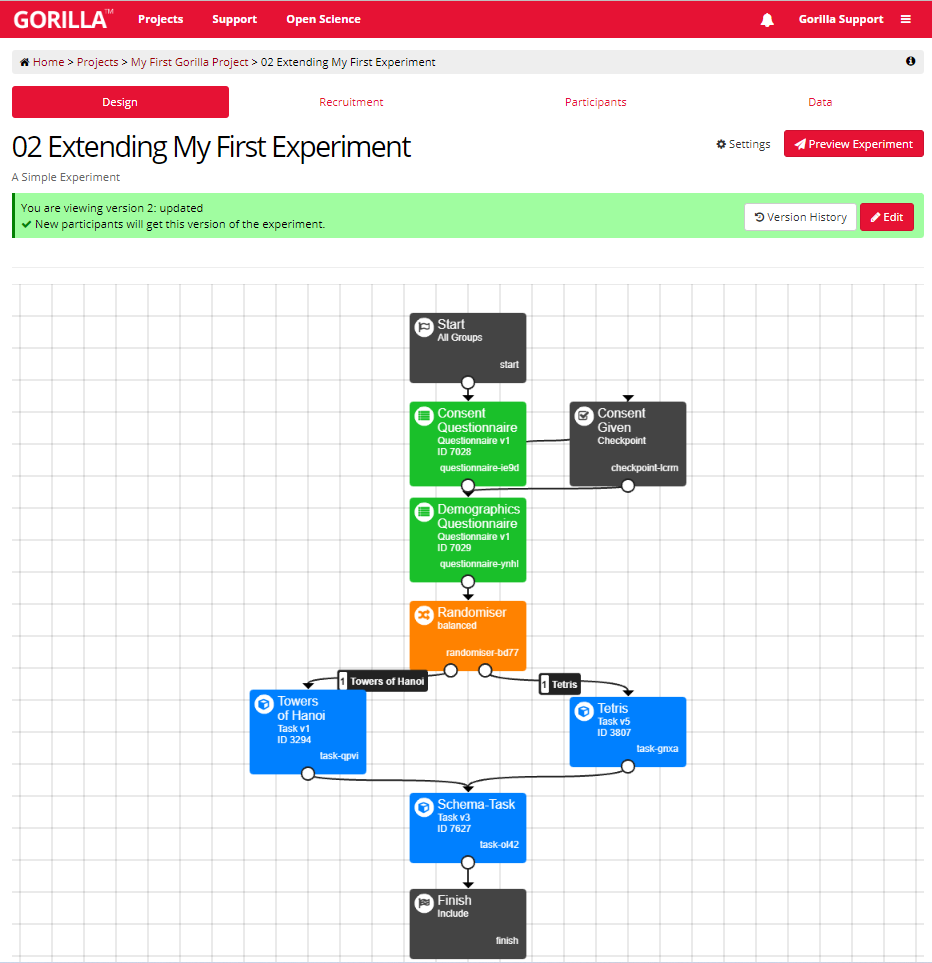
This screenshot shows the new Experiment Builder interface. If you’re still using the classic interface, it will appear slightly different.
How do I Start a New Experiment?
A new Gorilla Experiment can be created within a Project by scrolling to the Experiments section and clicking the 'Create New' button.

With the 'Create New' option selected, enter a name for your new Experiment and press Create. Alternatively, you can also decide to use an existing experiment by Cloning it.

You will then be redirected to the Design Tab for your newly created Experiment.
You can learn more about the Experiment Builder interface here.
When choosing a name for your Experiment, try to make it something unique and memorable - a name you would easily associate with the Experiment's content.
You will use this name to identify your Experiment in your project. It is also the name people will see if you collaborate with, or send your Experiment to, someone, so it's important that they are be able to recognise it easily, too!
You can also add a Description to your experiment. The description is visible from the project overview screen. You can use this feature to add a short reminder of what your Experiment is about or leave a progress message to yourself or collaborators. Descriptions are limited to 1000 characters in length.
To change your experiment's name or add/change a description:
- In New Experiment Builder: click the pencil icon next to the current experiment name.
- In Classic Experiment Builder: use the Name and Description options in the Settings menu.
How do I Use the Experiment Tree?
The Experiment Tree interface is divided into 4 major sections each found in a separate Tab:
- Design: This is where you build your experiment.
- Recruitment: This is where you set your recruitment options.
- Participants: This is where you view the status of participants you have recruited.
- Data: This is where you download your experimental data collected from your participants.
Each major section represents a stage in your overall experimental design. Usually, you will progress through each of these sections one after another from left to right.
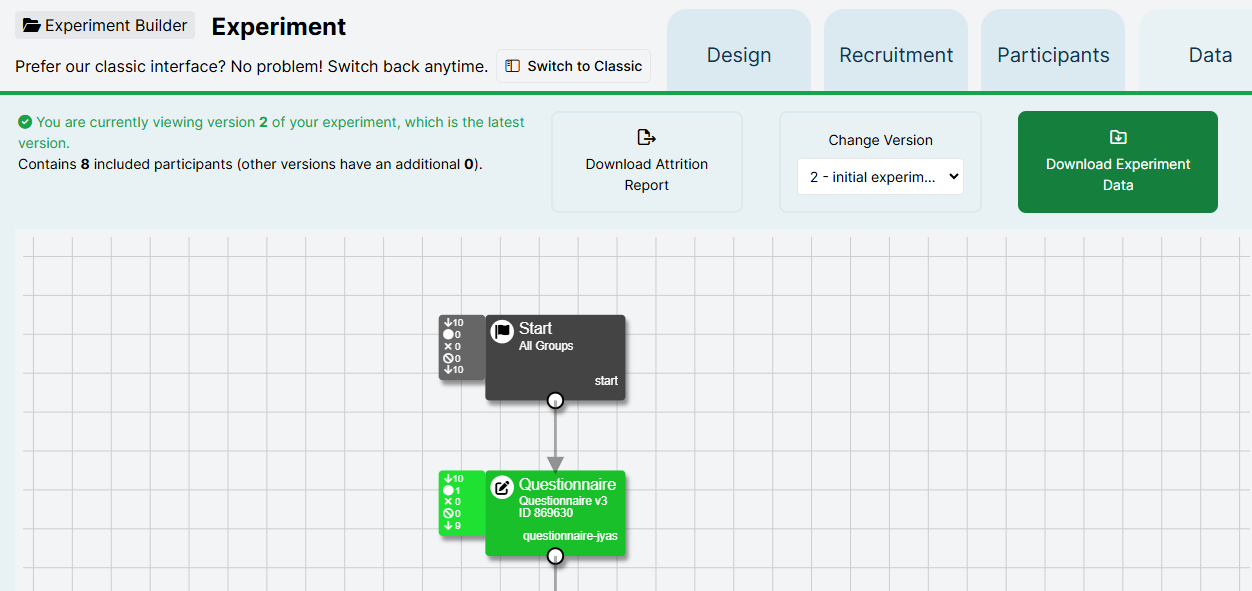
When you first enter an Experiment you will be presented with the Design Tab. The Design Tab is where you create your experimental design. From this page you can navigate to any of the tabs for your experiment (highlighted in the red box in the screenshot below).
The screenshot below shows New Experiment Builder. If you are still using Classic Experiment Builder, open the expandable section.

You can now learn how to use the Experiment Tree to design and build a simple Experiment, like the one in the example above.
How do I Use the Design Tab?
In Gorilla you build your Experiments in the Design Tab of the Experiment Tree.
The screenshot and description below shows New Experiment Builder. If you are still using Classic Experiment Builder, open the expandable section below.
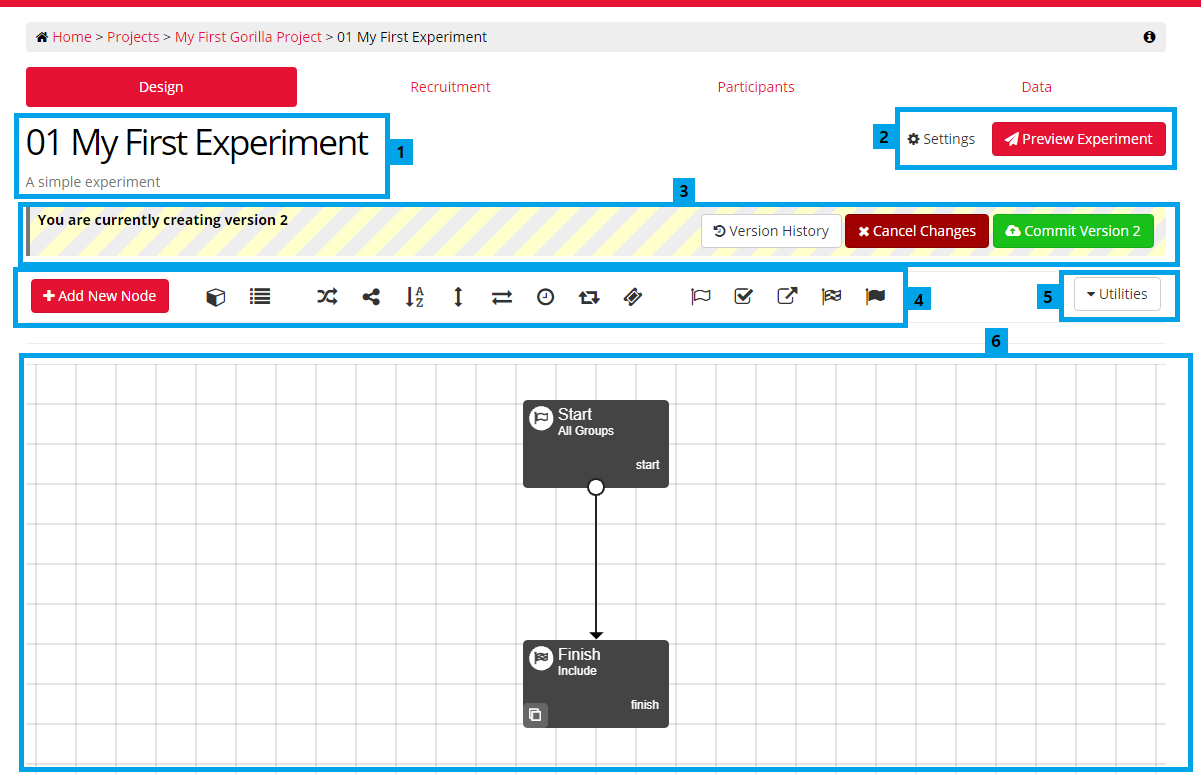
- Name of your Experiment and Description: you can change these in the Settings menu under Name and Description.
- Settings & Preview Experiment. Click Preview Experiment to see how your experiment looks for a participant.
- Version control tools: Version History to view previous versions of your experiment, and either the Edit button (if you are not currently making changes), or Cancel Changes/Commit Version buttons (if you are currently making changes).
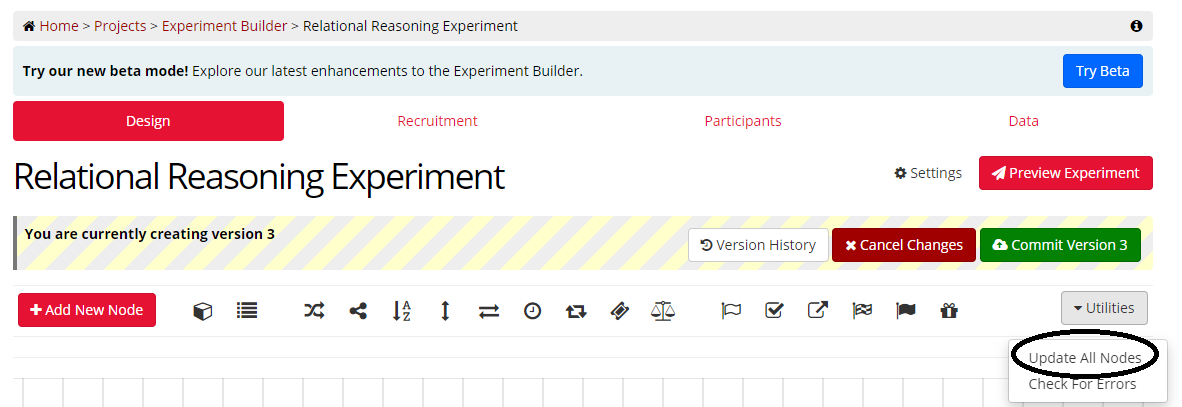
- Design Bar: Add New Node button and New Node icons. Use these to add new content to your experiment.
- Utilities menu. Update All Nodes: updates all task and questionnaire nodes in your experiment to the latest versions; Check for Errors: reports any problems with your Experiment Tree.
- Design Space. Zoom in and out is not available in Classic Experiment Builder. To zoom in and out, click 'Try Beta' in the blue banner at the top to try New Experiment Builder.
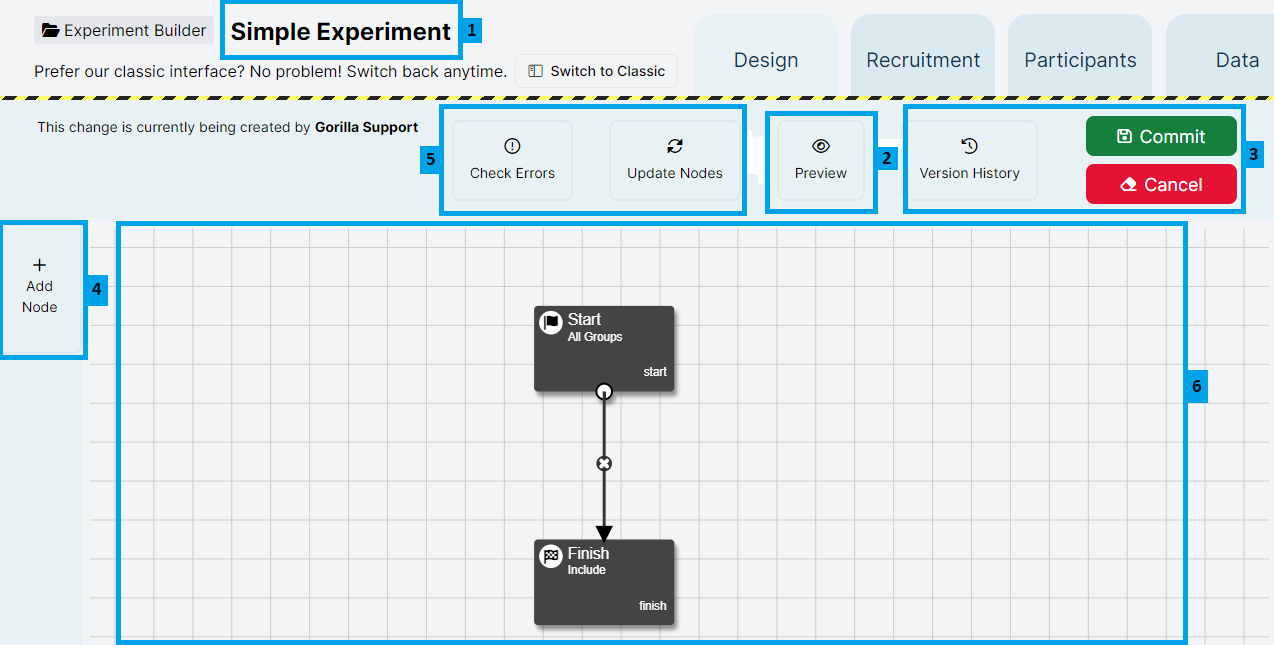
- Experiment Name. Change the name and description of your experiment by clicking the pencil icon.
- More Actions menu. Use this to view previous versions of your experiment.
- Commit/Edit button.
- When in Edit mode, click Commit to commit changes to your experiment.
- When not in Edit mode, click Edit to start making changes to your experiment.
- Preview button. Click this to see how your experiment looks for a participant.
- Update Nodes button. Click this to update nodes in your experiment to their latest versions.
- Check For Errors button. Use this button to check for errors in your experiment tree.
- Add Node button. Click this to add new content to your experiment. You can also use the blue plus buttons to add a node in a specific location in the experiment tree.
- Design Space. Use the scroll wheel on your mouse to zoom in and out.
How do I Build an Experiment in Gorilla?
In Gorilla you build your Experiments in the Design Tab of the Experiment Tree.
When you create a new experiment for the first time, you'll notice that the experiment tree already contains two Nodes: a Start Node and a Finish Node.
When building a new experiment, the first step is to add some more Nodes. Experiment Tree Nodes are the building blocks of experiment creation. You can find out more about different types of nodes in What are Nodes? section.
For all types of node, the process to add them is the same. The steps below refer to New Experiment Builder. If you are still using Classic Experiment Builder, open the expandable section.
In Classic Experiment Builder, to add a new node:
- Click the Edit button.
- Click the Add New Node button, found on the left just above the building area. (Alternatively, you can click the icon of the Node you want to add on the Design Bar).
- Select the type of Node you wish to add into your Experiment. If you select Task or Questionnaire, you will be prompted to choose a Task or Questionnaire from one of your Gorilla Projects.
- Click 'OK'.
- Your node will appear on the design space. Drag and drop it to the position where you want it.
- To configure the node's settings, click on the node.
- Connect the node into the flow of your experiment by clicking and dragging the white dots.
To make a copy of a Node, click the Duplicate icon at its bottom left corner.
To remove a Node, click the Node and then click the 'Remove' button.
In New Experiment Builder, to add a new node:
- Click the Edit button.
- Click the Add Node button at the top right, or click a blue plus button at the point in the tree where you want to add a new node.
- Select the type of Node you want to add to your experiment. If you select an Activity (Questionnaire, Task, Game, or Shop), you have two options:
- Create a new activity of this type, by entering a name and clicking Create.
- Choose an existing activity of this type. By default, activities located in the current project will appear. To select an activity from another project, click the arrow next to the name of your current project, find the project you want, and click it. Then click the activity you want to add.
- Your node appears on the design space. Drag and drop it where you want it. If it's not already connected into the flow of your experiment, connect it to other nodes by clicking and dragging the white dots.
- Node settings appear on the right. Configure these as you want - changes are auto-saved. To dismiss the settings panel, press the x at the top right.
To make a copy of a Node, click the Node and then click the 'Duplicate' button in the Node settings. To remove a Node, click the Node and then click the 'Remove' button in the Node settings.

What Are Nodes?
Experiment Tree Nodes are the building blocks of your experiment. They fall into two categories: Activities and Controls. Click on the name of each Node below for more detailed information about each Node and how to set them up.
Activities
These are the tasks, questionnaires, games, or shops you want your participants to take part in. By clicking the node in the Experiment Tree, you can configure any spreadsheets or manipulations to customise your activities for different experimental conditions.
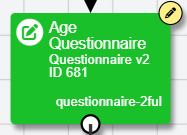
In New Experiment Builder, if you are currently editing an activity, it will appear in your experiment tree with a pencil icon at the top right:
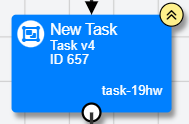
If an activity has not been updated to the latest version, it will appear in your experiment tree with two upward arrows at the top right:
Before recruiting participants, you need to commit your changes to the task/questionnaire and ensure that all nodes are updated to the versions you want to use in the final experiment. In New Experiment Builder, you can do these steps automatically when you commit the experiment.
Controls
These nodes control how your participants enter, progress through, and exit the experiment. They also allow you to manipulate the path participants take through your experiment, for example by randomising them to different conditions or having them repeat a task.
- Start Node: Where your participant enters your experiment. Most experiments have only one Start Node, but you can add multiple Start Nodes if you have multiple different groups of participants.
- Finish Node: Where your participant exits your experiment. The Finish Node can be configured to send participants on to another site, e.g., back to an external recruitment service.
- Reject Node: Reject participants who are not suitable for your experiment, or who withdraw their participation.
- Redirect Node: Move participants between an external site, questionnaire or task and return to Gorilla. This can be useful when you wish to use more than one research platform.
- Checkpoint Node: Monitor how far along a participant is in your experiment. This can be useful for longitudinal studies or for managing attrition.
- Delay Node: Suspend a participant from continuing with your experiment until the specified time has elapsed.
- Quota Node: Specify the number of participants you want to recruit for different parts of your experiment.
- Repeat Node: Have your participants repeat a section of your experiment.
- Switch Node: Allow your participants to switch between tasks/questionnaires during your experiment.
- Randomiser Node: Distribute participants at random between 2 or more paths through your experiment.
- Branch Node: Direct participants down different paths through your experiment based on their previous responses or performance.
- Order Node: Randomise the order in which tasks and questionnaires are presented to participants.
- Counterbalance Node: Assign participants at random to different stimuli sets.
- Allocator Node: Distribute participants at random between 2 or more paths through your experiment, while keeping your conditions balanced if participants drop out.
- Lobby Node: Group together participants to take part in multiplayer tasks.
By adding these nodes to your Experiment Tree and linking them together in different ways, you can perform randomisation, branching, counterbalancing, or even build a longitudinal study, all without touching a line of code.
Configuring Nodes
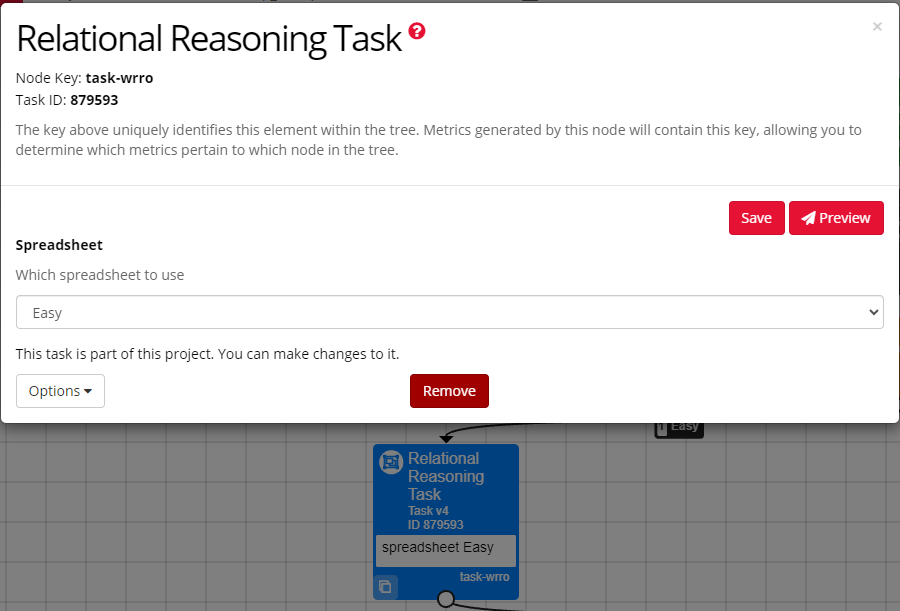
To change the configuration settings on any Node, click the Node in the experiment tree. This will open the Node Settings.
The screenshots and descriptions below show New Experiment Builder. If you are still using Classic Experiment Builder, open the expandable section.
In Classic Experiment Builder, Node settings look like this:
For all nodes, you can:
- Duplicate the node to create another copy to use within your experiment, by clicking the Duplicate icon at the bottom-left of the node itself.
- Remove the node to delete the current copy of the node from your experiment, by opening the node settings and clicking Remove.
For Activities (tasks, questionnaires, games, or Shop Builder tasks), you can also:
- Preview the task from the perspective of a participant. To do this, click the red Preview button.
- Select the task spreadsheet you want to use for this version of the task, and/or set the values of any task manipulations.
- Options Open in Editor to make changes to the task. Once you have made changes and committed them, you will need to update your nodes in the Experiment Tree to ensure the changes are reflected in your experiment.
- Options Add to library to add this task to your personal Library of Gorilla tasks.
- Options Update to latest version to update the node to use the latest version of the task.
- Options Use a different version of this task to select a different version of the task.
- Options Use a different task to swap the task out for a different task.
- Options Clone & Edit to make a copy of the task in your current project or a different project.
When you have made any changes to Node settings, click 'Save' to save these changes:
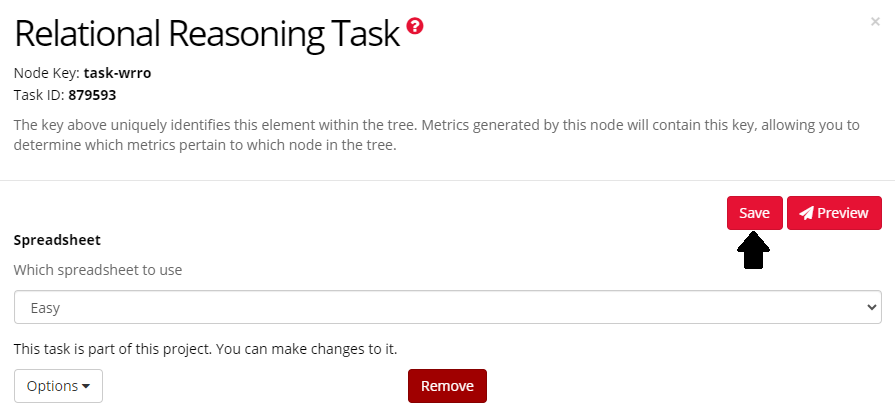
Control Nodes have other settings available, depending on the node type. You can find more information about the settings available for different Nodes in our Experiment Tree Nodes Reference Guide.
In New Experiment Builder, Node settings look like this:
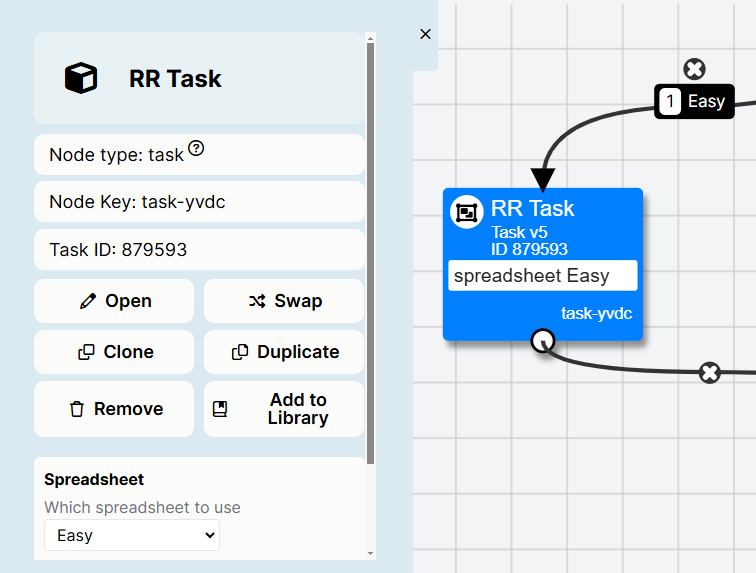
For all nodes, you can:
- Duplicate the node to create another copy to use within your experiment, using the Duplicate Node button
- Remove the node to delete the current copy of the node from your experiment, using the Remove Node button
For Activities (tasks, questionnaires, games, or Shop Builder tasks), you can also:
- Select the task spreadsheet you want to use for this version of the task, and/or set the values of any task manipulations.
- View the task to open it without making changes
- Edit the task to start making changes. Once you have made changes and committed them, you will need to update your nodes in the Experiment Tree to ensure the changes are reflected in your experiment.
- Use a different version of the task in your experiment.
Changes to node settings in New Experiment Builder save automatically. Once you're finished, click the x at the top right to close the settings.
Control Nodes have other settings available, depending on the node type. You can find more information about the settings available for different Nodes in our Experiment Tree Nodes Reference Guide.
Updating Your Nodes
It's important to keep your Activities (Tasks, Questionnaires, etc.) up-to-date so that participants will take part in the latest version of your experiment.
The Activity Nodes in your Experiment Tree do not update automatically - you need to update them after you commit a new version of your Task/Questionnaire in the Task or Questionnaire Builder.
The screenshot and description below show New Experiment Builder. If you're still using Classic Experiment Builder, open the expandable section.
In Classic Experiment Builder, to update all your nodes, go to the Utilities menu at the top-right and select Update All Nodes:
A window will pop up with details of the nodes that need updating. To update them, click 'Update All'.
You can also choose to update individual nodes to the latest version. To update an individual node, click on the Node, click 'Options' in the bottom left-hand corner, then 'Update to latest version'. If your Task/Questionnaire is not the latest version, an orange warning triangle will appear next to the 'Options' button.
In New Experiment Builder, you can see at a glance if any of your nodes are out-of-date by looking at the Experiment Tree. A node that is using an out-of-date version of an activity will appear with two upward arrows at the top-right:
To update only this node:
- Click the node and click 'Update to version [latest version number]'.
To update this and all other nodes:
- Click 'Update Nodes' at the top of the Design tab.

A window will appear with details of the nodes that need updating. To update them, click 'Update all nodes to latest versions'.
If you are currently making changes to a node, it will appear with a pencil icon at the top-right:
To commit changes to this and all other nodes and update them all within the experiment:
- Click 'Commit' at the top of the Design tab, then use the auto-commit and auto-update functions to commit and update all nodes within the experiment (see Pro Tip box below).
To commit changes only to this node and update it within the experiment:
- Click the node, click 'Continue Editing', then click 'Commit' in the Task/Questionnaire Builder.
- Return to the experiment. Click the node and click 'Update to version [latest version number]'.
Auto-commit and update nodes on experiment commit
In New Experiment Builder, when you commit the experiment, Gorilla will alert you to any nodes that you are currently editing:
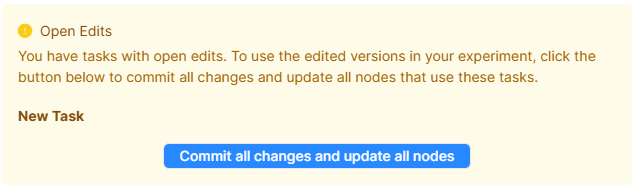
Clicking 'Commit all changes and update all nodes' commits all open changes to all activities in your experiment, and updates all nodes to use the newly committed versions.
If you do not click this button before committing your experiment, the experiment uses the latest committed versions before you started making your changes.
Gorilla will also alert you to any nodes that are committed, but where the experiment tree is not using the latest version:
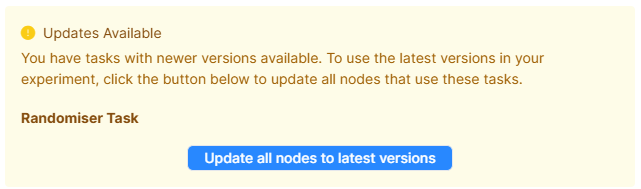
Clicking 'Update all nodes to latest versions' updates all nodes in your experiment tree to use the latest versions.
If you do not click this button before committing your experiment, the experiment uses the version currently selected in the experiment tree.
Previewing the Experiment
At Gorilla, we highly recommend previewing your experiment in full.
The screenshot below shows New Experiment Builder. If you are still using Classic Experiment Builder, open the expandable section.
In Classic Experiment Builder, click the red 'Preview Experiment' button at the top right:

In New Experiment Builder, click the white and blue Preview button at the top right:
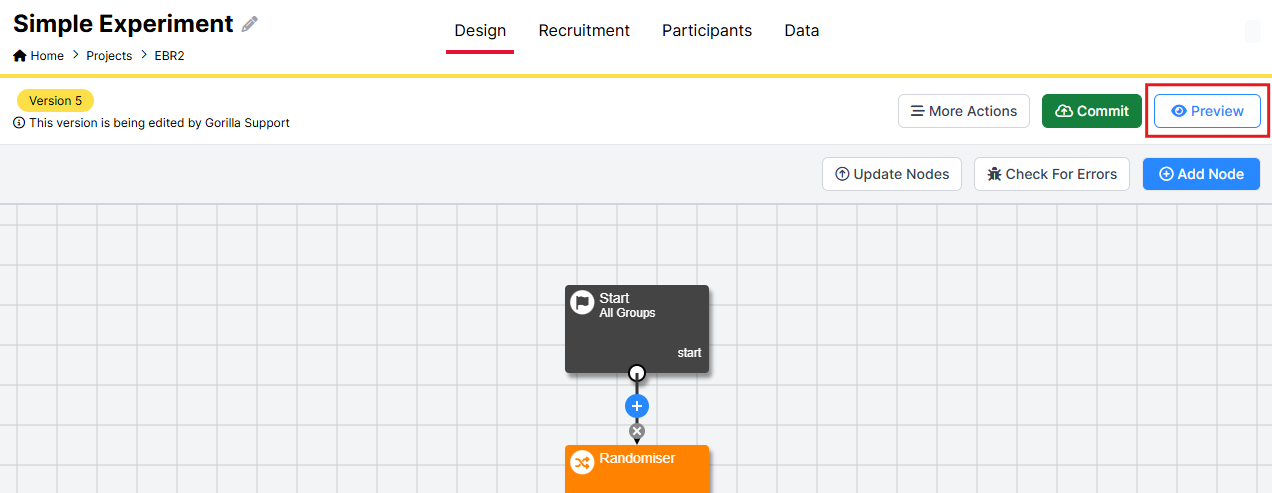
By clicking the Preview button, you can view the entire experiment from the perspective of a participant.
At the end of the preview, you will be able to download the data from all tasks and questionnaires in your experiment.
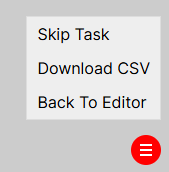
You can choose to download data from the current task at any point during the preview, by going to the menu at the bottom-right and selecting 'Download CSV'. You can also use the 'Skip Task' or 'Skip Remaining Pages' option in this menu to skip on to the next node in the experiment tree.
Previewing your experiment and downloading the resulting data is a great way to check that all the participant responses are recorded in the way you expect, before launching your experiment.
If you're not seeing what you expect when you preview your experiment, check out our Troubleshooting Guide!
Committing the Experiment
Once you have set up the experiment, you can commit it. Committing means saving a version of the experiment that you can always go back to. You must commit your experiment to send the most up to date version to participants.
Once participants start your experiment, they are locked in to that version. If you make any changes to your experiment after starting recruitment, only new participants who enter the experiment in the latest committed version will see these changes. You can check which version of the experiment participants completed in the Participants Tab of the Experiment Builder.
When you commit a new version of your experiment, any Randomiser, Order, Counterbalance, and Allocator Nodes reset: they start their randomisation again from scratch, without taking into account how many participants were assigned to each group in previous experiment versions. The only node that takes effect across experiment versions is the Quota Node.
The screenshot below shows New Experiment Builder. If you are still using Classic Experiment Builder, open the expandable section.
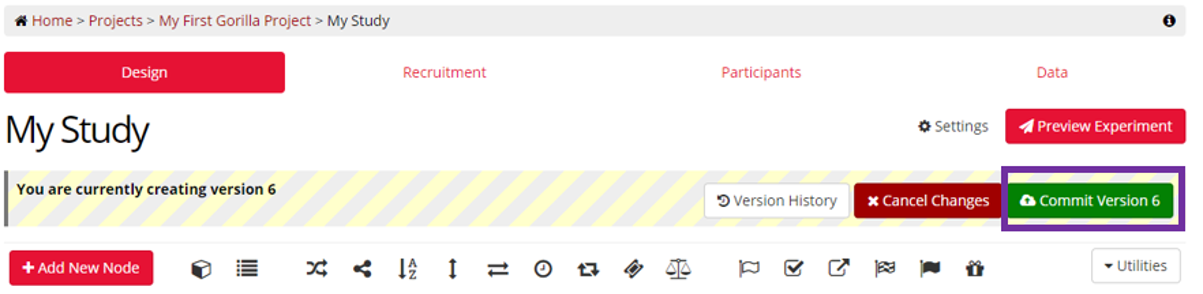
In Classic Experiment Builder, commit your experiment by clicking 'Commit version [current version number]':
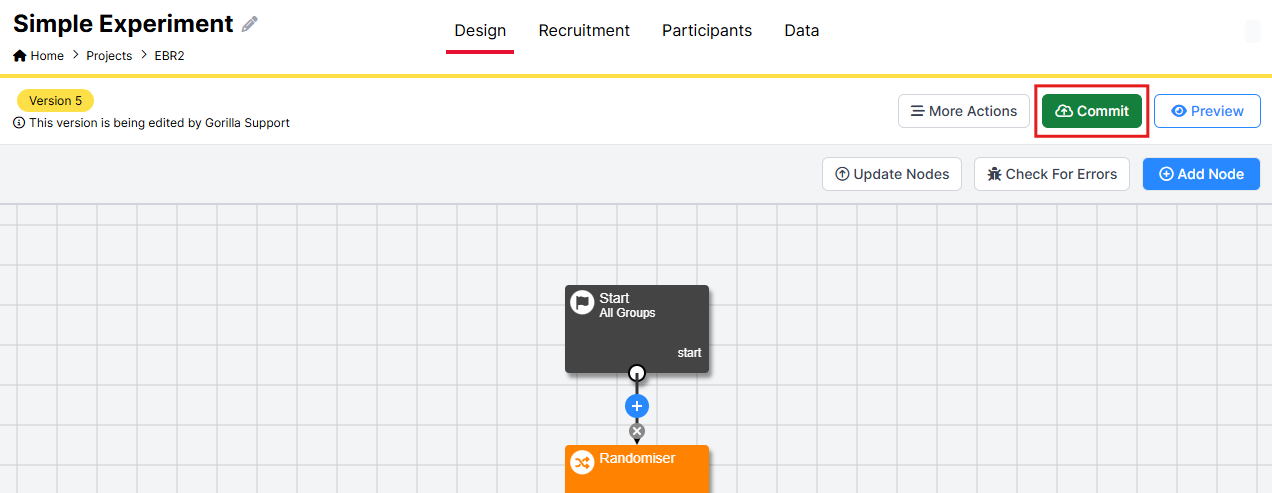
In New Experiment Builder, commit your experiment by clicking 'Commit':
Auto-commit and update nodes on experiment commit
In New Experiment Builder, when you commit the experiment, Gorilla will alert you to any nodes that you are currently editing:
Clicking 'Commit all changes and update all nodes' commits all open changes to all activities in your experiment, and updates all nodes to use the newly committed versions.
If you do not click this button before committing your experiment, the experiment uses the latest committed versions before you started making your changes.
Gorilla will also alert you to any nodes that are committed, but where the experiment tree is not using the latest version:
Clicking 'Update all nodes to latest versions' updates all nodes in your experiment tree to use the latest versions.
If you do not click this button before committing your experiment, the experiment uses the version currently selected in the experiment tree.
Once you are happy all your nodes are committed and up-to-date, enter a message in the text box detailing what has been changed in the current version of the experiment.
Press the Commit button at the bottom of this box to commit the new version of the experiment.
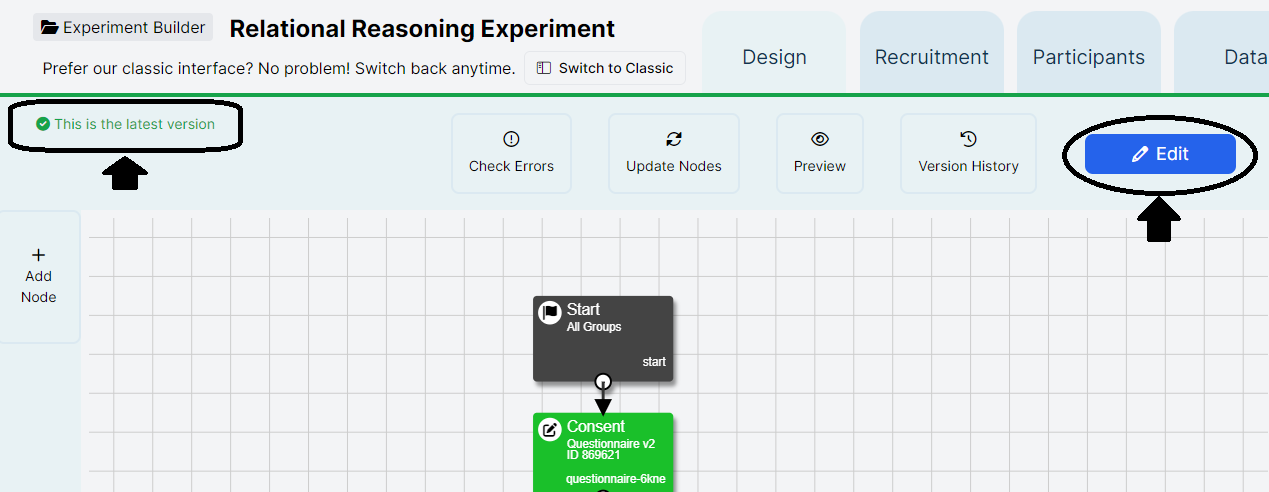
You will know the experiment version is committed when you can no longer edit the experiment. The Commit button has been replaced with the Edit button and the version indicator at the top is green.
The screenshot below shows New Experiment Builder. If you are still using Classic Experiment Builder, open the expandable section.
In Classic Experiment Builder, a committed experiment looks like this:

In New Experiment Builder, a committed experiment looks like this:
From Creation to Launch Walkthrough
We've created a Walkthrough that will take you step-by-step through the journey of creating and launching your Experiments in Gorilla. There, you will find references to the support pages for all the crucial components that build your Projects.
Explore the From Creation to Launch Walkthrough!
How do I Recruit Participants?
Gorilla does not recruit participants for you, however, you can link an external recruitment service to your Gorilla Experiment, create a link to distribute, or invite participants you already know to participate.
The Recruitment Tab is where you configure how participants will access your experiment, optionally restrict the devices, browsers or location they can take part from, and control how many participants you wish to recruit.
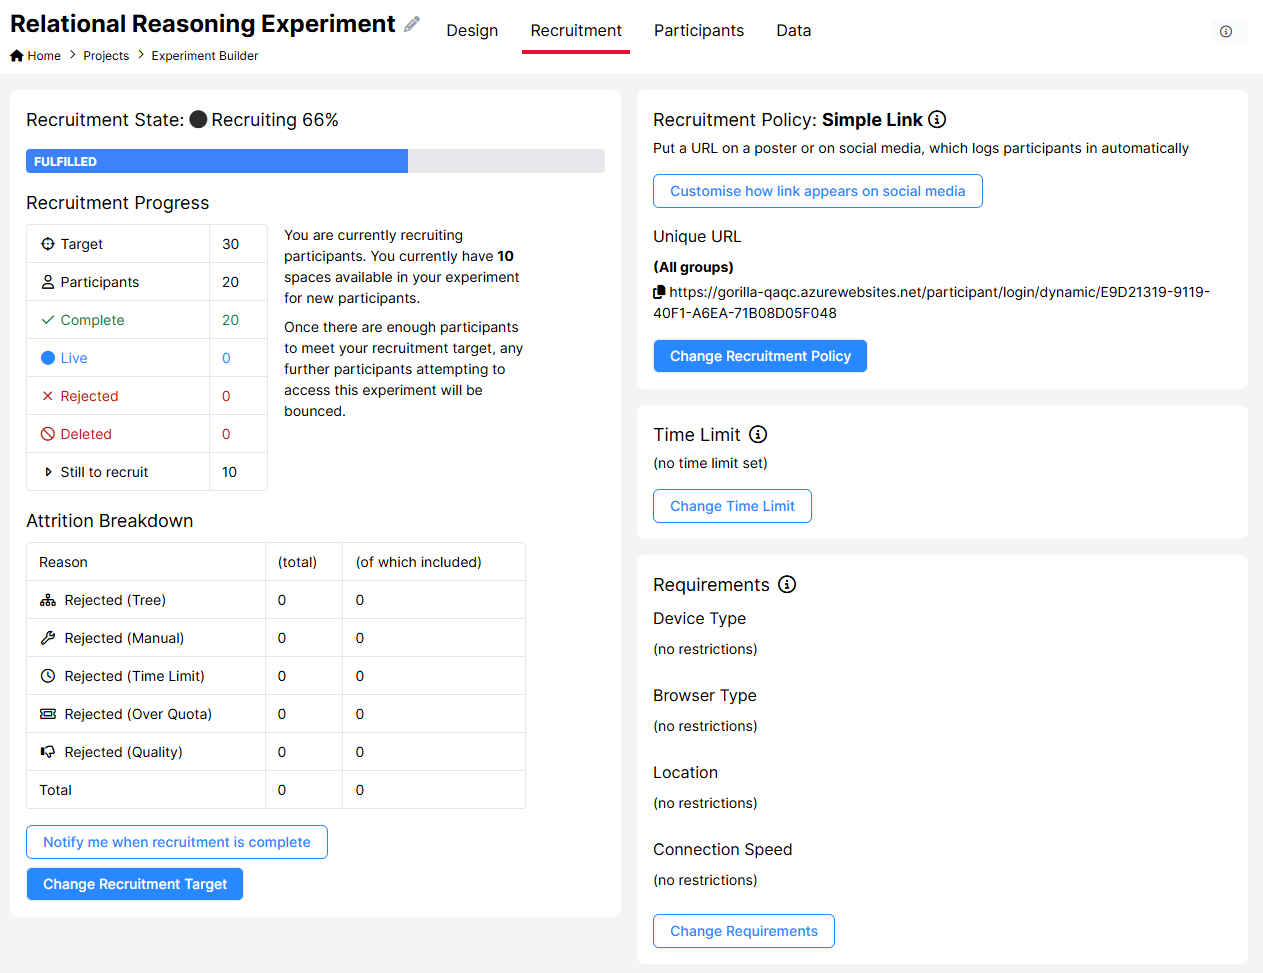
This screenshot shows the new Experiment Builder interface. If you’re still using the classic interface, it will appear slightly different.
Recruitment Policy
The recruitment policy you choose determines how participants will access your experiment. There are several options here: a simple link that you can put on your website or post to social media, uploading a CSV of email addresses and inviting them all to take part, or interfacing with other recruitment systems such as Prolific.com, MTurk, or SONA.
Go and check out our full list of recruitment policies.
Recruitment Target
The recruitment target is the number of participants you wish to recruit. All participants who are either currently live on your experiment, or marked as included on the Participants Tab, will count towards this total.
To change the recruitment target:
- Go to your experiment's Recruitment tab.
- Scroll down and click 'Change Recruitment Target'.
- Enter the total number of participants you want to recruit to the study.
- Token sources will appear below. Select where you want to get tokens from (your subscription or your personal account).
- Click Confirm.
To unassign tokens from an experiment and return them to your account, you can reduce the recruitment target. Note that any tokens from participants who are currently live on the experiment or have already completed the experiment cannot be unassigned.
The Recruitment Progress table on the Recruitment Tab summarises how many tokens have been consumed, are currently reserved, or are still available for your experiment. You can find a key to this table in our When Are Tokens Consumed? guide. For more general information about what happens to tokens as participants move through your experiment, see our Participant Status and Tokens guide.
Only the Project Owner can change the recruitment target settings. Only the Project Owner's tokens can be assigned to the experiment. Collaborators are not able to interact with these settings, so cannot contribute any of their own tokens or use their unlimited subscription (if they have one).
Can I Set a Time Limit?
The Time Limit setting, found on your experiment recruitment page, allows you to automatically reject participants who do not complete your experiment, or who take longer to complete it than is considered reasonable.
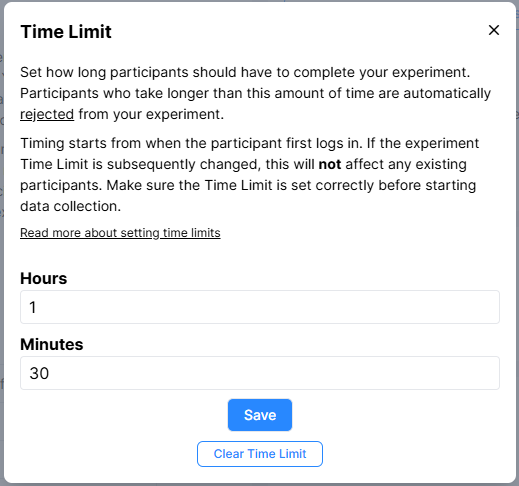
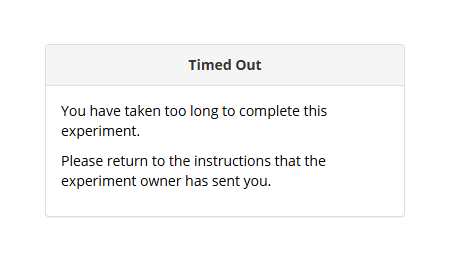
Once a Time Limit is set, in hours and minutes, participants who reach the Time Limit will be automatically rejected, but will be allowed to finish their current task, before being redirected to the Finish Node. Upon reaching the Finish Node, participants will see a Timed Out message.
You may wish to set a Time Limit because ‘Live’ participants reserve tokens, contributing towards your recruitment target. This means that participants who drop out without finishing your experiment can prevent more participants from entering your experiment until they are rejected.
Whilst you can reject participants manually, this requires monitoring your recruitment progress closely. Instead, you may choose to set a Time Limit to automate this process.
We suggest setting a Time Limit that is far longer than it could reasonably take to complete your experiment. For example, If your experiment should take 15 minutes to complete, you might set your time limit at 2 hours.
For this reason, we do not recommend using Time Limits for longitudinal studies. In a longitudinal study, the reasons for taking a long time to complete a study are much more numerous, which makes the padding you'd want to give the time limit excessively large and hard to estimate. When you can see your attrition and rejection numbers, you may wish to revise your Time Limit, and would then have to manually include the participants you’d automatically rejected.
Additionally, depending on ethics and your recruitment service, you will likely still have to pay participants who only complete the first half of your study for completing the first section, so you may wish to make use of their data.
Note: When using the Time Limit with recruitment services that offer a similar Time Limit, make sure that your Gorilla experiment Time Limit matches the time limit set in the recruitment service.
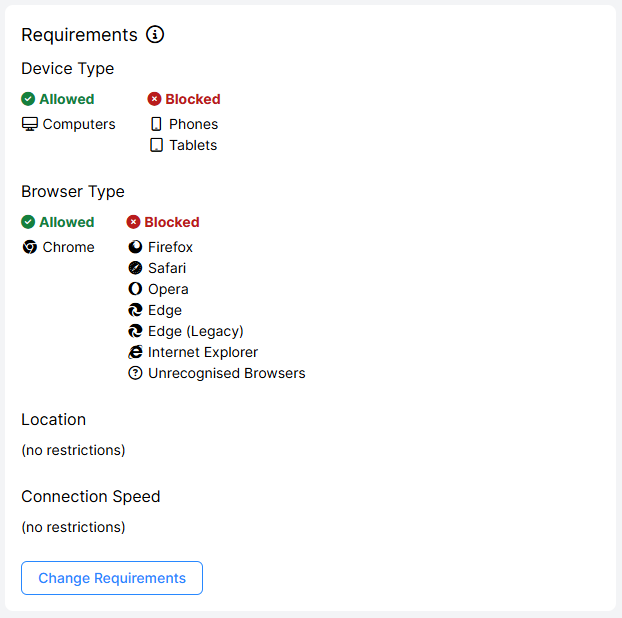
Can I Restrict who Enters my Experiment?
You can optionally restrict your participants by device type, connection speed, browsers or geographic location. Any participants not meeting these criteria will be shown an error message. Sometimes, this is helpful because certain aspects of tasks (e.g. displaying videos) might not function well in all countries, for low connection speeds and across all browsers. By previewing your experiment and piloting it, you can test whether you need to set any requirements.
To find out more about setting requirements, check out our Experiment Requirements guide.
This screenshot shows the new Experiment Builder interface. If you’re still using the classic interface, it will appear slightly different.
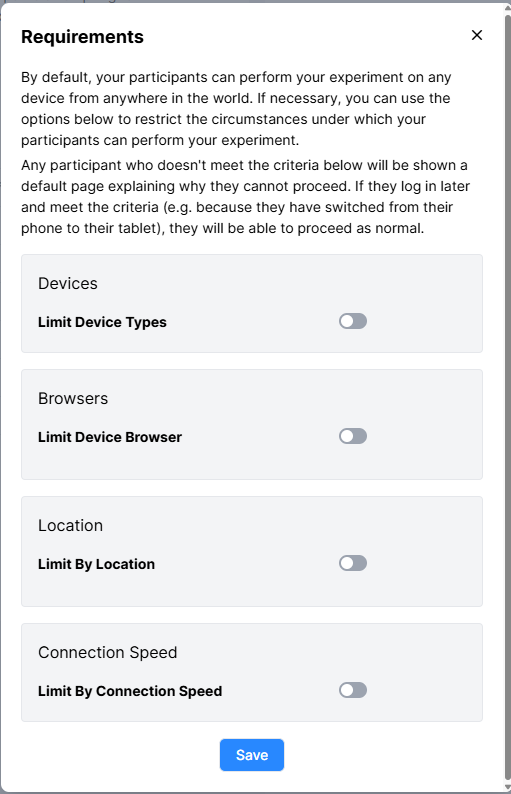
To change the restrictions on entry to your experiment, click 'Change Requirements' and adjust the toggle settings in the window:
I've Launched my Experiment, Can I Still Make Changes?
Can I edit other parts of my experiment after I've started collecting data?
It is not possible to make changes to the experiment version that live participants have already entered. Any participant who is already live on the experiment will complete the version they started.
You can make changes to your experiment while data is being collected, but only participants who start the experiment after you commit these changes will see the new version.
To make changes to your experiment while data is being collected, first edit any tasks or questionnaires within the experiment and commit your changes. Then, update your nodes in the experiment to use the new versions of the tasks or questionnaires. Finally, commit your changes to the experiment.
Once you have committed your changes to the experiment, any new participants who begin the experiment after that point will start with the new version of your experiment.
Can I change recruitment policies at any time?
It is possible to change a recruitment policy at any time. However, switching between policies that do or don't require public IDs can cause disruption to any current participants. For example, if participants have originally been sent a simple link and the recruitment policy is subsequently changed to require a public ID or login, the link used previously will no longer work. Consider only changing the recruitment policy once a trial of the experiment has run successfully, or sending out updated invites to existing participants.
How can I change the requirements of my task?
By default, participants can perform an experiment on any device from anywhere in the world. If necessary, it is possible to restrict the circumstances under which a participants can perform an experiment. These experiment requirements consist of: limiting device types to phones, tablets and/or computers; limiting to a geographical location via a 2-letter country code; limiting the browser used to Chrome, Safari, Edge, Firefox and/or Internet Explorer; and limiting to a minimum connection speed. Any participant who doesn't meet the criteria below will be shown a default page explaining why they cannot proceed. If they log in later and meet the criteria (e.g. because they have switched from their phone to their tablet), they will be able to proceed as normal.
Participants
The Participants Tab allows you to observe and manage the participants who have been invited to, are participating in, or have completed your experiment.
- If you are using a Simple Link or Pilot Recruitment policy, this list of participants will be populated when people first log into the task and will indicate their progress.
- If you are using the Email Shot, Email ID or Supervised Recruitment policies, the pre-prepared list of participants, email addresses or public IDs will appear in 'Participants' before the participant has logged in for the first time. If necessary, there will be an option on this page to 'activate' the participant, which will send them the initial recruitment email and any login details.
Participants can also be rejected, included or deleted from this page. Explore our Participant Status and Tokens guide to learn what different Participant Statuses mean, how they affect your tokens and how you can manipulate them when required.
CONSORT Data
The Data tab includes information about the state of participants at each Node as a little list of icons with numbers. This means that you can see where participants have dropped out, been rejected, and gain detailed attrition data.
For example, imagine a participant has been through three nodes before being rejected. The participant will be shown as entering and exiting three nodes, and then entering the node at which they were rejected and shown as rejected at that node.
A visual example of the attrition data for each node is shown below:
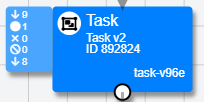
The Number of Participants who have entered the node
The Number of Participants who are still live on the node
The Number of Participants who were rejected
The Number of Participants who were deleted
The Number of Participants who have exited the node
In the example above, we have 9 participants entering the node and 8 exiting, with one remaining live. It may be that the participant has left the experiment at this point, and we may wish to manually reject them. This will set the number of live participants to 0, and the number of rejected participants to 1.
When your Experiment contains an Order Node, the CONSORT data refers to the Node position rather than the Node itself. For example, if you have a Flanker Task and next a Thatcher Task connected to an Order Node, the CONSORT data for the Flanker Node will refer to the first task participants saw, whether that be the Flanker or Thatcher Task, instead of the attrition data for the Flanker Task itself.
In the Data Tab of the Experiment Builder, you can download a CSV file which contains all the above information for each node in your experiment in an Attrition Report.
The screenshot and description below shows New Experiment Builder. If you're still using Classic Experiment Builder, open the expandable section.
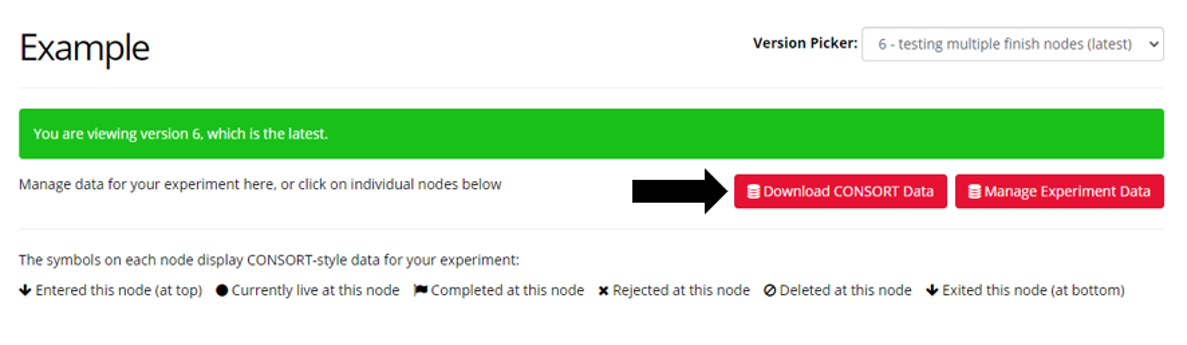
In Classic Experiment Builder, select the version of your experiment for which you want to access attrition data from the Version Picker dropdown. Then, click the 'Download CONSORT Data' button to download this report:
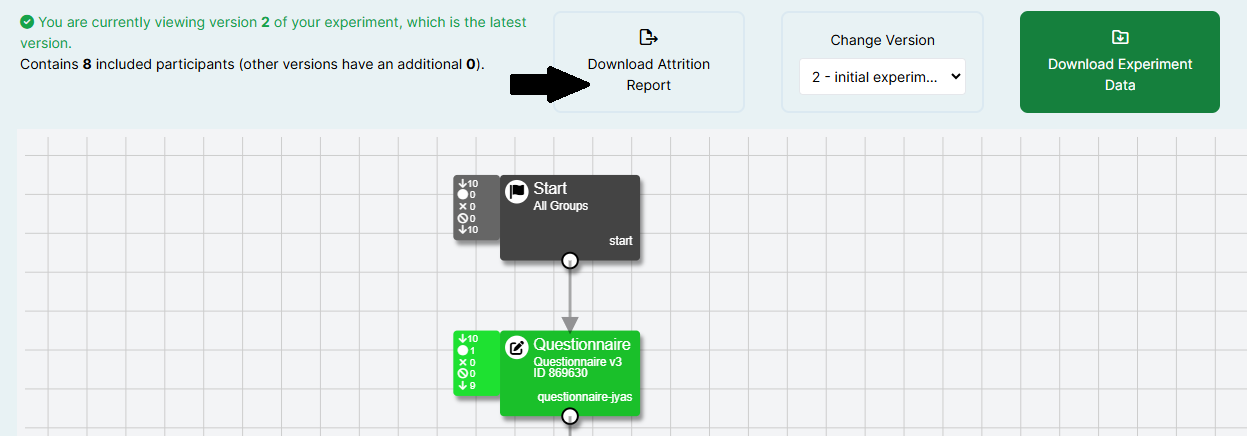
In New Experiment Builder, select the version of your experiment for which you want to access attrition data from the Change Version dropdown. Then, click the 'Download Attrition Report' button to download this report:
How Do I Download my Data?
The Data tab of the Experiment Builder allows you to download data from the various Task and Questionnaire Nodes of your experiment in the form of a spreadsheet.
Data is presented in long-format, with one row per event. For questionnaires only, there is an option to instead download the data in short-format, with one row per participant. You can find more information about this in our Data guide.
The data tab looks like this:
This screenshot shows the new Experiment Builder interface. If you’re still using the classic interface, it will appear slightly different.
In New Experiment Builder, the data generation panel appears by default. In Classic Experiment Builder, you can access it by clicking 'Download Experiment Data'.
Select from the options to customise your data:

- Choose how you want to combine your data. By default, Gorilla will generate a separate file for each node, for the currently selected version of your experiment only. Use the checkboxes to optionally combine data across versions, across multiple tasks, and/or across multiple questionnaires.
- Select your preferred file type.
- Tick 'Unblind' if you wish to include Participant Public IDs in your data.
- Select the time frame you wish to download data from.
- Select if you want your questionnaire data in short-form or long-form. Depending on which you select, you can select other options to customise your questionnaire data.
- Click 'Generate Data'. Optionally, you can ask Gorilla to send you a reminder when your data is ready to download.
- Once your data has been generated, a green Download Data button appears:
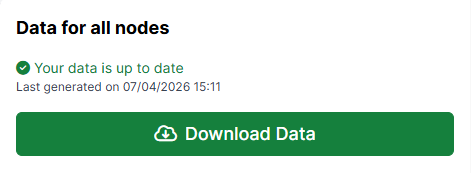
Click Download Data to download your data.
If your data takes longer than 24 hours to generate, please Contact Us!
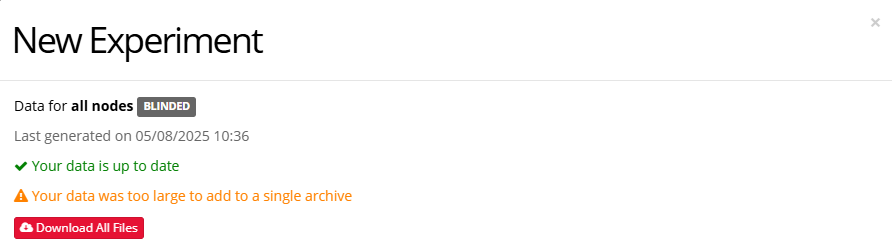
Large data sets
By default, Gorilla will zip your data files into a single archive for you to download. However, for large data sets, this can cause the generation process to stall. To prevent this, Gorilla will not create a zip archive for datasets that exceed a given size. Instead, a 'Download All Files' button will appear, allowing you to download all files with a single click:
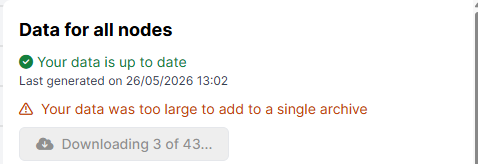
In New Experiment Builder, clicking the button to start the download shows a count of how many files have downloaded and how many there are in total:
You can also download data from a specific task or questionnaire node, or from an individual participant!
To download data from a specific node, click that node in your Experiment Tree from the Data Tab. This will open the data generation menu for that node.
To download data from an individual participant, go to the Participants tab, find the participant, and use Actions Download Data. This will open the data generation menu for that participant's data.
For more information on how to access and download your data, and an in-depth explanation of the options available for questionnaire data, take a look at the Data guide. For guidance on how to preprocess and analyse your data, check out our Analysis guide.
Data saved to the Store Walkthrough
Data that is saved to the Store is data collected from the participant's responses that can be used to alter the experiment (in real time), depending on their responses. Essentially, saving data to the Store is information you can ’carry’ from one part of your task or questionnaire to others within the same experiment.
Here are some examples of when to save data to the Store:
- You may want to show participants their scores at the end of an experiment.
- You may want participants to take different routes through your Experiment Tree depending on what answers they give in your questionnaire.
- You could end an experiment early if participants' scores do not match criteria needed for your experiment.
Learn how you can manipulate your experiment using the Store through our Binding to the Store Guide.
Randomisation and Attrition
Randomisation is an important aspect of many experiments as it reduces bias that could impact the outcome of the study. We have specific guides on how to randomise within the different tools in Gorilla:
- Explore randomisation in the Questionnaire Builder.
- Learn how you can randomise your trials by using the randomisation components in the Task Builder from our Randomisation Walkthrough.
- Find out how to use the Randomiser Node to randomise participants to different conditions in the Experiment Builder.
- Discover all available Randomisation options in Gorilla below.
Randomisation Options
This table presents the different randomisation options Gorilla offers, and explains in what circumstances you should use which.
| Type of randomisation | Useful for | Use Case | Location |
|---|---|---|---|
| Trial order | Within subject | If you want to present a list of trials in a random (shuffled) order in the spreadsheet. | Spreadsheet Randomisation: Randomise Trials |
| Block order | Within subject | If you have two (or more) blocks, you may want participants to be shown them in a different order. This can be achieved using the spreadsheet. | Spreadsheet Randomisation: Randomise Blocks |
| Stimuli set | Between Subject | If you want to present two different stimuli sets to participants, for instance an A and B set, then upload two different spreadsheets to the task. This can be useful for creating a pre-test and a post-test which are otherwise identical. You’d upload all the stimuli to the stimuli tab as normal. | Multiple Spreadsheets in the Task Builder |
| Subset of stimuli | Between Subject | If you want to randomly select a subset of stimuli to be shown to participants, you can select a subset of stimuli from the spreadsheet. | Spreadsheet Randomisation: Select Random Subset |
| Task Order | Within Subject | If you want to randomise the order of Task and Questionnaire Nodes within your experiment tree, use the Order Node. | Experiment Tree: Order Node |
| Experiment Group | Between Subject | If you want to distribute participants at random between 2 (or more) different paths through your experiment tree, use the Randomiser node or the Allocator node. |
Experiment Tree: Randomiser Node Experiment Tree: Allocator Node |
| Experiment Group | Between Subject | If you want to assign different stimuli sets to different participants, the Counterbalance node can be used in conjuction with spreadsheet bindings. This is especially helpful if you have more than 4 stimuli sets. | Experiment Tree: Counterbalance Node |
What follows is a description of some of the complexities surrounding randomisation in Gorilla.
In short, there are two types of randomisation: with replacement and without replacement. These differ in how they allocate participants to different conditions and it’s important to understand these differences.
There are also various ways that Gorilla can handle attrition!
RANDOM WITH REPLACEMENT (RANDOM)
The best way to think about random with replacement is that it is like a coin toss, or dice roll. Each coin toss is independent of what has happened before.
If we have a randomiser going to two groups, it’s like tossing a coin for each participant. On average, we would expect a 50:50 ratio of head to tails, but you could get runs of all heads by sheer (bad) luck. We are unlikely to end up with a ratio of exactly 50:50, but it will probably be close. The larger the sample, the closer the ratio will get.
This is called WITH REPLACEMENT because each time a participant is assigned a group, Heads or Tails, all options are still available for the next participant. Each allocation is independent of all previous allocations.
RANDOM WITHOUT REPLACEMENT (BALANCED)
The best way to think about the balanced randomiser is like a deck of cards. Each draw is dependent on what has been drawn before.
The colour of the card (red or black) determines which branch participants go down. Balanced with a 2:2 ratio means we have 4 cards, 2 are black and 2 are red. Cards are handed out in a random order (BBRR). In each lot of 4 cards, we will have the 2:2 ratio exactly. For the next four participants, the process is repeated. So over 12 participants we would get 3 lots of 4 cards, with 6 Red and 6 Black. For instance, the three lots could be; BRBR then RRBB then RBBR. Importantly, consider the 1st lot. Once we’ve had BRB, the last card has to be R. There is no chance of it being anything else.
A 2:2 ratio is different from 1:1 ratio. With 1:1 there are only 2 cards, 1 red and 1 black, so there are only two possible orders (BR and RB). So over 12 participants we might get BR, RB, BR, RB, BR, BR.
A 10:10 ratio means we have 20 cards, 10 red and 10 black. We could (by chance) have a run of 10 red followed by 10 black, then 10 black and 10 red. In that unlikely event, the only times we have a balanced set of participants is at 20 and 40 Ns. For example, if we only had 15 Ns, the first 10 would be allocated to red, leaving us with only 5 allocated to black.
With a 2:2 ratio, one group can only get 2 ahead of the other group. If you have already sampled 100 participants equally into black and red and you only want to sample two more, it may be that these last two both get red cards (RRBB), leading to 50 black and 52 red.
With 1:1 ratio this goes down to 1. If you have already sampled 100 participants equally into black and red and you only want to sample two more, one will be black and one red.
With 10:10 ratio, this goes up to 10. This is important because a larger ratio increases your chance of unequal conditions if you end recruitment early.
This is called RANDOM WITHOUT REPLACEMENT because in each lot of participants (2, 4, 10) cards are dealt out without replacing the cards that have been taken by previous participants. At the end of each lot we will have dealt participants the exact ratio we set. Allocations are dependent on all previous allocations.
ATTRITION
This table presents the different randomisation options Gorilla offers, and explains in what circumstances you should use which.
In Gorilla the Randomiser node, Order node and Counterbalance node have no knowledge of subsequent attrition. Attrition is when a participant drops out of your experiment part way through. This means that even with balanced randomisation, you may end up with unequal groups if participants drop out. Drop-out can be caused by a range of factors: participants can get bored, have their attention called elsewhere, dislike the task, or stop participating for whatever reason.
Worked example:
- Imagine we have a simple between-subject experiment with two groups. The Randomiser leads to Group A and Group B via two Checkpoint nodes. We want 12 participants overall and the randomiser is set to 2:2 Balanced (without replacement).
- We launch the experiment.
- Participants come into our experiment and get assigned as follows: AABB, ABAB, BABA
- Our experiment is now full and participants can no longer join. Great!
- Participants that have already started come to the end of our experiment. Participants AABB, BB, BABA all finish. Two participants remain live both on the A branch. It might be that these participants have got bored and wandered off.
Two scenarios can happen next.
Scenario 1: We have a Timelimit set, no manual intervention.
6. After the appropriate time, both remaining live participants are automatically rejected.
7. Our experiment is no longer full. New participants join.
8. Gorilla generates a new block of participants (BBAA). Remember, the randomiser has no knowledge of subsequent attrition.
9. The first participant starts and immediately drops out handing back their token. That’s the first B of our new BBAA lot used.
10. The next participant who joins takes up the next B on our BBAA lot and goes down the B branch and completes the task.
11. The next participant goes down the A branch and completes the task.
Summary: At the end we have 12 completes, 5 on the A branch and 7 on the B branch.
We might report this as: 12 participants randomised to condition (5 condition A, 7 condition B) completed the study. 14 participants were recruited overall, 2 participants dropped out of the A condition.
Scenario 2: We don’t have a Timelimit set, manual intervention.
6. Gorilla has sent us an email saying our experiment is full. We leave it 2 hours, so allow people to complete. After this time we are happy to manually reject Live participants as they have probably dropped out.
7. We look at our participants dashboard and see that we have 6 completes on the B branch and 4 completes on the A branch.
8. We edit our experiment and change the randomiser ratio from A2:B2 to A2:B0.
9. We reject the two live participants.
10. Recruitment resumes, and we get two participants that are sent down the A branch by our new randomiser ratio and complete the task.
Summary: At the end we have 12 completes, 6 on the A branch and 6 on the B branch.
We report this as 12 participants were randomly assigned to groups and recruited until there were 6 participants that completed each condition.
Conclusion
In scenario 2, we ended up with the ideal number of participants in each condition. But we have lost information about attrition. In scenario 1 we end up with small differences in group size, but we have the information about attrition. Neither are ideal, but good science is often about compromises.
Before we look at possible solutions, let's take a deeper look at attrition and why it is important.
ASYMMETRIC ATTRITION
To take an extreme example, imagine we have two groups, one with a positive mood induction (kittens and puppies) and one with a negative mood induction (spiders and snakes) followed by a probabilistic discounting task. Our hypothesis is that a poor mood makes people favour money now over money later, whereas a good mood pushes this horizon further out.
In an ideal condition, we’d recruit 50 participants to each group and they would all complete the experiment. But this is the real world, and that’s unlikely to happen. Importantly, we'd probably expect a lot more attrition in the negative mood group.
Three scenarios can happen next.
Scenario 1: We have a Timelimit set, no manual intervention.
By the time we have 100 complete datasets, our methods section might read as follows:
100 participants completed the study. They were randomised to conditions (70 in condition A, 30 in condition B). Overall, 200 participants were recruited; 10 participants dropped out of condition A and 90 dropped out of condition B.
This tells the reader that we had significant asymmetric attrition and that the negative mood induction group are probably systematically different to the positive mood induction group. They have self-selected for being less sensitive to spiders and snakes.
Scenario 2: We have don't a Timelimit set, manual intervention.
100 participants were randomly assigned to groups and recruited until there were 50 participants that completed each condition.
The asymmetric attrition information is hidden from the reader.
Scenario 3: Recruit in 3 phases changing the randomiser ratio.
An alternative, and elegant approach is to split our recruitment into 2 phases.
In phase 1 we collect 50 Ns worth of data at a 4:4 ratio. We then determine the attrition rate in each group and adjust the ratios accordingly.
In phase 2 we collect 50 Ns worth of data at the 4:8 or 4:12 ratio – whatever fits our attrition rate. By doing so we aim to get both groups to 50 completes at about the same time.
ATTRITION SENSITIVE NODES
QUOTA NODE
In Gorilla we have Quota Nodes, which are attrition-sensitive. This allow us to set a quota on a branch of our experiment. Once the quota is full, participants will no longer be sent down that branch. This will give us the effect of setting randomiser branches to 0 once we have enough participants for that condition without the need for manual intervention. If a participant is rejected part-way through an experiment (after having passed through the Quota node), this participant will not count towards the set Quota. The Quota node will allow another participant to enter through that Quota in their place.
This feature should be used with care so that we don’t hide asymmetric attrition from ourselves or others.
ALLOCATOR NODE
The Allocator Node combines Randomiser and Quota nodes and therefore allows them to be sensitive to subsequent attrition.
Going back to the original example:
- Imagine we have a simple between-subject experiment with two groups. The Randomiser leads to Group A and Group B via two checkpoint nodes. We want 12 participants overall and the randomiser is set to 2:2 Balanced.
- We launch the experiment.
- Participants come into our experiment and get assigned as follows: AABB, ABAB, BABA
- Our experiment is now full and participants can no longer join. Great!
- Participants start completing our experiment. Participants AABB, BB, BABA all complete. 2 remain live both on the A branch. It might be that these participants have got bored and wandered off.
- After the appropriate time, both these participants are automatically rejected.
- Our experiment is no longer full.
- New participants join.
- Gorilla checks to see if any branch assignments have been returned due to attrition. They have (AA).
- These assignments are handed out to new participants until they are consumed. The Allocator Node does exactly that: it will give us complete information on how many participants were recruited, how many completed and how much attrition there was in each condition, before reassigning new participants to a branch. On the face of it, it’s simple. But we also need to factor in Version Control across experiments and how to manage this.
Note: The Allocator node does not account for how many people have gone through each branch across previous experiment versions. If you edit your experiment during recruitment, this will create a new version of the experiment. The Allocator node will reset for each new version of the experiment.
Longitudinal or Multi-Part Studies
If you want to run a longitudinal or multi-part study there are a few more aspects you'll need to consider, particularly when building your experiment tree and choosing a recruitment policy. It's best to read through this page thoroughly to make sure you've set everything up properly.
If you're running a longitudinal study, you don't need to wait until participants have completed all the stages before accessing their data! By manually including participants while they are still taking part, you can immediately access the data they have generated so far, and then access future data as soon as it is ready without having to consume another token. Simply regenerate your data once the participant has completed the next stage of your study, and you will be able to download all the data they have produced so far at no extra cost.
Design
You can use one experiment tree for your whole study, and make good use of the Delay Node and Checkpoint Node.
- At the end of the first session of your experiment, add in a Delay Node to prevent your participants from continuing your experiment until the specified time has elapsed. You can customise this with a message to let your participants know that the session has finished and provide instructions (if necessary) on how to return for the next session. During testing and previewing of your experiment, we recommend reducing the specified delay to a few minutes so you can check your experiment is working as expected. Then, prior to piloting/full data collection, you can increase the delay again.
- A Checkpoint Node is a useful way to keep track of participants in your experiment. For example, you can quickly identify any participants who haven't returned for the next session of your experiment and use this information to prompt them to return or even to reject them from your experiment if too much time has passed.
- A Repeat node allows you to repeat a task or questionnaire, or groups of different nodes, several times before the participant moves onto the next node. For example, if you want a participant to repeat a task over 3 separate days you can nest your task node and Delay node within the repeat node and edit the settings to ask Gorilla to repeat 3 times.
For some recruitment platforms, such as Prolific, you can use the Redirect Node instead of the Delay Node to send participants externally to the recruitment platform at the end of each session. You can add a message to participants when they reach a Redirect Node, and also set a delay to prevent them returning too early. When you invite them back through the recruitment platform on the next day of participation, they can pick up where they left off in the experiment tree.
If you will be using Prolific for a longitudinal experiment, we recommend using their Gorilla Integration Guide FAQ "How do I set up a longitudinal (multi-part) study on Gorilla and Prolific" (scroll to the bottom of the linked page).
Once participants start your experiment they are locked to that version. If you make any changes to your experiment after starting recruitment, only new participants who enter the experiment in the latest committed version will see these changes. You can check which version of the experiment participants completed in the Participants Tab of the Experiment Builder.
Recruitment
You will need a way to identify your participants when they return for the next session of your experiment, to prevent Gorilla processing them as a new participant. This will also allow participants to resume the experiment where they left off in the previous session, because Gorilla will be able to identify them when they return. Fortunately, many of our recruitment policies (as well as external recruitment providers such as Prolific) allow you to do this with ease.
This is easiest to achieve using an ID-based recruitment policy, which allows your participants to return by logging in (e.g. Supervised or Email ID) or clicking (e.g. Email Shot) their personalised link. These recruitment policies prevent participants entering your study more than once, and allows them to continue later after completing part of the experiment. Most external participant recruitment services will assign each participant a unique ID, and so Gorilla will assume that two entries into the study with the same ID are the same person and therefore won't attempt to process them as new participants. If the participant returns with the same ID, they will continue on in the experiment tree at the next node from where they left off.
Note: We don't recommend you use Simple Link with a Delay Node because, by default, no reminder email will be sent to participants and they won't be able to log back in again where left off. If you do decide to use Simple Link for any reason, you must check Send Reminder and Reminder Form in the configuration settings of the Delay Node. This will require collecting participants' email addresses, so make sure you have ethical clearance for this first.
Participants and managing attrition
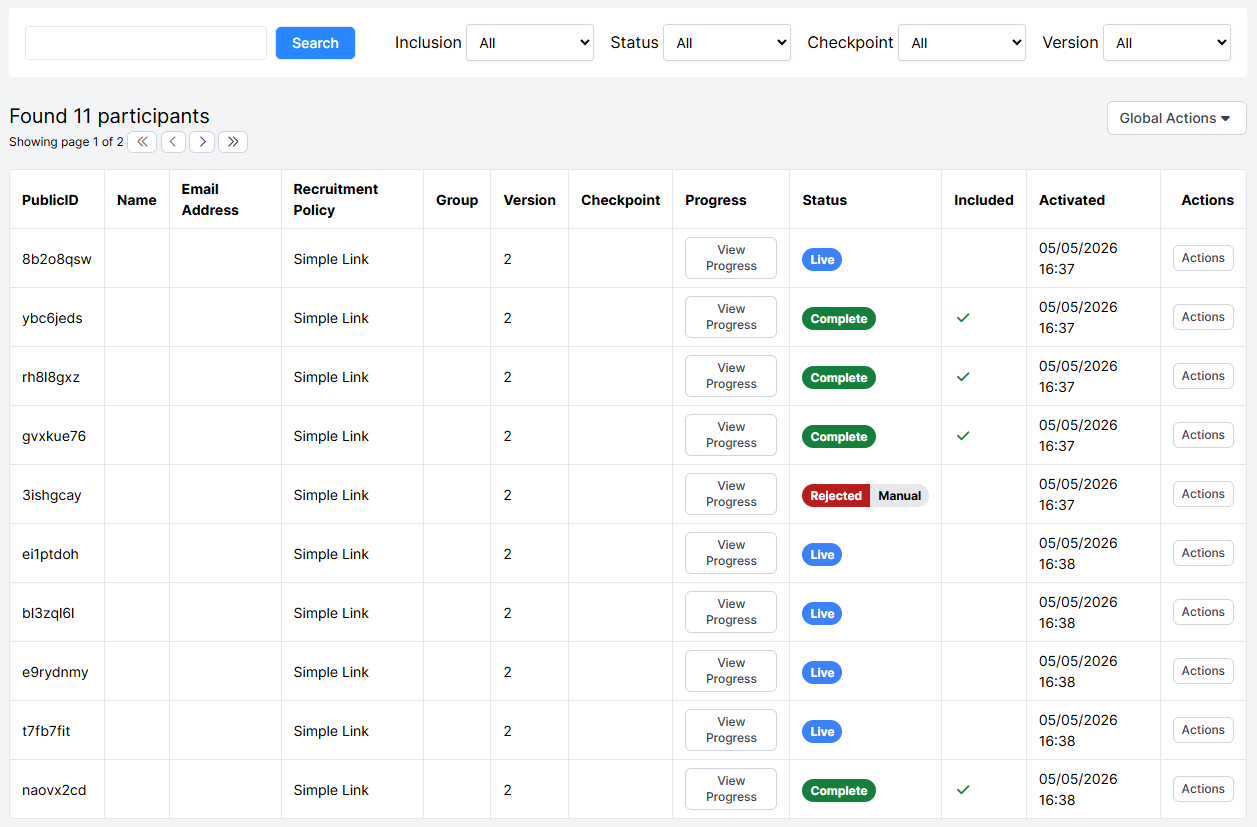
Longitudinal studies are likely to have higher attrition rates than studies that can be completed all in one sitting. You can monitor your participant status in the Participants tab of the Experiment Tree to track which participants have yet to return for a new session of your experiment. Doing this in combination with a Checkpoint Node (see above) makes this even easier.
In the above example, the Participants tab shows which Checkpoint each participant has passed through. Today, on Day 3 of the study, we expect everyone to have passed through Session 3 and be marked as "Complete", but two participants are still "Live". The first participant has passed through the "Session 1" Checkpoint and did not return for Session 2, so we might want to use this information to reject them from participating further. Another participant is due to complete Session 3 today but hasn't returned yet, so they might need a nudge to come back and finish the study before the end of the day. From the Participants screen, it's very easy to see the status of all your participants so that you can manage attrition.
For insights and top tips from real researchers, check out talks on multi-session studies from BeOnline:
'A (half) marathon not a sprint: Multi-session memory studies online' (Emma James)
Troubleshooting
For general troubleshooting advice visit our Troubleshooting Guide.
If you don't find an answer to your question reach out to our friendly support team via the Contact Form - we are happy to help!
Bot checks
To ensure your participants are real humans and not bots, we have a collection of Sample Bot Check tasks on our samples page. If you already have a Gorilla account, use our full searchable Samples database to find what you need.
You can choose from a variety of pre-created tasks that can be placed in the experiment tree and act as bot checks to help ease your mind about the quality of data collected.
If you are on a Standard or Department subscription, you may also want to consider adding the Hold/Release component to one of your tasks and making use of the bot detection metrics provided in your data.