How to Supervise a Dissertation on Gorilla
- For Supervisors
- Worked Example
Overview
Gorilla is an online experiment builder. We provide an easy-to-use graphical interface which allows you to create complex studies in an intuitive way.
Supervising student research projects on Gorilla allows you to guide students from initial research ideas through to data collection quickly and easily.
This guide walks you through the complete lifecycle of supervising projects, from setting up projects and reviewing experiments, to managing recruitment and data analysis.
Browse the list of topics in the menu to for specific guidance or see the Worked Example for a step-by-step guide!
If you're new to Gorilla, we recommend you start by watching our Getting Started Webinar videos. This will give you an introduction to Gorilla as well as some practical tips for getting started.
You can then come back to this guide for tips on supervising dissertations.
Project Setup
Everything you or your students create on Gorilla will be saved in a Project. You can have as many projects as you want. We recommend having a project for each dissertation you're supervising. This could be a project for just you and one student, or for a group project with multiple students.
To get started, you'll need to make sure you and your students are collaborating on the same project.
Collaboration
To add a collaborator to your Project:
- Open the Project that you want to collaborate on.
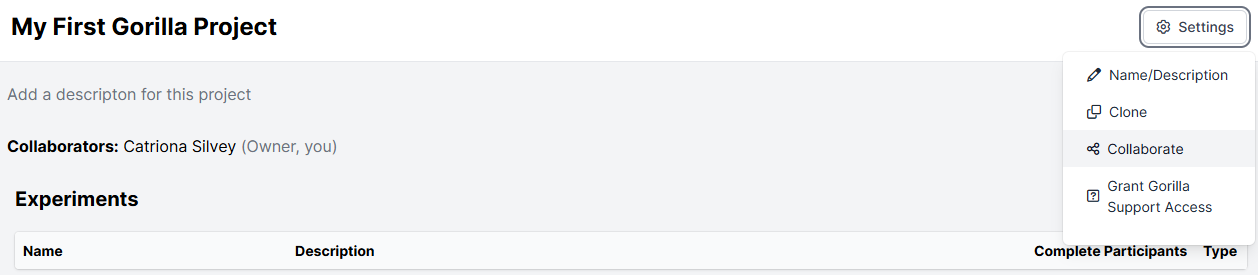
- Click 'Settings' at the top right.
- Click 'Collaborate'.
- In the search bar, type the email address or name of the person you want to add as a collaborator.
- Select your collaborator from the list and click 'Add to project'.
- Decide what permissions to give your collaborator.
- By default, collaborators will be able to view all materials within your Project, and clone them to make their own copies.
- Toggle on 'Make Changes' to allow your collaborator to make changes to materials within your Project.
- Only one user can have an open change at any given time.
- The user currently editing must commit or discard their changes before another user can open an edit.
- Toggle on 'View Data' to allow your collaborator to download participant data from experiments within your project.
In the clip below, permission has been granted for the collaborator 'An Undergraduate Student' to make changes and view data.
Your new collaborator will be notified by email that they've joined your project.
You can view current collaborators on your project and change their permissions via Settings -> Collaborate.
You can invite multiple students to the same project, making this setup ideal for group dissertation projects.
For more details on project permissions, see our Collaborating Guide.
Who should create the project?
Either you, as the supervisor, can create the project and invite the students, or a student can create the project and invite you.
Whoever creates the project will be the project owner. Only the project owner can launch an experiment. If you would like to be in control of when the experiment starts recruiting, we recommend that you create the project, be the project owner, and invite your students to collaborate on your project. You can at any point request that project ownership is transferred to another user.
See the Launching the experiment section of this guide for more information about Project Ownership.
Teaching Tools
For wider support with students, we also have teaching tools!
Gorilla's Teaching Tools provide a great resource to integrate Gorilla into your research methods teaching.
Project Names
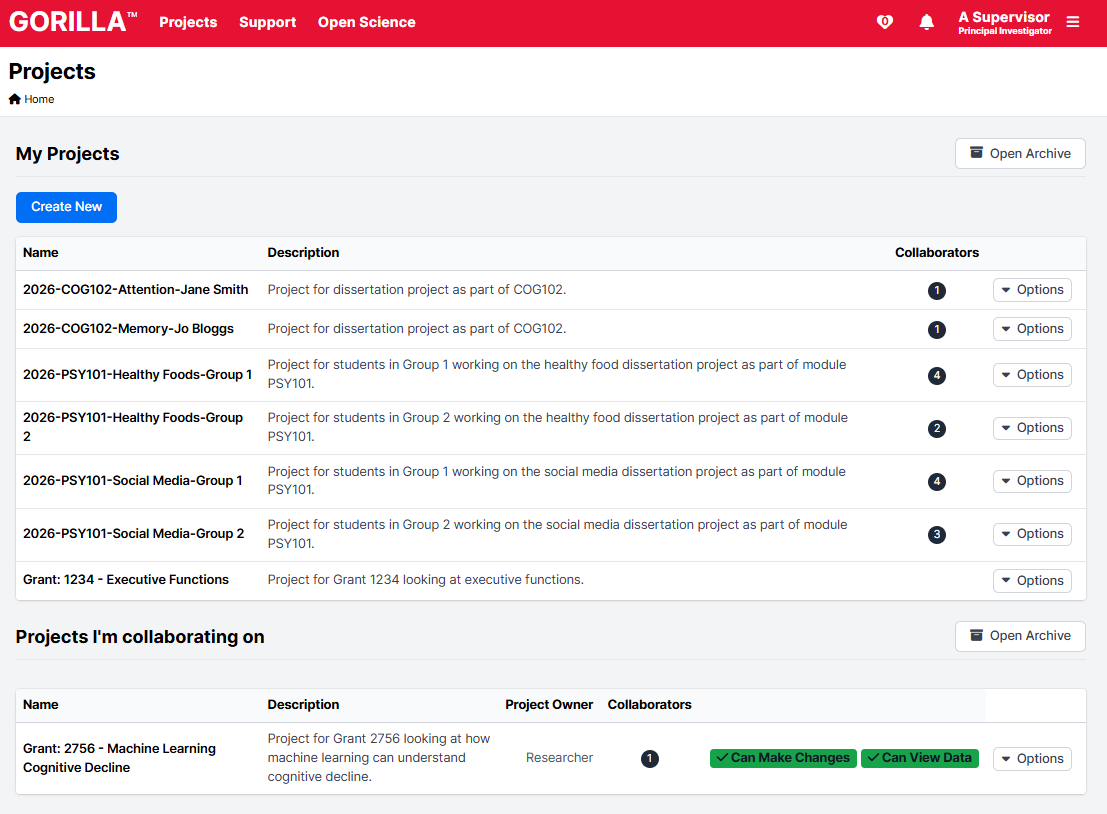
Keeping your dashboard organised across cohorts and academic years ensures smooth collaboration between you and your students. When supervising multiple dissertations, adopting a clear naming structure for all projects makes managing your students a lot easier!
A recommended naming convention is:
[Year]-[Module Code]-[Topic/Title]-[Student or Group Name]
For example: 2026-PSYC3001-Spatial Memory-Alex Smith.
Adding a clear description inside the project settings helps both you and your students keep track of what project is for what experiments.
Doing so should leave you with a Project Dashboard like this.
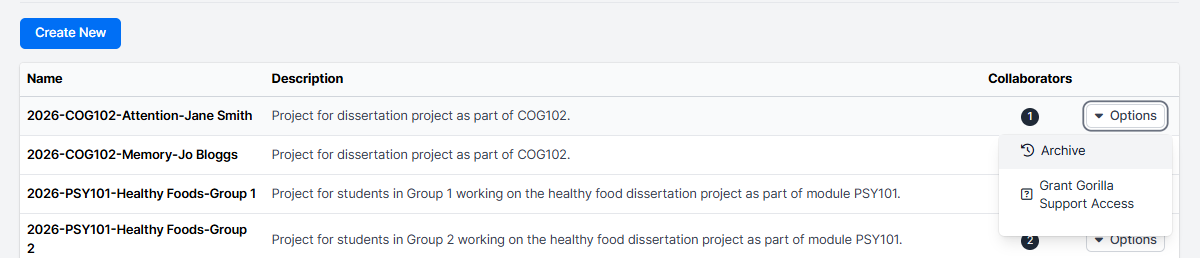
At the end of each academic year, you can archive completed projects by clicking Options next to the project, then Archive. This helps keep your project dashboard well organised and makes finding current projects even easier!
Getting Started Quickly with Cloning
Rather than building experiments and paradigms from scratch, students can use existing resources to help speed up their work.
You can either add these pre-made Tasks, Questionnaires, or Experiments right at the start of working with your students, as a way to direct them to the paradigms you want them to use. Or your students can access these later themselves when they're looking for ways to add to their experiment.
Our Getting Started Guide walks you through the various ways to clone in Gorilla in lots of useful detail.
For a quick summary:
Samples Library
Our samples library of classic tasks, questionnaires, and experiments (e.g. Stroop, Flanker, Go/No-Go, Digit Span, and Visual Search) is a great place to start. Students can clone these directly into their project and adapt instructions, timings, or stimuli.
If you don't yet have a Gorilla account, check out our public Samples page for a selection of the tasks we have available. If you already have a Gorilla account, use our full searchable Samples database to find what you need.
Attention and Bot Checks
For any online data collection, you should consider adding Attention Checks or Bot Checks.
In our searchable Samples database we have some useful Bot Checks you can clone right into your experiment!
Open Materials
Gorilla Open Materials hosts real, peer-reviewed experimental protocols published by behavioural researchers worldwide. Students can inspect these experiments and clone the exact tasks referenced in academic papers to replicate or extend existing literature.
Cloning Previous Research
If students are continuing or extending research conducted within your department or lab in a previous academic year, you can clone existing tasks directly into their project workspace from the Experiment Builder.
This can be a great way to continue your research across different academic years.
Supporting Students' Work
After you've set out the aims of the project, helped set the students up with cloning, and they've gone away to build their full experiment, we're here to help!
We recommend sharing the below resources with your students to help them build experiments successfully on Gorilla:
- Our Getting Started Webinar videos will provide a great starting point for anyone new to Gorilla.
- Our Troubleshooting Guide answers many of the questions students might have.
- Our Task Builder Tutorials are a great resource for explaining more advanced functionality of the Task Builder.
If you or your students do encounter any issues, you can always get in touch with us!
We aim to respond to all support queries within 48 hours (within our working days of Mon-Fri, 9-5pm GMT). Our recent data from the previous 6 months shows 70% of support queries are typically answered within 24 hours and 15% are answered within 1 hour. The median time for a query to be fully resolved is 19 hours.
You can contact our fast and friendly Support Desk at any time!
By using Gorilla and our Support Team, you don't have to worry about the technical headaches!
Reviewing Students' Work
Once your students have finished their first draft of their experiment, it's time for your feedback! As their work is part of a project you're already in, there's no extra permissions they need to grant you to access the experiment - you're ready to start testing it.
Before approving an experiment for data collection, follow this step-by-step guide to check the experiment's flow, timing, and data output.
Step 1: Preview the Experiment
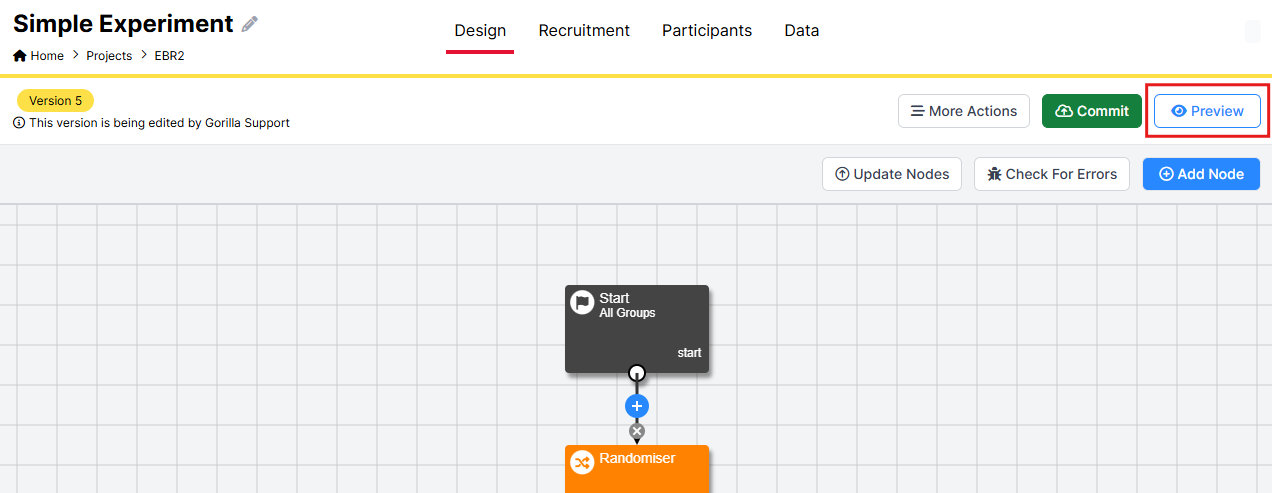
Open the experiment in the Experiment Builder and click Preview. Go through the full study flow from the perspective of a participant.
We recommend focusing on whether:
- Task and Questionnaires are working as expected, with no missing text or stimuli.
- Any scores or values shown to participants match what you'd expect.
- Experimental controls like randomisation, counterbalancing, or branching direct participants along the intended paths.
Step 2: Edit the Tasks
If you've spotted any minor errors in the Experiment, you can find the relevant Task or Questionnaire in the experiment tree, click on it, and click Edit:
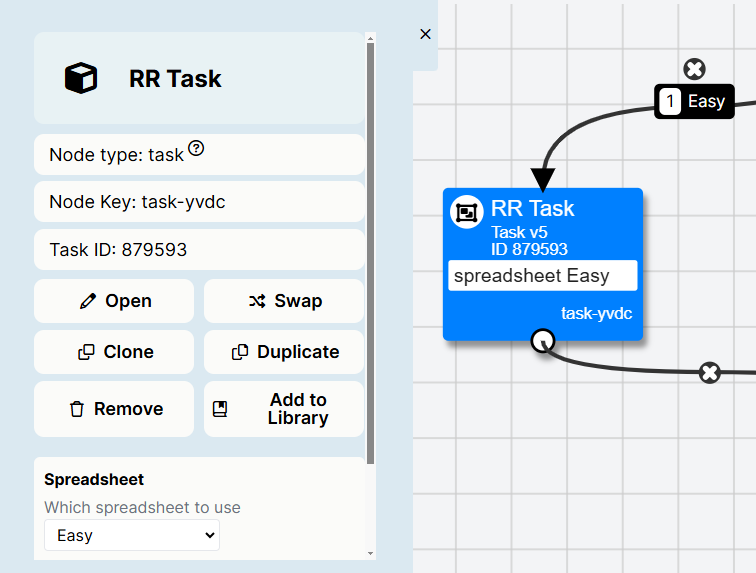
Some supervisors have told us that going through and making edits with a student live can be a useful approach!
For more complex issues, you may need to test and troubleshoot the Experiment.
Step 3: Testing and Troubleshooting
For anything that's not working, our Troubleshooting Guide is the best place to start, or get in touch!
When testing things yourself, we recommend focusing on the following areas:
Experiment Builder:
- All nodes are connected to another node.
- In any Control Nodes, like the Branch Node, that only one default branch is chosen, and all fields are filled in.
- Participants whose data you don't want are directed to a Reject Node, but all other participants are directed to a Finish Node.
Questionnaires:
- Any Randomisation excludes pages or questions that shouldn't be randomised.
- Scoring is set up correctly and looks right in your data (see Step 6 below).
- Participants are branched to the correct pages within the questionnaire.
Tasks:
- Ensure all screens contain the required response components (e.g., Keyboard Response, Click Response).
- Stimuli file names are added correctly in the spreadsheet and the cells have turned green.
- In the Spreadsheet, make sure that each row has an entry in the Display column.
For more advanced tips on testing Tasks:
If you or your students have designed a more complex Task, finding what's causing the issue can be tricky. The Debug Panel can be a great place to start when you preview one screen at a time.
If that's not showing any issues or your problem is across screens, we recommend that you add ‘metadata’ to the task to find the cause so you can fix it.
To do this:
- Add a Markdown Text component to a screen where the issue is.
- Bind this component to the Store or Spreadsheet, depending on what you're testing. For example, if you're measuring a score that's saved to the store and shown to participants at the end of the task, you'd bind that Store field to the Markdown Text component.
- Preview the Task as normal.
- You should then see how your Store or Spreadsheet value is changing across trials.
For example, in the below video, the Task asks participants to select between two food choices. At the end of the Task the researcher wants to tell participants how many healthy food choices they've selected. The number that's shown to participants, however, isn't correct, so a Markdown Text component is used to test the Store field throughout the Task:
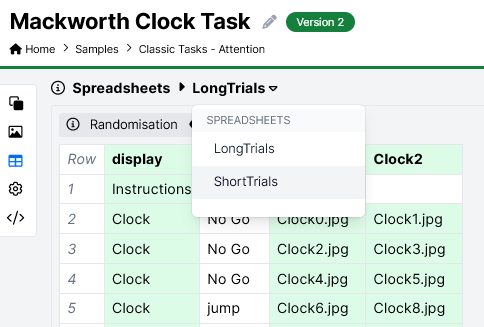
You may have a Task with several trials, resulting in a long Spreadsheet and a long testing process.
If this is the case, you can add a new Spreadsheet to your Task that mirrors your main Spreadsheet but with fewer trials.
Our Mackworth Clock Task is a good example of this set-up!
Step 4: Preview the Tasks
Once you've made any edits, you can check they're working as hoped!
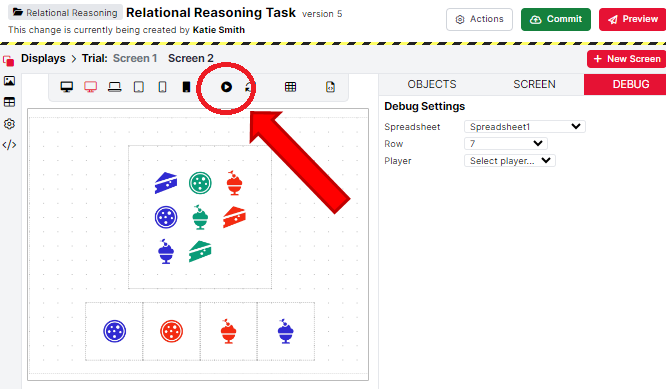
You can instantly preview and debug your setup by clicking the play button above the screen editor. When you do this, the panel on the right will automatically switch to Debug mode.
- Check participant responses are as expected in the Debug Panel.
- If scoring, ensure the Scorer component evaluates answers correctly in the Debug panel.
- If using the Store, confirm that values are updated in the format ‘Setting field x to value y'.
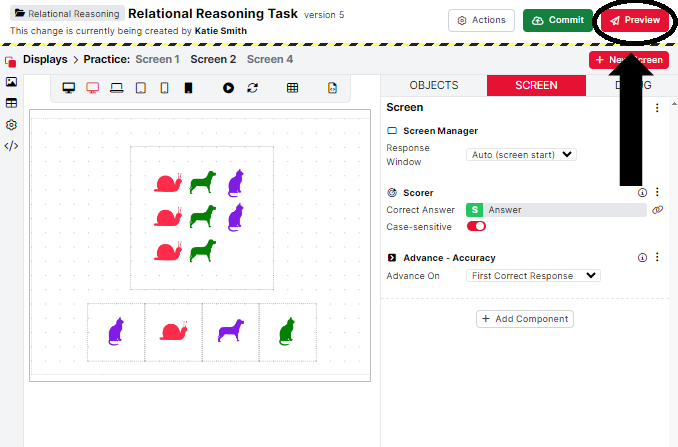
You can also test the entire task by clicking the "Preview" button at the top right of the screen. This will run a preview of the full task based on your spreadsheet setup.
Step 5: Preview the updated experiment
Once you're happy with individual Tasks and Questionnaires, you can go back to preview the Experiment, as you did in Step 1.
Previewing a full experiment can take some time. If there are Tasks or Questionnaires you haven't changed and are happy to skip, you can do this by clicking the Menu button in the bottom right and then Skip Remaining Pages or Skip Task.
You'll also get the data from this preview (see Step 6). To make testing the data easier, we recommend giving more extreme answers when previewing the experiment. For instance, if you're looking at Reaction Time, deliberately wait on a page for longer than you would normally, or, if looking at a two-way-forced choice Task, alternate your answers each trial. This will give you a clear pattern in your preview data that can make checking the output easier!
If your task and questionnaire previews looked good but your experiment preview doesn't, check all the nodes are up to date.
Step 6: Check Preview Data Output
At the end of your Experiment preview (or when just previewing a Questionnaire or Task), you can download the preview data CSV file. This is a great way to check you’re getting the data you need, and to allow students to accurately design their data analysis plans ahead of time.
Task data is provided in long-format (one row per event), whereas questionnaire data can be downloaded in either long format or short-format (one row per participant).
If you're unsure what part of your data means, a great place to look is our Data Columns page. This page lists all the columns you should see in your data and explains what each one means.
The key areas we recommend checking are:
- The Response Column is usually the most important part of your Task data, head here first to make sure you're getting the responses you need.
- Any scores are looking correct based on how you did the experiment.
- Participants are being shown the right number of trials within the Tasks.
Please keep in mind that Gorilla does not store preview data, so once you leave the Finish page, the preview data will no longer be accessible. Preview data is available only in CSV format.
For more information on data, see the Data Analysis part of this guide.
Step 7: Ethical Approval
Once you’ve reviewed the experiment, getting the information you need for ethical approval is easy on Gorilla.
Our Internal Review Board/ Ethics page is a useful starting point for students to describe Gorilla.
Students can also publish private pages on Open Materials to share their experiments for ethical approval, which can only be accessed via the direct URL. And you don’t need an account to view these pages, so external reviewers can see the experiments easily!
Launching the Experiment
Once your student has received ethical approval and is ready to collect data, it's time to launch their experiment.
For a detailed step-by-step walkthrough, see our From Creation to Launch guide.
Tokens
Before sharing the experiment, it's important to think about Tokens.
Gorilla charges one participant token per participant per experiment. The token represents the data that can be downloaded.
Only the Project Owner can launch an experiment and spend tokens. Earlier in this guide, we recommended that you, as the supervisor, create the project and be the project owner. This is so you're the only one who can launch the experiment and be in charge of token expenditure.
However, your students can launch the experiment if they're the project owner - there's nothing wrong with this, it just depends on your department's approach!
The two approaches to token management:
| Approach | Set-up | Best Used When |
|---|---|---|
| Supervisor is Project Owner | The supervisor creates the project and invites students as collaborators. Only the supervisor can launch the study and spend tokens. | You want strict ethical oversight, ensuring data collection cannot begin until formal ethics approval is signed off + You want to be in control of how many participants are recruited. |
| Student is Project Owner | The student creates the project, requests tokens from the subscription, and adds the supervisor as a collaborator. | Students operate under standard department ethics approval + You want students to take full ownership of launching and managing participants. |
You can at any point request that project ownership is transferred to another user.
Recruitment
Gorilla does not recruit participants for you. However, you can link an external recruitment service to your Gorilla Experiment, create a link to distribute, or invite participants you already know to participate.
The Recruitment Tab is where you configure how participants will access your experiment, optionally restrict the devices, browsers or location they can take part from, and control how many participants you wish to recruit.
If you are the project owner, then you are the only person in the project who can edit the recruitment policy and change the recruitment target.
- Set any requirements for accessing your experiment. For example, you may want to limit access to participants using computers, or from a particular location.
- Set a time limit for your study. This is optional, but helps manage participant attrition.
- Set a recruitment target for your experiment. This assigns the right number of tokens for the number of participants you want to recruit.
- Select a recruitment policy that meets your study's requirements.
- Crowdsource your participants by posting a Simple Link on Facebook or other social media channels.
- If you already have a list of participants, then Email ID or Email Shot may be the right recruitment policies for you.
- Many researchers use Third Party Recruitment Services. Check out our guidance on using recruitment services.
You can browse our full list of available Recruitment Policies.
If participants are having trouble accessing your experiment, check out our Troubleshooting Guide.
Track active participant statuses under the Participants tab as submissions move from Live to Complete. Once recruitment reaches the specified quota, data can be downloaded directly from the Data tab in long or short format for analysis.
Data Analysis
By default, your Gorilla data is provided as a separate file for each node in the experiment tree. This allows you to easily comply with British Psychological Society requirements to keep performance data, demographic data, and identifying data separate.
Once your study is complete, you simply download your data. We provide the data in CSV or Excel format. Task data is provided in long-format (one row per event), whereas questionnaire data can be downloaded in either long format or short-format (one row per participant).
Long format data means that every participant has multiple rows. For tasks, this means every relevant timed event (stimuli and responses, for example) in each individual trial occurs on a different row. In questionnaires, each question is on a separate row.
Short format data means that there is only one row per participant, with each question and answer provided in separate columns.
You can convert long format task data to short format (one row per participant) in various software, but we provide guides for doing this using Pivot Tables in Microsoft Excel, or in RStudio.
For a more detailed guide check out our dedicated Data Analysis page.
R & Excel
If your department recommends students use R, we have a useful guide on how to use R with Gorilla.
If your department prefers Excel or similar software, we also have a useful guide on how to use Excel with Gorilla.
Research Question
This worked example will take you through how you could supervise a student project on Gorilla. In this example, the research question students are working on is, does watching relaxing content before using social media influence the level of interaction on social media, and does personality moderate this relationship?
Click through each section to see how the research project goes!
Project Setup
We first create a new project and call it 2026-PSY101-Social Media-Group 1 and a useful description:
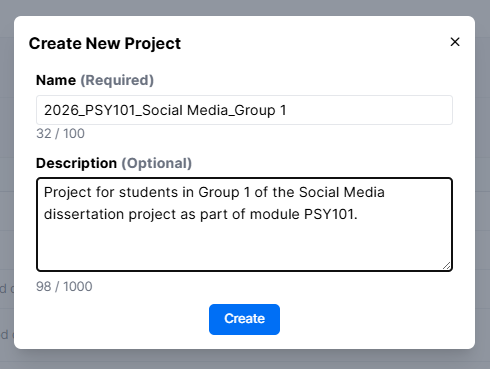
Once you click Create, you'll be prompted to create a new experiment. You can go through and create the experiment, adding the tasks and questionnaires right away. In this example, we're going to hold off doing that and first add the students as collaborators!
We now need to add the students that are assigned to this dissertation project. In this scenario, it's a group dissertation with two students working together on this project.
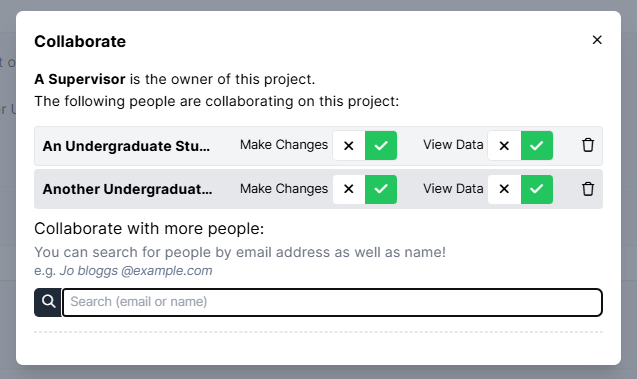
We click Settings at the top right, select Collaborate and then add two students, making sure they have permissions to edit and view data:
Cloning
Now the project is set up, we can bring in the samples and previous research we want the students to start with. So the students can get started easily, we plan to add:
- The consent form used by the department
- Your own personality questionnaire
- A social media sample
By following the cloning guide, we can easily get the Questionnaires and Tasks we need into the relevant project.
After cloning, your Experiment will look something like this:
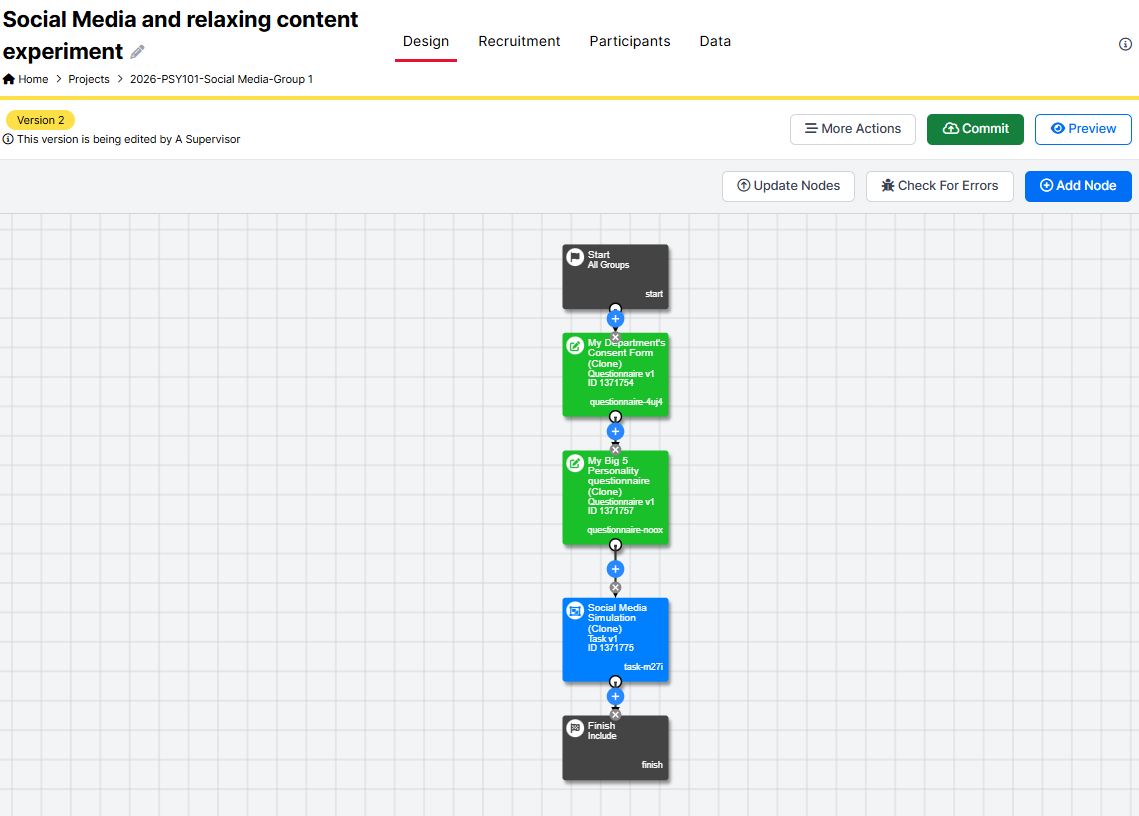
Make sure to Commit the changes to your experiment. Without doing this, your students won't be able to make changes.
Leave a commit message that explains what you've done:
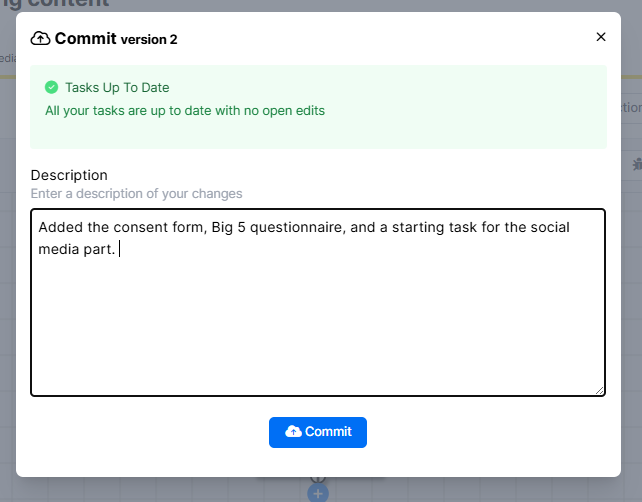
Your basic Experiment is now set up! This is a good stage to get in touch with the students and ask them to progress the design to fit the research question.
Next: Students make their changes
Students make their changes
Now the Experiment is with the students to make their changes. They can go into the experiment and add more Tasks or make changes to the parts you've just added.
After checking out a tutorial on how to make videos play, they create a simple Task that contains some instructions and a relaxing video they found online:
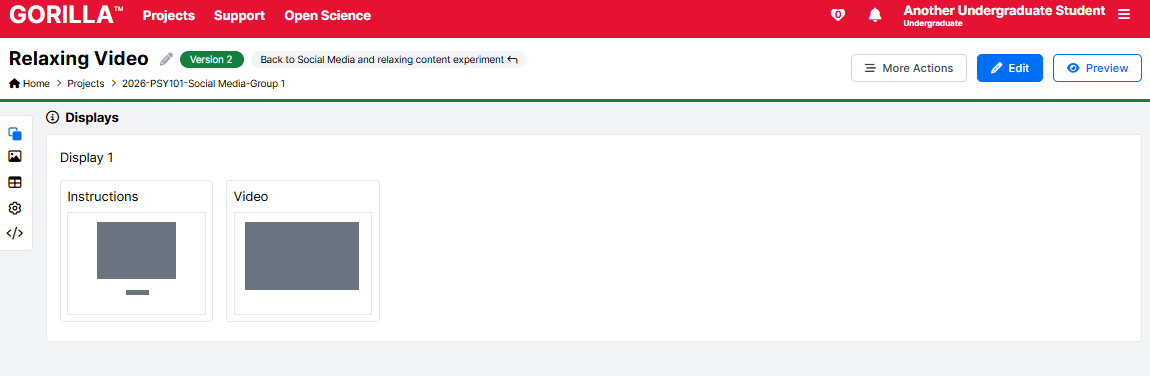
Next, they add this Task to the Experiment, so it looks like this:
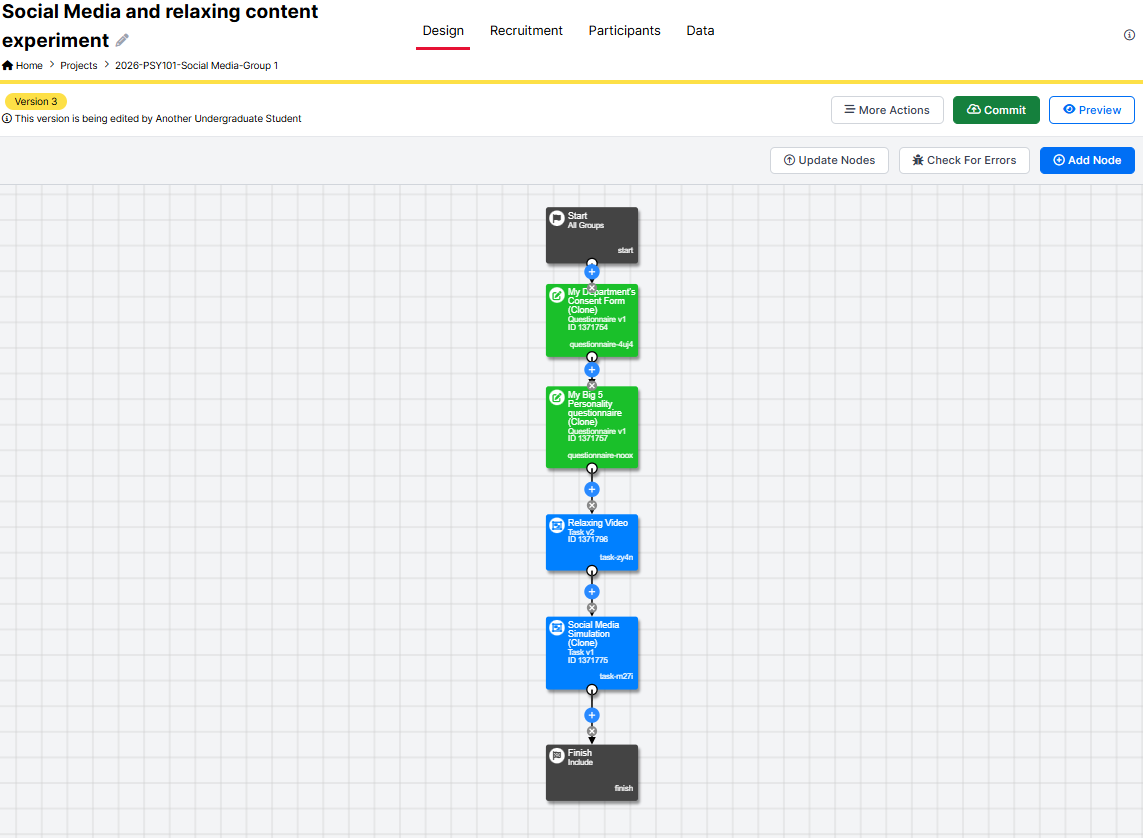
Next: Review the students' experiment
Review the students' experiment
The students have let you know they're finished and the experiment should be good to go. However, you instantly notice an issue - there's no control condition!
On a video call with the students you ask them to make the experiment a between-subjects design.
Luckily, the students had already gone through the Experiment Builder Step-by-Step guide, so they know what to do. They add a Randomiser Node, so that the experiment looks like this:
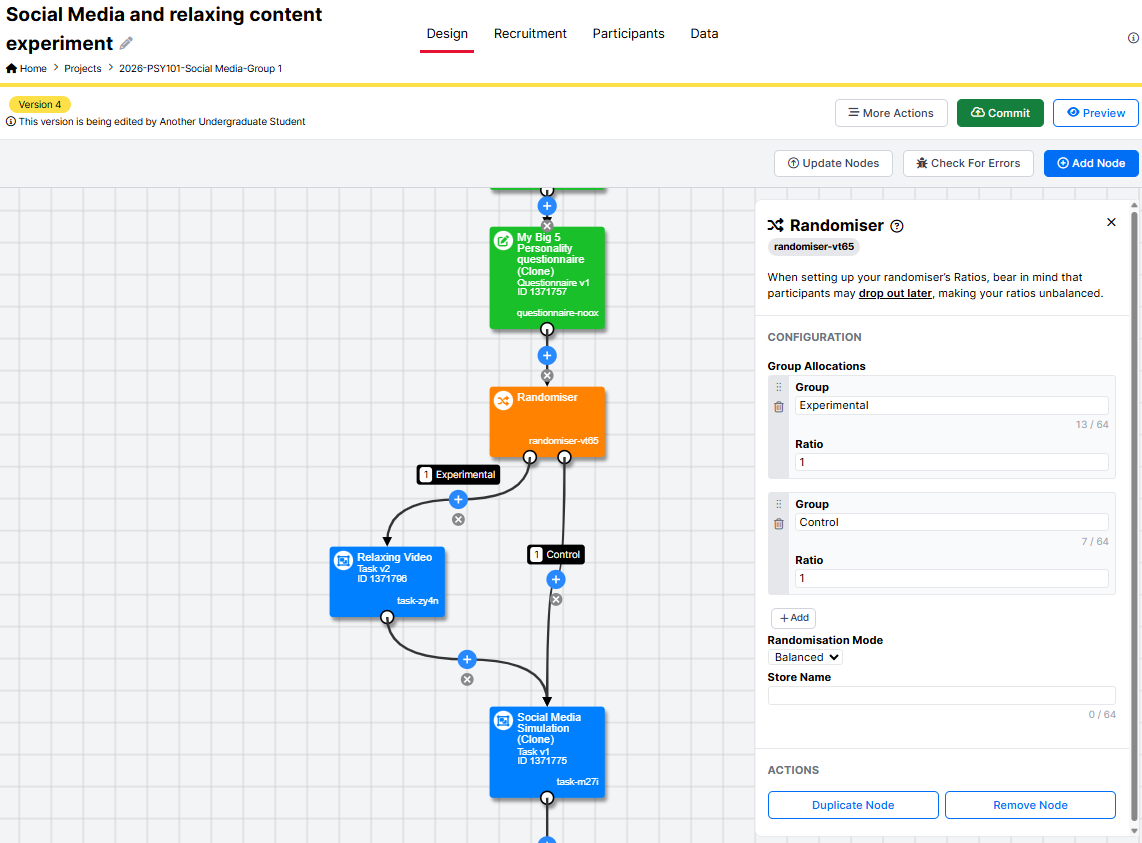
Together, you now preview the full experiment and make sure you're all happy with the design!
This preview gives you dataset you can download, and you recommend the students do download it. This will give them a file they can base their data analysis plan on.
Next: Submit for Ethical Approval
Submit for Ethical Approval
You now advise the students that the next step is getting ethical approval to run the experiment.
You first ask them to add the experiment to Open Materials.
This gives you a page that reviewers can access without an account. The reviewers can easily preview the experiment as if they were a participant. The Open Materials page looks something like:
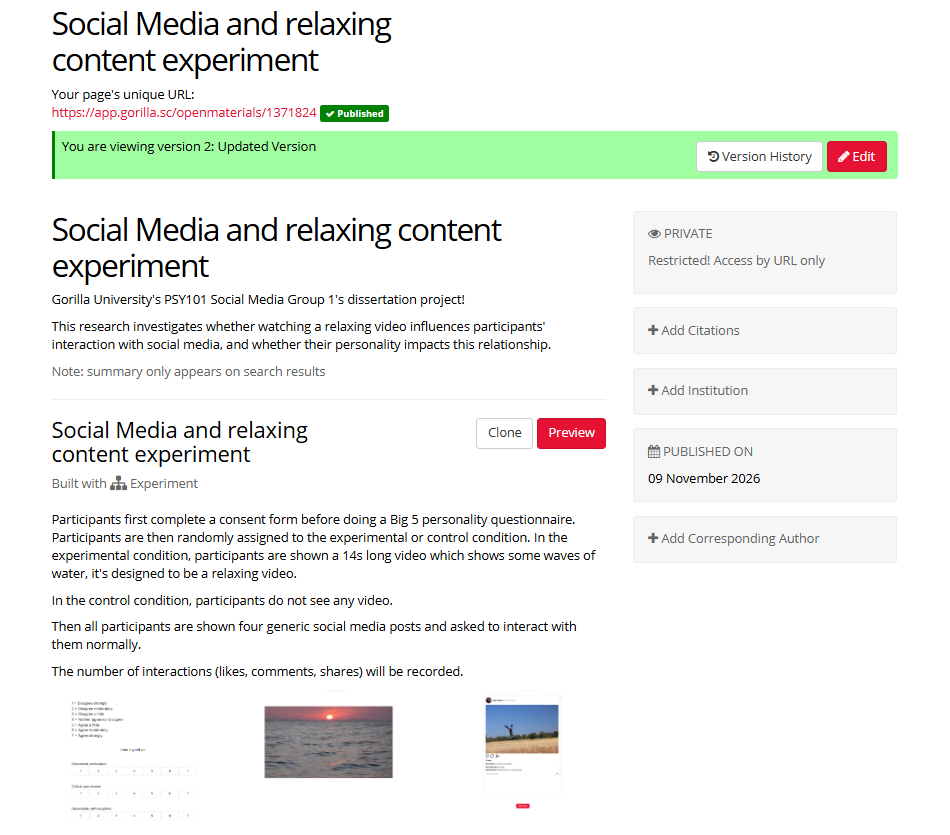
Next, you recommend the students use Gorilla's pre-written text on ethics to help with their application.
The students then have a well documented experiment to submit to your ethical review board!
Start Recruitment
Once you get confirmation of ethical approval, you can begin recruitment. As you created the project, and are, therefore, the project owner, you don't have to worry about the students collecting data before ethical approval, as only you can launch the experiment.
You follow the steps in the Launching the Experiment section of this guide, changing the recruitment target, choosing the recruitment policy, and adding any restrictions.
You then have an experiment that's ready to be shared with participants:
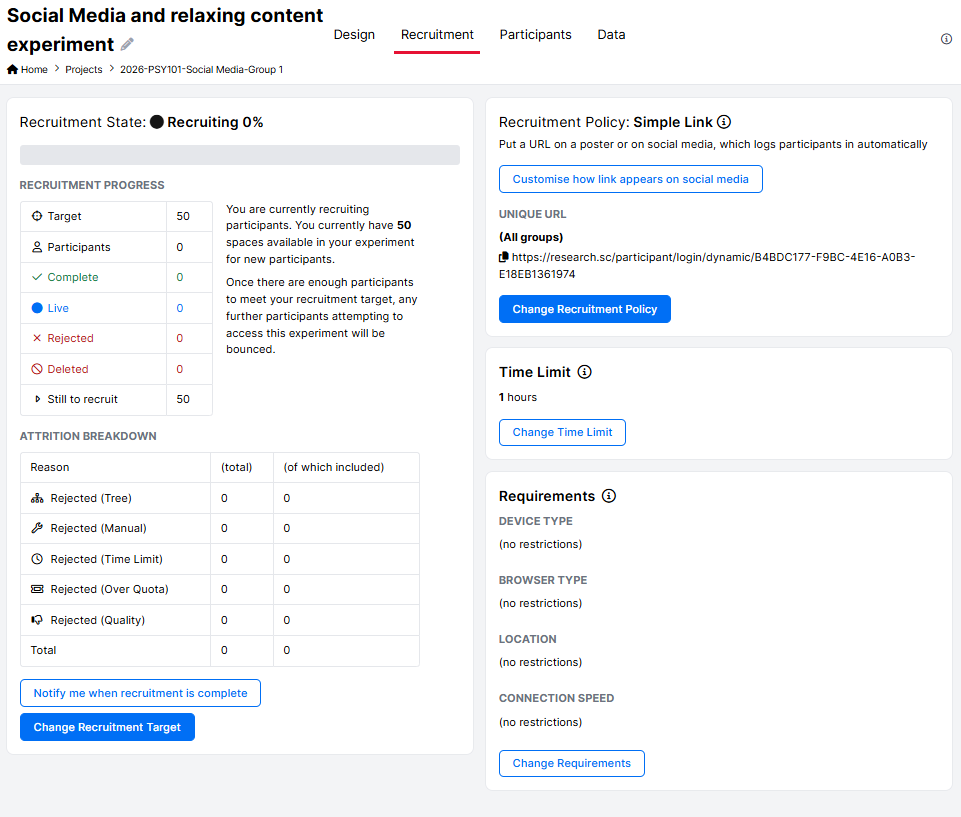
Your students can then share the recruitment URL online and with their friends to collect data!
Manage Participants
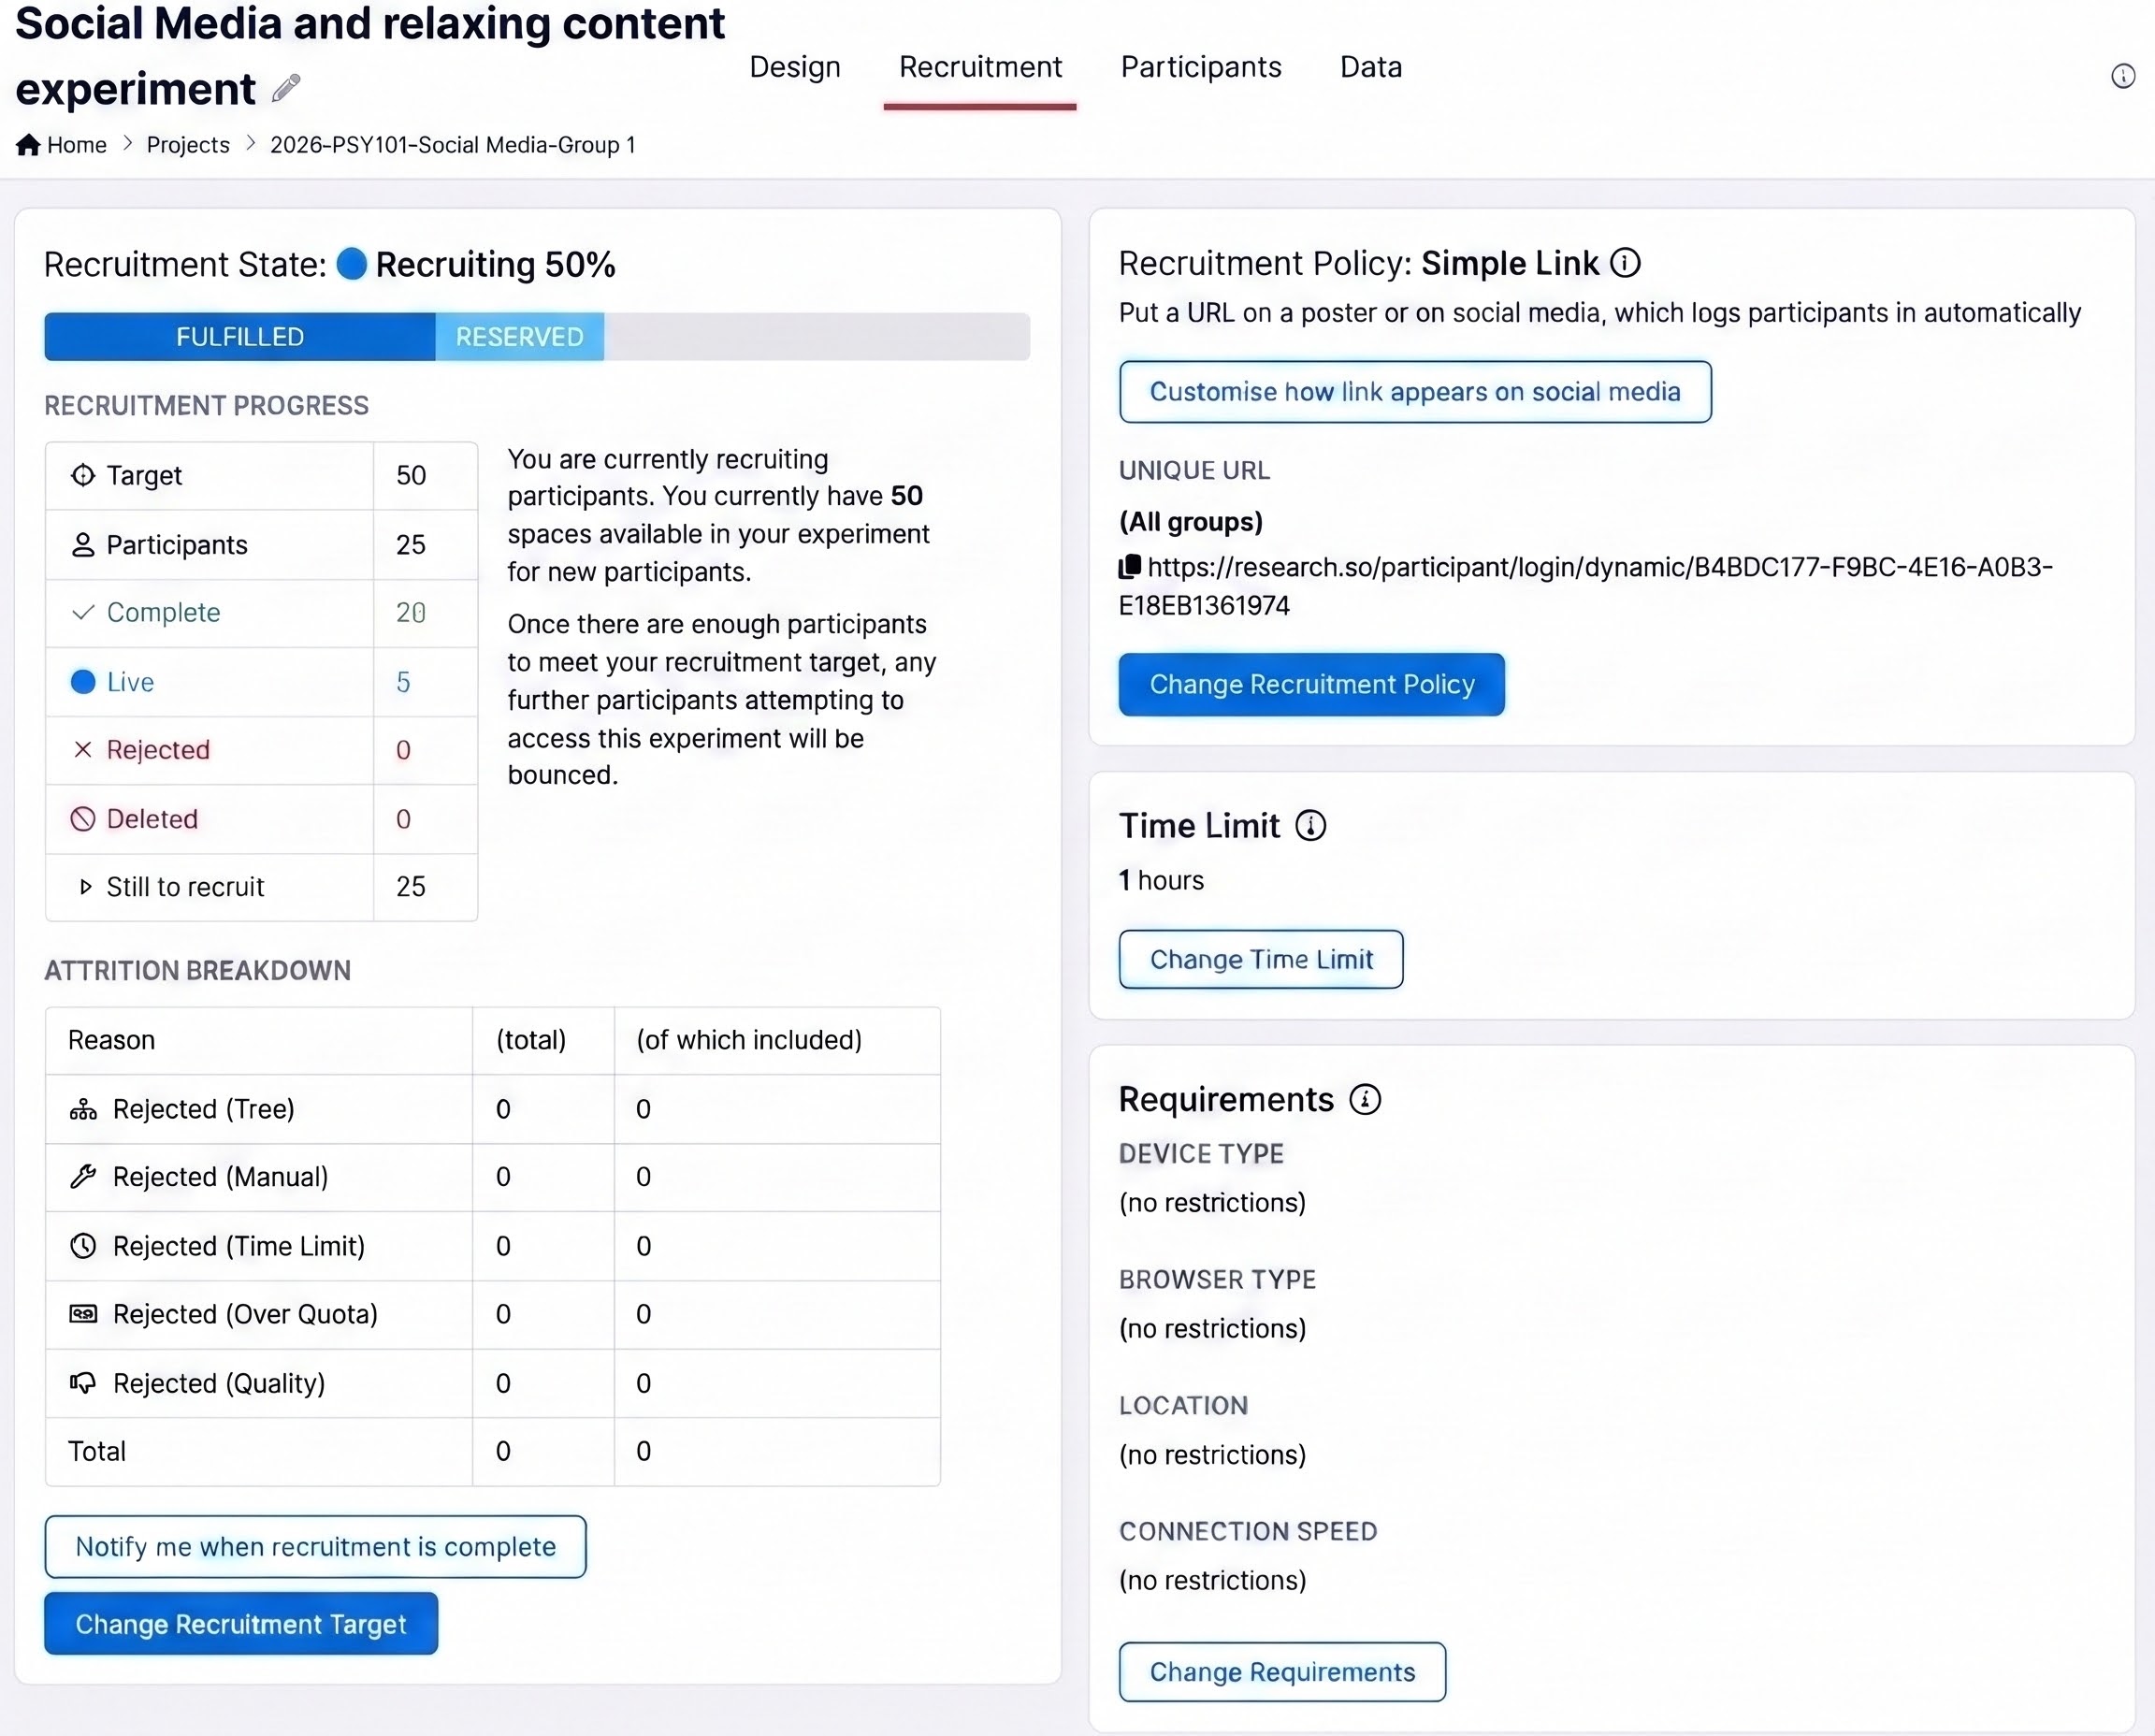
The data should start rolling in. It's important to keep an eye on the data and see if any participants need to be rejected.
For example, a participant may have started the experiment but not finished it. Their status will be Live and they'll be reserving a token. You can follow our guide on Participants to see when and how you can reject participants.
Data Analysis
Once all the data has been collected, it's time for your students to start on their data analysis.
As they already had the preview data from earlier tests, they should've had time to prepare their data analysis plan. If not, our guides to Gorilla with Excel and R are great places to start!
Dissemination
Finally, once the project is complete, your students can make their Open Materials page public to share the experiment easily at poster sessions, add to a CV, or wherever they want to share their Experiment!
If you submit the paper for publication, you can also add the Open Materials page to the publication, so that other researchers can see your method. Once published, you can also go back to the Open Materials page and add the recommended citation!