Questionnaire Builder 2 Step-by-step
Overview
The best way to get started with Questionnaire Builder 2 is to start building. This guide will walk you through the process of creating a basic questionnaire, complete with different question types, conditional questions and page branching.
We suggest you have two tabs open - one with this walkthrough, and one to create the questionnaire in. To start the walkthrough you should open your Gorilla homepage. You will also need the stimuli used in this questionnaire - you can download them here:
Watch the following video to see what the finished questionnaire will look like for the participant:
You can also view a finished version of this questionnaire in our Questionnaire Builder 2 Tutorials Project.
Create a new questionnaire
First, create a new project and then create a new Questionnaire inside it by scrolling down to Tasks & Questionnaires, clicking 'Create New', and choosing Questionnaire Builder 2.
Start building
Your Questionnaire is built page by page. We’ll start with the first page. The first page is automatically created for you. Onto this blank page, you can add objects - objects are individual questions, text, or stimuli. These replace the ‘widgets’ of the old Questionnaire Builder. You can find a full list of objects in our Questionnaire Builder 2 objects guide.
We’re going to start by adding a title to the questionnaire. To do so, click ‘add object’, then select ‘Text’.
To a text object, you can add any text you’d like, and add additional formatting using Markdown. Add the text ‘# Pet survey’ - then use the Text Align setting to center this title.
You should see a live preview of what the questionnaire should look like so far. A ‘Next’ button is automatically added to each page.
First Page
Now we’ve added our first object, we’re going to continue by adding our first question. Click ‘Add Object’ again, and select Multiple Choice List. Under the ‘Question’ setting, on the right hand side of the screen, add ‘Do you have a pet?’. Under Options, click the ‘Add’ button. In the box, add ‘Yes’ to both the Value and Label fields. Repeat this to add a ‘No’ option.
For the second question, add a ‘Dropdown’ object, with the Question ‘How many pets do you have?’, and the options: 1, 2, 3, and 4+
We’re going to follow this with another text object, this time with the text ‘This survey will ask you about only one pet, so please decide which pet you'd like to answer questions about’.
The order in which different objects appear in your Objects tab defines the order in which they are going to appear on your page. If you want to change their order, you can just drag and drop them to a different place.
That’s our first page done! Now click the + New Page Button. You can flick between pages by clicking the arrows above the live preview, or clicking the ‘Page Order’ button in the top right.
Add questions
Do you want participants to be able to skip questions?
By default, participants must answer every question in your questionnaire. However, if you toggle on the ‘Optional’ setting in the object, participants can skip that question and leave it unanswered.
In total, we want 5 pages. On Page 2 and 3, add questions using a variety of objects. A full list is available in the Objects Guide.
Each object includes an ‘Optional’ setting that lets you decide whether participants must respond or they can leave the question blank.
On Page 4, add a slider object, with the question ‘On a scale of 1-10, with 0 meaning not at all cute, and 10 meaning extremely cute, how cute would you rate the above animal?’ Set a minimum value of 0 and a maximum value of 10, add labels to show this, show the slider tooltip, and set the step size to 1. Participants will be able to select only a full number between 0 and 10.
Page 5 is our last page, so use a text object to add a thank you message.
Add Images
Next, we want to add a picture of a dog to page 4. On the far left of your screen, click on the image icon to navigate to the stimuli tab.
You can upload images by clicking on the ‘Add Stimuli’ button on the right of your screen, then ‘Choose files’. In your folders, find the image of the dog you downloaded from the ‘Overview’ screen. Select it, and click ‘open’
Next, click on the page icon on the far left, to navigate back to pages. On Page 4, click ‘Add Object’, and select ‘Image’.
Under Image settings, click on ‘choose’ , and select the dog image. Shrink the image by setting Image Max Height to 500, and center the image.
Then in the objects list, drag the word ’Image’ above the word ‘Slider’ to reorder the objects, so the Image is at the top of the page.
Conditional questions
A great feature of Questionnaire Builder 2 is the ability to hide and show questions based on the responses to other questions. You can find out more about this in our How-To Guide.
Let’s go back to Page 1. If the participant doesn’t have a pet, it doesn’t make sense to ask them how many pets they have. So we’ll hide this question unless they answer ‘Yes’.
To do this, Go to your Dropdown object, and turn on the ‘Conditional’ toggle. Set the default state to ‘Hide’. Visibility should be set to ‘Show if’. Field should be set to ‘Do you have a pet’ . Comparison should be ‘Equal to’. Value should be ‘Yes’.
Once we’ve done this, the ‘How many pets do you have?’ dropdown will be hidden unless the participant selects ‘Yes’.
Similarly, we only want to show the ‘please decide which pet to answer questions about’ message to participants with more than one pet, so let’s make this text object conditional on their response to ‘How many pets you have’. Start by clicking on the Text object that contains the message. Repeat the above steps, but this time, set the Field to ‘How many pets do you have?’, the Comparison setting to ‘Greater than’, and the Value to 1.
Great job! You can check this is working using the page preview function - click on the play symbol on top of the page, to see what the participant will see.
Screen branching
In addition to setting up conditional questions, we can send participants to completely different screens depending on their answers. This means that if our participant has no pets, we can send them straight to the finish screen, but ask all other participants the rest of our questions.
We can control screen branching from the Screen setting tab, above your object settings. Toggle on screen branching. (Note: The video was made before the Criteria setting was added. The Criteria setting should be left as default, 'Match Field'.)
You’ll need two destinations boxes. In both, bind the Field to ‘Response - Do you have a pet?’, and set Comparison to Equal to.
In one, set the Value to Yes, and the Page to Page 2. In the other, set the Value to No, and the Page to Page 5.
Preview
Great! Your questionnaire is all set up. To check everything is working properly, let’s run a preview.
To Preview, press the Preview button in the top right of the screen. At the end of the preview, you’ll have the opportunity to download the preview data.
Commit
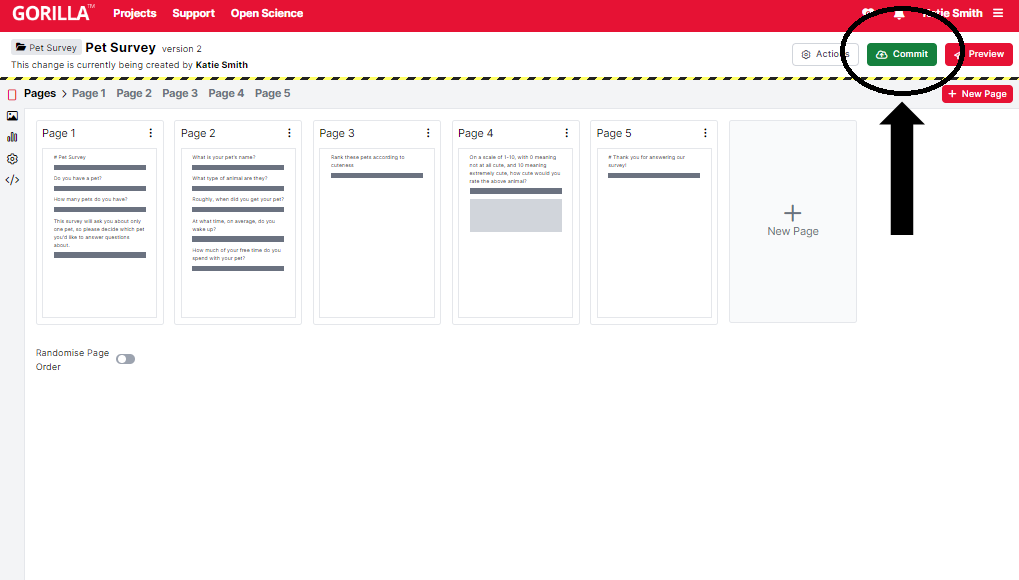
Now that we have set up and previewed the questionnaire, we can commit it. Committing means saving a version of the questionnaire that you can always go back to. You must commit your questionnaire to be able to add it to an experiment.
To do this, click the green 'Commit' button at the top right of the screen. Then, enter a description of your changes in the text box and press Commit to save the new version of the questionnaire.
You will know the task version is committed when you can no longer edit the questionnaire, and the blue 'Edit' button has replaced the green 'Commit' button. These changes indicate that we are now viewing the committed version of the questionnaire, not editing it.
Next Steps
Once you’ve created and committed your Questionnaire, the next step is to add it to an Experiment! Our How To: Experiments guide is the best place to start.
Have a go at creating your own custom questionnaire.
Now you’ve conquered Questionnaire Builder 2, try our Task Builder 2 Step-By-Step guide!