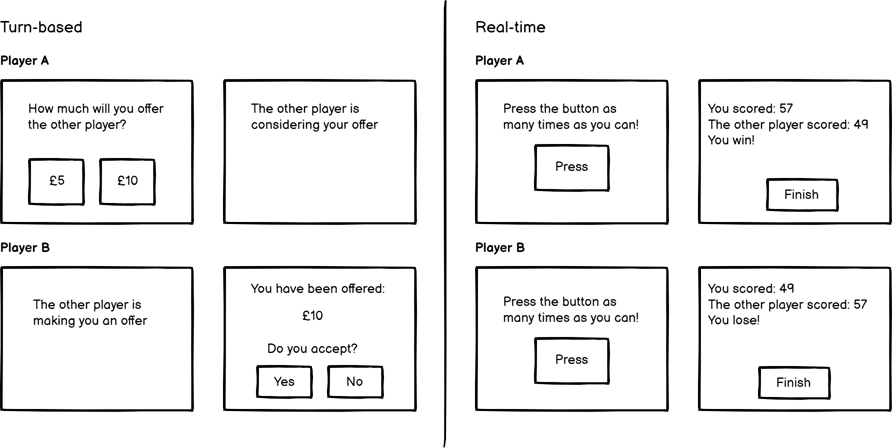
The Multiplayer tool allows you to easily create online multiplayer experiments and studies. In a multiplayer task, several participants take part in a task together, in real time. A multiplayer task can either be more 'turn-based', where one participant takes an action and then another participant responds, or 'real-time', where participants perform actions simultaneously.
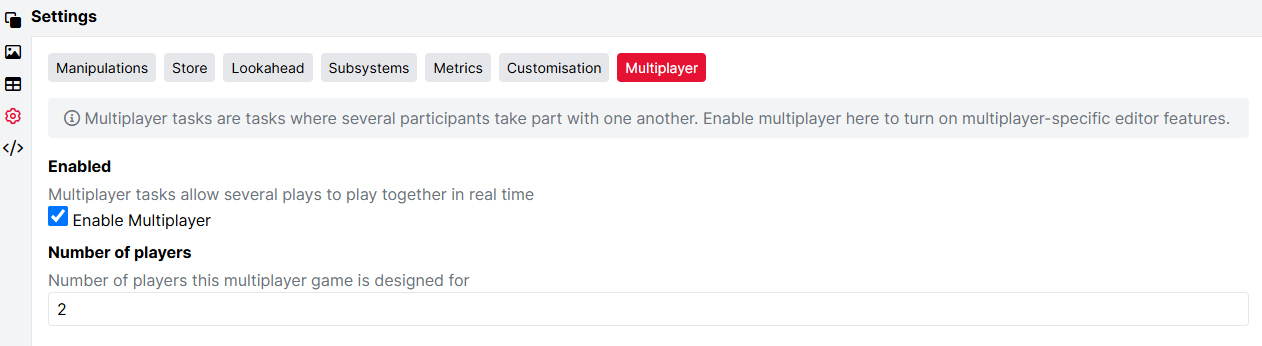
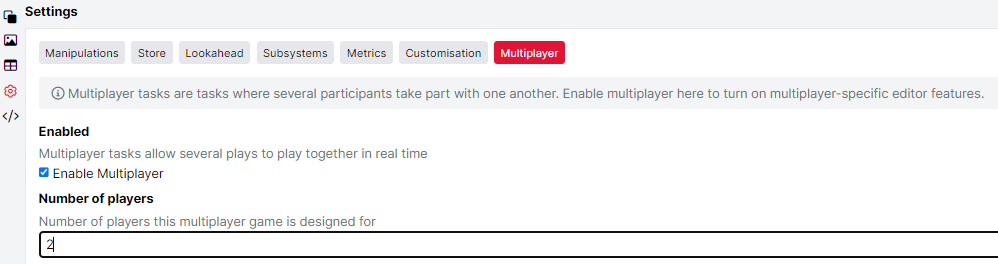
Multiplayer is a new Task Builder 2 feature that is available to all Gorilla users. It's free to start building your Multiplayer tasks and preview them. You can create a Multiplayer task by creating a new Task Builder 2 task from inside any of your projects, going to Settings, clicking Multiplayer, and selecting 'Enable Multiplayer':
You can also contact the Support Desk if you have any questions about Multiplayer!
To add your Multiplayer tasks to an experiment and start collecting data, you'll need a licence. Visit our pricing page for more information.
Multiplayer is an add-on to the Task Builder 2 tool. You can create tasks using Multiplayer for free, but you will need to have a Standard level subscription in order to collect data from participants in a multiplayer experiment.
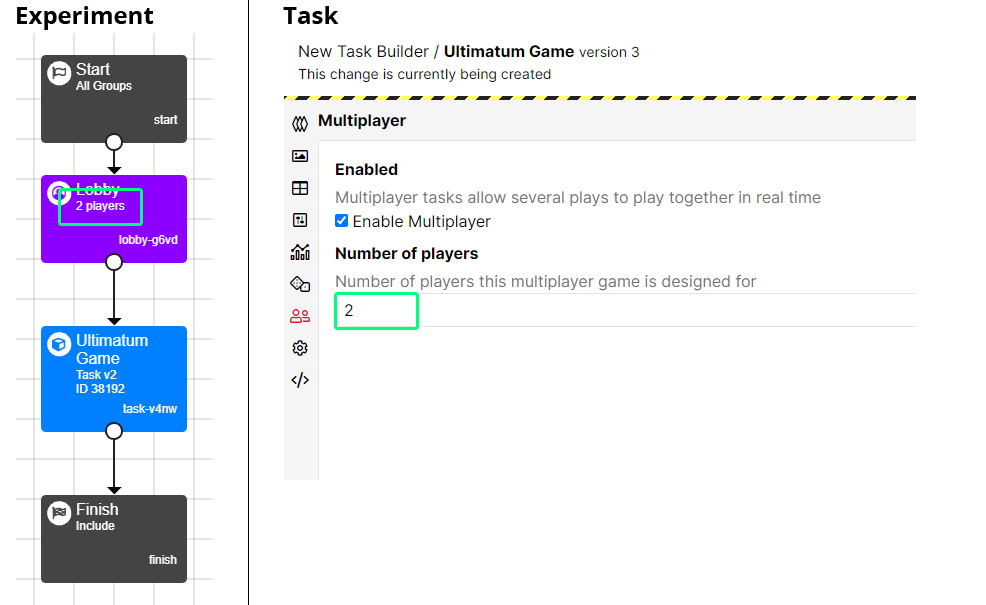
The first thing to do is to create a new Task Builder 2 task, and enable multiplayer. Go to the Settings tab, click Multiplayer and select "Enable Multiplayer". You also need to specify how many players are needed for your task - Gorilla supports tasks with up to 8 players. You will usually want to keep player numbers small (think 2-4) as tasks with larger player numbers are inherently more susceptible to participants dropping out (and therefore leaving the others without enough people to continue).
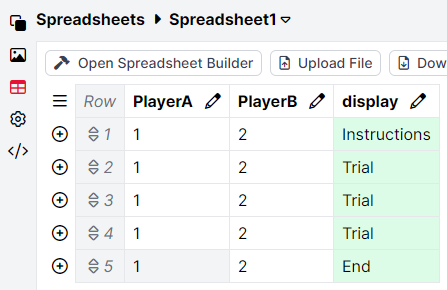
You will notice that your spreadsheet automatically gains some new columns, one for each player (Player A, Player B and so on):

These columns correspond to roles allocated to players during a multiplayer task. This is further covered in the Allocating Roles to Players part of this guide.
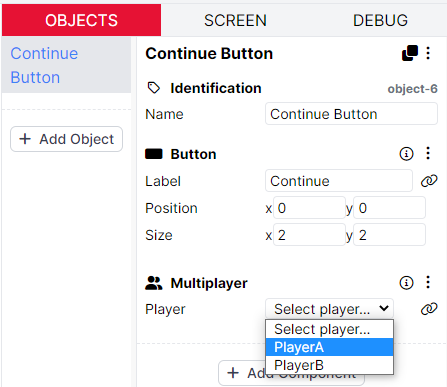
You create multiplayer tasks just as you would a standard, single-player task in Task Builder 2 - you can use all the same components to build your task. In addition, you gain access to the Multiplayer component, which simply controls which player an object is enabled for. This allows you to only enable certain objects (e.g. response buttons) for a specific player.
For example, consider a task where Player A has to think of an animal, and Player B guesses which animal Player A chose. Player A then says whether Player B was correct or not:
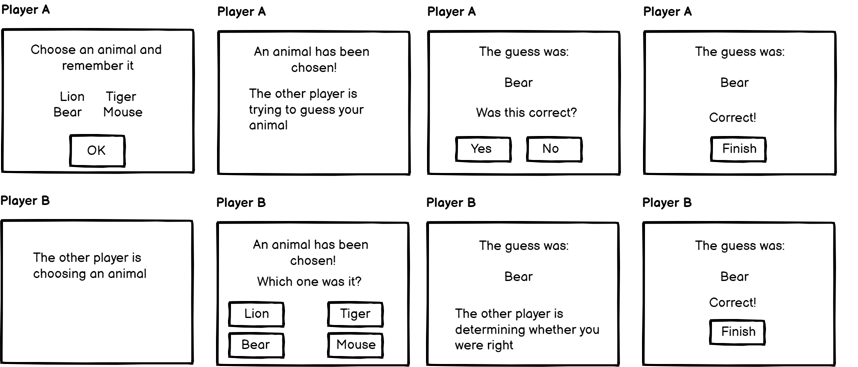
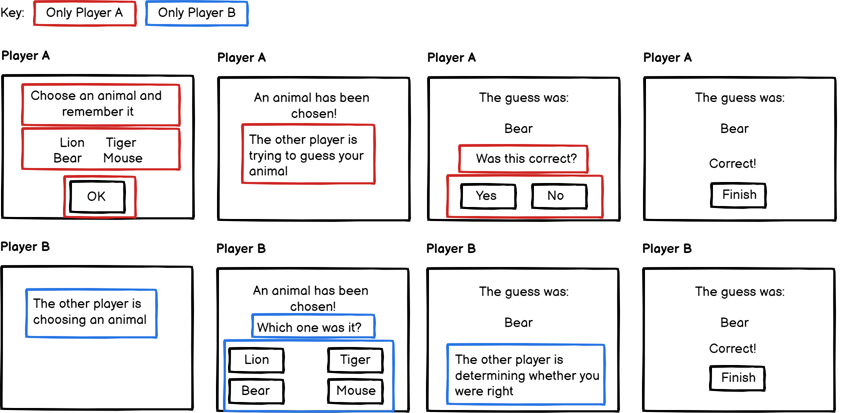
There are objects that are always visible, and some that should only be available to a specific player. The Multiplayer component allows you to control this and assign certain roles to specific players:
Read more about roles in the Allocating Roles to Players part of this guide.
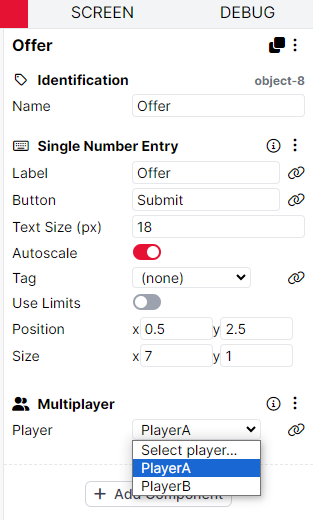
Different players can have different roles in the multiplayer game. For example, in a monetary negotiation game, such as the Ultimatum Game, one player is an offer-maker who makes an offer to other player(s).
Roles can be created within the multiplayer task, using the Multiplayer component. Adding the Multiplayer component to an object in the task allows you to specify which player gets to see/interact with that object.
For example, when you add a Multiplayer component to an object with a Single Number Entry component, and select Player A in the Multiplayer component, this would make the Single Number Entry component only available to Player A and not other players. In the example of a monetary negotiation game, this can be used to allow Player A to play the role of the offer-maker who types in the amount they wish to offer to other players.
When taking part in a mulitiplayer study, participants play in different player positions. For example, in a two-player game, someone will play as Player 1 and someone else as Player 2. You will learn more about player position assignment from the Player Positions section of this guide.
You must let Gorilla know which players (Player 1, Player 2 etc.) should have what roles (Player A, Player B etc.) at each point in the multiplayer task using the 'Player' columns in the Spreadsheet. The 'Player' columns appear in the Spreadsheet automatically when the multiplayer setting is switched on, and the number of columns reflect the number of players that the game is configured for:
For example, if you create a 2-player game, two columns - one for 'Player A' and one for 'Player B' - will appear in the Spreadsheet. These columns will then need to be filled with the numbers corresponding to the player positions, e.g. entering 1s in the Player A column and 2s in the Player B columns means that Player 1 in the room will play the role of Player A, and Player 2 in the room will play the role of Player B:
In the example above, where all the rows in the Player A column are filled with the same number '1' and all the rows in the Player B column are filled with the same number '2', the role allocation will stay consistent throughout the task. This means that Player 1 in the room will play the role of Player A and Player 2 will play the role of Player B through the whole task.
If you wish to configure turn-taking in your task, you can reshuffle roles for your players by switching the numbers in the Player columns. Learn more about turn taking in the Taking Turns section of this guide.
In some multiplayer paradigms, players should take turns performing different roles. For example, in a monetary negotiation game, such as the Ultimatum Game, Player 1 can be an offer-maker first and make an offer to Player 2. In the second round, Player 2 can make an offer and Player 1 can be the offer-receiver. They can swap roles again in the next trial, making Player 1 the offer-maker again and Player 2 the offer-receiver, and so on. This turn-taking can be configured in the Spreadsheet tab, using the player columns.
When designing your task, you use the Multiplayer component to control whether a particular object is only enabled for Player A, Player B, Player C, etc.
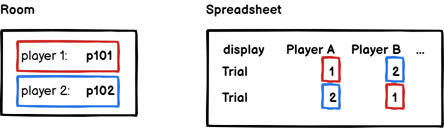
In your task's spreadsheet, you must enter values corresponding to player numbers into the Player columns to assign which player in the room gets to play which role in each trial. In Gorilla, each row in the spreadsheet indicates a single trial in the task. Therefore, you can use the 'Player' columns to configure turn-taking and change the roles of your players throughout the task.
For example, entering a '1' in the Player A spreadsheet column and a '2' in the Player B spreadsheet column in the first row means that, in the first trial, Player 1 in the room will play the role of Player A and Player 2 in the room will play the role of Player B.
If you then reverse the player numbers in the second row (so Player A column has a '2' and Player B column has a '1'), then Player 2 in the room gets to play the role of Player A and Player 1 in the room gets to play the role of Player B in the second trial. This allows you to use the spreadsheet to define turn-taking, and ensure that all participants have been able to perform each role.
You can see turn-taking in practice in our Ultimatum Game multiplayer sample.
If you wish to keep the role allocation consistent throughout the trials, fill in the same number for all rows within a given Player column in the spreadsheet. For example, entering 1s in all the rows of the Player A column assigns Player 1 to the Player A role througout the whole task. Read more about role allocations in the Allocating Roles section of this guide.
Multiplayer tasks can progress in various ways, depending on your paradigm. There are three modes you can choose from:
This is the default option, and is suitable when you want your players to progress through the screen(s) at the same pace. For example, you might want to ensure every player reads the instruction screen before they progress onto the task trials - you can set this up in two ways:
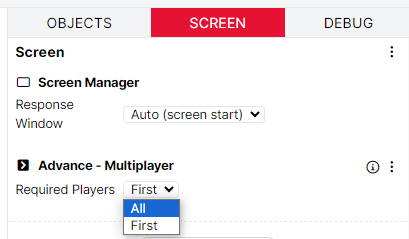
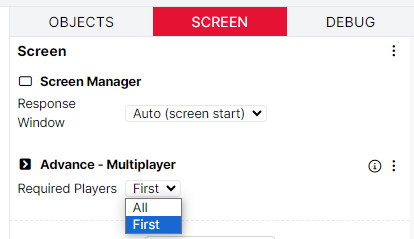
By adding the Advance - Multiplayer component to the Screen tab, you can control whether the screen should progress after all players complete it, or when just the first response is received. This is suitable for screens where it is a single player's turn, and once they have completed their action, the screen should advance.
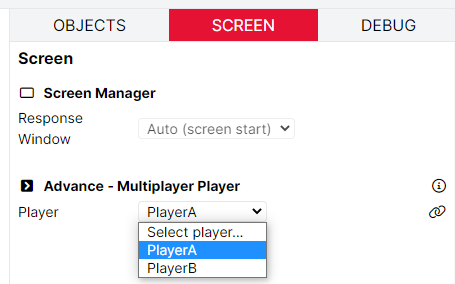
If you want to allow only a specific player to control the advancement of the screen, without waiting for responses from other players, add the Advance - Multiplayer Player component to the Screen tab and specify which player should progress the screen. Gorilla will then progress the screen only after receiving a response from the designated player.
Read on to learn more about player positions.
When taking part in a multiplayer study, participants play in different player positions. In a two-player game, someone will play as Player 1 and someone else as Player 2.
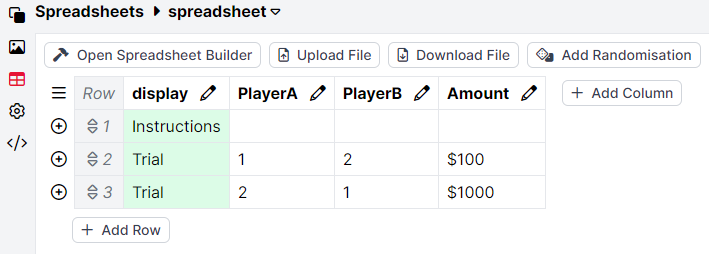
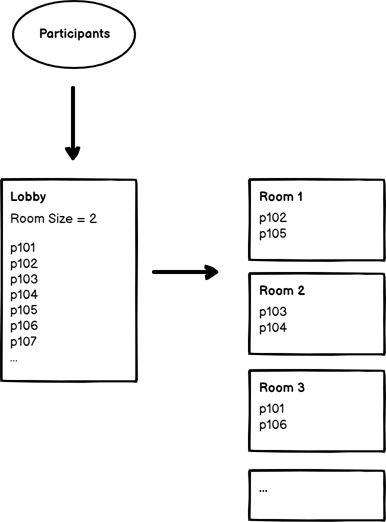
Imagine you have 6 participants in your experiment: let's call them p101, p102, p103, p104, p105 and p106, and you want them to take part in a two-player task. When participants are matched together in your experiment, they are assigned to the same room. A room is simply a collection of participants who have been matched together.
Within this room, the players have a fixed, canonical order: e.g. in a two-player room, one participant will play in a Player 1 position and the other in a Player 2 position. (In a 4-player room, there would be four player positions: Player 1, Player 2, Player 3 and Player 4.)
When paired up into rooms of two players each, the player rooms would look something like this:

In the rooms, your participants will be matched and assigned to Player 1 and Player 2 positions.
As a default, the order in which your participants are assigned to the player positions is arbitrary (we actually apply some randomisation to ensure that participants aren't simply matched in the order that they arrive). However, you can manually assign players if you want specific participants to play on specific positions - learn more in the Matching Players section of the guide.
Players playing in positions of Player 1, Player 2, Player 3 etc. must be allocated roles of Player A, Player B, Player C etc. within the multiplayer task. Read more about role allocation in the Allocating Roles to Players part of the guide.
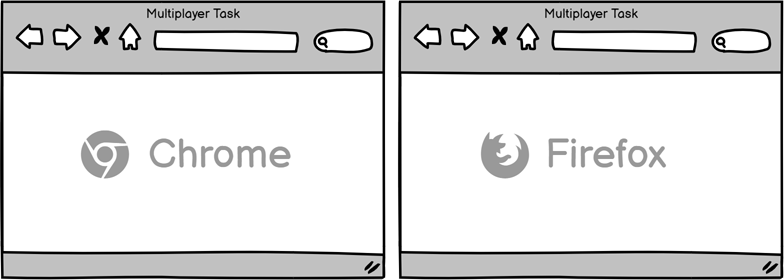
In order to simulate real participants, you should open as many previews of your task as you have players, so that you can see each player's view of the task at the same time.
You must preview your multiplayer task using separate browsers or devices. You cannot be logged in as two different participants in the same web browser, even if you open separate tabs or windows. Therefore, the easiest way to preview your multiplayer task is to log in to your Gorilla account in two separate browsers (or however many you need), and create separate previews, one preview in each browser.
Although you must be logged into different browsers when previewing multiplayer tasks, you should only be logged in to your Gorilla account in one browser when building or editing your multiplayer tasks. Making changes to your task whilst it's open in multiple browsers may cause a loss of task content!
Note: If your multiplayer task uses subsystems, such as audio and/or video recording, you will need to preview the task for each player using separate devices, as opposed to just separate browsers on the same device. This is because a subsystem used on one device can only be used for one player at a time. You can use the same type of browser on each of the devices.
Do not run multiplayer in incognito/private browsing mode. Incognito mode does not allow loading and storing of task data in the same way as a normal browser mode does. This can affect data sent from one player to another, and subsequently prevent multiplayer tasks from previewing/running properly.
Participants should also not take part in your multiplayer study in incognito or private browsing mode. There is no way to prevent participants from using incognito mode, but we recommend advising them not to use it. You can include this information in a study description, on the instruction screen, or in an email to your participants.
When you click the 'Preview' button in your multiplayer task, you will be asked if you want to create a room or join a room. In order to join players in the same room, click on 'Create a room' as one player, and click on 'Join a room' as another player. Then, copy and paste the room ID from the created room into the other player's preview. This will pair the preview participants so that they are playing together. See the video below for reference.
The player who creates a room in preview mode will be assigned to the Player 1 position, while the player who joins the room using the room ID will be assigned to the Player 2 position. See more information about position assignment in the Player Positions section of this guide.
Note: creating and joining a room is a preview feature to allow you to simulate the multiplayer experience. In real, live experiments, multiplayer rooms will be created automatically. See the Running Multiplayer Experiments section of this guide for further information on real-life experiments.
Once you have set up the multiplayer task, you can commit it. Committing means saving a version of the multiplayer task that you can always go back to. You must commit your multiplayer task to be able to add it to an experiment and send it to participants.
To do this, click the green 'Commit' button at the top right of the screen. Then, enter a description of your changes in the text box and press Commit to save the new version of the multiplayer task.
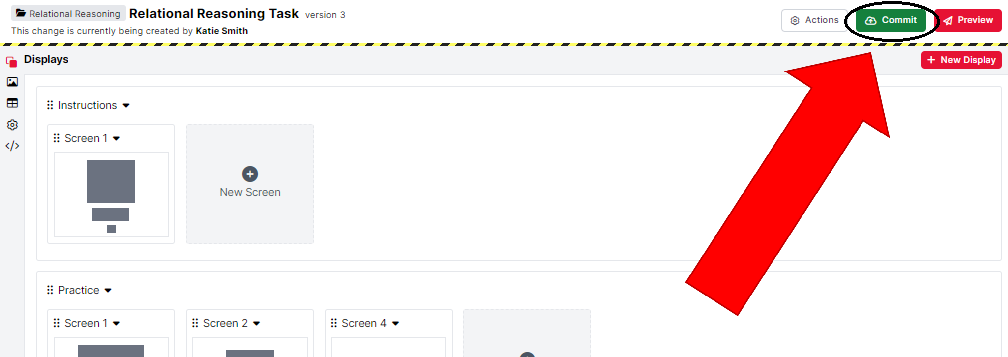
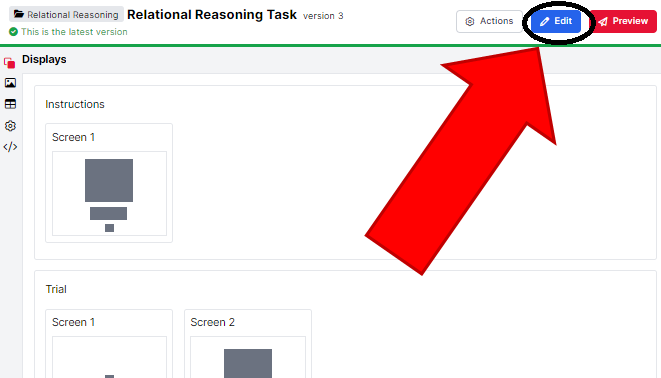
You will know the new multiplayer task version has been committed when you can no longer edit the multiplayer task, and the blue 'Edit' button replaces the green 'Commit' button. These changes indicate that you are now viewing the committed version of the multiplayer task, not editing it.
Each time you commit a new version of the multiplayer task, the version number increases. We can view previous multiplayer task versions by clicking on the 'Actions' button (to the left of the 'Edit' button), and then History.
From opening this History box, you can view previous multiplayer task versions. The '(open)' text indicates that this is the version of the multiplayer task you are currently working on and has not yet been committed.
To go back to a previous version of the multiplayer task, choose this version from the dropdown and click 'Show this version' to view it. To roll back to this version, choose 'Restore' from the Actions menu.
---Multiplayer is an add-on to the Task Builder 2 tool. You can create tasks using Multiplayer for free, but you will need to have a Standard level subscription in order to collect data from participants in a multiplayer experiment.
To send a Multiplayer Task to participants, you need to add it to an Experiment.
The Experiment Tree is where you design your entire experiment, such as adding demographics questionnaires and reaction time tasks into a single experimental flow.
Once you have constructed an Experiment Tree, you’ll want to distribute it to participants. To do this, go to the Recruitment tab in the Experiment builder. In this tab, you can choose a Recruitment policy, which will generate a URL to send to participants. We offer a variety of recruitment policies, all explained in our Recruitment Policy Guide. After selecting a policy, set your Recruitment Target (i.e., how many participants you want to complete your experiment), and apply any Participant Requirements, such as a time limit or specific device types.
As participants begin the experiment, they will appear as Live in the Participants tab. When a participant reaches the Finish node, their status will change to Complete. You can then download the participants' data from the Data tab.
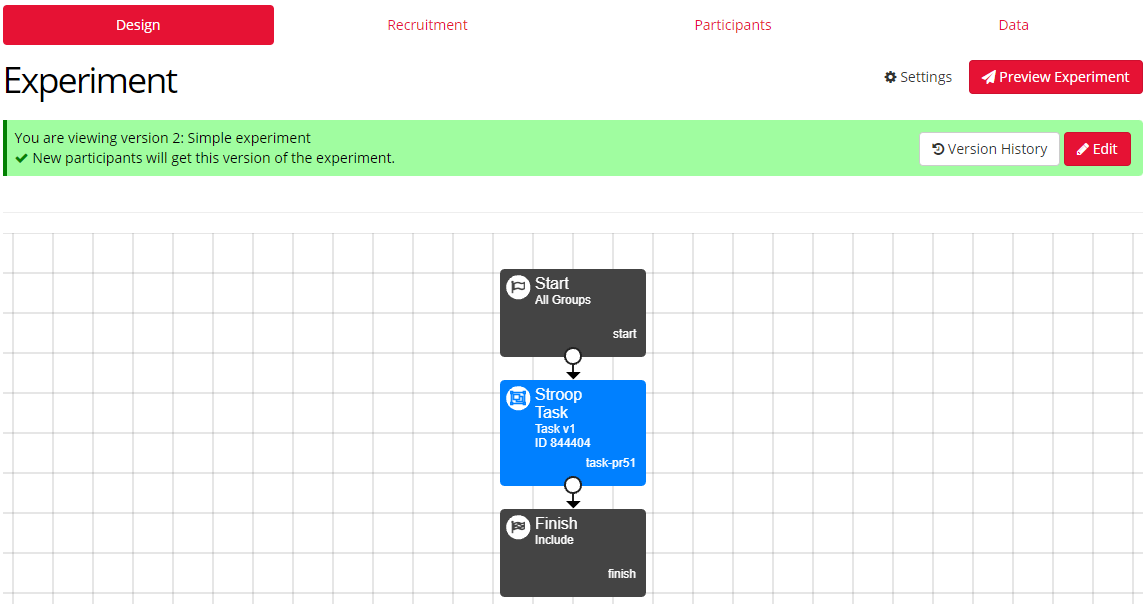
This screenshot shows the new Experiment Builder interface. If you’re still using the classic interface, it will appear slightly different.
You can find out more information on how to design and build your Experiments in our Experiment Builder: How-To guide.
There are specific nodes you will have to add to your Experiment Tree in the case of multiplayer experiments. You can read more about this in the next section of this guide, on running multiplayer experiments.
Multiplayer is an add-on to the Task Builder 2 tool. You can create tasks using Multiplayer for free, but you will need to have a Standard level subscription in order to collect data from participants in a multiplayer experiment.
Therefore, the Lobby node is only available for users who have purchased a multiplayer license. If you would like to buy access to our multiplayer tools, please go to our pricing page. Access to multiplayer experiment nodes is granted automatically to users with a multiplayer license. If you have any multiplayer-related questions, please contact our friendly support team.
Do not run multiplayer in incognito/private browsing mode. Incognito mode does not allow loading and storing of task data in the same way as a normal browser mode does. This can affect data sent from one player to another, and subsequently prevent multiplayer tasks from previewing/running properly.
Participants should also not take part in your multiplayer study in incognito or private browsing mode. There is no way to prevent participants from using incognito mode, but we recommend advising them not to use it. You can include this information in a study description, on the instruction screen, or in an email to your participants.
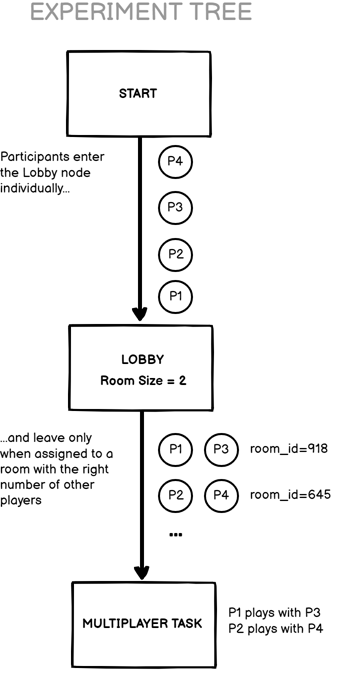
To create a multiplayer experiment, you need to add a Lobby node to your experiment tree. The Lobby node groups together participants who are going to play together. Participants who are grouped together for multiplayer experiments are put into the same room - everyone starts off in the lobby and then gets assigned to a room with the other players they are going to play with. The size of the room depends on how many players the task is for. For a two-player task, we want two participants in each room, for a four-player task, we want four in each room, etc. See an image example below:
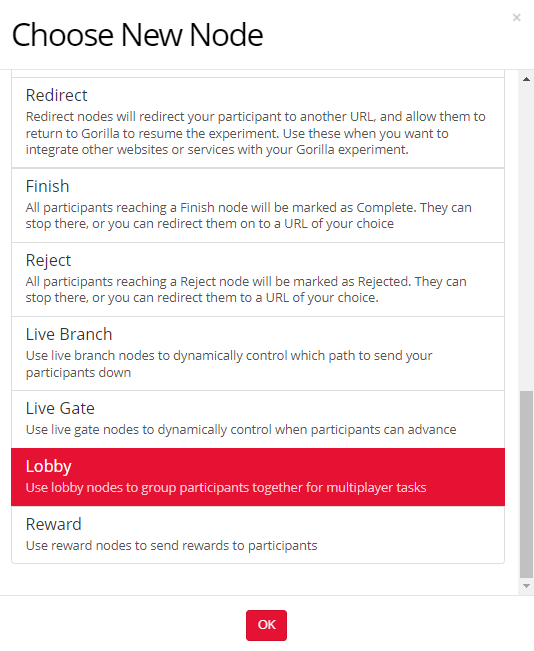
You can add a Lobby node to your experiment in the same way you would add other nodes. Go to the Experiment Builder, click Edit, and click on the '+Add New Node' button in the Design tab. Then select Lobby from the list of experiment nodes:
The screenshots on this page show the new Experiment Builder interface. If you’re still using the classic interface, it will appear slightly different.
When we previewed a multiplayer task, we created a player room manually (see the Previewing Multiplayer Tasks section for more details). Now in the experiment, we use a Lobby node to create player rooms for us.
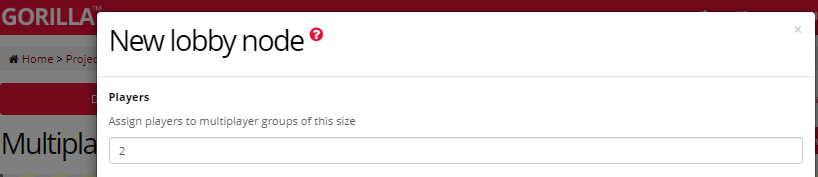
To configure the Lobby node, click on the node to open up its configuration settings. The minimum required setting for the Lobby node is the number of Players that should be assigned to each player room. This needs to be the same number that you specified earlier in your multiplayer task:
Using a Lobby node and a Repeat node?
When using the Repeat node in Multiplayer studies, the Lobby node must be placed within the Repeat loop. If the Lobby node is placed outside of the Repeat loop, the connection between players will only be established on the first loop and players will skip though the other repeat, without completing the tasks.
You can find some more information about how to setup a Repeat node within a Multiplayer experiment on the Repeat node page.
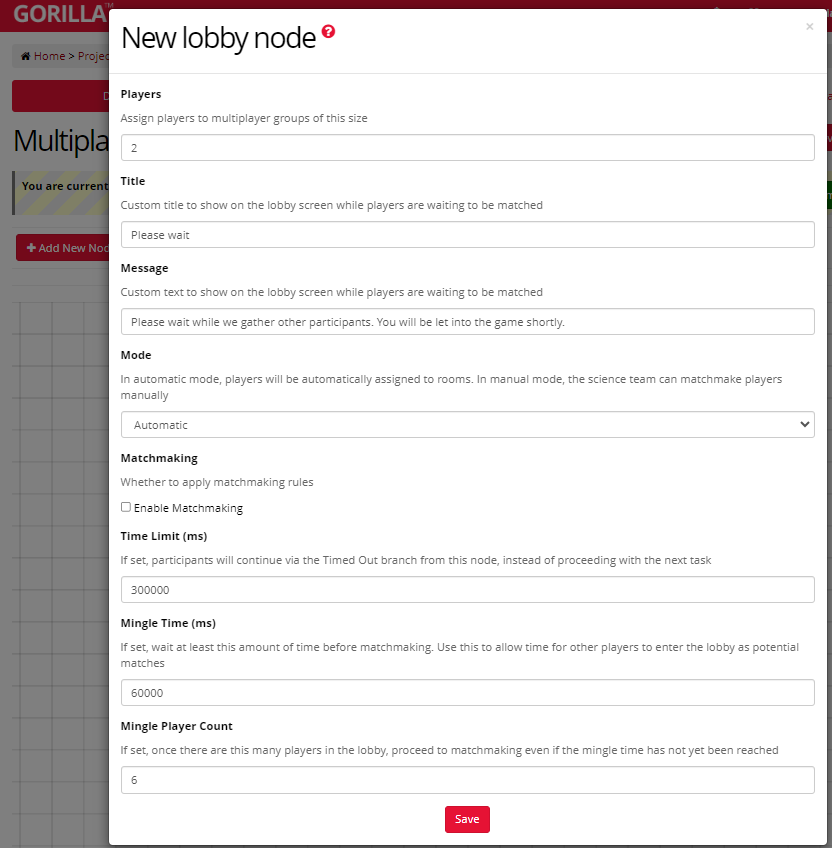
Apart from the Player number setting, the Lobby node has multiple other settings that allow you to customise your multiplayer study. See a full list of Lobby node settings with example settings filled in below:
One setting of the Lobby node needs to be explained in more detail: the Mode setting, that determines how participants form player groups. Participants can be matched with other players automatically, either randomly or according to specific rules, or manually by researchers. Learn more in the Matching Players section of the guide.
This section explains room assignment modes, and covers how to apply advanced matchmaking rules so that participants are matched according to specific criteria.
Participants entering the Lobby node during a live experiment can be matched with other players either automatically or manually. You can select how you wish your participants to be matched using the Mode setting in the Lobby node.
When running your experiment, participants will be coming into your study at various rates. This is a challenge for multiplayer paradigms where participants need to gather at similar time to form a group of players, and progress through the study at a steady pace. As a consequence, your participants might experience delays while waiting for other players to join, or progress through the experiment, which decreases their satisfaction and risks them withdrawing. To mitigate this issue, we've created a Live Gate node that lets you dynamically control the progress of participants within the experiment. You can use Live Gate node anywhere in the experiment tree, but it is especially useful to place it just before the Lobby node to control the flow of participants into the lobby where they are matched.
Automatic mode is the default mode of the Lobby node. There are two ways your participants can be matched in automatic mode:
1) Random automatic mode: As a default, the order in which your participants are assigned to the player positions and rooms is arbitrary (we actually apply some randomisation to ensure that participants aren't simply assigned to rooms in the order that they arrive).
The screenshots on this page show the new Experiment Builder interface. If you’re still using the classic interface, it will appear slightly different.
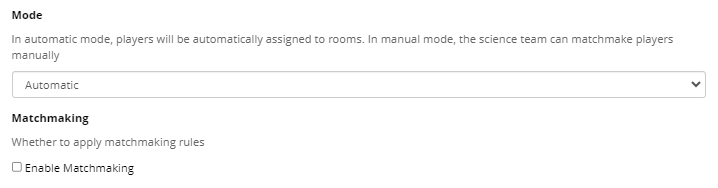
2) Automatic mode with preset criteria: If you wish to define rules for how participants are assigned to rooms, you can use the Matchmaking setting - this is a setting of the Automatic mode that ensures that Players are matched with other players according to specific criteria. For instance, you might want to create groups where a male participant is paired with a female participant, a conservative participant is matched with a liberal participant, or any other combination you wish to examine in your study.
In order to apply the matchmaking rules, select Automatic matchmaking mode in the Lobby node and tick the 'Enable Matchmaking' setting.

When you enable matchmaking, two new settings will appear: a Fixed Order setting and a Player Criteria setting. We'll explain the Player Criteria setting first.
The Player Criteria setting allows you to set up automatic matchmaking rules based on selected criteria. Participants who meet the criteria will join the same group of players and proceed to the multiplayer task together. The criteria operate by checking values saved in each participant's Store. During tasks or questionnaires, you can save information about participants to Fields in their individual Stores. You can then extract this information to use it later in the task, e.g. in the Player criteria settings. You can read more about using Store in our Store Guide.
As an example, you might wish to match players based on their political views. In your Experiment Tree, you can precede the multiplayer task with a questionnaire asking whether participants support a 'conservative' or 'liberal' party. You can save their answers to a Store Field called party. Then, in the Lobby node's matchmaking setting, you would add criteria for Player 1 to have the value 'conservative' in their Field 'party' and Player 2 to have the value 'liberal' in their Field 'party'. This way, the Lobby node will automatically match conservative and liberal players into one group and will repeat that matching for each group of players.
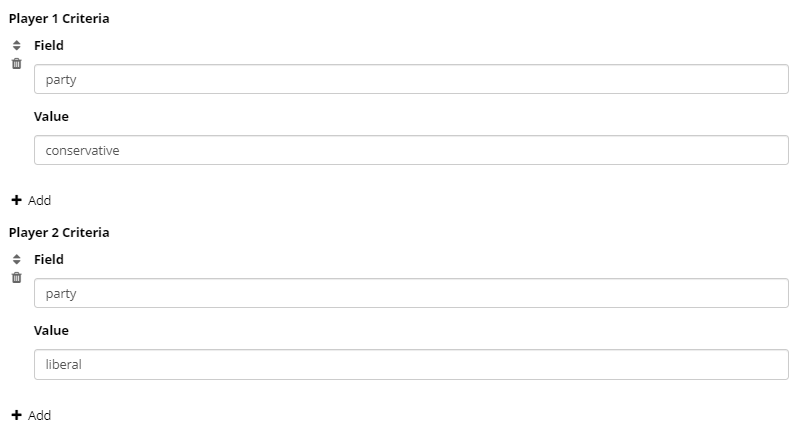
It's possible to create multiple criteria for each player by clicking the +Add button under each player's criteria. In order to be matched successfully, players will need to match all of the rules in their corresponding player criteria. Using the same example as above, we could add additional 'gender' criteria for each player, as shown below. In this case, Player 1 must have a value of 'conservative' in the party Store field and a value of female in the gender Store field.

The Fixed Order setting, when turned on, ensures that participants are always ordered according to the rules defined in the Player Criteria. In the example above, if Fixed Order was turned on, then Player 1 would always be conservative and Player 2 would always be liberal. If Fixed Order was turned off, then each room would always have one conservative player and one liberal player, but it would be random which one was Player 1 or Player 2.
You can choose to match players into rooms manually. This might be handy when, for example, you want to run a multiplayer study with a moderator who should play in a specific player position within the room.
You can matchmake players manually by selecting the Manual matchmaking mode in the Lobby node. In this case, when participants enter the Lobby node they will wait for you, the researcher, to match them with other players and form rooms which will then progress onto the rest of the experiment.
Manual assignment happens in the matchmaking room which can be accessed using the URL provided in the Lobby node:
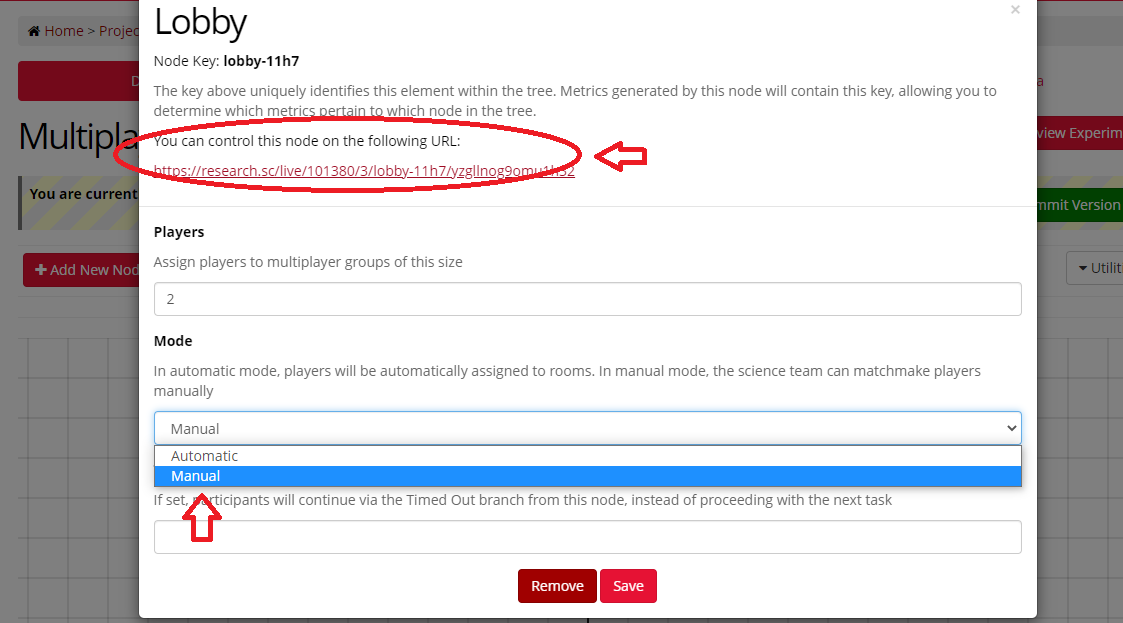
You can only test Manual assignment mode when you have participants in the Lobby. You therefore need to run the experiment, as opposed to previewing it, to see the manual Lobby node mode in action. During the preview, the URL leading to a matchmaking room will not appear.
Following the URL from the Lobby node, you will enter a matchmaking room, where you will see IDs of the players who are waiting in the Lobby. You can add the players to the current room by clicking on the 'Add' buttons next to their IDs. In the Manual assignment mode, player assignment happens in numerical order. This means that the first player manually added to the room will be assigned to the Player 1 position, the second - Player 2, the third - Player 3 etc.

Once you are happy with your matching, confirm it by clicking a 'Create' button. The player room you just created will automatically move onto the next node of your experiment. Repeat the process with other players until you form all the rooms.
When running your experiment, you can open the experiment tree and click on the Lobby node - this will show you a URL on the top of the node which you can click on and follow to bring up the matchmaking room.
See a step-by-step example of manually assigning players to specific player positions in the Player Control - Worked Example section of the guide.
When participants reach a Lobby node, they will wait there until they have been matched with enough other participants to create a complete room. Once they have been matched, they will all advance to the next node in the tree. Usually, this will be your multiplayer task, to ensure they all start it at the same time and don't need to wait for one another.
If you have only one Lobby node in your experiment tree, participant matching stays consistent, This means that participants remain in the same player rooms for any multiplayer tasks they encounter in the experiment.
However, if you wish to reshuffle your participants during the experiment, simply add another Lobby node(s) to your experiment tree - every time participants reach the Lobby node they will be removed from their existing player rooms, gathered all together, and then re-matched to the new player groups.
Live Gate nodes are invaluable in experiments that involve rematching players midway through the study. Live Gate nodes let you dynamically control the progress of participants within the experiment, so you could wait for several groups of players to progress throughout the first part of the experiment and let them wait in the Live Gate node until you have a desired number of groups to rematch the players. For this purpose, use one Live Gate node before each of the Lobby nodes that you use for rematching players.
Designing and running a multiplayer experiment introduces a number of unique challenges. Below are best practices to help you set up your study for success and provide a smooth experience for participants.
Our tips are divided into three sections:
Multiplayer functionality cannot simply be added to an existing experiment. It requires deliberate and thoughtful design from the start. Below are some key design elements to consider.
When using Randomiser or Allocator nodes, place your Lobby nodes after each group. Otherwise, participants may be matched with one another in the Lobby and then later allocated to different groups.
By placing the Lobby node after the Randomiser or Allocator, you ensure that participants will only be matched with other participants in the same condition.
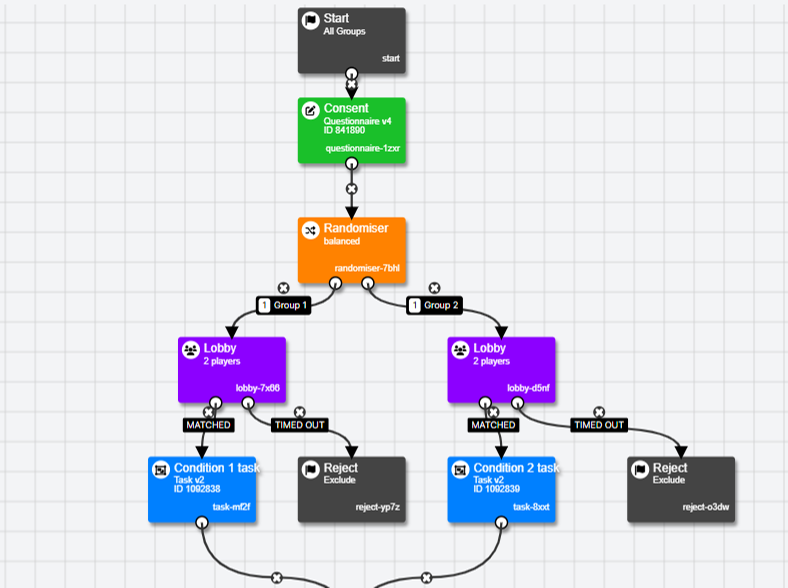
Using Randomiser or Allocator nodes within multiplayer experiments will impact participant matchmaking. The more groups you add to your Randomiser or Allocator node, the more groups your participant pool will be split into, reducing the likelihood of successful matching. Using a batching strategy can help mitigate this problem, as shown in the following example.
Worked example - without batching
Let's consider an example experiment where there are 6 groups within a Randomiser node and participants must be matched in groups of 2. If 12 participants enter the experiment at exactly the same time, in theory, this should allow for 6 pairs of matched participants. However, this is unlikely in practice. As an example scenario:
Even with 8 participants remaining in the experiment, it's unlikely Gorilla will be able to create more than 2 groups of matched participants. This is because participants are separated across Lobby nodes, unable to match with other players.
Furthermore, the Randomiser node does not account for participant attrition, so will continue to assign participants in a balanced manner without accounting for participants who have dropped out. Even if new participants enter the experiment, these participants will be arriving at the Lobby nodes at varying times, leaving some participants waiting extended periods of time for a match.
Worked example - with batching
Now let's consider the same experiment, but this time we are recruiting participants in batches and assigning all participants in the batch to the same group of the Randomiser node:
We now have 8 participants all arriving at the same Lobby node, resulting in a much higher likelihood that more participants can be successfully matched.
Therefore, to faciltate randomisation in multiplayer experiments, we recommend:
When and how you match participants into groups has a large impact on the success of the matching. Multiplayer studies are particularly sensitive to participant attrition, as dropouts can result in increased matching times for participants and unsuccessful matching.
Match participants as early as possible. The earlier you match your participants and complete the multiplayer task(s), the better. Any task or questionnaire before matching creates another point where participants may drop out from your experiment. Therefore, we recommend placing your Lobby node(s) and multiplayer task(s) as early as possible within the experiment and moving additional tasks such as demographic questionnaires to after the multiplayer task(s). This helps as many participants as possible reach the Lobby and multiplayer task(s) with minimal attrition, increasing the chances of successful matchmaking.
Consider your matchmaking criteria. Gorilla supports matchmaking with preset criteria in the Lobby node, which allows you to match participants based on prior responses or demographic information. However, the more specific the matchmaking criteria, the harder it becomes to find suitable matches in real-time. For example, you might ideally want to match players based on age, gender and language, but with stricter criteria, the pool of potential matches decreases significantly. This increases wait times and the risk of unmatched participants, especially in smaller studies or studies with slower recruitment. We therefore recommend keeping the matching criteria as relaxed as possible and only using matchmaking when essential to the experiment design.
Pre-match participants. In studies requiring very specific matching, you might consider running a separate, pre-screeening experiment first. This will allow you to collect the matching data first and externally match participants into pre-defined groups. You can then invite groups of participants to complete the main multiplayer experiment at the same time, ensuring they are placed in the same Lobby/group by using the Live Branch node.
When running your experiment, participants will be coming into your study at various rates. This is a challenge for multiplayer paradigms, where participants need to gather at a similar time to form a group of players and progress through the study at a steady pace. As a consequence, your participants might experience delays while waiting for other players to join and progress through the experiment, which decreases their satisfaction and risks them withdrawing. To mitigate this issue, we've created a Live Gate node that lets you dynamically control the progress of participants within the experiment.
For example, if you run a multiplayer task for four players, you can wait to have four participants in your Live Gate node before you manually let them start the multiplayer task together. You can monitor how many participants are waiting in the Live Gate node, and control the release of participants via the URL provided within the node (it's a good idea to refresh the Live Gate node frequently to see the most recent updates). You can use a Live Gate node anywhere in the experiment tree, but it is especially useful to place it just before the Lobby node to control the flow of participants into the Lobby where they are matched. Read more about matching participants in the Matching Players section of this guide.
Live Gate nodes are also invaluable in multiplayer experiments that involve rematching players midway through the study. You can wait for several groups of players to progress throughout the first part of the experiment and hold them in the Live Gate node until you have a desired number of groups to rematch the players. For this purpose, use one Live Gate node before each of the Lobby nodes that you use for rematching players. You can find more information in the Rematching Players section of this guide.
Multiplayer experiments place significantly greater demands on participants' internet connections than standard online experiments. As explained in our Technical Attrition guide, any online experiment requires a higher level of precision and connectivity than standard web pages. These requirements are heightened in multiplayer experiments, as a continuous, real-time connection between participants is required. If your study also includes video chat or audio/video recording, these requirements increase even further. Even brief interruptions in connection can cause matches to fail or connections between players to drop.
To reduce the risk of technical issues disrupting your multiplayer experiment, we recommend:
During a multiplayer task, Gorilla continuously monitors the connection between participants. If a participant loses connection, Gorilla will attempt to reconnect the group of participants multiple times. If reconnection fails after several attempts, the participants will be moved on to the next node of the experiment tree. This is to prevent participants being stuck in an endless loop of trying to re-establish a connection. This means that in some cases, participants may progress through your study even if they did not fully complete the multiplayer task, which can lead to tokens being consumed for partial task data.
To ensure you retain only complete data from participants who finished the entire task, you can save a value to a local field in the Store, which can then be evaluated within a Branch node. For example, on the final screen of you multiplayer task, you can add a Set Field on Start component to set a local field in the Store called 'complete' to the value 'true'. This means that only participants who reach the final screen of your task will have the value 'true' in this local Store field.
Following the multiplayer task, you will need to add a Branch node with two groups. For the first group, if the value in the 'complete' field in the Store is equal to 'true', you know that this participant completed the entire task and can continue with the remainder of the experiment. In the second group, if the value in the 'complete' field is not equal to 'true', you know that this participant did not complete the entire task, perhaps due to a loss of connection, and you can branch them to a Reject node. This ensures your tokens will only be consumed for participants who fuly completed the multiplayer task.
The Time Limit setting in the Lobby node is a very handy setting that can improve participant experience and save you time and tokens! When this setting is used, participants can move onto another node in the experiment via a Time Out branch, instead of being 'stuck' in the Lobby node indefinitely. You can branch them to a Questionnaire node where you can show them some information on their time out ('Sorry we couldn't match you with other players at this time!'), then to a Reject node where the token they have reserved will be returned to your account for future use.
There are multiple recruitment policies you can use to collect data for your study - see a full list in our Recruitment Policies guide. Some Third Party recruitment services, such as Prolific, Sona, MTurk etc., may have restrictions that could affect the running of your multiplayer study.
For instance, Prolific uses a 'rate limiter' to even up access to studies between participants, so that studies aren't taken only by the most frequent participants. Having the rate limiter in place can be tricky when recruiting for a multiplayer study, because it slows down recruitment and delays player group formation. This can lead to participants getting frustrated and dropping out. You might want to consider contacting Prolific Support and asking for the rate limiter to be temporarily disabled on your Prolific account.
We also recommend warning your participants that player matching might take some time, and asking them to wait for others to join before they can begin the study.
To get started with the Multiplayer tools, follow our Step-By-Step Guide to build the Ultimatum Game, a classic multiplayer behavioural study.
You can find multiplayer task and experiment examples on our Multiplayer Samples page.
Let's work through a scenario where you, the researcher, want to be one of the players in your 2-player Multiplayer experiment, and where you want to ensure that you are in control of the screen progression. Follow the steps below to set this up.
Firstly, create a new Task Builder 2 task and go to the Settings tab. In the Settings, select the Multiplayer tab and tick the Enable Multiplayer box. Specify the number of players this task is designed for - in our example we are creating a 2-player game.
In our example, we want to create a role that progresses the screen and then allocate this role to one player. To do that, create a new display with a new screen. On the screen, add an object with a screen advancing component, such as a Continue Button, and add a Multiplayer component to it. Set the Player setting on the Multiplayer Component to Player A.
Then, add the Advance - Multiplayer Player component to the Screen tab and, again, set the Player on this component to Player A. Read more about the Advance - Multiplayer Player component in the Controlling Flow part of the guide.
Now, we want to make sure you are Player A who has the role of controlling the continue button.
In the Spreadsheet tab, you will notice columns for Player A and Player B. The number of columns depends on the number of Players you specify in the Multiplayer tab in your Settings. We are creating a 2-player task, therefore two columns will appear in our spreadsheet: one for Player A and one for Player B. We need to fill these columns with numbers that correspond to player positions, that is '1' for Player 1 and '2' for Player 2.
Let's put 1s in the Player A column - this means that the person who is playing in a Player 1 position will be allocated a role of Player A, who is in control of screen progression. Now we will need to make sure you will play in a Player 1 position.
Now we will assign you to the Player 1 position.
Player assignment happens in the Lobby node in the Experiment tree. As a default, in Automatic mode, when participants enter the room, the Lobby node randomly allocates them to be Player 1, Player 2, Player 3 etc. To ensure that you are Player 1 and not a random player, use Manual mode instead.
A URL will appear on the top of the Lobby node settings window. Click on the URL to go to the matchmaking room.
This screenshot shows the new Experiment Builder interface. If you’re still using the classic interface, it will appear slightly different.
In Manual mode, player assignment happens in numerical order, therefore add yourself first - this will make you Player 1. Add the other player second - this will make them Player 2. Assign all the players to positions according to your protocol. Once you are happy with your player assignment, confirm it by clicking a 'Create' button.
Now when you run the study, Gorilla will recognise you as Player 1 and match this information with the '1' you have put in the Player A column of the multiplayer task spreadsheet. This way you will be playing a role of Player A who is in control of screen advancement. Gorilla will find '2' in the spreadsheet column for Player B, and will allocate a Player B role to Player 2.