You've set up your spreadsheet with the basic flow of your task and the content you want to show on each trial. Now you're ready to randomise that content.
Whether you want to shuffle the order of trials, or show buttons in random locations on each trial, Gorilla has a randomisation component that can achieve what you're looking for.
Follow the sections of this walkthrough to learn how!
This walkthrough focuses on randomisation that happens within a task. For more information on how to randomise at the experiment level, see our Randomisation and Attrition guide.
Read this page to learn how to randomise the order of all trials in your task.
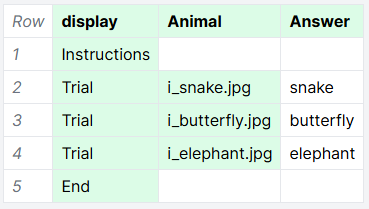
Let's start with the Naming Task from Spreadsheet Walkthrough: Changing Correct Answers.
The participant has to type the name of the animal they see. There are 3 trials, each showing a different animal: snake, butterfly, and elephant.
In this task, we show the participant:
Here's how that looks in the spreadsheet:
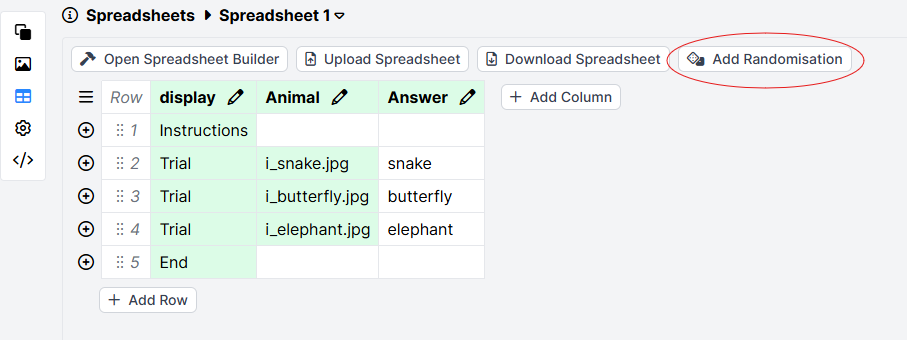
Right now, all participants will see the trials in the order they are listed in the spreadsheet.
Instead, we want each participant to see the task trials in a random order.
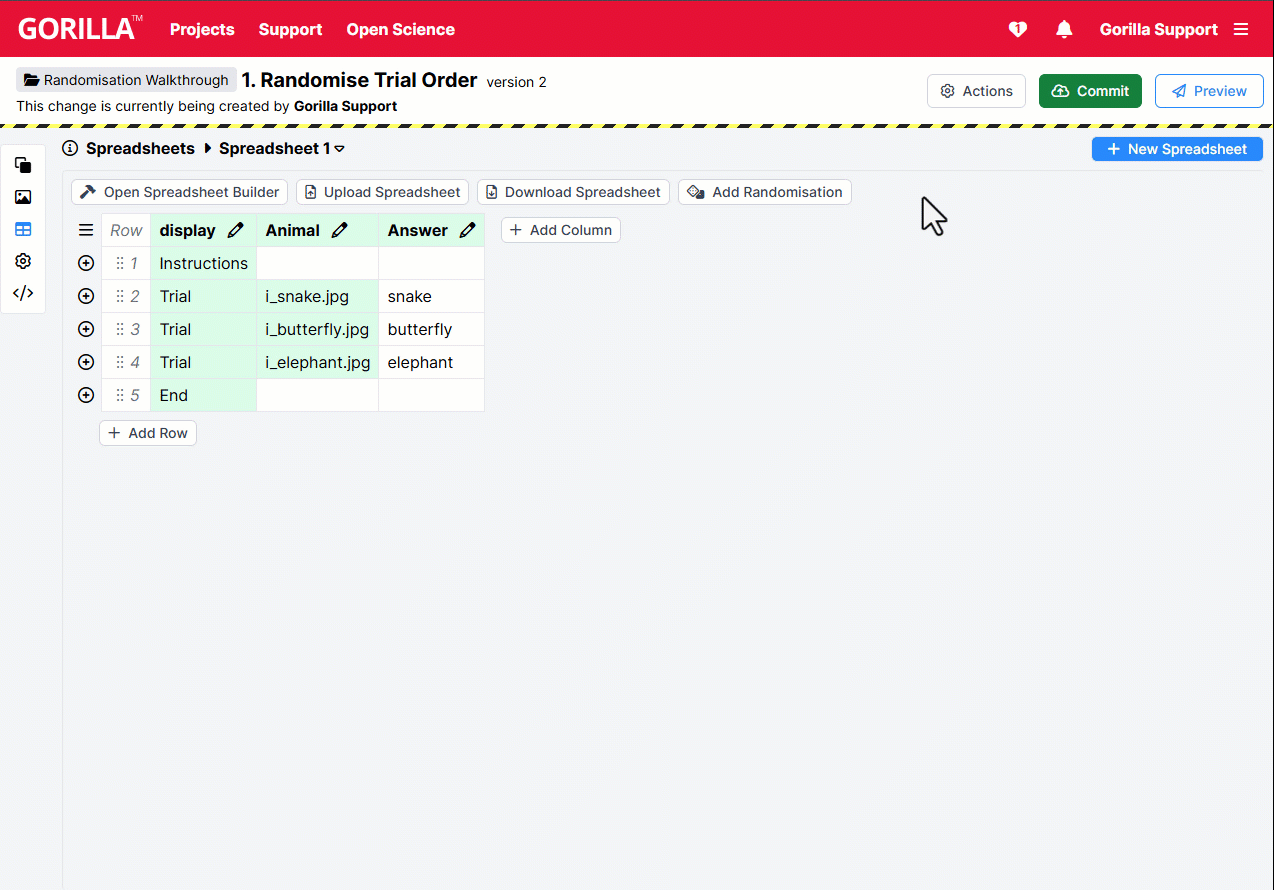
To randomise the order of trials, we start by going to the spreadsheet and clicking 'Add Randomisation':
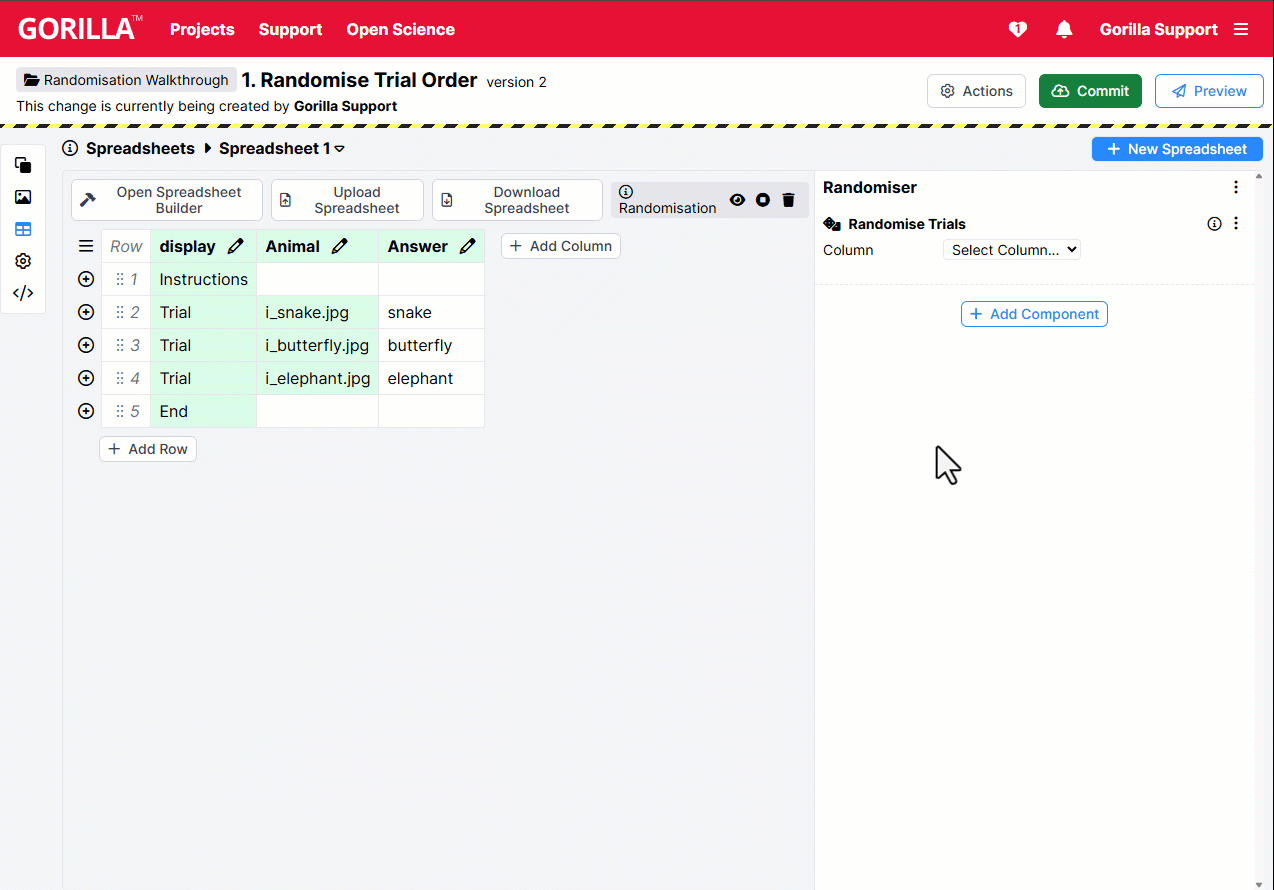
This opens the Randomiser panel on the right. You can then click 'Add Component' to add any kind of randomisation to your spreadsheet.
The component we need is Randomise Trials. This component works by:
Here, we want to shuffle the order of the trial rows - i.e., the rows that have Trial in the display column. So we select the 'display' column in the Randomise Trials component.
Once we do this, we can preview our randomisation by clicking the eye icon above the spreadsheet. Each time we click it, we see one possible way the trials might be randomised:
Take a closer look at this example and clone it into your own projects: Randomise Trial Order
Next: Randomise Trial Order by Type
Read this page to learn how to randomise the order of trials in your task, but keep the relative position of different trial types the same.
This time, we're going to use the simple lexical decision task from Spreadsheet Walkthrough: Changing Stimuli.
Participants see a word and have to decide if it's a real word in English or not. There are 9 trials, 6 showing real words and 3 showing non-words.
In this task, we show the participant:
Here's how that looks in the spreadsheet:
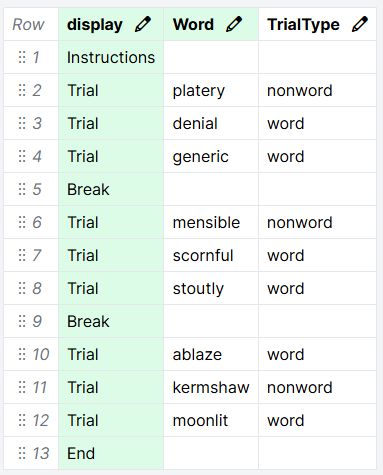
The TrialType column shows whether each trial contains a word or a non-word.
Right now, all participants will see the trials in the order they are listed in the spreadsheet.
For this task, we want to randomise the order of trials, but keep the order of trial types the same.
This means we need to preserve the order of trial types shown in the TrialType column, but randomise the specific word and nonword trials that appear in each slot.
Like in the Randomise Trial Order example, the component we need is Randomise Trials. This component works by:
Here, we want to shuffle all 'word' trials as a set, and all 'nonword' trials as a different set. The sets we want to randomise are defined by the TrialType column. So we select the TrialType column in our Randomise Trials component.
Once we do this, we can preview our randomisation by clicking the eye icon above the spreadsheet. Each time we click it, we see one possible way the trials might be randomised:

The order of trial types is preserved, but the specific word of that type shown on each trial is randomised.
Take a closer look at this example and clone it into your own projects: Randomise Trial Order by Type
Read this page to learn how to randomise the order in which whole blocks of trials are presented in your task.
This time, we're going to use the relational reasoning task from Spreadsheet Walkthrough: Changing Response Options.
Participants see a puzzle with one piece missing, and have to select the missing piece from an array of options. There are 6 trials, split into 2 blocks of 3.
In this task, we show the participant:
Here's how that looks in the spreadsheet:
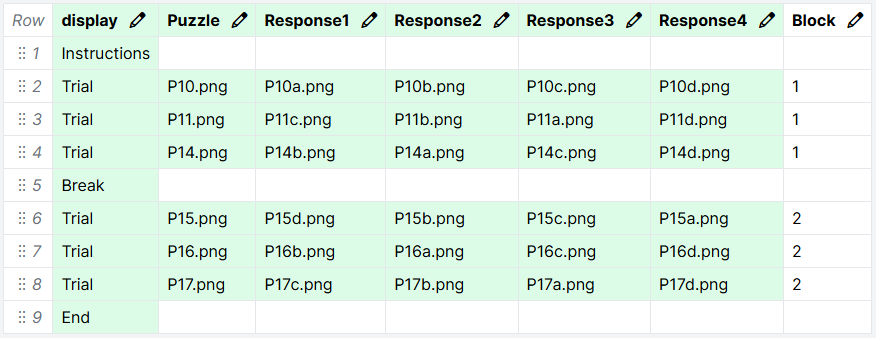
The Block column identifies which block each row is in. It contains a 1 in all rows that belong to the first block, and a 2 in all rows that belong to the second block.
Right now, all participants will see the trials in the order they are listed in the spreadsheet.
For this task, we want to randomise the order in which blocks of trials are shown.
We want some participants to see block 1 trials, then a break, then block 2 trials, and other participants to see block 2 trials, then a break, then block 1 trials.
The component we need is Randomise Blocks. This component works by:
Here, the blocks we want to randomise are defined in the Block column. So we select the Block column in our Randomise Blocks component.
Once we do this, we can preview our randomisation by clicking the eye icon above the spreadsheet. Each time we click it, we see one possible way the trials might be randomised:

The order of trials within each block is preserved, but the order of the blocks themselves is randomised.
If we also wanted to shuffle the order of trials in each block, we could do this by adding a Randomise Trials component and also selecting the Block column:

This works because the Block column contains matching values for the trials within each block, identifying each of them as a set for the Randomise Trials component to independently randomise.
Take a closer look at this example and clone it into your own projects: Randomise Block Order
Read this page to learn how to randomise the order in which response options are presented on the screen.
To demonstrate, we'll use a Wisconsin Card Sorting Task.
On each trial, the participant sees a card with a pattern. They have to pick the matching pattern from 4 options.
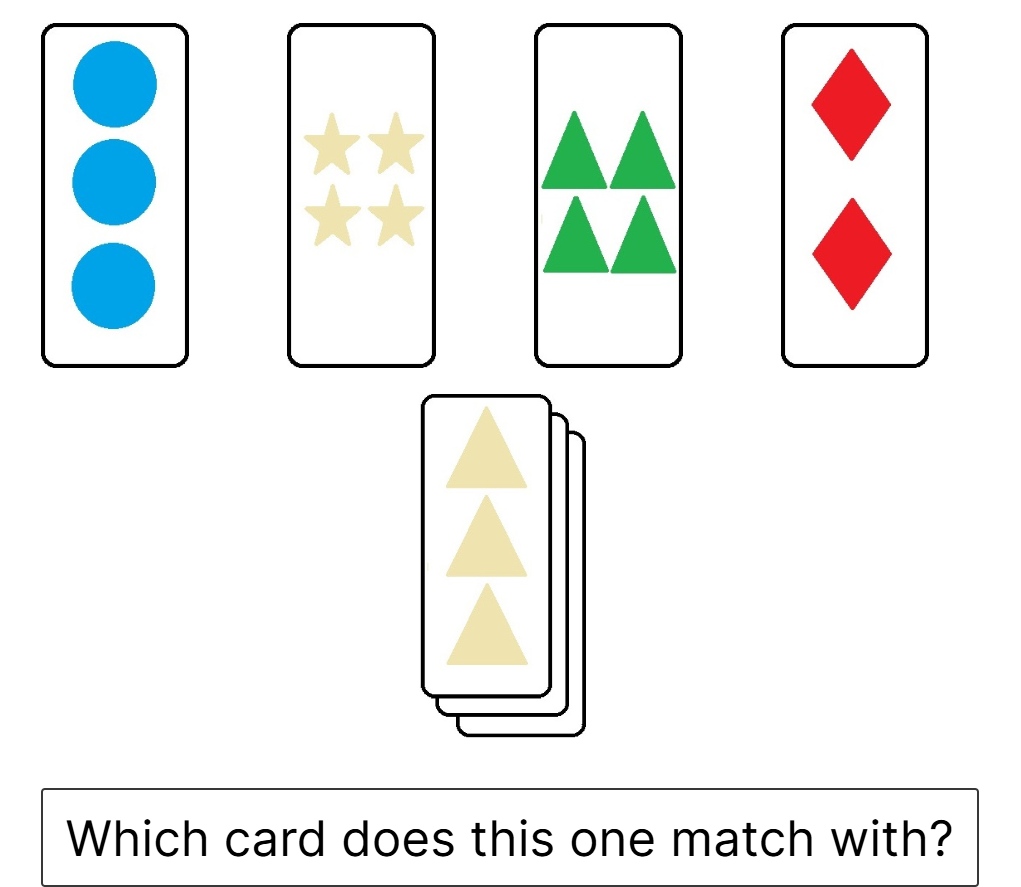
There are 12 trials, split into 3 blocks of 4.
In this task, we show the participant:
Here's how that looks in the spreadsheet:
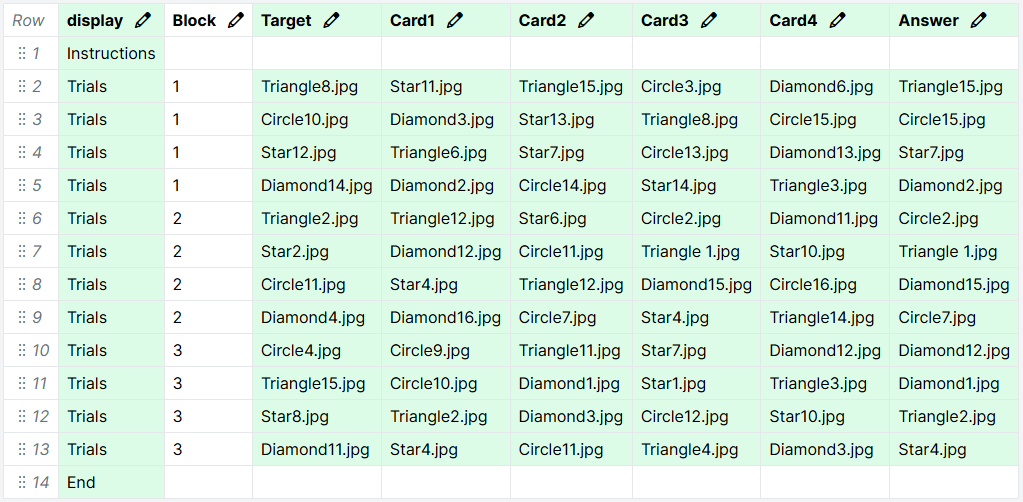
The Card1, Card2, Card3, and Card4 columns contain the image filenames of the 4 response options for each trial.
On the Trials display, the images and responses of the 4 Image objects are bound to these columns in left-to-right order:
This means the first card will show the image in the Card1 column, the second card will show the image in the Card2 column, the third card will show the image in the Card3 column, and the fourth card will show the image in the Card4 column.
Because the Response setting of the Click Response component is bound to the same spreadsheet column as the image, the response recorded when the participant clicks each card will match the filename of the image shown.
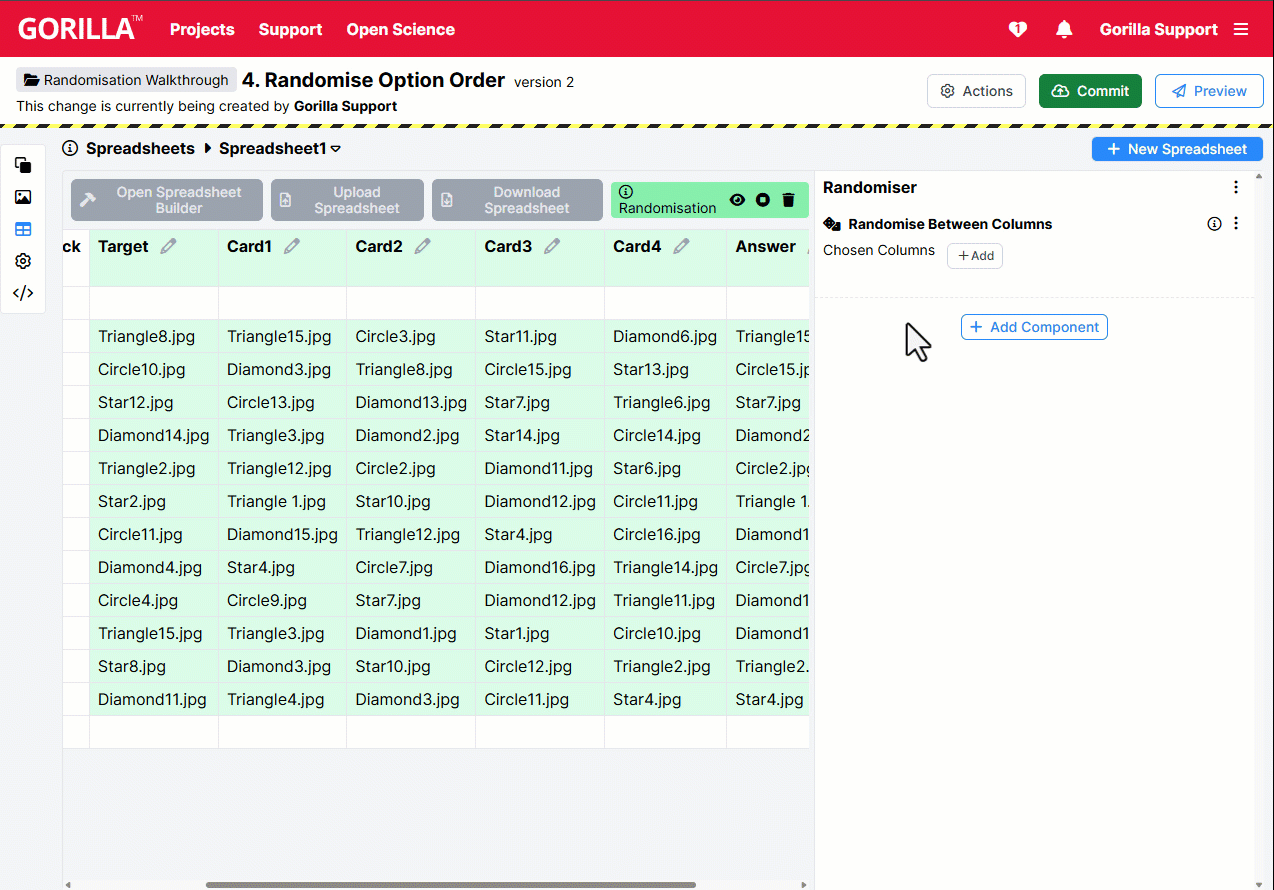
Right now, on all trials, all participants will see the Card1, Card2, Card3, and Card4 images for each trial in left-to-right order.
We want to randomise which response option is shown in which position on each trial.
The component we need is Randomise Between Columns. This component works by shuffling contents across the columns you select, while keeping the contents of each row together.
Here, the response options are in the Card1, Card2, Card3, and Card4 columns. So we select these columns in our Randomise Between Columns component.
Once we do this, we can preview our randomisation by clicking the eye icon above the spreadsheet. Each time we click it, we see one possible way the options might be randomised in each row.
(The first row is highlighted to show that options in the same row stay together, but are randomised between columns.)
This means the specific image in the Card1 column, and therefore shown in the left-hand position, will be randomised for each participant on each trial.
In the example task, this option order randomisation is combined with block order randomisation, showing how multiple randomisation components can work together.
Take a closer look at this example and clone it into your own projects: Randomise Option Order
Next: Randomise Feedback Per Trial
Read this page to learn how to randomise whether the participant sees feedback on each trial.
This time, we're going to use the Thatcher task from Spreadsheet Walkthrough: Adding Trial Metadata.
On each trial, the participant has to decide if the face image they're seeing is real or not real.
On half the trials, we want to show participants feedback on whether their response was correct or incorrect. On the other half of the trials, we don't want to show participants any feedback.
There are 12 trials. We want to show feedback on 6 trials, and not show feedback on 6 trials.
In this task, we show the participant:
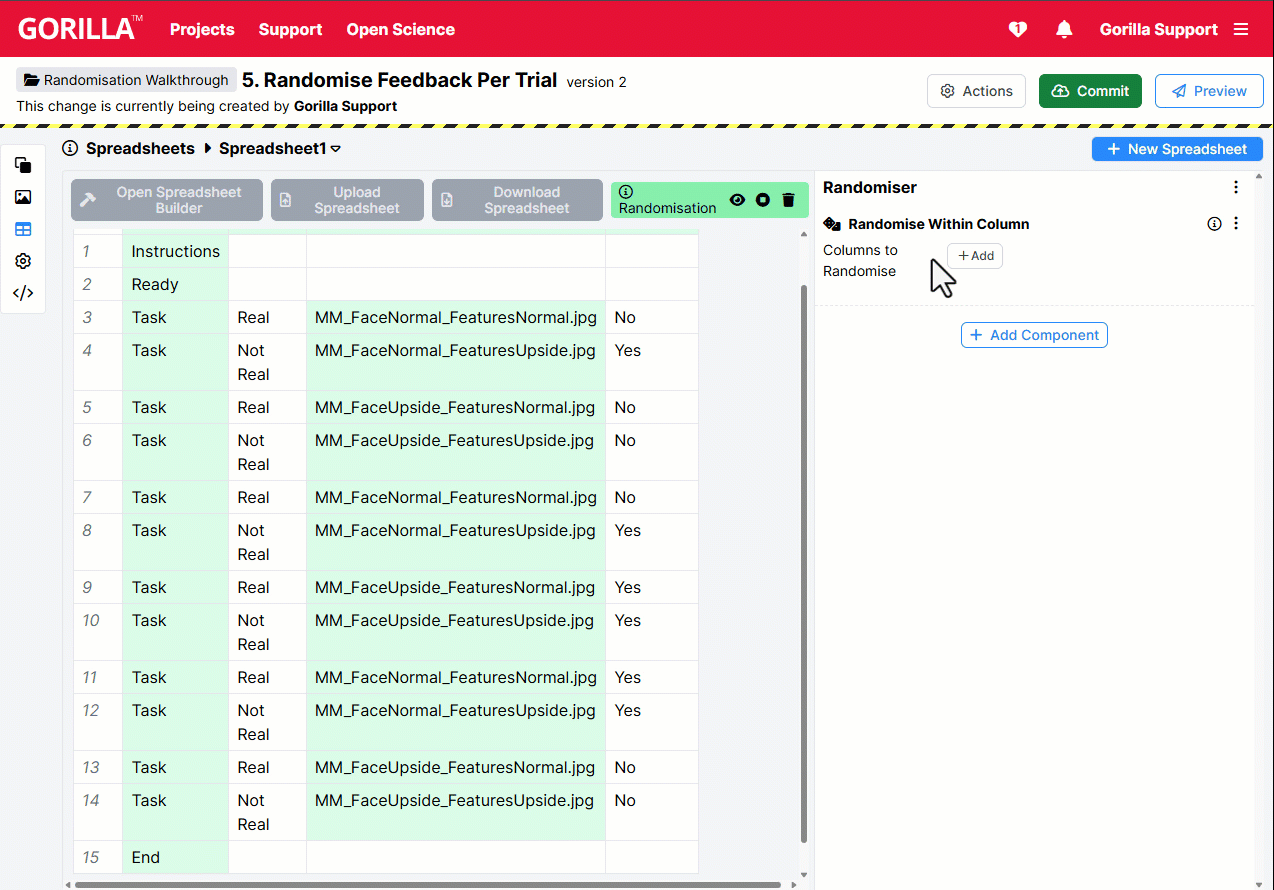
Here's how that looks in the spreadsheet:
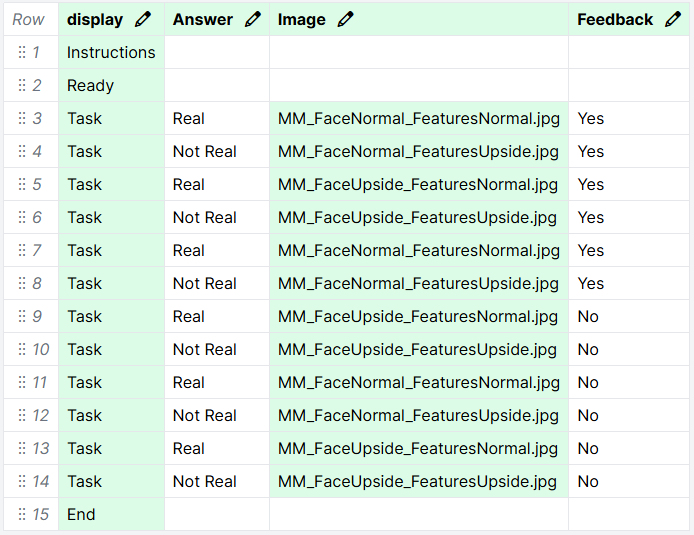
The Feedback column contains Yes in rows where we want the participant to see feedback, and No in rows where we do not want the participant to see feedback.
The Task display, which shows each trial, has 3 screens:
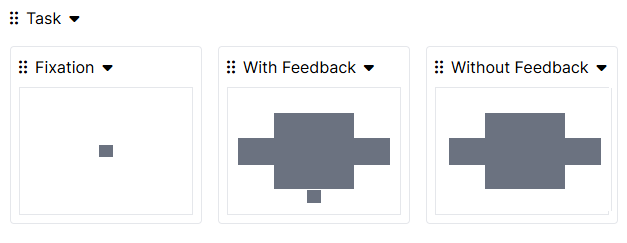
On each trial, the participant sees the Fixation screen, followed by either the With Feedback or Without Feedback screen.
Which one they see is determined by a Branch component on the Screen tab of the Fixation screen:
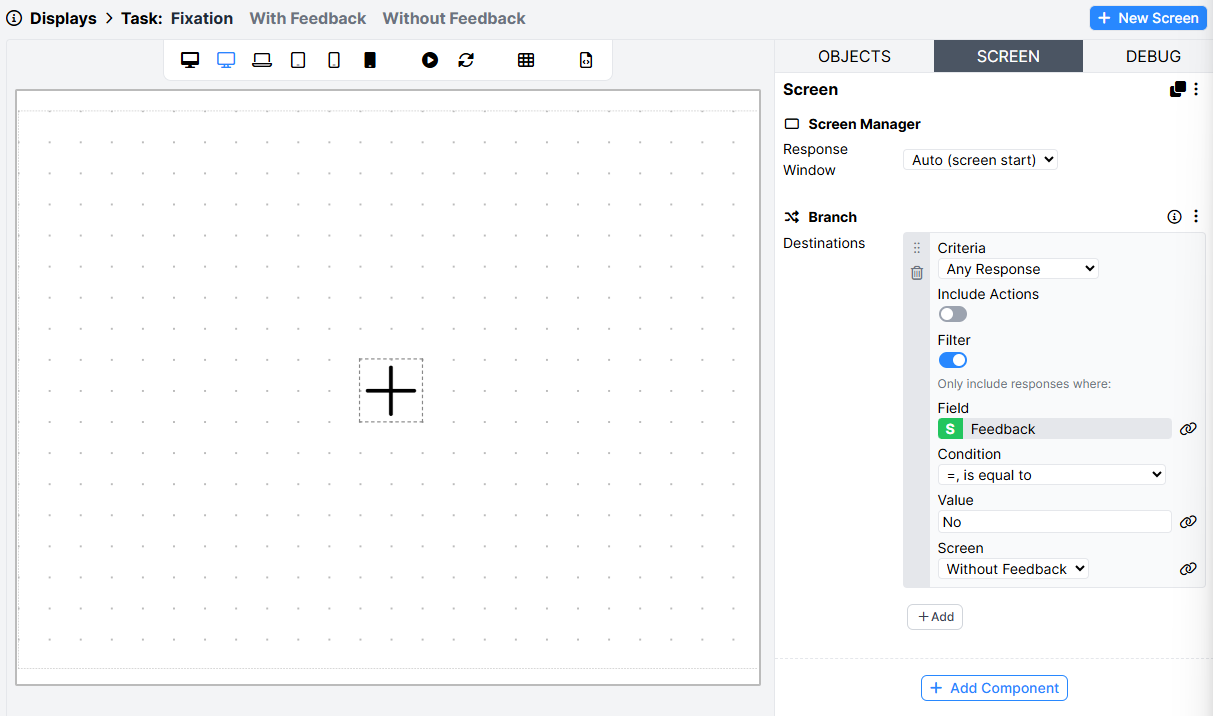
The Criteria is set to Any Response, meaning the end of the fixation display will trigger the branching decision. Filter is toggled on, and the Field is bound to the spreadsheet column Feedback. The Condition, Value, and Screen settings specify that in rows where the Feedback column contains 'No', the participant will be immediately sent to the Without Feedback screen (i.e. skipping the With Feedback screen).
The With Feedback screen has a Branch component that sends participants to the end of the display (i.e. skipping the Without Feedback screen).
Right now, based on the spreadsheet, all participants will get feedback on the first 6 trials, and will not get feedback on the last 6 trials.
We want to randomise whether each trial has 'Yes' or 'No' in the Feedback column, but keep the overall proportion of trials that have feedback constant across the task.
The component we need is Randomise Within Column. This component works by shuffling contents across rows within the column you select.
Here, the values we want to randomise across trials are in the Feedback column. So we select that column in our Randomise Within Column component.
Once we do this, we can preview our randomisation by clicking the eye icon above the spreadsheet. Each time we click it, we see one possible way the assignment of feedback to trials might be randomised.
This means that whether feedback is shown on each trial will be randomised for each participant, but that feedback will still be shown on exactly half the trials.
If we instead wanted feedback on each trial to be probabilistic - i.e. shown with a certain probability, rather than shuffling an exact number of pre-entered outcomes - we would use the Random Assignment Per Trial component. You can find more details on how to set this component up in our Advanced Spreadsheet Randomisations guide.
Take a closer look at this example and clone it into your own projects: Randomise Feedback Per Trial
Next: Show Randomly Selected Trials
Read this page to learn how to randomly pick a subset of the trials in the spreadsheet to show to a participant.
To demonstrate, we'll use a Navon Global Precedence Task.
On each trial, the participant sees a letter made up of smaller letters. The participant should click Yes if the image contains the letters H or O (large or small).

In this task, we show the participant:
For each participant, we want the 3 Yes trials to be drawn at random from a pool of 9 total Yes trials.
Here's how the initial spreadsheet for this task looks:
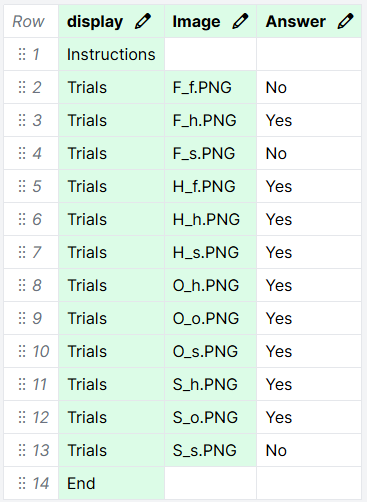
If we ran the task without randomisation, all trials in the spreadsheet would be shown to all participants.
Instead, we want to show each participant 3 randomly selected trials where the answer is Yes, and all 3 trials where the answer is No.
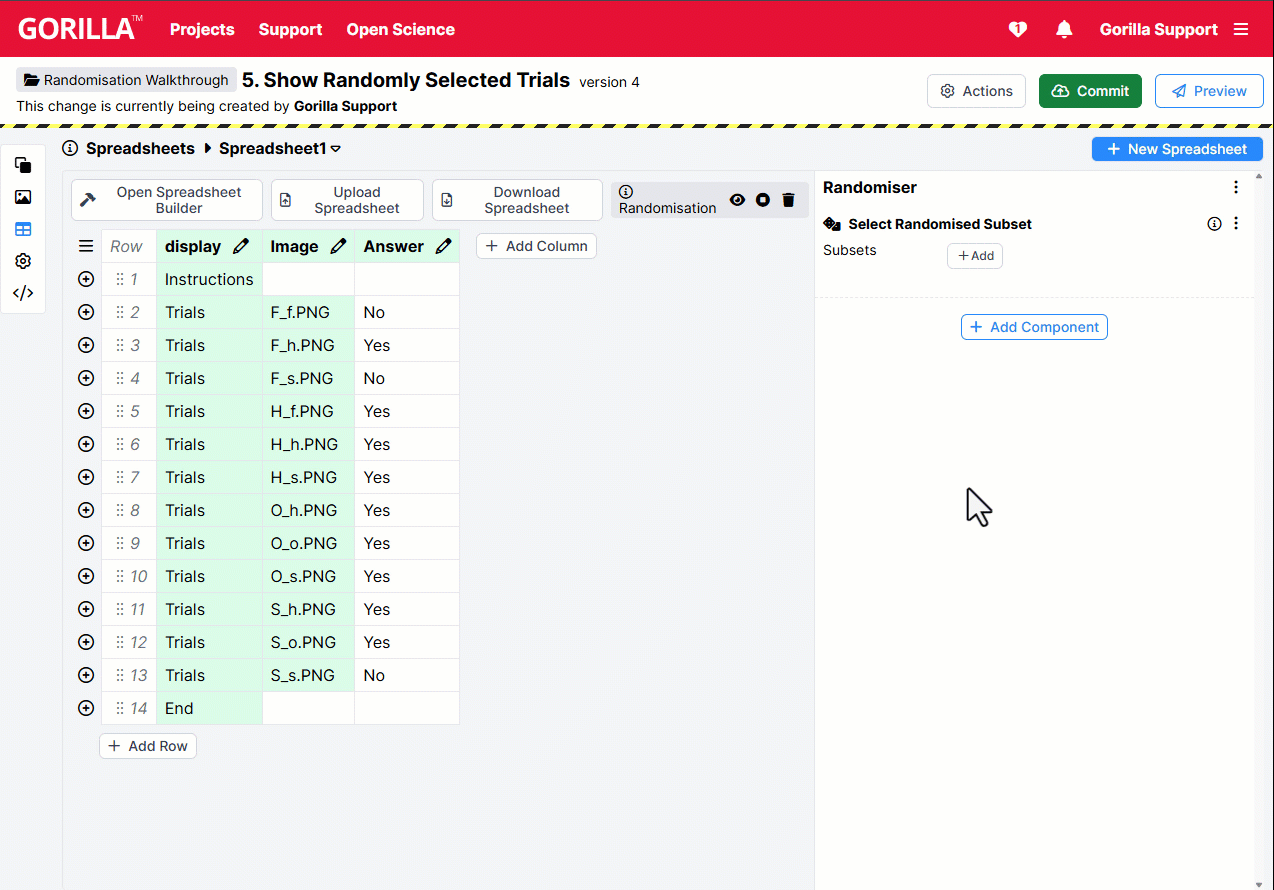
The component we need is Select Randomised Subset. This component works by randomly selecting a specified number of trials from the spreadsheet that match defined criteria, and only showing those selected trials to the participant. Effectively, it hides the remaining trials that match the criteria.
Here, we want to select 3 trials where the Answer column contains the value Yes. So we select 'Answer' under Column, enter 'Yes' in the Value box, and enter 3 in the Number box.
Once we do this, we can preview our randomisation by clicking the eye icon above the spreadsheet. Each time we click it, we see one possible set of trials that will be shown to a participant.
There are always 3 Yes trials, but the specific stimuli shown on these trials will vary between participants.
While the Select Randomised Subset component randomises the order of the subset, it does not randomise the order of all trials. The last step, then, is to add a Randomise Trials component and select the display column to randomise the order of all trials, as shown in Randomise Trial Order.
Take a closer look at this example and clone it into your own projects: Show Randomly Selected Trials
That's all for this walkthrough! For more examples of how to use the randomisation components, check out our guides to Simple Spreadsheet Randomisations and Advanced Spreadsheet Randomisations.