How-To Guide: Task Builder 1
- Task Structure Tab
- Spreadsheet Tab
- Stimuli Tab
- Manipulations Tab
- Putting Your Task Online
- Technical
- Formatting
- Advanced Techniques
- Troubleshooting
You're viewing the support pages for our Legacy Tooling and, as such, the information may be outdated. Now is a great time to check out our new and improved tooling, and make the move to Questionnaire Builder 2 and Task Builder 2! Our updated onboarding webinar is a good place to start.
Welcome to the Task Builder 1 'How To'
Here you can learn about the basic features of building Tasks in our older Task Builder 1 in Gorilla by exploring the list of topics in the menu.
Not sure where to start? Try one of these quick-start shortcuts:
- Task Structure Tab
- Spreadsheet Tab
- Stimuli Tab
- Manipulations Tab
- Script Tab
Looking for more information on a specific Task Builder Zone? - Check out the Task Builder's Tooling Reference Guide.
If you can't find an answer to your question here please get in touch with us via our contact form. We are always happy to help you, simply tell us a little about what you are trying to achieve and where you are getting stuck.
See how to create an entire Gorilla task, from scratch, in just 3 minutes.
Length (mins): 3:03
You're viewing the support pages for our Legacy Tooling and, as such, the information may be outdated. Now is a great time to check out our new and improved tooling, and make the move to Questionnaire Builder 2 and Task Builder 2! Our updated onboarding webinar is a good place to start.
What is a Task?
Tasks are used to build the components of your experiment where you collect psychological/cognitive data you are interested in.
In Gorilla Task Builder you create your tasks using blocks of trials that can include text, image, video, or audio stimuli. Participant's responses can be collected in a variety of ways (touch, mouse, keyboard). Our task builder automatically stores participant's Reaction Time Data.
For advanced users there are also options available for providing feedback to a participant, on both accuracy and reaction times, during a task.
See our Task Builder's Tooling Reference Guide to learn about all the Task Builder Zones available in Gorilla!
You're viewing the support pages for our Legacy Tooling and, as such, the information may be outdated. Now is a great time to check out our new and improved tooling, and make the move to Questionnaire Builder 2 and Task Builder 2! Our updated onboarding webinar is a good place to start.
How Do I Start a New Task?
A new Gorilla Task can be created within a Project by scrolling down to Tasks & Questionnaires, clicking 'Create new', selecting Legacy Tools and then clicking Task Builder 1.
In the create menu that appears, enter a name for your new Task and then press 'Create'.
You will then be redirected to the Task Structure Tab for your newly created Task.
When choosing a name for your Task, try to make it something unique and memorable - a name you would easily associate with the Task contents.
You will use this name to identify your Task in your project. It is also the name people will see if you collaborate or send your Task with someone, so its important that they would be able to recognise it easily too!
Add descriptions to your Task via the 'description' option in the Settings menu. This description will then be visible from the project overview screen. You can use this feature to add a short reminder of what your Task is about or leave a progress message to yourself or collaborators.
To learn how to navigate and start building, see the What is the Task Builder? page.
You're viewing the support pages for our Legacy Tooling and, as such, the information may be outdated. Now is a great time to check out our new and improved tooling, and make the move to Questionnaire Builder 2 and Task Builder 2! Our updated onboarding webinar is a good place to start.
What is the Task Builder?
The Task Builder allows you to assemble your task from both prepared and customisable components and to populate the content of each trial by specifying the content in a spreadsheet. You may recognise this principle from similar tools such as E-Prime. There is a very high degree of flexibility on the design of displays which you have complete control over!
Importantly, you do not have to touch a single line of code! The majority of classic reaction time experiments can be built in the Task Builder.
Learn more about building tasks with the Task Builder.
You're viewing the support pages for our Legacy Tooling and, as such, the information may be outdated. Now is a great time to check out our new and improved tooling, and make the move to Questionnaire Builder 2 and Task Builder 2! Our updated onboarding webinar is a good place to start.
How do I Build a New Task?
There are four components to the task builder: the task structure, the stimuli, the spreadsheet and the manipulations.
- The task 'structure' defines how your task will appear and how it can be interacted with. In each display you specify the placement of content such as stimuli and the control of user responses and feedback.
- The 'stimuli' are the media files (images, video, gifs etc.) which will be presented to your participants during the task.
- The 'spreadsheet' controls the flow of your task. It governs what stimuli and screens are displayed in each trial. The spreadsheet is also used to create randomised blocks.
- The 'manipulations' allow you to configure settings that can be changed from within the experiment tree to create a between subject experiment. For instance, this could be used to alter timing between condition, or whether or not feedback is received.
In order to edit any aspect of your task, you must be in edit mode. To do this, select the 'Edit task' button on the upper right hand side of your screen. If instead you see the buttons 'Cancel changes' and 'Commit version' then you are already in edit mode.
You're viewing the support pages for our Legacy Tooling and, as such, the information may be outdated. Now is a great time to check out our new and improved tooling, and make the move to Questionnaire Builder 2 and Task Builder 2! Our updated onboarding webinar is a good place to start.
How do I Structure my Task?
In the task structure tab, you design how your task will be presented to your participants. You will decide where stimuli will be placed on the screen and how the user can interact with them. There are four levels of specification within the task structure:
- Displays which contain one or more screens
- Screens which are configured to show stimuli, record responses, and show feedback
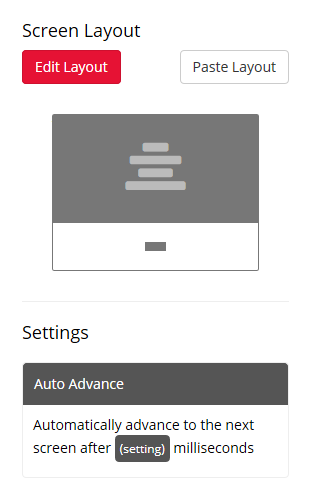
- Screen Layout which is used to adjust the placement of visual elements
- Settings which are used to configure advanced settings such as stimuli and feedback timing.
You're viewing the support pages for our Legacy Tooling and, as such, the information may be outdated. Now is a great time to check out our new and improved tooling, and make the move to Questionnaire Builder 2 and Task Builder 2! Our updated onboarding webinar is a good place to start.
What are Displays?
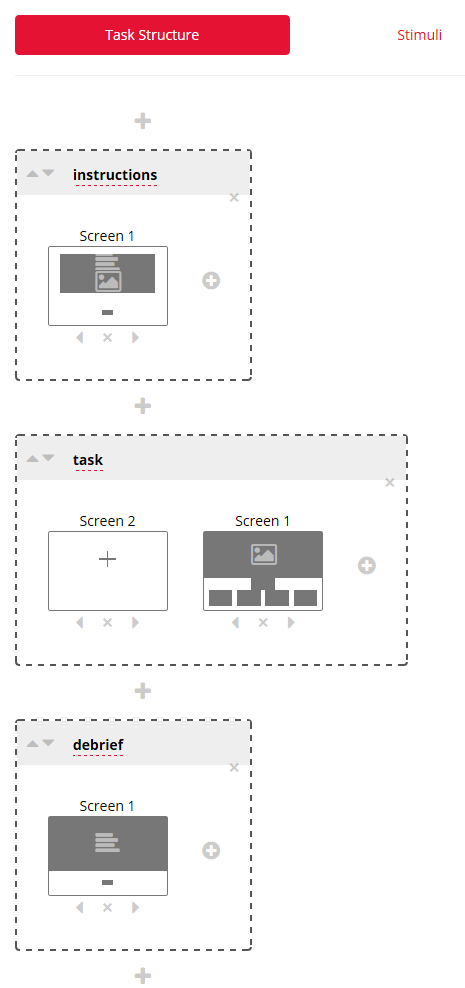
At the highest level, there are displays. Displays are made of at least one screen, more generally multiple screens. Each run of a display is triggered by a row in the spreadsheet.
In the example above, separate displays are used for the instructions, task and debrief. Both the instructions and debrief only consist of one screen. In contrast, the task is made of two screens, a fixation and the task screen itself. Multiple exposures to the task displays each with different stimuli is controlled by using the spreadsheet.
If your experiment consisted of multiple different trial types, for instance massed or spaced trials, then these could be set up as two different displays and triggered sequentially or interleaved from the spreadsheet.
You're viewing the support pages for our Legacy Tooling and, as such, the information may be outdated. Now is a great time to check out our new and improved tooling, and make the move to Questionnaire Builder 2 and Task Builder 2! Our updated onboarding webinar is a good place to start.
What are Screens?
A screen could consist of a fixation, text, stimuli, responses options or combinations of the former. The screen shown below contains a text title, an image, and a navigation button.
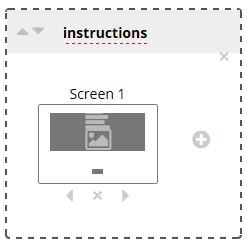
A screen can be added to your display by clicking on the circled 'plus' button within your display. This will open a modal titled 'Choose Template.' A range of common templates are included. The Rich Text template is useful for displaying instructions and debriefing information.
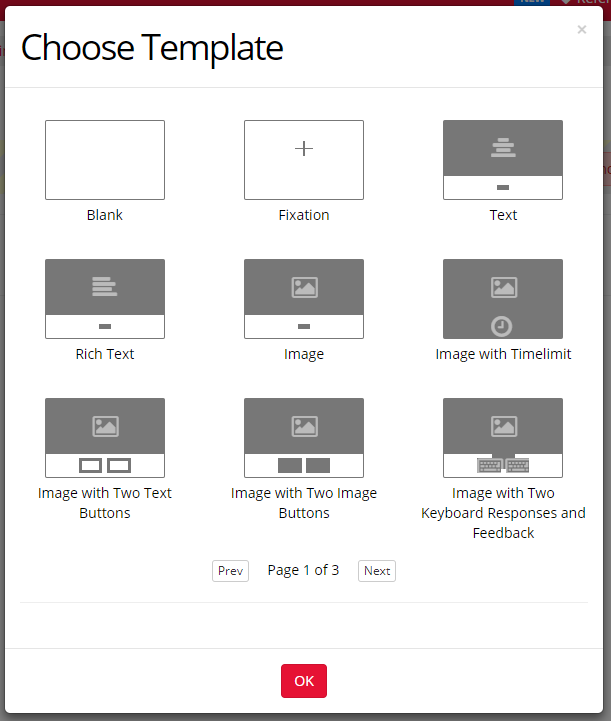
Each screen is initially based on a template, though this can later be customized by reconfiguring existing zones or changing the layout by moving or resizing existing zones or adding new zones. If you know you want a bespoke display, then you can select the 'Blank' template.
In edit mode, selecting a screen on the left-hand side of the task editor will open a more detailed screen configuration panel on the right-hand side shown below. In the screen layout area, the content and layout can be configured. Below this, in the screen settings area, additional settings can be configured.
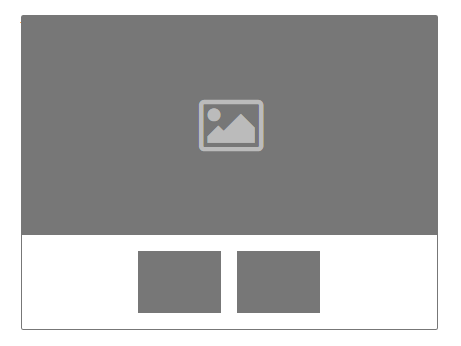
For instance, the template above consists of three zones: an image zone and two response zones, in this case two more image zones. Some zones have an icon representing the type of content that they support. In the example above the large image zone has an icon of an image.
This video shows you how to create your own reaction time Task Screens from scratch in the Gorilla Task Builder.
Length (mins): 2:16
Screen Events
This video shows you how to make it appear as though something has appeared on the screen and then disappears off the screen (using several screens in a row with slightly different things on them).
Length (mins): 1:32
You're viewing the support pages for our Legacy Tooling and, as such, the information may be outdated. Now is a great time to check out our new and improved tooling, and make the move to Questionnaire Builder 2 and Task Builder 2! Our updated onboarding webinar is a good place to start.
What are Zones?
Gorilla Task Zones are the building blocks of Task Screen creation. Task Zones represent predefined areas of a Screen that hold specific, customisable items, such as a presentation image or a response button.
There are currently over 50 different Task Builder Zones for you to choose from, allowing you to easily create sophisticated reaction-time Tasks by adding different types of Zone to your Task Screens. You can fully customise your Screens layout and configure individual Zone settings to create the exact designs you need, all without touching a line of code!
You can create any task you wish by simply combining Task Builder Zones in different layouts and with different configuration setups.
Learn how to add Task Builder Zones into your Tasks.
For all Zones you can:
- Change Zone Content: Click on a Zone while in Edit Mode to change its contents and set content source.
- Change Zone Type, Size & Position: Drag and drop a Zone while in 'Edit Layout mode' of a screen.
- Configure Zone Settings: Click and edit the setting in Configuration Settings area.
Task Builder Zones fall into 6 categories:
- Content Zones
- Response Zones ('active' and 'passive')
- Feedback Zones
- Control Zones
- Social Media Zones
- Advanced Zones
Task Builder Zones
Below are the available Task Zones you will find in Gorilla's Task Builder, click on an individual Zone to view the dedicated Tooling Reference Guide page:
Content Zones
| Text| Rich Text| Image| Web Audio| Video| Embedded YouTube| Embedded Vimeo|
Response Zones
| Continue Button | Response Button (Text)| Response Button (Image) | Response Slider|
| Dropdown| Response Text Paragraph| Response Rich Text Paragraph| Keyboard Response (Single)|
| Keyboard Response (Multi)| Keyboard Space To Continue| Rating Scale/ Likert (Passive)|
| Rating Scale/ Likert (Active)| Text Entry| Text Entry (Multi) | Text Entry Area|
Every Response Zone is in one of two groups: Active Responses, or Passive Response Zones. Active Responses provide additional settings such as the ability to mark answers as correct or incorrect, or store answers for scoring and branching.
Feedback Zones
| Progress Bar| Feedback Accuracy| Feedback Web Audio Accuracy| Feedback Speed |
Control Zones
| Fixation | Timelimit Screen | Timelimit Section | Go To | Jump To Row | Switch Button | Early Exit |
Social Media Zones
| Share On Facebook | Share On Twitter |
Advanced Zones
You'll see that some advanced zones have Beta or Closed-Beta labels. Zones with a Beta label are available for everyone to use but we advise you to do some extra testing and piloting when using these zones on non standard devices. Zones with a Closed Beta label are available on a per-account basis. If you see a Zone you are interested in get in touch with us through the support contact form and choose 'Beta Feature Access' in the dropdown menu. We can add the feature to your account free-of-charge.
| Change Blindness | Click Painting | Go / No Go | Go / No Go Web Audio | Keyboard Hold / Release |
Beta
Approach Avoidance | Audio Recording | Canvas Painting | Gabor Patch | Mouse Tracking | Mouse Response | Reading | Screen Calibration
Closed Beta
| Eye Tracking | MouseView | Video Recording | Video Feed
You're viewing the support pages for our Legacy Tooling and, as such, the information may be outdated. Now is a great time to check out our new and improved tooling, and make the move to Questionnaire Builder 2 and Task Builder 2! Our updated onboarding webinar is a good place to start.
How do I Add or Edit a Zone?
There are currently over 50 different Task Builder Zones for you to choose from, learn more about these here.
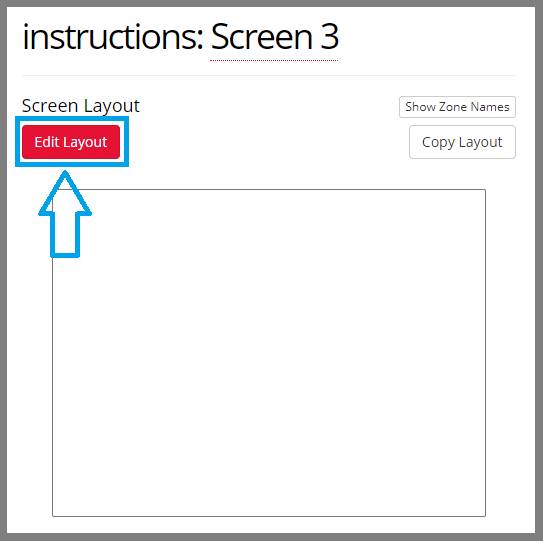
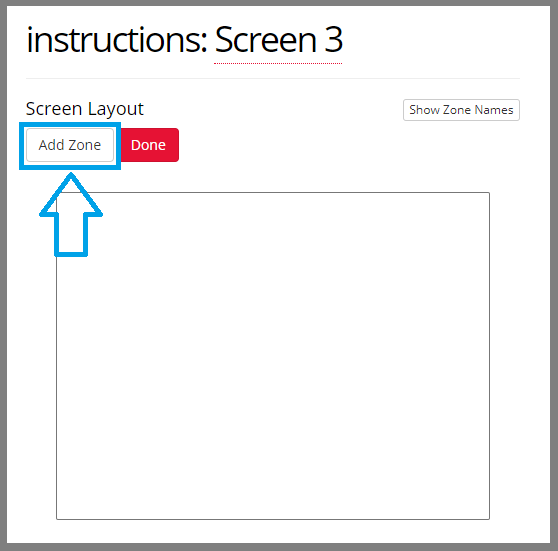
To add a Zone, click ‘Edit Layout’ then ‘Add Zone’. Name your Zone if you wish and select the Zone type from the menu, then click ‘OK’. By default, no Zone Type is selected. If you do not select a Zone Type, the Zone will not display when you click ‘Done’.
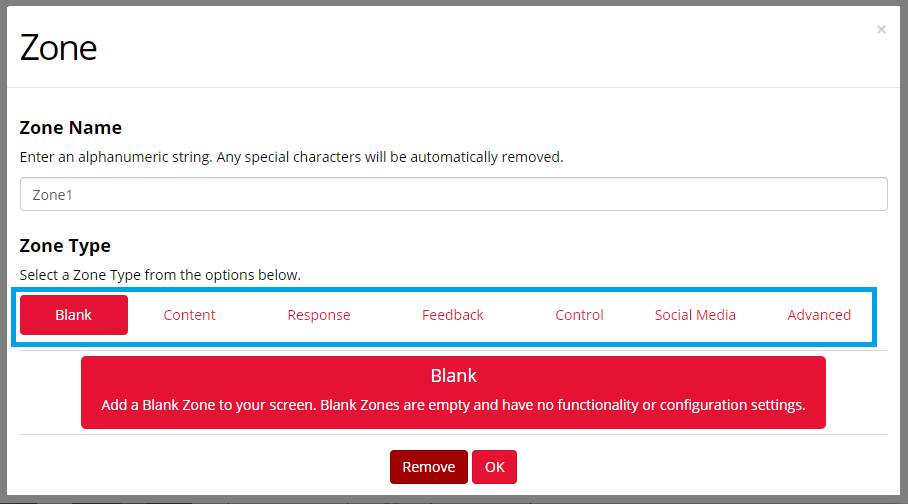
To rename a Zone, type the new name of the Zone in the text entry box below 'Zone Name'. (Changing the name of a zone is particularly useful when using the Script Tab within tasks.)
To move a Zone, click ‘Edit Layout’ then drag and drop the Zone into the desired position. Then click ‘Done’.
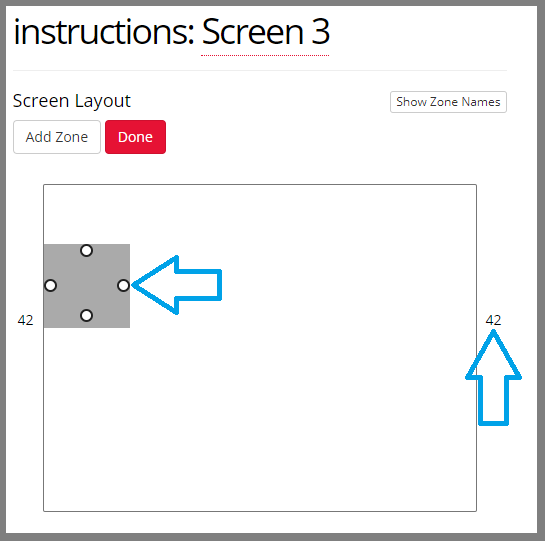
To resize a Zone, click ‘Edit Layout’ then drag the circles in the corner of the Zone until it reaches the desired size. You can use the numbers on the sides of the screen preview to gauge the size on-screen and align zones. Then click ‘Done’.
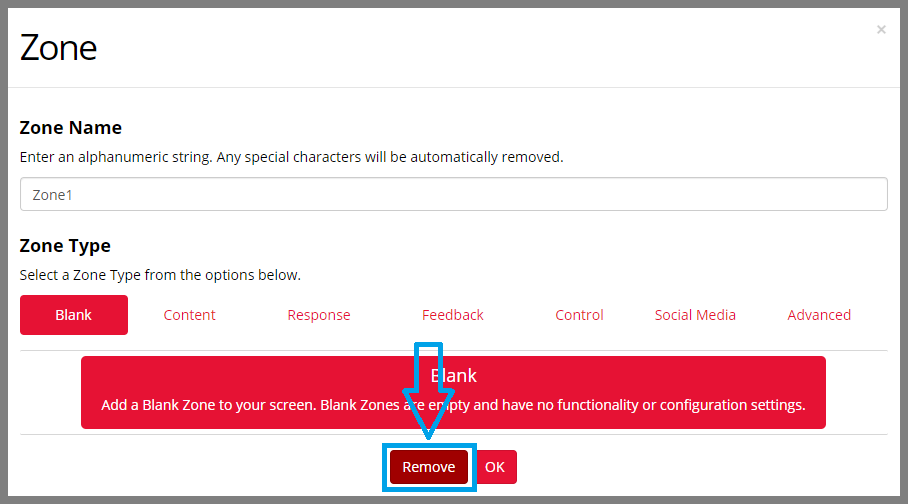
To remove a Zone, click ‘Edit Layout’, then click on the Zone you wish to Remove. The Zone menu will appear, including a pale red button that says ‘Remove’. Click the Remove button, then click ‘Done’.
To change the Zone Type, click ‘Edit Layout’, then click on the Zone you wish to change. Use the Menu labelled Zone to select your new Zone Type, then click ‘OK’ and then ‘Done’.
You're viewing the support pages for our Legacy Tooling and, as such, the information may be outdated. Now is a great time to check out our new and improved tooling, and make the move to Questionnaire Builder 2 and Task Builder 2! Our updated onboarding webinar is a good place to start.
What is Zone Source?
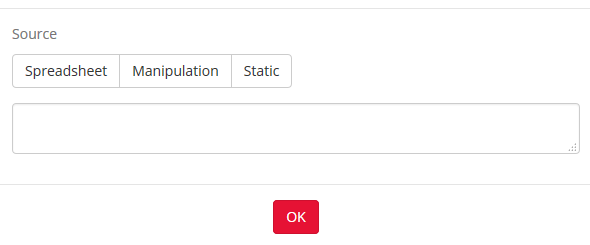
The content of zones can be sourced in four different ways:
- Static: For content that never changes - for instance, instructions.
- Spreadsheet: For content that changes trial by trial. Learn more about spreadsheets.
- Manipulation: For content that changes between participants and that you want to specify from within the experiment tree. Learn more about manipulations.
- Spreadsheet Manipulation: For content that changes between participants by being drawn from different spreadsheet columns, as specified in the experiment tree. Learn more about spreadsheet manipulations.

In the example below:
- The title is a Rich Text zone, with static content (orange) which is 'Rate this picture:'
- The text zone in the bottom right has content sourced from the spreadsheet (green) in a column labelled TrialNumber. Once the source as been set to spreadsheet and named (i.e. TrialNumber), the spreadsheet tab will be pre-populated with this column. You would then simply fill in this column with the numbers you want to display on each trial.
- The buttons are text response buttons, set as manipulation (blue). In this experiment, the buttons might be labelled 'happy' or 'sad'. Having them set as manipulation allows us to have two conditions in the experiment tree, one with 'happy' on the right and 'sad' on the left, and vice-versa. You would configure these conditions by clicking on each task node in the experiment tree and filling in the appropriate labels for LeftButton and RightButton for each version of the task.
- The image is an image zone, with content sourced from a spreadsheet manipulation (red) called StimSet. You might use this setup if you had multiple sets of images and wanted to show different image sets to different participants. Each image would be uploaded to the Stimuli tab, and the filenames of the images in each set would be contained in different columns of your spreadsheet. You would then click on each task node in the experiment tree and fill in the StimSet manipulation with the name of the column you want to draw the images from for each version of the task.

You're viewing the support pages for our Legacy Tooling and, as such, the information may be outdated. Now is a great time to check out our new and improved tooling, and make the move to Questionnaire Builder 2 and Task Builder 2! Our updated onboarding webinar is a good place to start.
How Does the Spreadsheet Work?
The spreadsheet governs the overall flow of your task. It will determine what displays are shown and in what order. If any zones are set to be populated from the spreadsheet, the spreadsheet will determine their content.
The best way to learn about Task Spreadsheets is via our Spreadsheet Walkthrough. This walkthrough provides a step-by-step guide through the different ways of using spreadsheets in Gorilla each with their own task example which you can clone and edit to try it out for yourself.
Each row of the spreadsheet triggers a display populated by a chosen set of data. We can show the same display multiple times with different stimuli by having multiple rows for that display, with different input data in the columns. The task will progress through each row in the spreadsheet one after the other until the task is complete. The columns will contain all of the data necessary to run that display.
The first three columns in a spreadsheet are: 'randomise_blocks', 'randomise-trials' and 'display':
- 'randomise_blocks' is used to group blocks together so that the blocks can be presented in a random order to each participate. Learn more about randomisation.
- 'randomise_trials' is used to identify rows that will be shuffled before presenting them to a participant. This allows the trials to be presented in a random order.
- 'display' determines which 'Display' from your tasks structure is going to be shown. In the example below, the first display we want to have show from our task structure is the 'instructions' display. The next seven are 'task' displays and the final is the 'debrief' display.
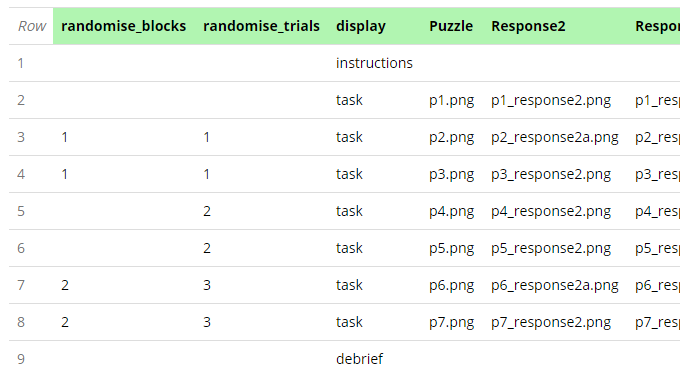
How to read the spreadsheet shown above:
- The spreadsheet above consists of 7 trials.
- An instructions screen is shown before the first trial
- The first trial doesn't not have a '1' in the randomise_trials or randomise-blocks column. Consequently, this trial will always be shown first.
- The next six trials are split across three blocks using the randomise_trials column. You can't see the metadata, but this corresponds with two trials at each of three levels of difficulty (easy, medium and hard). Consequently, at each level of difficulty, the trials will be shown in a random order.
- The 'randomise_blocks' column has a 1 next to the easy trials and a 2 next to the hard trials. These trials are block randomised. So, some will get the trials in the order easy, medium, hard. Whereas others will get hard, medium, easy.
- Once the final trial has been completed, a debrief screen will be shown.
The remaining columns determines what stimuli or data is shown on the screens within the display. For example, in the screen shown above we have indicated that an image zone called Puzzle will be populated from the spreadsheet column with the title Puzzle.
- In the task structure tab, declare the name of the columns you will need in your spreadsheet.
- This will populate the columns on the spreadsheet tab
- Download the spreadsheet. This will be pre-populated with the column headings.
- Complete the spreadsheet with trial and trial content information
- Upload the spreadsheet
We highly recommend reading through our Spreadsheet Walkthrough to fully learn the tips and tricks of using the Spreadsheet.
You can find more information in the Spreadsheet Walkthrough.
You're viewing the support pages for our Legacy Tooling and, as such, the information may be outdated. Now is a great time to check out our new and improved tooling, and make the move to Questionnaire Builder 2 and Task Builder 2! Our updated onboarding webinar is a good place to start.
More on Randomisation
Perhaps you want to show the trials within your block in a random order? In Gorilla this is simple: you can do this by editing the 'randomise_trials' column - just put a 1 next to trials that you want shuffled. If the rows in that column are left empty, gorilla will always run the rows in the order they are placed. If the rows in the 'randomise_trials' column have a number then gorilla will run one of the rows that share the same randomise trial number.
Rows with the same randomise trial number don't need to be adjacent on the spreadsheet. Say for example that you wanted to have two blocks, each randomised. One of them could be a block of easy tasks and the other a block of harder tasks. Rather than have the easy block followed by the hard block, you could alternate with an easy trial followed by a hard trial. As each row is still part of a randomised block, each 'easy' trial will stick be taken from one in the '1' block and each 'hard' trial will be taken from one in the '2' block. What other ways do you think you could use this to create unique and imaginative tasks?
You're viewing the support pages for our Legacy Tooling and, as such, the information may be outdated. Now is a great time to check out our new and improved tooling, and make the move to Questionnaire Builder 2 and Task Builder 2! Our updated onboarding webinar is a good place to start.
How do I Upload a Spreadsheet?
A Task Spreadsheet can be uploaded in XLSX, ODS and CSV formats.
You can upload your spreadsheet on your Task's Spreadsheet Page in a similar manner as you would Task Stimuli. You can upload a Spreadsheet in many formats however we recommend using only XLSX, ODS and CSV formats.
Here are the steps:
- First, while in your task, be sure to enter Edit mode.
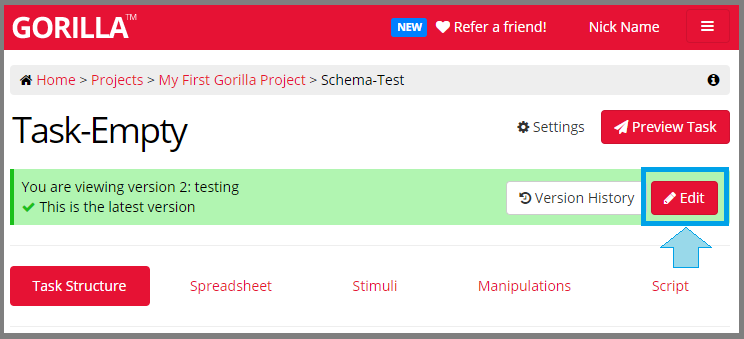
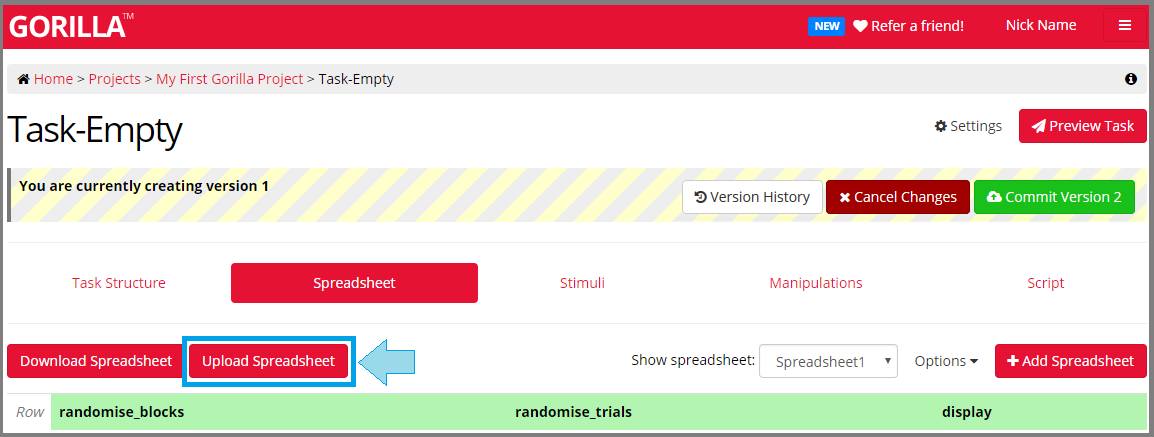
Now navigate to the Spreadsheet Tab for your Task.
Finally click the 'Upload Spreadsheet' button, navigate to your spreadsheet file on your computer and click 'OK'.
Your task spreadsheet should now be uploaded. Check to see it working by pressing the Preview Task button and select the spreadsheet you just uploaded.
Need to download a Task Spreadsheet? Find out how to download a spreadsheet. Want to learn more about creating Task Spreadsheets? Check out our Spreadsheet Walkthrough!
When adding the names of your stimuli files into your Spreadsheet, if your stimuli file names contain special characters or includes commas (,) as part of the name, you will need to upload your spreadsheet in a format other than CSV or else use a different separator/delimiter for your CSV. This is because the default separator for CSV files is 'comma'. Which results in the browser interpreting the comma's in your file name as separators!
You're viewing the support pages for our Legacy Tooling and, as such, the information may be outdated. Now is a great time to check out our new and improved tooling, and make the move to Questionnaire Builder 2 and Task Builder 2! Our updated onboarding webinar is a good place to start.
How do I Download a Spreadsheet?
A Task Spreadsheet can be downloaded from your Tasks Spreadsheet Tab in a similar manner as you uploaded your Spreadsheet. Whether you wish to download an existing (previously uploaded) spreadsheet, or else are creating your own task spreadsheet and wish to download the default example spreadsheet, the process is the same.
Here are the steps to download your Task Spreadsheet:
- First, while in your task, be sure to enter Edit mode.
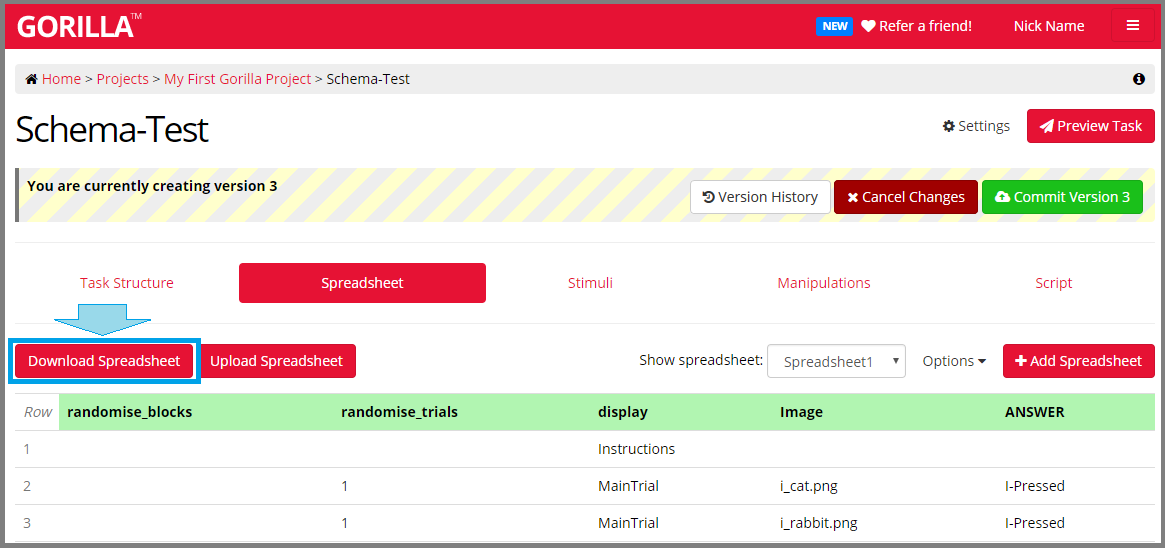
Now navigate to the Spreadsheet Tab for your Task.
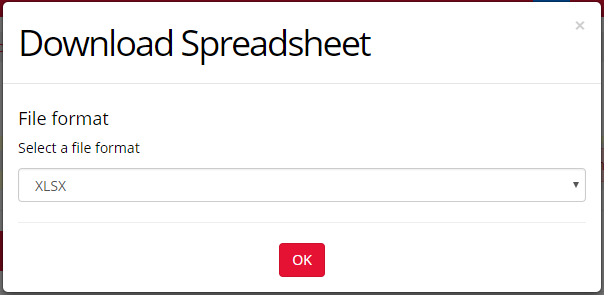
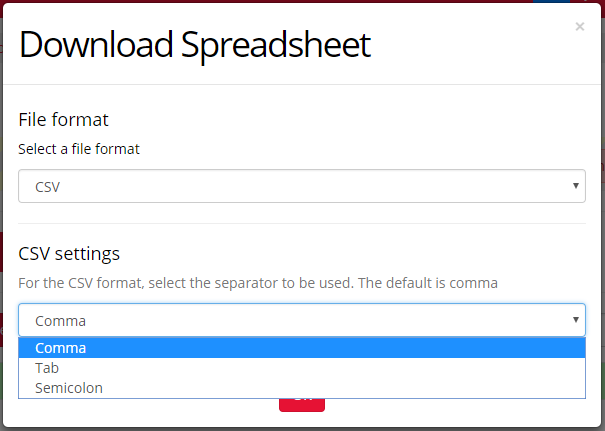
Click the 'Download Spreadsheet' button, to open the Download menu:
- Finally, from the download menu, select the file format that you wish your spreadsheet to be downloaded as. Press OK when you are happy with your selection.
Below is an image of the Spreadsheet Download menu. You can choose to download your spreadsheet as an XLSX, ODS or CSV file via the dropdown menu.
Below is an image example of CSV selection in the Download menu. If you choose to download your file as a CSV you can also choose which separator/delimiter type you wish to use:
Your task spreadsheet should now be downloaded!
Note: When you download a spreadsheet this will be regarded as a new file by your browser and computer. Depending on which browser you use and your computer's default download settings you may have to choose a folder location and file name when downloading your spreadsheet file.
If you are having trouble locating your recently downloaded spreadsheet first check your browser's download history. Then check your computers default downloads folder. If in doubt try re-downloading the spreadsheet file; Most major browsers (Chrome, Firefox, Edge) will give you the option to view the file immediately - you can then specify the location to save the file via your preferred spreadsheet programme's save function.
Examples
Downloading the Default Example Spreadsheet
You can download any Task spreadsheet that is currently uploaded to Gorilla, at any time. This includes the default spreadsheet. You can access the default spreadsheet when you enter the Spreadsheet tab of a new task for the first time.
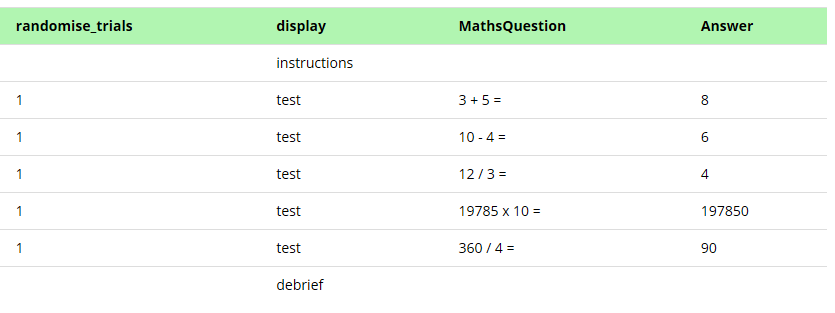
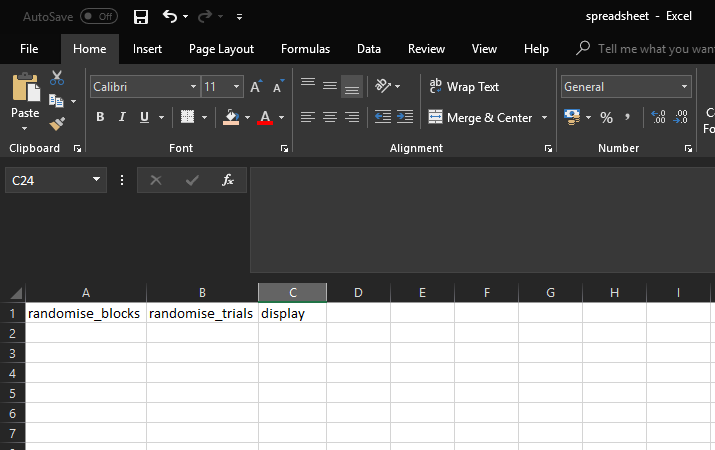
The default spreadsheet will contain the default standard column heading: randomise_blocks, randomise_trials and display. Here's an example of what the default spreadsheet looks like:
Downloading an Existing Spreadsheet
You can download any Task spreadsheet that is currently uploaded to Gorilla, at any time. If you have started creating your task in the task structure this default spreadsheet may also include additional column headings for any zone content whose source is 'Spreadsheet' (Spreadsheet).
For example, if you have included any response zones which have 'active response' configuration settings then you will also see the default column heading 'ANSWER'. Which is where you can enter the correct answer for each of your trials. Here's an example of downloading an existing spreadsheet:Image of CSV separator options in Spreadsheet Download Menu

If you've had a task shared with you, you can use the 'download spreadsheet' button to obtain your own copy of the task spreadsheet. You can then make your own changes to the spreadsheet and upload the spreadsheet to change how your copy of the task runs or what stimuli are displayed.
You're viewing the support pages for our Legacy Tooling and, as such, the information may be outdated. Now is a great time to check out our new and improved tooling, and make the move to Questionnaire Builder 2 and Task Builder 2! Our updated onboarding webinar is a good place to start.
Using Multiple Spreadsheets
Once you are familiar with the basics of building a task and creating spreadsheets you will likely want to start using multiple spreadsheets within your tasks!
You can add as many spreadsheets to your task as you wish, here are the steps to follow:
- Enter the Edit mode for your task by clicking the Edit button.
- Navigate to the Spreadsheet page of your task.
- Click the + Add Spreadsheet button.
- Enter a name for your spreadsheet.
- Press the Upload Spreadsheet button to upload your new spreadsheet.
You can view all your uploaded spreadsheets from your Tasks Spreadsheet Page: Press the Show Spreadsheet Dropdown menu to select the spreadsheet you would like to view.
You can also select which spreadsheet you would like to use when you preview your task: In the 'Manipulations' window - select the spreadsheet from the dropdown menu.
Organising your spreadsheets:
- You can rename a spreadsheet at any time by using the 'Options' menu.
- You can delete a spreadsheet at any time by using the 'Options' menu. Deleting spreadsheets is a permanent action.
- You can also update an existing spreadsheet - by uploading a new spreadsheet - this will replace the existing spreadsheet.
In all of the above cases the action will always take place on the spreadsheet listed in the 'Show Spreadsheet' Dropdown menu. The actions will only occur for spreadsheets in the current version of your Task. Spreadsheets in previously committed versions of your task will not be affected.
Why would I use multiple spreadsheets? Using multiple spreadsheets in the same task can allow you to easily create different versions of your task, quickly and simply without needing to spend time recreating the task structure or other aspects of a task you want to reuse.
It's also very useful for testing your task; split your task into manageable sections for your own testing purposes, save time by testing new task changes without having to run through all your task.
Check out an example of using multiple spreadsheets to implement different task versions in the context of a real experiment in this Gorilla Academy case study
Example 1: Using multiple spreadsheets to create multiple experimental tasks
Often you may wish to use the same task structure but with different stimuli sets or perhaps different response methods or stimuli presentation orders. All this can be done by uploading multiple spreadsheets in the same task.
You can then add multiple versions of your task to your experiment tree. Select which spreadsheet you want to use in each version by clicking the task node and selecting the desired spreadsheet from the Spreadsheet dropdown menu.
Alternatively, you can use a Counterbalance Node to assign participants to different spreadsheets while using only one task node, as shown in this example.
A common use case for multiple spreadsheets is with stimuli sets of increasing difficulty. You can see an example of this kind of performance branching using multiple spreadsheets in our example.
Example 2: Streamline your testing
Some of your tasks may have many trials, or multiple different sections. You may wish to make minor semantic or layout changes and will then want to preview and test these changes.
However sitting through all the trials in your task, time and time again, can become tiresome and a waste of your valuable time.
Using multiple spreadsheets for testing purposes can help to streamline your testing and reduce the time taken to review and make changes. Here are some tips and tricks we recommend to help streamline your own task testing:
Start by creating a 'layout-testing' spreadsheet in which you include at least one display of each type.
- This will allow you to view every display in your spreadsheet when you preview your task. This sort of testing spreadsheet is useful when you wish to make layout, grammatical or semantic changes and immediately see the visual effect for a participant.
- This spreadsheet is also great for testing the basic functionality of your different displays - without having to go through all your trials.
Another testing spreadsheet which can be helpful to upload would be 'trials-test'. Here you include at least 1 trials of each trial 'type'. For example if your experiment is testing the difference between classification speed of two types of stimuli you would include at least one trial from each stimuli group.
- When testing your task make sure you get at least one answer correct and one answer incorrect.
- This will allow you to test if any feedback and scoring is working correctly.
- Be sure to download the metrics and check the Response column
- This will allow you to test the answers are being scored as 'correct' and 'incorrect' appropriately.
Lastly, for tasks with many trials or with multiple different sections create separate 'short-test' spreadsheet for your task:
- For each different or unique 'section' create a separate spreadsheet with just these trials. This can also be useful for initial piloting - allowing you to test individual sections as you create them before combining them into your final task.
- For tasks with many different trials, often randomised into blocks or split into sections with breaks - produce a cut down version of your full task spreadsheet by selecting only a couple of blocks or sections for testing purposes.
You're viewing the support pages for our Legacy Tooling and, as such, the information may be outdated. Now is a great time to check out our new and improved tooling, and make the move to Questionnaire Builder 2 and Task Builder 2! Our updated onboarding webinar is a good place to start.
Stimuli
Stimuli are the media files you will present your participant as part of your task. They are typically images or sound files.
You're viewing the support pages for our Legacy Tooling and, as such, the information may be outdated. Now is a great time to check out our new and improved tooling, and make the move to Questionnaire Builder 2 and Task Builder 2! Our updated onboarding webinar is a good place to start.
What File Types are Supported?
- Image files: All images files are supported and can be displayed in Gorilla as long as they are supported in the browser you and your participants are using. We recommend using JPEGs.
- Although most of the image formats will be supported in all browsers, we recommend avoiding the following: BMP, ICO and TIFF.
- Sound files: We recommend MP3s as they are mostly likely to work across different browsers, operating systems and device.
- Video:
- If you need tight control over the display of the video:
- This can only be achieved by uploading the video file to Gorilla. In this case we recommend using MP4s as this is the most reliable across browsers. Nevertheless, we cannot guarantee that the video will work across all browsers. See the format compatibility table below to understand which formats will work in which browsers.
- If you don't need tight control over the display of the video:
- We recommend uploading the video to Vimeo or YouTube and embedding it. This is because different browsers, operating systems and devices required different video formats, and Vimeo or YouTube provides the video in multiple formats which takes care of this for you.
- See Mozilla's website for more about browser compatibility.
- If you need tight control over the display of the video:
Useful Links:
- Details about configuring the Image Zone
- Details about configuring the Web Audio Zone
- Details about configuring the Video Zone
- Details about configuring the Embedded YouTube Zone
- Details about configuring the Embedded Vimeo Zone
You're viewing the support pages for our Legacy Tooling and, as such, the information may be outdated. Now is a great time to check out our new and improved tooling, and make the move to Questionnaire Builder 2 and Task Builder 2! Our updated onboarding webinar is a good place to start.
How do I Add or Upload New Stimuli?
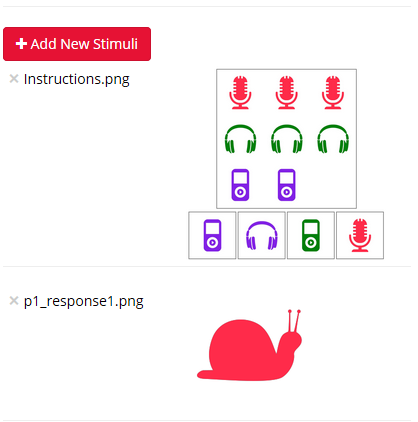
To add new stimuli, press the 'Add New Stimuli' button. Click 'Choose files' to then select files from your computer or attached device. You can upload stimuli from multiple locations by repeating this process. The stimuli will then be listed on the Stimuli screen.
You're viewing the support pages for our Legacy Tooling and, as such, the information may be outdated. Now is a great time to check out our new and improved tooling, and make the move to Questionnaire Builder 2 and Task Builder 2! Our updated onboarding webinar is a good place to start.
How do I Include Stimuli in a Task?
There are two ways to include stimuli in your task.
- Some stimuli you may always want to show on a screen. For instance, a trial example on an instruction screen for instance. These can be included as 'static' stimuli in an 'image zone' of your screen.
- If the stimuli on the screen will change as you progress through the task, then you would want to populate it from your spreadsheet. Select the 'spreadsheet' option and give the name of the column that will hold the stimuli for this zone. As Gorilla progresses through your task, it will change the stimuli in this zone based on the contents of that column in the spreadsheet.
You're viewing the support pages for our Legacy Tooling and, as such, the information may be outdated. Now is a great time to check out our new and improved tooling, and make the move to Questionnaire Builder 2 and Task Builder 2! Our updated onboarding webinar is a good place to start.
Manipulations
Manipulations allow you to change task wide settings which can then be varied between participants or experiment. They can also be useful when you are developing and piloting a task to see which settings work best!
How do I use manipulations?
Manipulations are set by using the 'Manipulation' option on either the zone settings screen or the screen settings screen.
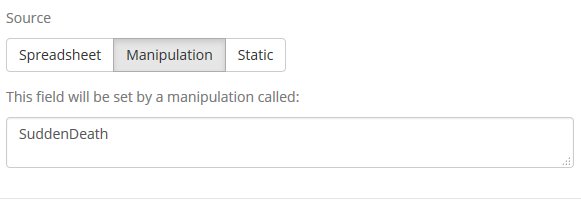
Much like when using the spreadsheet, the manipulation is given a name. Rather than appearing in the column of a spreadsheet, the manipulation will appear under the manipulations tab.
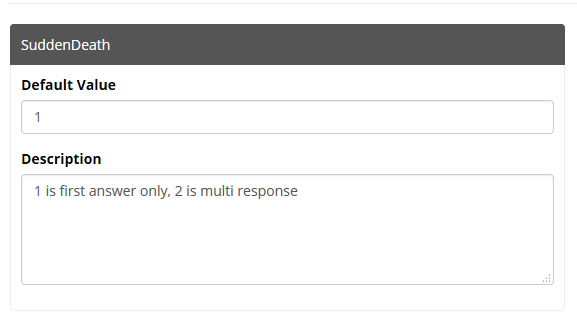
In the manipulations tab, you can set a default value of the manipulation and also give a description of what the manipulation does and the different values it could take.
When previewing or running your task, you are then given the option to set or change these manipulations. Imagine a 'between subjects' experiment where you have a randomiser in the experiment tree which allocates participants to one of two versions of a task.
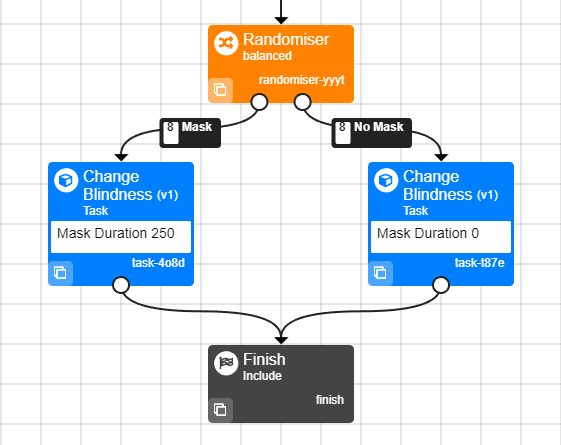
A manipulation can be used to create the two versions of the task.
Watch this video guide to Manipulations to see a practical example on how to implement manipulations into a task:
Spreadsheet Manipulations
Spreadsheet Manipulations allow you to control which spreadsheet column to use via a manipulation. This is useful when you want to present participants with different stimuli sets. You could randomise which stimuli sets participants will be presented to in your Experiment Tree.
Watch this video guide to Spreadsheet Manipulations for a practical example on how to implement spreadsheet manipulations in your Task and Experiment Tree:
You're viewing the support pages for our Legacy Tooling and, as such, the information may be outdated. Now is a great time to check out our new and improved tooling, and make the move to Questionnaire Builder 2 and Task Builder 2! Our updated onboarding webinar is a good place to start.
How do I Send my Task to Participants?
To send a Task to participants, you need to add it to an Experiment.
The Experiment Tree forms a framework around your Task that allows participants to enter the Task. From the Experiment Builder Recruitment Tab, you can control entry of participants into your Experiment. From the Participants tab, you can manage your list of participants, and from the Data tab, you can download the responses to your Task.
Check out the 'How do I use a Task as part of an Experiment?' section of this guide for more information about Experiments, and how to add your Task to an Experiment!
You're viewing the support pages for our Legacy Tooling and, as such, the information may be outdated. Now is a great time to check out our new and improved tooling, and make the move to Questionnaire Builder 2 and Task Builder 2! Our updated onboarding webinar is a good place to start.
How do I use a Task as Part of an Experiment?
To use a Task as part of an Experiment:
- In your Project select the Experiment you wish to add your Task in to.
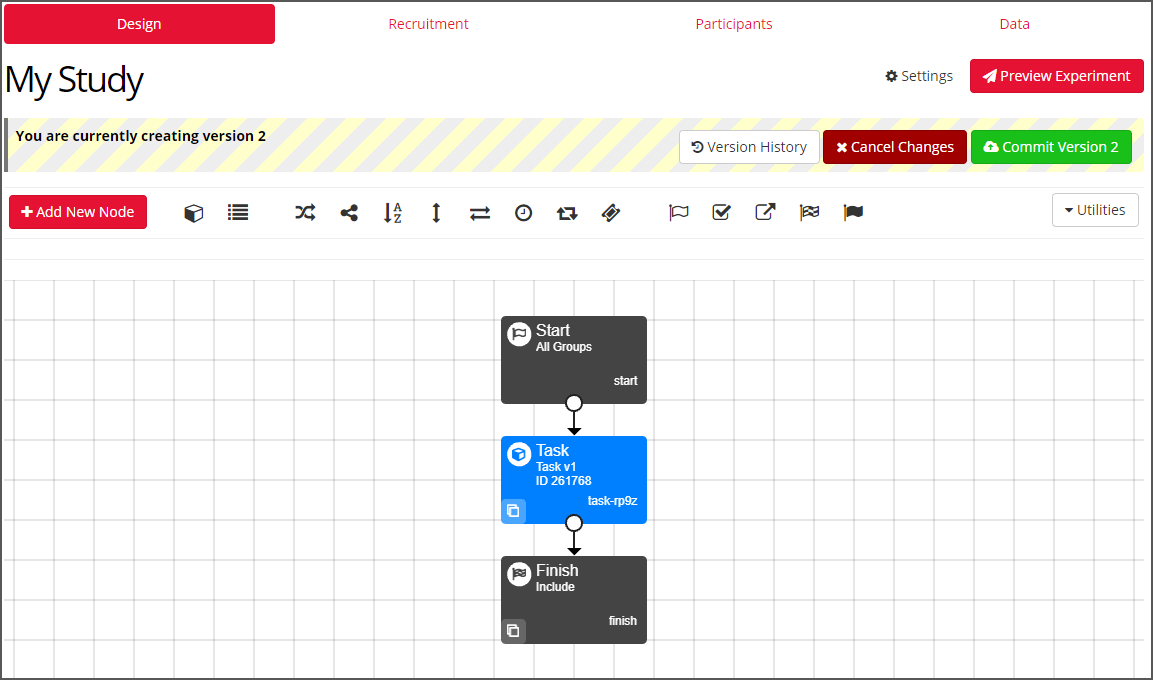
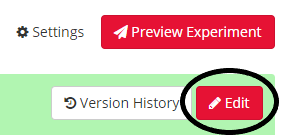
- Click the Edit button on the right of the green info bar at the top:
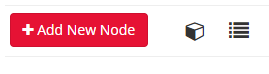
- Click the red Add New Node button on the top-left hand side:
- A Choose New Node menu will appear. Select Task.
- Select the Task you wish to add to your experiment.
- In the Experiment Tree, your Task will appear as an un-connected blue Node.
- Connect the Task Node into your Experiment Tree by linking the arrows to and from it.
For more detailed information on adding Nodes to your Experiment Tree read the How To: Experiment Builder guide. You can also find some more information building Experiments and using the Experiment Tree in the How To guide, as well.
As well as gathering data from your participants, a task can be used in conjunction with a Branch Node to influence the progression of other tasks or your experiment as a whole. For example, you could end an experiment early or make a following task harder or easier depending on a participant's responses.
In order to do this you must configure the embedded data settings for the relevant Zone. Find out more information in our Embedded Data Walkthrough.
You're viewing the support pages for our Legacy Tooling and, as such, the information may be outdated. Now is a great time to check out our new and improved tooling, and make the move to Questionnaire Builder 2 and Task Builder 2! Our updated onboarding webinar is a good place to start.
Timing in Gorilla
In online research, the main sources of inaccuracy in regards to timing come from peripheral devices, which affect both native applications (i.e. installed on a computer in the lab) and browser-based ones alike. In Gorilla, we use high resolution timers for accurate reaction times and frame counting for accurate stimuli presentation times - techniques that have only recently become available in all major browsers.
Explore our Timing in Gorilla page to learn all about timing in Gorilla and online research.
You're viewing the support pages for our Legacy Tooling and, as such, the information may be outdated. Now is a great time to check out our new and improved tooling, and make the move to Questionnaire Builder 2 and Task Builder 2! Our updated onboarding webinar is a good place to start.
Scaling in Gorilla
Visit our Scaling guide to read about image and text scaling in Gorilla.
You're viewing the support pages for our Legacy Tooling and, as such, the information may be outdated. Now is a great time to check out our new and improved tooling, and make the move to Questionnaire Builder 2 and Task Builder 2! Our updated onboarding webinar is a good place to start.
Markdown
Markdown is used throughout Gorilla in the Task Builder and Questionnaire Builder to add styling and to format text.
It is a very simple 'markup' language that can be used to format sections of text, providing a similar set of functionality to text editors such as Word. For example, you can create titles, embolden or italicise text or create numbered/bullet-pointed lists, among many other things.
The other key feature of Markdown is that you can include regular HTML code.
Below is a guide for common formatting in Markdown:
| Markdown Syntax: | What it looks like when displayed: |
| Creating Titles | |
|---|---|
|
# My Title |
My Title |
|
## My Subtitle |
My Subtitle |
|
### My Subtitle |
My Subtitle |
|
#### My Subtitle |
My Subtitle |
|
This is a my paragraph of text. |
This is a my paragraph of text. |
| Styling and formatting Text | |
|
You can also make text **bold** |
You can also make text bold |
|
and use *italics* |
and use italics |
| Inserting Line Breaks (Task Builder 2/Questionnaire Builder 2) | |
|
You can easily create separate paragraphs. <br/><br/>Just insert two <br/> tags between the lines! |
You can easily create separate paragraphs. Just insert two <br/> tags between the lines! |
| Inserting Line Breaks (Task Builder 1/Questionnaire Builder 1) | |
|
You can easily create separate paragraphs. Just press return and leave a clear new line! |
You can easily create separate paragraphs. Just press return and leave a clear new line! |
| Adding in Links to other web-pages | |
|
Adding in a [Link](https://gorilla.sc/support) is nice and neat! |
Adding in a Link is nice and neat! |
| Creating Lists | |
|
You can use bullet points:
|
You can use lists, which will be numbered automatically
|
|
You can use bullet points:
|
And lists, which will be numbered automatically:
|
| Using HTML within Markdown | |
|
You can use HTML within markdown and it will usually work pretty well: <img src='/support/images/gorilla_logo_red.png'> Just be sure to use single ' quotation marks within your html code. If you use double quotation marks in your html it may not always work! |
You can use HTML within markdown and it will usually work pretty well:
Just be sure to use single ' quotation marks within your html code. If you use double quotation marks in your html it may not always work! |
You're viewing the support pages for our Legacy Tooling and, as such, the information may be outdated. Now is a great time to check out our new and improved tooling, and make the move to Questionnaire Builder 2 and Task Builder 2! Our updated onboarding webinar is a good place to start.
HTML
HTML, like Markdown, can be used to format sections of text within your Questionnaires or Tasks. HTML, or HyperText Markup Language, is an 'extensive language' which is used by all websites to communicate how information on a web page should be displayed within a browser.
In Gorilla HTML can be used instead of markdown to add styling to text, such as to embolden, italicise, colour or text alignment. Create titles, numbered/bullet-pointed lists and tables. It can also be used to link to external pages or embed images or videos.
When writing HTML 'elements' we must always use what is known as an opening tag (e.g. <p>) and a closing tag (e.g. </p>).
Markdown is a simpler language for formatting text content. However, you may wish to use HTML if you are more familiar with it, or if you need more flexibility in formatting things in a way Markdown can’t, such as adding colour to text.
Below is a guide to basic formatting in HTML:
| HTML code elements: | What it looks like when displayed: | |||||||||
| Creating Titles and Text Blocks | ||||||||||
|---|---|---|---|---|---|---|---|---|---|---|
|
<h1>My Title</h1> |
My Title |
|||||||||
|
<h2>My Subtitle</h2> |
My Subtitle |
|||||||||
|
<h3>My Subtitle</h3> |
My Subtitle |
|||||||||
|
<h4>My Subtitle</h4> |
My Subtitle |
|||||||||
|
<p>My paragraph would go here if I were writing one</p> |
My paragraph would go here if I were writing one. |
|||||||||
| Styling and formatting Text | ||||||||||
|
<p>You can create <strong>bold</strong> text.</p> |
You can create bold text. |
|||||||||
|
<p>Using <em>Italics</em> text is fun!</p> |
Using italics is fun! |
|||||||||
|
<p>Sometimes you will want to <u>underline</u> you text.</p> |
Sometimes you will want to underline your text. |
|||||||||
|
<p style="color: blue;">You can change the colour of your text by naming colours</p> <p>Or specify the colour using
<p>Alternatively you can use <span style="color: #1b9513;">
|
You can change the colour of all your text by naming colours Or specify the colour using 'decimal code' (R,G,B). Alternatively you can use Hex Code to pick a colour. |
|||||||||
|
<p style="font-size: 150%;">You can change the font size by %</p> <p style="font-size: 16px;">Or specify the number of pixels (px) for your new font size.</p> |
You can change the font size by % Or specify the number of pixels (px) for your new font size. |
|||||||||
|
<p style="font-family: courier, sans-serif;">
|
You can also change the font style. Note: If you use a font that the participant’s browser/operating system does not support, the text will not appear. Its good practice to add in a backup after your first font style. Separate this back-up font from the first by using a comma. Sans-serif usually works. |
|||||||||
|
<p>You can combine different formatting e.g.
|
You can combine different formatting e.g. colour, font size and style by listing your formatting elements one after another, separated by semi-colons. | |||||||||
| Aligning Text | ||||||||||
|
<p style="text-align: left;">
|
This text is aligned to the left. |
|||||||||
|
<p style="text-align: center;"> This text is centre aligned.</p> |
This text is centre aligned. |
|||||||||
|
<p style="text-align: right;">
|
This text is aligned to the right. |
|||||||||
|
<p style="text-align: justify;"> This text is justified.
|
This text is justified. You may wish to use this when writing longer paragraphs. |
|||||||||
| Adding in Links to other web-pages | ||||||||||
|
<a href="https://gorilla.sc/support/">My Link</a> |
My Link | |||||||||
|
<a href="https://gorilla.sc/support/" target="_blank">
|
Open My Link in a New Tab | |||||||||
| Inserting Line Breaks | ||||||||||
|
<h4>This is how to insert a line break</h4>
|
This is how to insert a line breakbetween other html elements. |
|||||||||
|
<p>Sometimes you want to separate text with a horizontal rule</p>
|
Sometimes you need to separate text with a horizontal rule like this! |
|||||||||
| Creating Lists and Tables | ||||||||||
|
<ul>
|
|
|||||||||
|
<ol>
|
|
|||||||||
|
<h4>This is how to create a score table:</h4> <table class="table border border-gray-300"> <thead> <tr> <th>My Heading</th> <th>Score1</th> <th>Score2</th> </tr> </thead> <tbody> <tr> <th>My Row Label</th> <td>value 1</td> <td>value 2</td> </tr> <tr> <th>My Next Row Label</th> <td>value 3</td> <td>value 4</td> </tr> </tbody> </table> |
This is how to create a score table:
|
|||||||||
You're viewing the support pages for our Legacy Tooling and, as such, the information may be outdated. Now is a great time to check out our new and improved tooling, and make the move to Questionnaire Builder 2 and Task Builder 2! Our updated onboarding webinar is a good place to start.
Embedded Data Walkthrough
Embedded data is data collected about a participant's responses that can be used to alter the experiment (in real time) depending on their response. Essentially, embedded data is information you can ’carry’ from one part of your task or questionnaire to others within the same experiment.
Here are some examples of when to use embedded data:
- You may want to show participants their scores at the end of a task.
- You could end an experiment early if participants' scores do not match criteria needed for your experiment.
- You can make a following task easier or harder depending on participants' performance.
Learn how you can manipulate your experiment using Embedded Data through our Embedded Data Guide.
You're viewing the support pages for our Legacy Tooling and, as such, the information may be outdated. Now is a great time to check out our new and improved tooling, and make the move to Questionnaire Builder 2 and Task Builder 2! Our updated onboarding webinar is a good place to start.
Spreadsheet Walkthrough
The best way to learn about Task Spreadsheets is via our Spreadsheet Walkthrough. This walkthrough provides a step-by-step guide through the different ways of using spreadsheets in Gorilla each with their own task example which you can clone and edit to try it out for yourself.
You're viewing the support pages for our Legacy Tooling and, as such, the information may be outdated. Now is a great time to check out our new and improved tooling, and make the move to Questionnaire Builder 2 and Task Builder 2! Our updated onboarding webinar is a good place to start.
Branching Participants Based on Response
Wanting to adapt a task so it directs participants to different screens based on their performance/responses is a common requirement in behavioural experiments. In Gorilla, you can do it using our built-in Within Task Branching settings. You will find them in all the Active Response zones - for reference, see the 'Branching Settings' section on the Active Responses Tooling Reference Guide documentation page.
For worked examples and further guidance on within task branching, see our dedicated Troubleshooting Page.
You're viewing the support pages for our Legacy Tooling and, as such, the information may be outdated. Now is a great time to check out our new and improved tooling, and make the move to Questionnaire Builder 2 and Task Builder 2! Our updated onboarding webinar is a good place to start.
Language and Localisation
You can localise the content of your task to be in another language by manipulating the localisation settings in multiple task builder zones. See our Language and Localisation page.
You're viewing the support pages for our Legacy Tooling and, as such, the information may be outdated. Now is a great time to check out our new and improved tooling, and make the move to Questionnaire Builder 2 and Task Builder 2! Our updated onboarding webinar is a good place to start.
Scripting in the Task Builder
The Script Tab in the Task Builder allows you to add custom script (code) to your GUI built Gorilla Task.
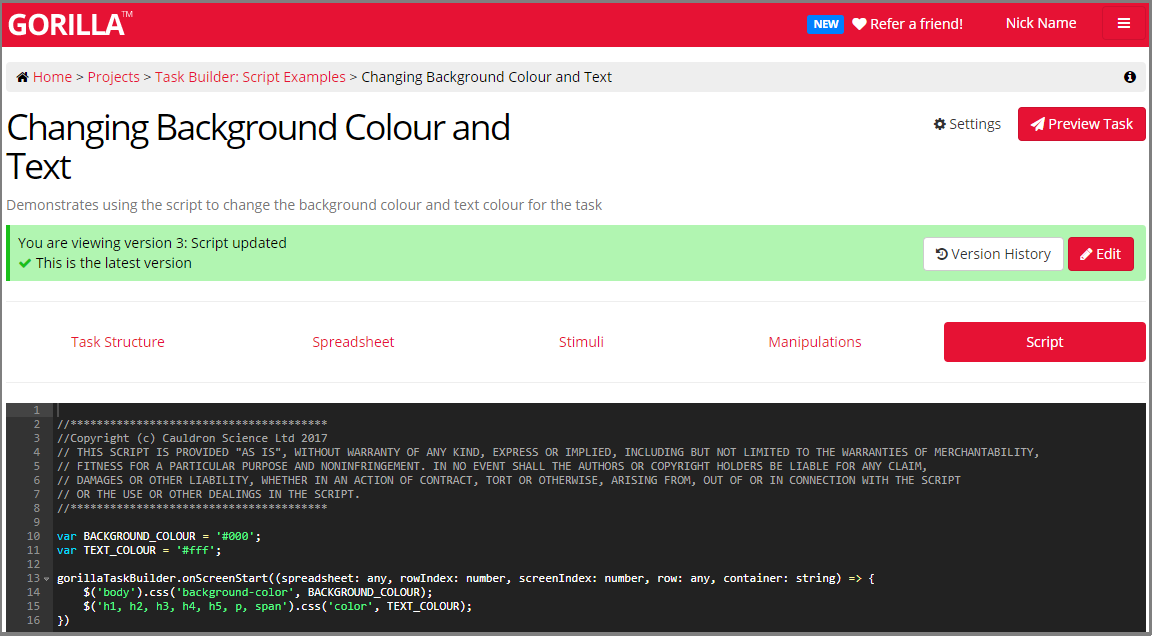
The Task builder Script tab is a powerful feature of the GUI Task Builder which allows you to add new functionality to your Task without needing to Code everything from scratch! You can also use the Script tab to alter the function of existing GUI Task Builder features or implement your own styling for your Tasks.
The Script Tab allows you complete flexibility to design your tasks to look and function exactly as you need. While saving you time spent having to code everything yourself, you can instead focus on the aspects which really matter to you and your research.
The image example below shows an example of the Task Builder Script Tab containing a simple script which changes the background colour and text colour of the task:
Using the Task Builder Script: Gorilla Script Library
We have many Task Builder Script examples available and free to use within your tasks. You can find a full list of our existing scripts in our Gorilla Task Builder Scripts List and Task Builder: Script Examples library.
Once you have located a script you wish to use adding Gorilla scripts into your Task is simple. Just copy and paste the full example script into the script tab of your task and then change the required variables to get the script working.
Gorilla Task Builder Scripts: Adding a custom Script to your Task.
Check out the video below to learn about the Gorilla Task Builder Script library and how to add custom scripts into your Task Builder Tasks:
Length (mins): 6:50
Task Builder Script or Code Editor Tool?
When the majority of your task can be built using the Task Builder GUI tools and available zones but you wish to modify functionality or style/formatting of a particular item then the Task Builder Script tab is for you.
If you wish to have complete control of the entire task function and write all your code from scratch then the Code Editor is the better tool for you to use.
For more guidance on scripting in Gorilla see our Task Builder Scripting Walkthrough.
Support
If you have any trouble implementing an existing Gorilla script do get in touch we are always happy to help and give advice.
Can't find what you need in our script library? Get in touch via our Support Contact Form.
You're viewing the support pages for our Legacy Tooling and, as such, the information may be outdated. Now is a great time to check out our new and improved tooling, and make the move to Questionnaire Builder 2 and Task Builder 2! Our updated onboarding webinar is a good place to start.
Task Builder Scripts List
You can find a full listing of all the scripts available in the Task Builder Script Examples Project on our Gorilla Task Builder Scripts List.
You're viewing the support pages for our Legacy Tooling and, as such, the information may be outdated. Now is a great time to check out our new and improved tooling, and make the move to Questionnaire Builder 2 and Task Builder 2! Our updated onboarding webinar is a good place to start.
Troubleshooting
You can find some dedicated troubleshooting links listed below:
- General troubleshooting advice.
- For troubleshooting in Media Zones.
- For troubleshooting in the Audio Zone Autoplay.
If you don't find an answer to your question reach out to our friendly support team via the contact form - we are happy to help!