Task Builder 1 Troubleshooting
- Task Builder 1 - Worked Examples
- Media Errors in Task Builder 1
Overview
You're viewing the support pages for our Legacy Tooling and, as such, the information may be outdated. Now is a great time to check out our new and improved tooling, and make the move to Questionnaire Builder 2 and Task Builder 2! Our updated onboarding webinar is a good place to start.
This guide contains archived troubleshooting content for our legacy tool Task Builder 1. For help with Task Builder 2, Questionnaire Builder 2, and Experiment Builder, see our updated Troubleshooting Guide.
If you're still using Task Builder 1 and have encountered a problem or an error message, consult the sections of this guide.
You're viewing the support pages for our Legacy Tooling and, as such, the information may be outdated. Now is a great time to check out our new and improved tooling, and make the move to Questionnaire Builder 2 and Task Builder 2! Our updated onboarding webinar is a good place to start.
What is the spreadsheet? Why do I need it? How do I set it up correctly?
The spreadsheet is the basis for the task in Gorilla, it drives the task telling Gorilla what should be displayed and in what order. This means that you have to upload a spreadsheet for a task to work on Gorilla, even for the simplest task.
The spreadsheet is a simple table where you put information about one trial per one row.
In Gorilla Task Builder, you create displays (e.g. 'instructions', 'trial' and 'goodbye' displays) that contain screens with specific zones.
You do not need to manually set up each of the trials on separate screen within the task editor - you only build each screen (or set of screens in a display - usually one individual trial) once and then simply list that display multiple times within the spreadsheet to tell Gorilla how many will read and follow when displaying your task.
Worked example:
The example below discusses the Trial Randomisation Math Test example.
If you have 5 maths questions that you want to display to participants on 5 screens and ask them to solve them, instead of creating 5 separate screens and typing your math equations on each of them, you could only use one math equation screen within 'test' display and in your Rich Text Zone specify that you want the equations to be read from the spreadsheet column source called MathsQuestions. This way Gorilla will read from the specified spreadsheet column what images should be displayed on the screens and run as many trials as you specify in your spreadsheet!
For example, in case where you have 5 trials you would need to have 5 rows in your display column called test and 5 rows with maths equations in your MathsQuestions column. See an examplar Task and Spreadsheet set-up below!
I only have two screens in my 'test' display: Screen 1 with a fixation cross and Screen 2 with my math equation typed in the Rich Text Zone with a zone source specified as a MathsQuestions spreadsheet column.
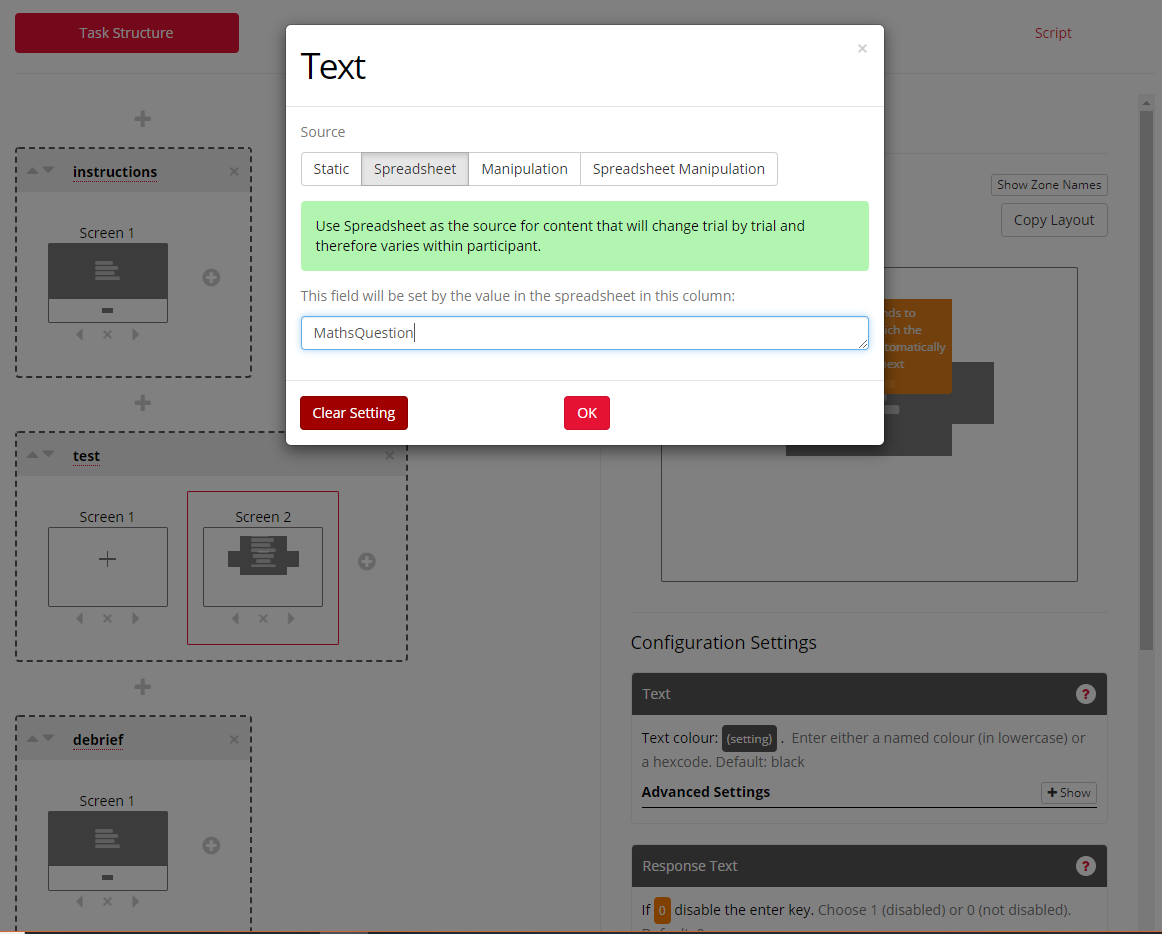
Because I chose spreadsheet as my zone source, Gorilla now decides what will be displayed in Screen 2 from the spreadsheet I uploaded in the Spreadsheet Tab. In this case, it will run all 5 maths quations from the MathsQuestions column in my test display. See the spreadsheet set-up on the image below:
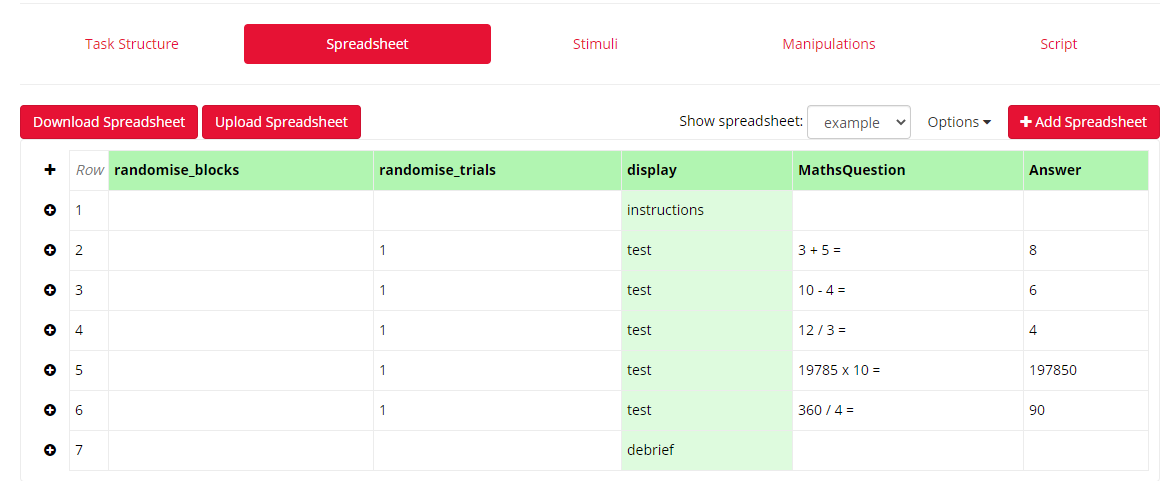
Using Spreadsheets to run your tasks also gives you lots of flexibility when it comes to randomising your trials, block of trials, storing correct responses etc. In the example above, my 5 math equations will be shown in a random order because I have indicated in the randomise_trials column that I want them to be randomised. Read more about randomisation in spreadsheets.
I have also typed in correct responses into my Answer column. I can later use this as an embedded data to e.g. show participants how many of these equations they have solved correctly. Read more about embedded data in our Embedded Data guide!
You're viewing the support pages for our Legacy Tooling and, as such, the information may be outdated. Now is a great time to check out our new and improved tooling, and make the move to Questionnaire Builder 2 and Task Builder 2! Our updated onboarding webinar is a good place to start.
How do I change the font size/style/colour of my text?
Firstly, you should make sure that the text you are editing is typed in the Rich Text Zone as opposed to using the Text Zone. The Text Zone is meant for displaying simple unfortmatted text (e.g. single words/phrases/short texts) and, unlike the Rich Text Zone, it cannot be styled using Markdown and HTML formatting styles.
The easiest way to change the font size, style and/or colour of your text is to use HTML formatting applied to each stimuli word/phrase.
If in your task you specify the stimuli through Spreadsheet, you would apply HTML formatting to all the words/phrases within the Spreadsheet and Gorilla will read it from there!
Worked example:
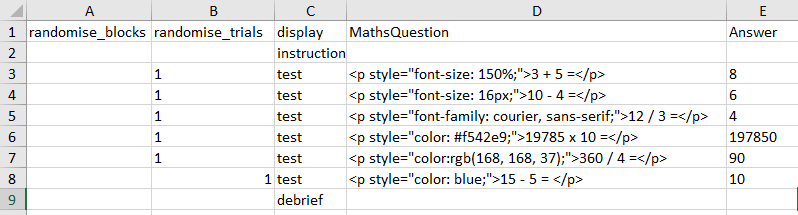
Perpahs you would like to display your math equations in different fonts, sizes and colours. You are sourcing your trials from a spreadsheet column called MathsQuestions. In order to format the text in this column you would need to download your spreadsheet and apply HTML formatting, according to our HTML guide. See an examplar spreadsheet below:
Then, after saving your edited spreadsheet, you would upload it to your task and gorilla will automatically display the formatted text in your Spreadsheet Tab (see below):
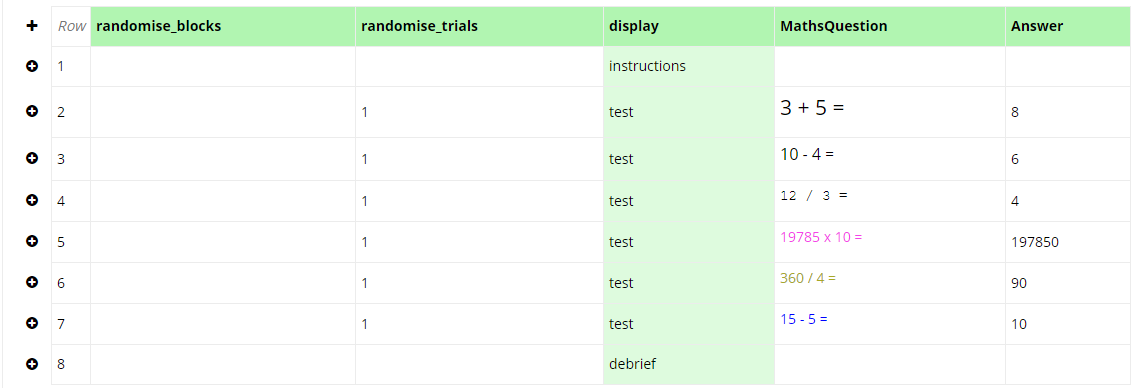
Bear in mind that you can combine these and have for example bigger text in a desired font and colour simply by making the HTML line a bit longer in your spreadsheet cell!
If you were using a static source for your Rich Text zone, you would need to apply the HTML formatting around the text that you type in the zone.
Adding Script
Alternatively, you can format your text by adding this background and text customisation script to your task, and adapting it to change the font style and size using the HTML guide. See our Task Builder Scripting guide or watch our instructional video on how to add a custom script to your task!
You're viewing the support pages for our Legacy Tooling and, as such, the information may be outdated. Now is a great time to check out our new and improved tooling, and make the move to Questionnaire Builder 2 and Task Builder 2! Our updated onboarding webinar is a good place to start.
How To Direct Participants To Different Screens Within The Task Based On Their Response?
Wanting to adapt a task so it directs participants to different screens based on their performance/responses is a common requirement in behavioural experiments. In Gorilla, you can do it using our built-in Within Task Branching settings. You will find them in all the Active Response zones - for reference, see the 'Branching Settings' section on the Active Responses Tooling Reference Guide documentation page.
Worked Example:
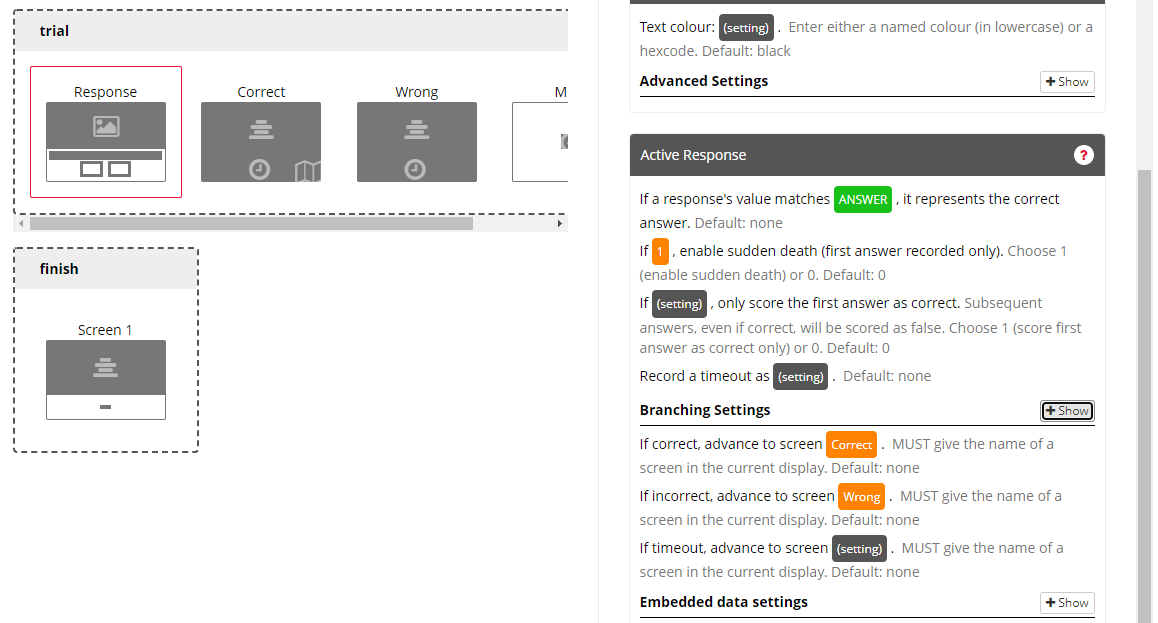
Have a look at this simple example task. Here, we show participants pictures of animals and ask them whether a presented animal is a mammal. We want to branch participant to a 'Correct' feedback screen if they answer correctly, or to the 'Wrong' feedback screen if they answer incorrectly.
In order to do that, we create four screens in the 'trial' display: 'Response' screen with our question, 'Correct' screen with the positive feedback, 'Wrong' screen with the negative feedback, and a 'Move' screen at the end with a Timelimit (Screen) zone.
We will use the Active Response settings in the 'Response' screen to direct participants to different feedback screens based on their response:
In the Active Response settings, first tell Gorilla what is the correct answer for a specific trial. In this case, we indicate the ANSWER spreadsheet column as a source of correct answers for our trials. Gorilla will now compare participant's responses with the correct answers listed in the ANSWER column of our Spreadsheet:
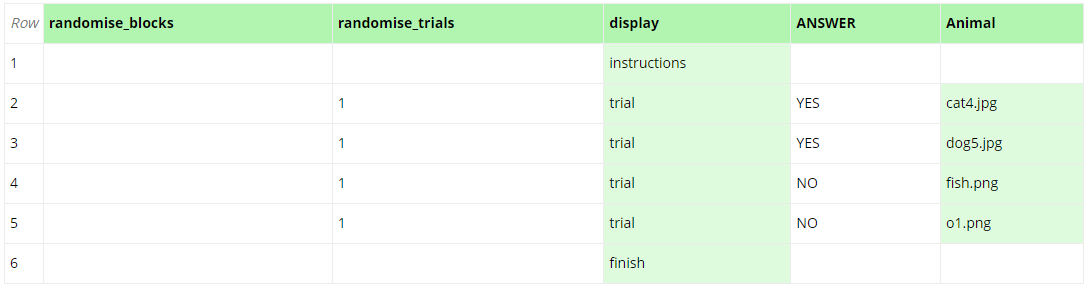
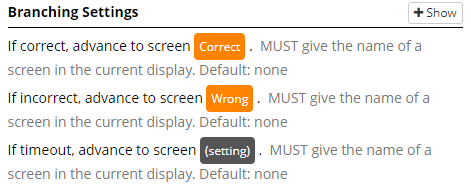
Now, in the Active Response Branching Settings, we tell Gorilla where to direct participants if they answer correct or incorrect. In this case, if correct, participants will advance to the 'Correct' screen, while if incorrect, they will advance to the 'Wrong' screen in our 'trial' display. Note that, as mentioned in the Branching Settings, the screens we wish to branch participants to must be within the same display - in our case the 'trial' display.
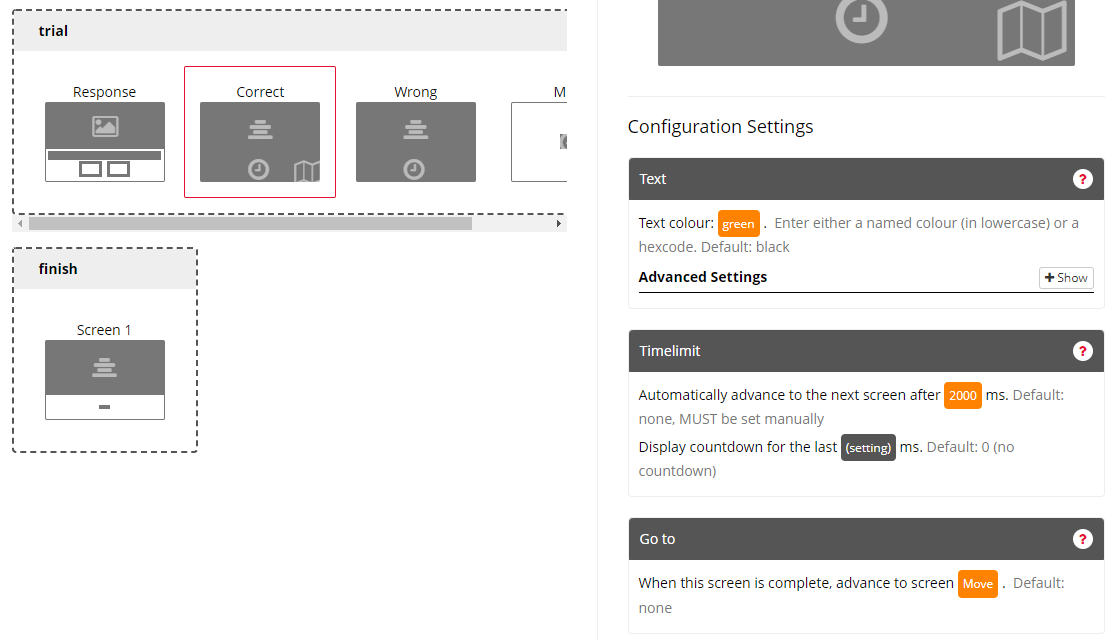
The last thing to do is to make sure that participants who advanced to the 'Correct' screen won't also see the 'Wrong' screen but instead move onto the next trial. In Gorilla's displays, screens are shown chronologically - so the 'Wrong' screen would normally follow the 'Correct' screen. To prevent that, we 1) add the Go To zone to our 'Correct' screen and 2) add an additional screen at the end of our 'trial' display, here called 'Move', where we add a Timelimit (Screen) zone set to 1ms. (This screen is only used to advance participant to the next trial so it can be as short as 1ms.)
In the 'Correct' screen Go To zone settings, we indicate that we want to go to screen 'Move' after the 'Correct' screen is complete. This way we will skip the 'Wrong' screen for those who answered correctly:
And that is our within task branching setup done!
Top Tip: You can use the Branching Settings of the Active Response zones even if your task doesn't include correct/incorrect responses. It is often the case that researchers might want to show participants different screens purely based on their response and regardless of the accuracy. In this case, you can e.g. put in your ANSWER column the response options and still use the correct/incorrect Branching settings to advance participants to different screens.
This video shows you how to branch participants to different screens within a trial depending on their response and use their answer later in the task. This is achieved using advanced branching and embedded data within the Task Builder.
Length (mins): 6:03
You're viewing the support pages for our Legacy Tooling and, as such, the information may be outdated. Now is a great time to check out our new and improved tooling, and make the move to Questionnaire Builder 2 and Task Builder 2! Our updated onboarding webinar is a good place to start.
How Can I Add a Back Button to a Task?
In some cases you might want to allow participants to go back from the current screen they are on to the previous one, for example to give them a chance to review the instructions, see the stimuli again or even change their answer. There is no built-in back button because tasks are designed to progress forwards, not backwards, however, if you want to add this functionality, it can be done and does not require scripting!
Since it's the spreadsheet that runs the task (see this spreadsheet guide for more information on Spreadsheets), we can allow participants to go back to the previous screen by jumping back a row in the spreadsheet. To do that, we would use the Jump to Row zone. The Jump to Row zone needs to be combined with within task branching to avoid an infinite loop - pressing a 'back' button sends the participant to a specific screen, containing the Jump to Row zone. Participants who don't press the button will skip the Jump to Row screen. You can learn more about the within task branching from the video on this page.
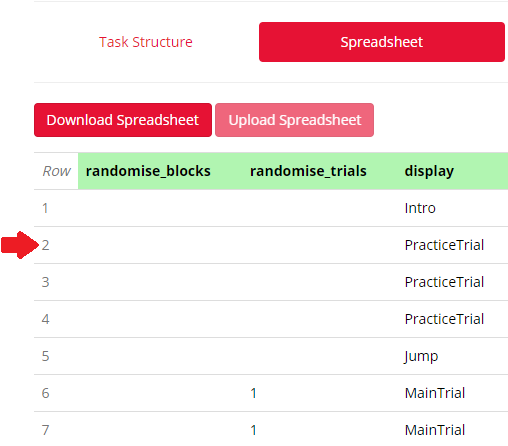
Worked Example:
Have a look at this Jump to Row tutorial. In the Task Structure tab, have a look at the screens setup in the display called 'Task'. The Jump to Row zone is positioned on Screen 5. In the screen settings, we indicate that we want participants to jump to the 2nd row in the Spreadsheet when this screen is complete. In the Spreadsheet tab, you will see that row 2 includes the 'TaskInstructions' display. Participants will be automatically directed to the 'TaskInstructions' display after the time limit on jump to row screen (Screen 5 in the 'Task' display) expires.
Now, you would want to direct participants to 'TaskInstructions' display only when they wish to 'go back'. Those who don't, need to be able to skip this. Therefore, we need to create a screen that participants will be directed to in case they do not wish to 'go back' and want to move on. The trick is to use the within task branching settings available for the Active Response zone setting - read more about them in our Tooling Reference Guide.
Have a look at Screen 4 in the 'Task' display. There are two buttons there that participants will click in order to respond. For the purpose of branching, we are setting one of them as a 'correct' and one as an 'incorrect' answer. This is to tell Gorilla which screen should follow when participants choose one button or another. See the images below:
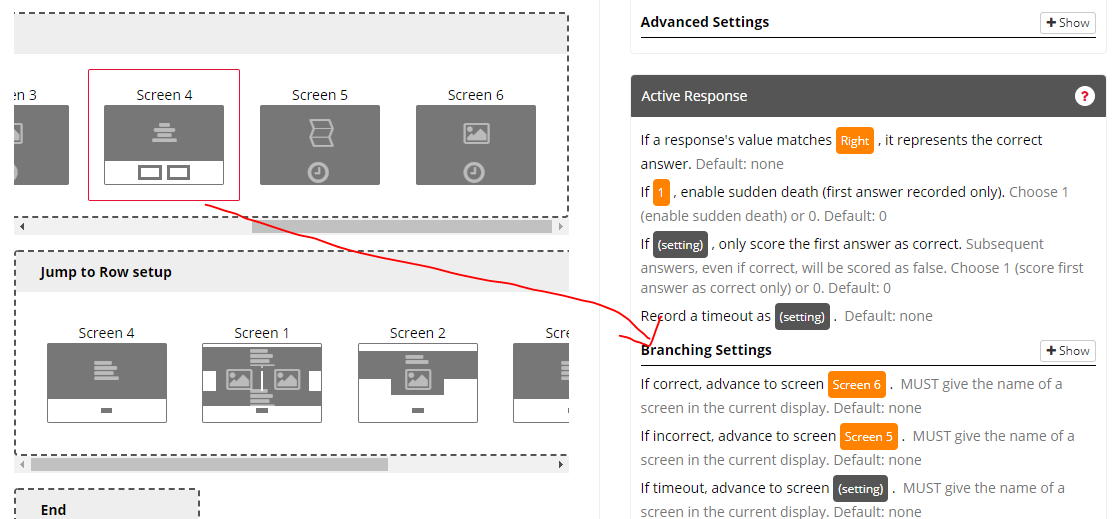

In this case, 'Right' has been indicated as a correct answer. When participant clicks the Right button, they will go to Screen 6 and omit the Jump to Row screen, therefore continue without 'going back' in the task. If they click the Left button, however, they will be directed to Screen 5 i.e. the Jump to Row screen (Screen 5) that will take them back to the 'TaskInstructions' display.
Preview the tutorial task, read the instructions on the screens for more details and try out the 'back button' action in practice!
You're viewing the support pages for our Legacy Tooling and, as such, the information may be outdated. Now is a great time to check out our new and improved tooling, and make the move to Questionnaire Builder 2 and Task Builder 2! Our updated onboarding webinar is a good place to start.
How to Allow Participants to Repeat Trials?
In some cases you might want to allow participants to repeat trials of your task to e.g. read the instructions one more time, see the stimuli again or practice more before they move onto the next part of your experiment.
Since it's the spreadsheet that runs the task (see this spreadsheet guide for more information on Spreadsheets), we can allow participants to repeat the trials by jumping back to the previous row in the spreadsheet. To do that, we would use the Jump to Row zone. The Jump to Row zone needs to be combined with within task branching to avoid an infinite loop - pressing a 'back' button sends the participant to a specific screen, containing the Jump to Row zone. Participants who don't press the button will skip the Jump to Row screen. You can learn more about the within task branching from the video on this page.
Worked Example
Have a look at this Jump to Row example.
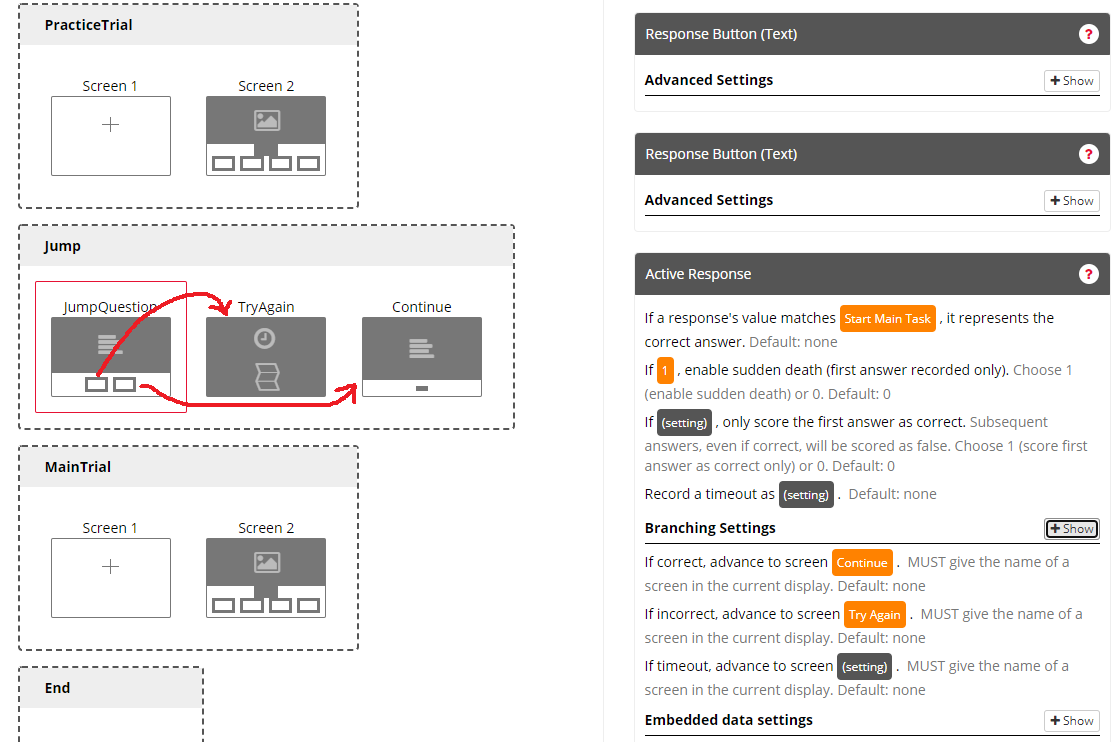
After reading instructions and going through PracticeTrial, participants see the Jump display.
On the first JumpQuestion screen, participants are asked whether they would like to go through the practice trials again or to start a main task. Depending on their responses they will be directed to different screens.
Gorilla branches participants to different screens based on correct, incorrect or timeout answers. When there is no 'correct'/'incorrect' answer, like in this JumpQuestion screen, we can set up one of the answers as 'correct' and one as 'incorrect' just for the purpose of branching. Here we say:
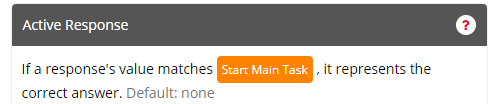
Because we can determine one correct answer, only the 'Start Main Task' button will be scored as 'correct'. Any other answer will be scored as 'incorrect' - in our case the 'incorrect' answer will be the other answer we have which is the 'Try Again' button.
Then, in the Branching Settings of the Active Response zone we say 'If correct, advance to screen Continue'. Because we said the 'Start Main Task' button is the 'correct' answer, those participants who choose that button will go to the 'Continue' screen and continue with the task.
We have also set up 'If incorrect, advance to screen TryAgain'. Those participants who click 'Try Again button' (i.e. an answer scored as incorrect) will be directed to the 'TryAgain' screen. See below:
Now, in the Jump display, TryAgain screen, we place the Jump to row zone. In the zone settings, we say which spreadsheet row the task should jump into when the screen is complete. To complete (i.e. move), the screen, we need to add Timelimit zone and set the time after which the screen will automatically progress. In this example, the screen will jump to row 2 of the spreadsheet after the Timelimit of 5ms expires. See below:
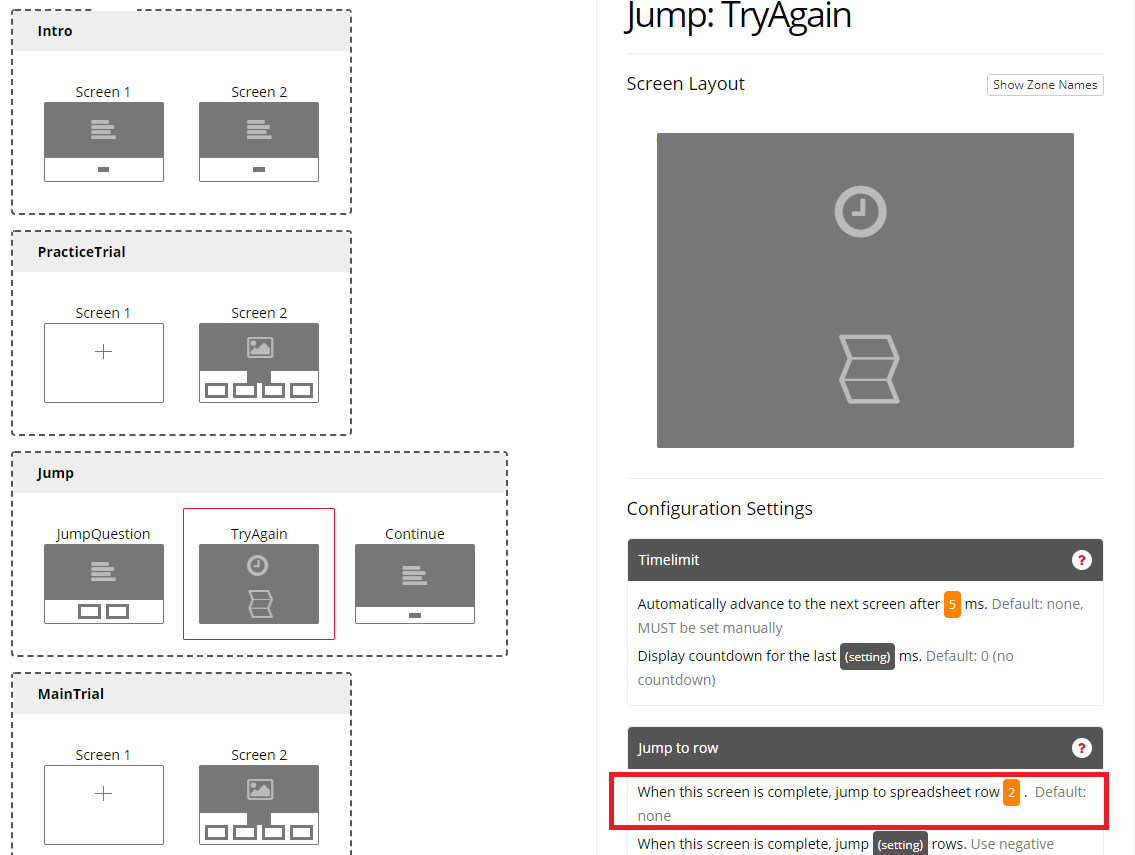
As you will see in the Spreadsheet tab, row 2 of the spreadsheet is a row where Gorilla shows the PracticeTrial display. Therefore, when Gorilla jumps to that row, participants will be directed to the practice display again and this way they will repeat the trials!
My Screen Appears to be 'Stuck'
This video teaches you 3 ways to get your task moving forward when it appears to be 'stuck' on a screen.
Length (mins): 5:47
Testing Mobile Compatibility
This video shows you how to use Chrome's browser developer tools to view how your experiment looks on mobiles or tablets.
Length (mins): 1:17
Media Errors: Summary
You're viewing the support pages for our Legacy Tooling and, as such, the information may be outdated. Now is a great time to check out our new and improved tooling, and make the move to Questionnaire Builder 2 and Task Builder 2! Our updated onboarding webinar is a good place to start.
Sept 2018
The brief
For a while, if a video or audio file failed (for whatever reason) the participant would be presented with a blank screen with no further information and the task would cease to progress. Blank screens with no information and stopped tasks are bad. Debugging these issues when they arise has been time consuming for both researchers and Gorilla developers, particularly given their often temperamental and unpredictable nature. For some participants it would be fine, for others it wouldn’t be and throughout all this, activity and workloads on the Gorilla servers would be entirely nominal. If there was a smoking gun out there it was being wielded by Marvel’s Hawkeye (Or DC’s Deadshot, if you’re that way inclined…).
In the absence of being able to prevent these issues from occurring, we’ve concluded that the next best step is to clearly communicate that there has been a problem. Add thorough error messaging throughout the process of loading and presenting video and audio stimuli. This will do three things:
- Present a message to the participant (in the form of a browser alert), telling them what has happened and how they should respond
- Upload a metric to the participants data with the details of the error and when it occurred
- Upload an error report to our server
With this, participants won't be left completely in the dark if something goes wrong: they'll have some guidance on what to do next and more useful information to report to the researcher. Researchers will have logs in the participants metrics for when something has gone wrong but gone unreported. Finally, we'll get live reports as these issues occur, which should allow us to better diagnose and advise researchers when these errors occur.
This guide covers the following error messages, what they mean and how you should respond:
ERROR: MEDIA_ERR_SRC_NOT_SUPPORTED
ERROR: NO MEDIA ELEMENT PRESENT
For the less technically minded, I'll begin with a simple overview of each error, stating the content of the corresponding error message and the action your should take. For those who need or want more information into what each error message means, I'll be taking a deeper dive into each error afterwards, giving some more technical information and link to further reading.
Before we begin though...
A few important notes
- This document is not intended to be an exhaustive list of causes. There are, potentially, a lot of different things that could lead to each error and an entry for each would make this document unhelpfully long. Further, as we don't know that this is a cause relevant to Gorilla's implementation, it could also be misleading and ultimately unhelpful. Instead, we'll list the most common and most realistic reason for each error and then, as specific instances of the error get diagnosed, update the document accordingly.
- The error message recorded in the metrics (Message to Researcher), though it may sound cryptic, is close to how the error is represented in official documentation. This way you, the researcher, have something that should be easily searchable to find more information online.
- Not all browsers are made equally!! If an error message fires in one browser but not another, that likely means it's only that browser that's taking umbrage. This is, in itself, very useful diagnostically and at least gives you the option to run your experiment in a different browser.
- You will not get Media Error messages if you are using any embedded media such as YouTube or Vimeo videos.
The source for the video/audio element couldn't be found!
You're viewing the support pages for our Legacy Tooling and, as such, the information may be outdated. Now is a great time to check out our new and improved tooling, and make the move to Questionnaire Builder 2 and Task Builder 2! Our updated onboarding webinar is a good place to start.
Error message seen by participant: "No source for the media could be found! Try refreshing the page. If the problem persists, contact the researcher for the experiment”
Error message seen by researcher: "No source for the media file [Gorilla inserts name of stimuli here] could be found! Most likely this is because the file has not been uploaded to your stimuli list or its name has been typed incorrectly in the spreadsheet”
This is a simple one and, honestly, by far the most common problem that occurs when running a task, with any kind of uploaded stimuli. Either the researcher hasn't uploaded the stimuli in the Stimuli tab or it has been named incorrectly in the spreadsheet. These names need to match exactly including upper case letters, the file extension, and any extraneous spaces.
As it stands, if a stimuli can't be found there will still be a 30 second delay before the trial loads as Gorilla tries (fruitlessly) to prepare the stimuli for presentation. There are ways to prevent this but it fell outside the scope of this phase of improvements.
Long overdue 2022 update: The fact that this was one of the most common issues researchers encounter with stimuli was a strong motivator for finding better ways of preventing this. And we did indeed do just that...well, um...well, a while ago. Years ago. We just forgot to update this page. Now the spreadsheet is dynamically linked to the stimuli and screens/displays and the cells in the spreadsheet will highlight green when Gorilla has found matching content, and will remain white if it hasn't. It should now be easy to see whether the stimuli have been named correctly in the spreadsheet.
Error: MEDIA_ERR_ABORTED
You're viewing the support pages for our Legacy Tooling and, as such, the information may be outdated. Now is a great time to check out our new and improved tooling, and make the move to Questionnaire Builder 2 and Task Builder 2! Our updated onboarding webinar is a good place to start.
Error message seen by participant: “Something has cancelled downloading the media for this trial. If you have anything setup to limit downloads on your browser or device, or prevent video/audio from playing, you may need to deactivate it to proceed. Then, try refreshing the page”
Error message seen by researcher: “The fetching process for the media resource was aborted by the user agent at the user's request”
The participant, or something on the participant's device, stopped the media from being downloaded. The latter is more likely. Something like a third-party or inbuilt tool that limits downloads on a device is the most likely culprit.
There's nothing Gorilla can do to override such functionality where used and, indeed, there shouldn't be. If a participant has set a download cap, we have no right to subvert it.
To prevent this from occurring for other participants, consider compressing your stimuli or using a smaller file format where possible. If using large, or a large number of, stimuli is unavoidable, warn participants before they start the tasks, giving them the option to leave if they wish.
As we don't expose any controls that would enable it, it is unclear how the participant themselves could be manually halting the download on the task screen, though this is the other possible cause for the error. If this error occurs, get in touch with Gorilla, providing as much detail on the circumstances surrounding its occurrence as possible and we'll investigate.
Error: MEDIA_ERR_NETWORK
You're viewing the support pages for our Legacy Tooling and, as such, the information may be outdated. Now is a great time to check out our new and improved tooling, and make the move to Questionnaire Builder 2 and Task Builder 2! Our updated onboarding webinar is a good place to start.
Error message seen by participant: “There's something wrong with your internet connection! Try refreshing the page to re-establish the connection. If that doesn't work, check your router or change from wi-fi to a wired connection, if possible and then refresh the page”
Error message seen by researcher: “A network error of some description caused the user agent to stop fetching the media resource, after the resource was established to be usable”
The media can't be downloaded because of a problem with the connection between Gorilla and the participant. 95% of the time this will be a problem with the participant's internet connection.
During normal browsing, a participant's internet connection is only significantly utilized when first loading a page. After that, it sits idle until the participant changes the page (clicks a link etc.) As a result, small disconnects can be easily missed or masked.
However, during the course of an experiment, Gorilla requires near continuous access to a participants internet connection: we're preloading data for the next trials, constantly uploading progress data and metrics. Small 'blips' in a connection will become noticeable and be disruptive in these conditions. Another important note is that, the speed of the participant's connection will have no bearing on its overall reliability. I used to get close to 1Gb download speed in student halls at Cambridge — I would still get infuriating disconnects during utterly critical and time-sensitive, um, games of League of Legends, that no one else on my team would experience.
Refreshing the page will usually take enough time to pass through the momentary connection blip and the task can progress smoothly again. In more serious cases, the participant may need to restart their router, try connecting to the internet in a different way (wired vs wireless) or switch device altogether. My new mobile will happily connect to any wireless connection on the planet — my decade old laptop will be lucky to connect for more than 30 seconds at a time.
All that said, yes, Gorilla does experience disruption which affects participants very, very occasionally. This is almost always a result of actions that are outside of your control — Azure promises our services will be available 99.95% of the year, but this still adds up to a notable amount of downtime each year. If a lot of participants are getting this error message, and you've ruled out any issues associated by location, then check out the Gorilla status page and the Twitter feed. Even short (< 1 second) disruptions are usually listed on the Gorilla Status page and anything significantly longer than that will almost always go onto our twitter page. If still in doubt, don't hesitate to contact us!
Future development: While we can't do anything to improve difficulties at the participant's end, we can make sure that downtime on the Gorilla side, and the effects of that downtime, are as small as humanly possible. Note that, even with all their resources, services like Facebook and Twitter still experience outages — its a risk that's impossible to eliminate completely. Regardless, we are continually improving Gorilla's performance, building in more redundancies and fail-safes, and making the impact of unexpected downtime as negligible as possible. As more of these systems come online, we'll let you know about them!
Error: MEDIA_ERR_DECODE
You're viewing the support pages for our Legacy Tooling and, as such, the information may be outdated. Now is a great time to check out our new and improved tooling, and make the move to Questionnaire Builder 2 and Task Builder 2! Our updated onboarding webinar is a good place to start.
Error message seen by participant: “Your browser has detected a problem with the media and can't play it. You can try refreshing the page but if the problem persists, you'll need to report this issue to the researcher”
Error message seen by researcher: “An error of some description occured while decoding the media resource, after the resource was established to be usable”
While the media resource can be accessed, downloaded, and started playing, something has gone wrong while actually playing it. Corruption in the media itself is the most likely cause here. If this is an edited video or audio file, try going back to the source file and see if the error still occurs using that. If the media is already the original, you'll need to find a way to scan it for errors or corrupt bytes. Your institution's technicians might be able to help with that!
This is an issue we can reproduce locally (and one of the incidents that prompted this investigation). Back in March/April 2018, a video in our internal testing rig stopped working but only in Chrome! The task would hang at the end of the video, rather than moving on to the next screen. It turned out that, in Chrome, playback was actually stopping just before the end of the video and Chrome was complaining that the last few chunks of data were corrupt. A recent update to Chrome must have changed something that made it more sensitive to the quality of a media file. While other browsers will contently play it without issue, Chrome throws its toys out the pram instead.
The video had been edited to be shorter (apparently there's a timelimit on how long we can watch kittens playing with a laser pen while testing Gorilla's systems) and the cut in the video hadn't been created cleanly by the editing software. It seems a common practice to trim sections from a video/audio, compress them, change their file format or process them in someway. So, in the first instance, always go back to the source material and see if you get the trouble there. If you don't, try the editing process again or try using another tool. If you haven't edited the media from source, see if your editing software has a validation tool that can be used to check for (and hopefully fix!) any corruption in the media.
Error: MEDIA_ERR_SRC_NOT_SUPPORTED
You're viewing the support pages for our Legacy Tooling and, as such, the information may be outdated. Now is a great time to check out our new and improved tooling, and make the move to Questionnaire Builder 2 and Task Builder 2! Our updated onboarding webinar is a good place to start.
Error message seen by participant: “Something has gone wrong while trying to download the media. Either the audio file is missing or your browser cannot play it. You can try refreshing the page but, if the problem persists, you'll need to report this issue to the researcher”
Error message seen by researcher: “The media resource indicated by the src attribute was either missing or not supported by the browser”
This error is a bit more... complicated and the docs on this are rather lacking. One half of it seems to be a similar issue to MEDIA_ERR_NETWORK, though the conditions under which this one fires rather than the other is unclear. The other half, not being supported by the browser, seems to come up with the media source is actually a media 'stream' rather than a file. Its not possible to populate an Audio or Video component from a media stream - stimuli need to be uploaded in advance and you can't upload a stream!
This is an error for which I can't forsee a reason for it triggering in a Gorilla task. If we find a reason, we'll update this document accordingly.
No media element present!
You're viewing the support pages for our Legacy Tooling and, as such, the information may be outdated. Now is a great time to check out our new and improved tooling, and make the move to Questionnaire Builder 2 and Task Builder 2! Our updated onboarding webinar is a good place to start.
Error message seen by participant: “No media element present: While trying to load the media, no containing media element could be found!”
Error message seen by researcher: “No media element present: While trying to load the media, no containing media element could be found!”
Even though Gorilla has been told there should be a video or audio component on the page, it can't find the corresponding HTML for it!
Coding tip: if all the code that follows hinges on X existing then, even if you can't possibly imagine a way in which you could arrive at this point without X being there, check that it's there anyway. While it might seem pedantic and unnecessary, and lead to awkwardly worded paragraphs in a support doc, a simple if/else statement can save you bags of time. Otherwise, X will be the last thing you look at at the end of a very long and frustrating bug hunt.
If an Audio or Video component is placed on a screen, Gorilla will collect the HTML for that component and add it to the page, before running the scripts associated with that component. That script begins by collecting a reference to the HTML on the page, which can then be used to prepare it for playback and, eventually, trigger the play function! Can't trigger a play function on HTML that doesn't exist though, which is why checking it exists on the page is a necessary step.
Reaching the point of running a component's script but not actually having the component's HTML on the page is not something I've ever encountered in my (at the time of writing) fifteen months of supporting Gorilla users. I suppose, hypothetically, if something prevented or interrupted the HTML while it was rendered, but without disrupting any other functionality, then it's possible we could arrive at this eventuality.
Like all the errors described in this guide, the full content of the error will come direct to our servers too, so if this does ever occur, we should be able to work out why!