Walkthrough: Spreadsheets (TB1)
- Advanced examples
You're viewing the support pages for our Legacy Tooling and, as such, the information may be outdated. Now is a great time to check out our new and improved tooling, and make the move to Questionnaire Builder 2 and Task Builder 2! Our updated onboarding webinar is a good place to start.
Overview
This Walkthrough is a step-by-step guide to the different ways of using spreadsheets in Gorilla.
To make the most of this guide, cross reference the descriptions with the Walkthrough: Spreadsheets Project.
You're viewing the support pages for our Legacy Tooling and, as such, the information may be outdated. Now is a great time to check out our new and improved tooling, and make the move to Questionnaire Builder 2 and Task Builder 2! Our updated onboarding webinar is a good place to start.
Single Trial
In Gorilla, the spreadsheet drives the task. Consequently, you will always need a spreadsheet even for the simplest task.
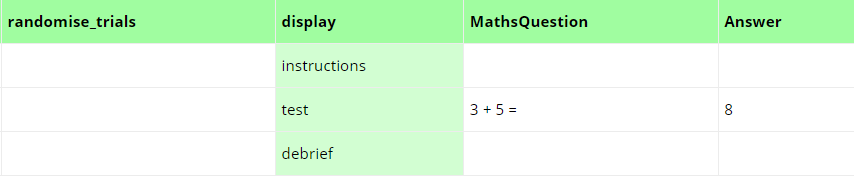
The simplest task would contain a single trial configured via a single row in a spreadsheet. In the example below, a text zone called MathsQuestion will display the text '3 + 5 ='.
To make this work, the text zone in the task structure would have the Source set to Spreadsheet. When the source is set to spreadsheet the colour of name will be green. This is a mnemonic aid; the livery for Excel is also green.
See the single trial example.

By default Gorilla always includes two additional columns: randomise_blocks and randomise_trials. If unused leave these blank. More on these later.
You're viewing the support pages for our Legacy Tooling and, as such, the information may be outdated. Now is a great time to check out our new and improved tooling, and make the move to Questionnaire Builder 2 and Task Builder 2! Our updated onboarding webinar is a good place to start.
Linking Displays
You can also use the spreadsheet to move between displays.
In the linking displays example we first show the instructions, then a single trial (test) and finally a debrief screen.
The displays in the task structure do not have to be in the same order as in the spreadsheet.
You're viewing the support pages for our Legacy Tooling and, as such, the information may be outdated. Now is a great time to check out our new and improved tooling, and make the move to Questionnaire Builder 2 and Task Builder 2! Our updated onboarding webinar is a good place to start.
Single Block
Once you have the flow of your task working by linking across displays, it's time to populate a block of trials.
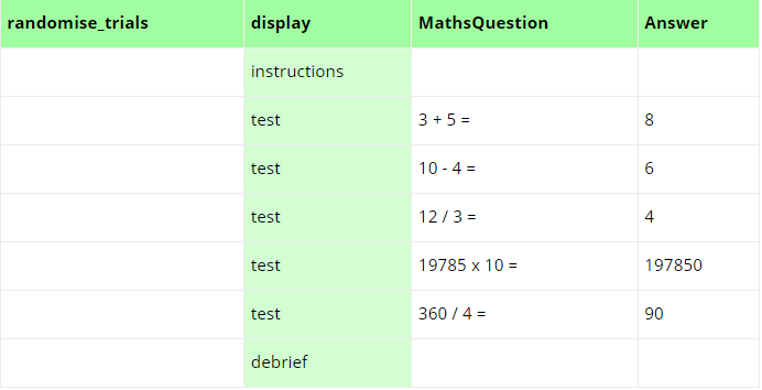
In the single block example, we want participants to see the task instructions, followed by a block of 5 test trials, and closed out with a debrief. To acheive this, we have created 3 displays in the example task: 'instructions', 'test' and 'debrief'. In our spreadsheet, we start off with one row where the display is instructions, followed by 5 rows where the display is test (meaning that the test display will be shown to the participant 5 times), and finally a row where the display is debrief.
As the text in the test display is controlled by the spreadsheet, participants will see different text every time the test display is presented.
You're viewing the support pages for our Legacy Tooling and, as such, the information may be outdated. Now is a great time to check out our new and improved tooling, and make the move to Questionnaire Builder 2 and Task Builder 2! Our updated onboarding webinar is a good place to start.
Randomise Trial
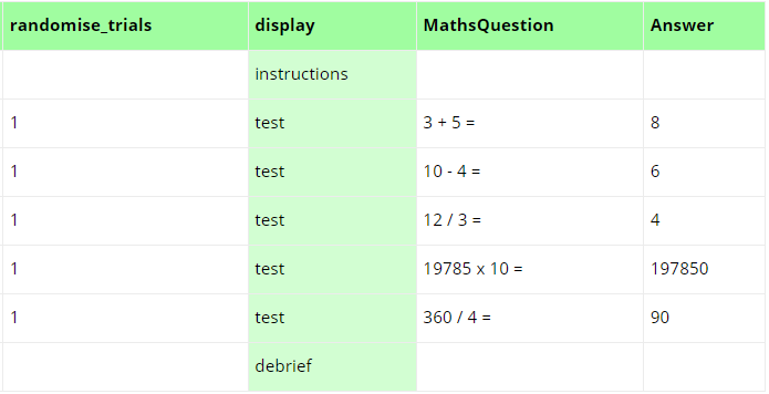
Perhaps you want to show the trials within your block in a random order? In Gorilla this is simple: you can do this by editing the 'randomise_trials' column - just put a 1 next to trials that you want shuffled. If the rows in that column are left empty, Gorilla will always run the rows in the order they are placed. If the rows in the randomise_trials column have a number, then Gorilla will run the rows that share the same randomise_trials number in a shuffled order.
In the trial randomisation example we see that the 5 test trials will now be shown in a random order.
You're viewing the support pages for our Legacy Tooling and, as such, the information may be outdated. Now is a great time to check out our new and improved tooling, and make the move to Questionnaire Builder 2 and Task Builder 2! Our updated onboarding webinar is a good place to start.
Multiple Blocks
Perhaps you want multiple block of trials with a screen for participants to rest between each block.
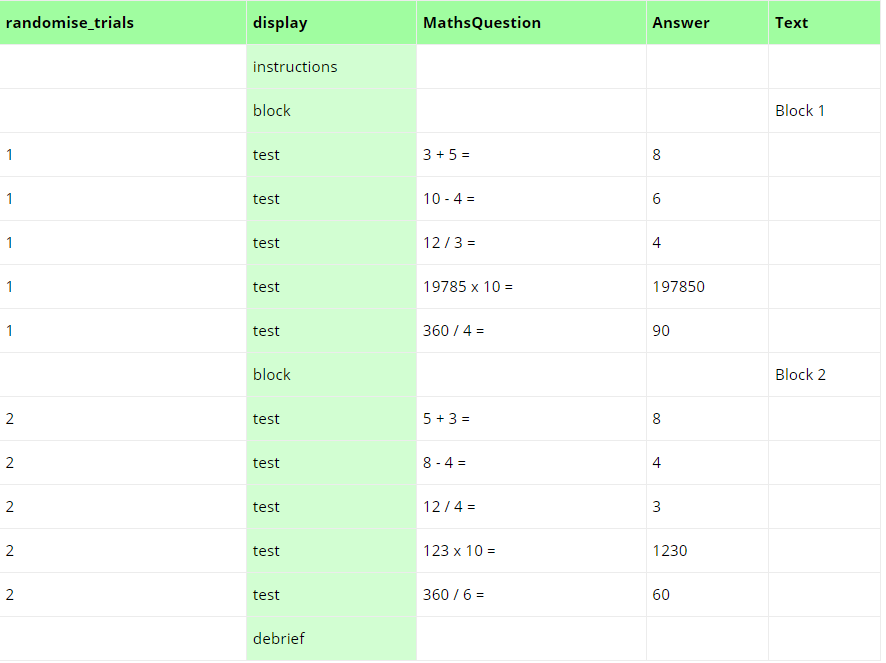
To do this add a Block display with text populated from the spreadsheet (see column Text) and then put 1s next to the first block and 2s next to the second block. This will shuffle each block separately.
This is shown in the Multiple Blocks example - spreadsheet consecutive.
Or perhaps you want to shuffle the trials across blocks. That is possible too. Instead of putting 2s next to the second block, leave these as 1s.
This is shown in the Multiple Blocks example - spreadsheet fixed length.

You can view an example of a real experiment that incorporates both of the above techniques (shuffling trials across blocks, and shuffling trials independently within blocks) in this Gorilla Academy case study.
You're viewing the support pages for our Legacy Tooling and, as such, the information may be outdated. Now is a great time to check out our new and improved tooling, and make the move to Questionnaire Builder 2 and Task Builder 2! Our updated onboarding webinar is a good place to start.
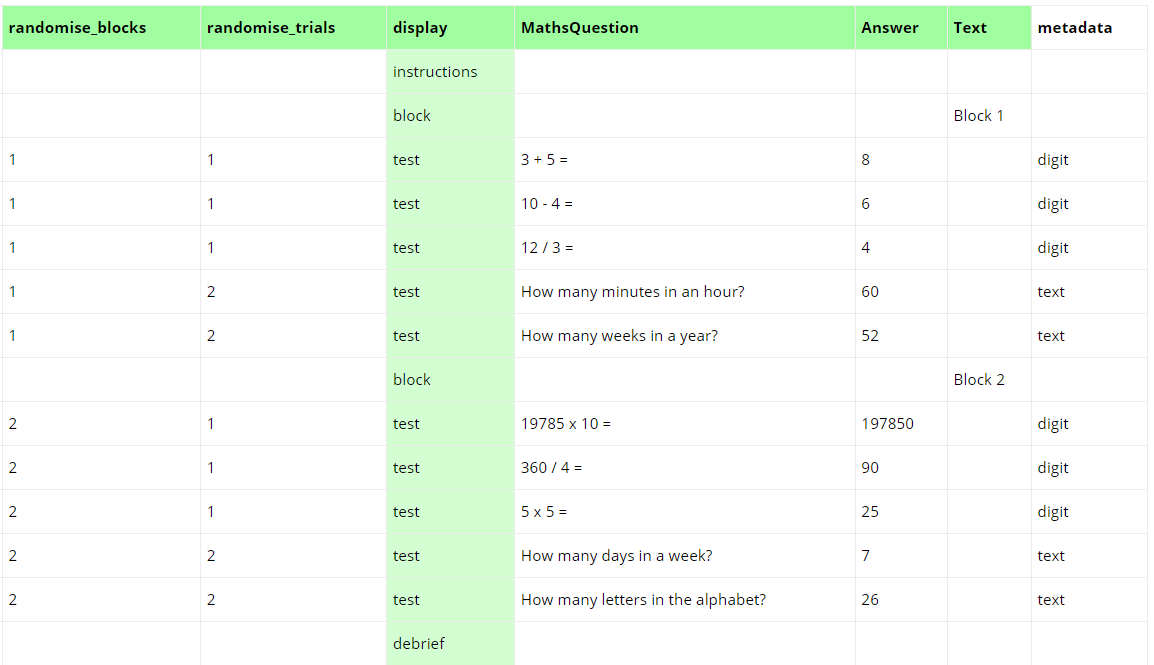
Randomise Block
Perhaps you have two (or more) blocks and between participants you want them shown in a different order.
To achieve this, use the 'randomise_blocks' column. Next to the first block put 1s and next to the 2nd block put 2s. When a participant comes to the task, Gorilla will randomly pick which block to show first.
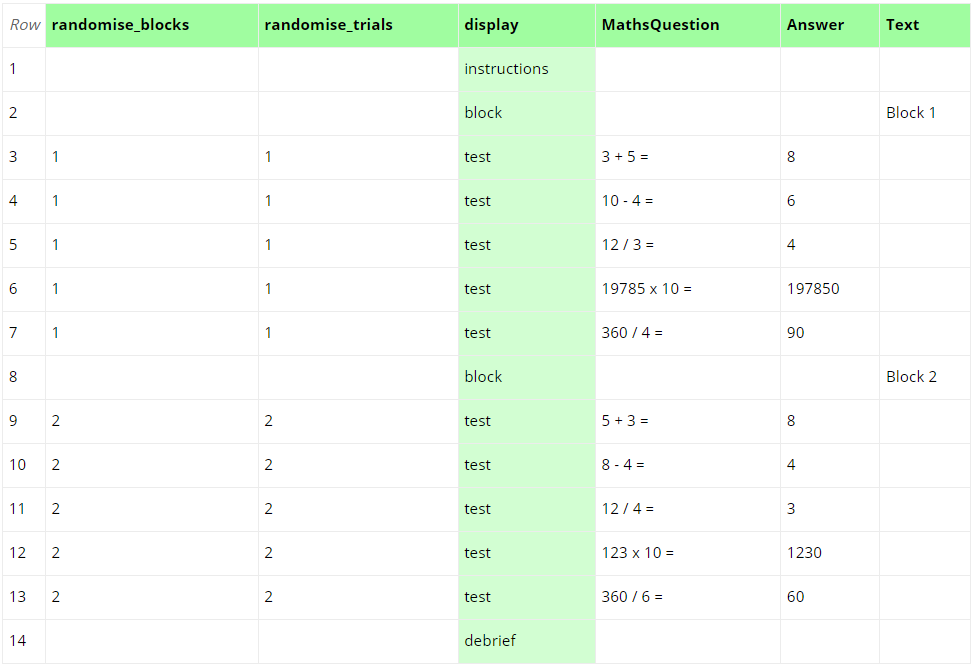
The Block Randomisation example demonstrates this. Preview it a few times to see that sometimes you get the 1st set of test questions first and sometimes you get the 2nd set of test questions first.
Note that the Block displays do not have a number in the randomise_blocks column, and so will always be shown in the order Block 1 then Block 2. If they had a number in the randomise_blocks column that matched their respective trials (so 1 for the Block 1 display and 2 for the Block 2 display), these would change order too. This can be useful if you have different instructions for each block.
Counterbalanced Order: If you want to counterbalance the block presentation, create two spreadsheets (one for each order) and use a randomiser in the experiment tree.
More than 2 blocks: You can randomise more than two blocks in the spreadsheet. Gorilla will randomly shuffle the order of blocks independently for each participant.
You're viewing the support pages for our Legacy Tooling and, as such, the information may be outdated. Now is a great time to check out our new and improved tooling, and make the move to Questionnaire Builder 2 and Task Builder 2! Our updated onboarding webinar is a good place to start.
Practice Trials
Perhaps you want to show some practice trials first. The practice trials example demonstrates this. In the task structure there is a new display called practice which provides participants with feedback. In the spreadsheet, there are now new rows to trigger the display of the practice trials.
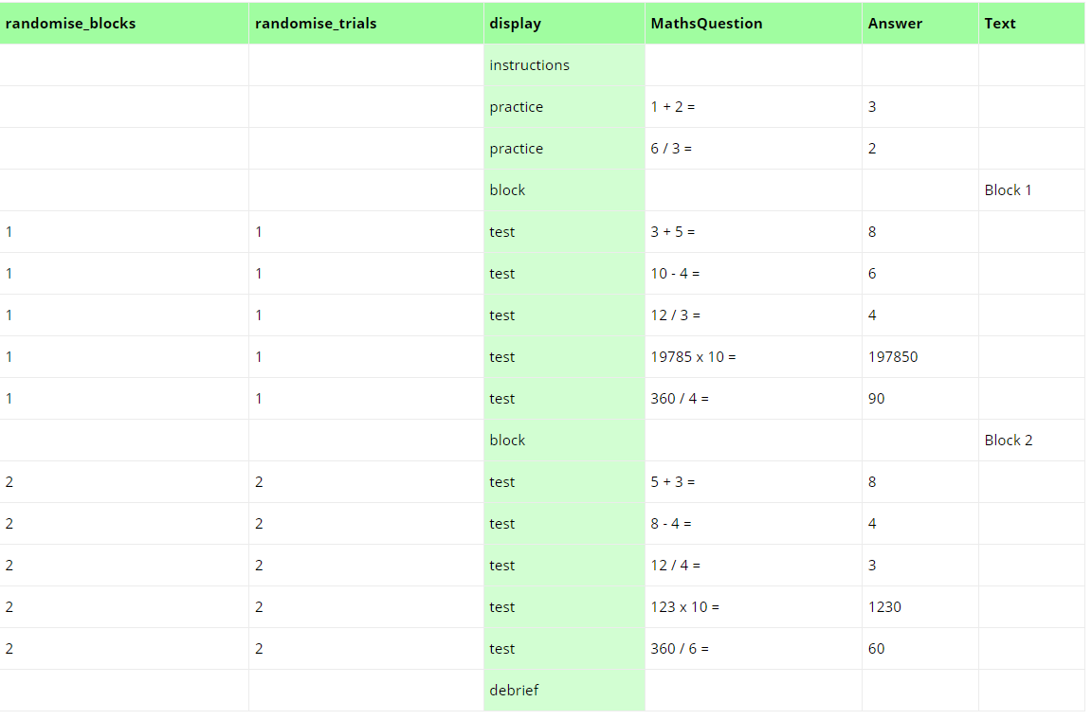
An alternative approach would have been to re-use the test display with the option to turn feedback on or off based on the content of a spreadsheet column.
You're viewing the support pages for our Legacy Tooling and, as such, the information may be outdated. Now is a great time to check out our new and improved tooling, and make the move to Questionnaire Builder 2 and Task Builder 2! Our updated onboarding webinar is a good place to start.
Metadata
Gorilla requires content for all the user-defined columns that it is expecting, but you can also include additional metadata.
Metadata columns have 3 primary use cases:
- Analysis: Add additional columns you will need at the analysis stage. Read more about Analysis here.
- Spreadsheet manipulations: Metadata columns are needed to store the different manipulations you require such as different stimuli sets, or response set ups. See our guide to Spreadsheet Manipulations here.
- Scripting: Metadata columns are also frequently used alongside task builder scripting.
The Metadata example demonstrates case 1. Notice the different values under the column heading 'metadata'. Here the metadata shows the type of question being asked. Once data has been collected, trials and responses can be grouped using this metadata. This greatly simplifies the analysis process using Excel pivot tables or other data analysis software.
Read more about analysing your Gorilla Task Data in our How To: Metrics Guide. You can also view an example of using metadata columns in the context of a real experiment in this Gorilla Academy case study.
There is no limit to how many columns of metadata can be added. The only restriction is that they must all have different column names.
Once a Metadata columns is added, so long as there is content in at least 1 row of the Metadata column, the Metadata column headings will appear in all spreadsheets within your task.
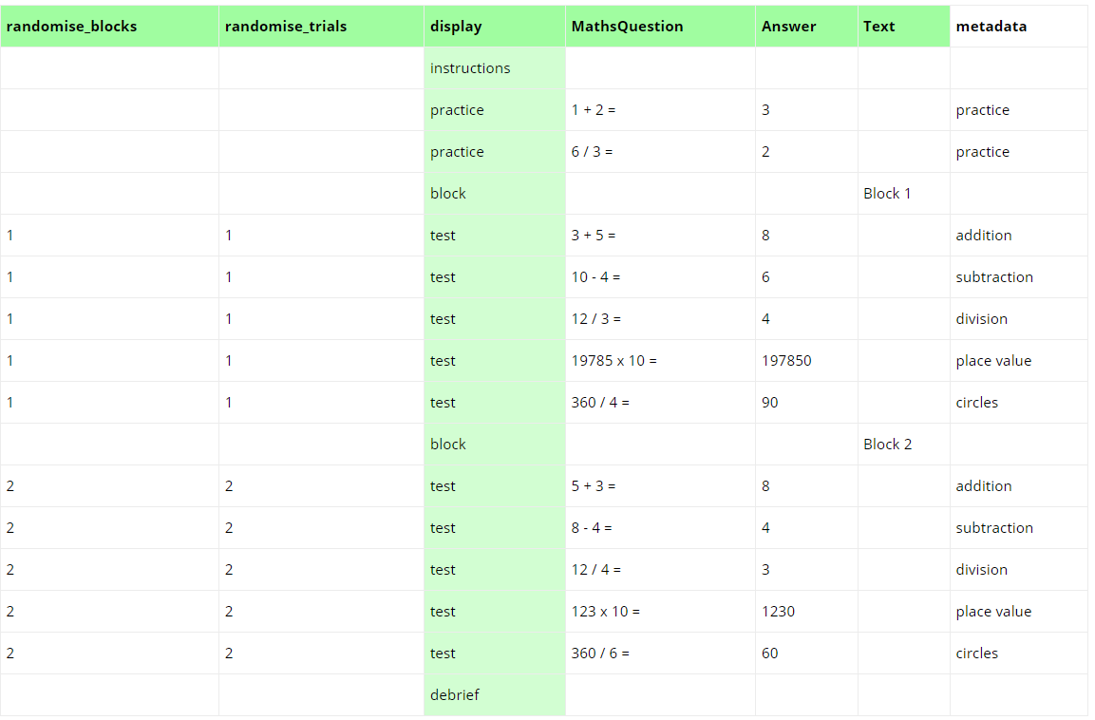
In the image above, notice the white colour for the heading of the Metadata column. This helps to clearly distinguish between metadata columns (white) and the columns linked your task structure (green).
Metadata columns (white) will typically be collectively positioned to the right of the linked spreadsheet columns as shown above.
When you upload a new spreadsheet, be sure to check your column heading colours. Only columns which are coloured green are being used to run your task. White-headed columns are metadata. Use this as a quick way to check your Task Zones are linked correctly with your Task Spreadsheet columns.
Using empty metadata columns
There are times when you may require completely empty Metadata columns. This is typically only applicable in case 3 - for instance, when using script to create your own scoring system.
If you require empty Metadata columns, you MUST include these metadata columns on EVERY spreadsheet you upload to the task, even if other spreadsheets make no use of these metadata columns.
If you do not include the empty columns on every spreadsheet upload, these empty metadata columns will disappear when you upload the new spreadsheet. This can create create problems for your scripts - as these required metadata columns will not exist neither while running the task nor in the task metrics downloaded from the task.
Remember to check your Task's Spreadsheet Tab to view all the known columns for your Task. If you can't see a required column, reupload your full spreadsheet. Please read our Troubleshooting Guide for more detailed information on this.
You're viewing the support pages for our Legacy Tooling and, as such, the information may be outdated. Now is a great time to check out our new and improved tooling, and make the move to Questionnaire Builder 2 and Task Builder 2! Our updated onboarding webinar is a good place to start.
Interleaving
Trials can also be interleaved. The Interleaving example demonstrates this.
The participant will alternate between digit trials (1) and text trials (2). Nevertheless, both the digit and text trials will be shown in a random order.
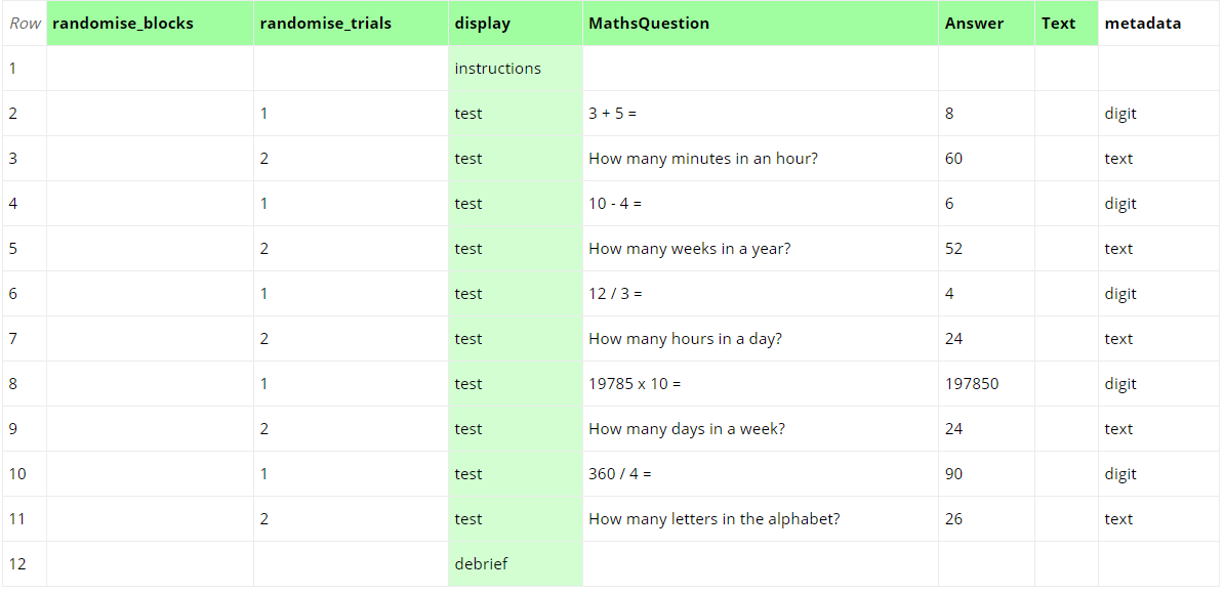
Advanced Technique: In the example above, we use the same display for both trials types. This is not mandatory; different displays could also be interleaved.
You're viewing the support pages for our Legacy Tooling and, as such, the information may be outdated. Now is a great time to check out our new and improved tooling, and make the move to Questionnaire Builder 2 and Task Builder 2! Our updated onboarding webinar is a good place to start.
Block Interleaving
Within a block, you can present a mixture of trial types. The Block Interleaving example demonstrates this.
In this example, each block will first show three digit trials (picked randomly from all 6 digit trials) and then show 2 text trials (picked randomly from all 4 text trials).
Advance Technique: In the example above we use the same display for both trials types. This is not mandatory; different displays could also be included in the same block.
You're viewing the support pages for our Legacy Tooling and, as such, the information may be outdated. Now is a great time to check out our new and improved tooling, and make the move to Questionnaire Builder 2 and Task Builder 2! Our updated onboarding webinar is a good place to start.
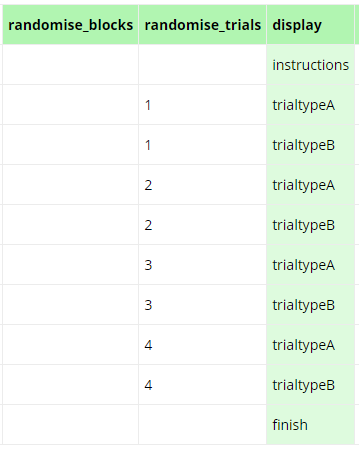
Pseudo-randomisation
If you want to constrain how your trials are randomised, you can use pseudo-randomisation. For example, imagine you have two different trial types, type A and type B. You may want to randomise trial order while ensuring that the participant sees no more than 2 consecutive trials of the same type.
You can set up this kind of pseudo-randomisation in the Spreadsheet by creating pairs of trials consisting of one trial of each type. We give each pair of trials a different number in the randomise_trials column. The order of each pair is then randomised independently. This ensures that the participant will never see more than 2 trials of the same type consecutively.
You can view an example of implementing pseudo-randomisation in the context of a real experiment in this Gorilla Academy case study.