Welcome to the Recruitment Policy Options Tooling Reference Guide!
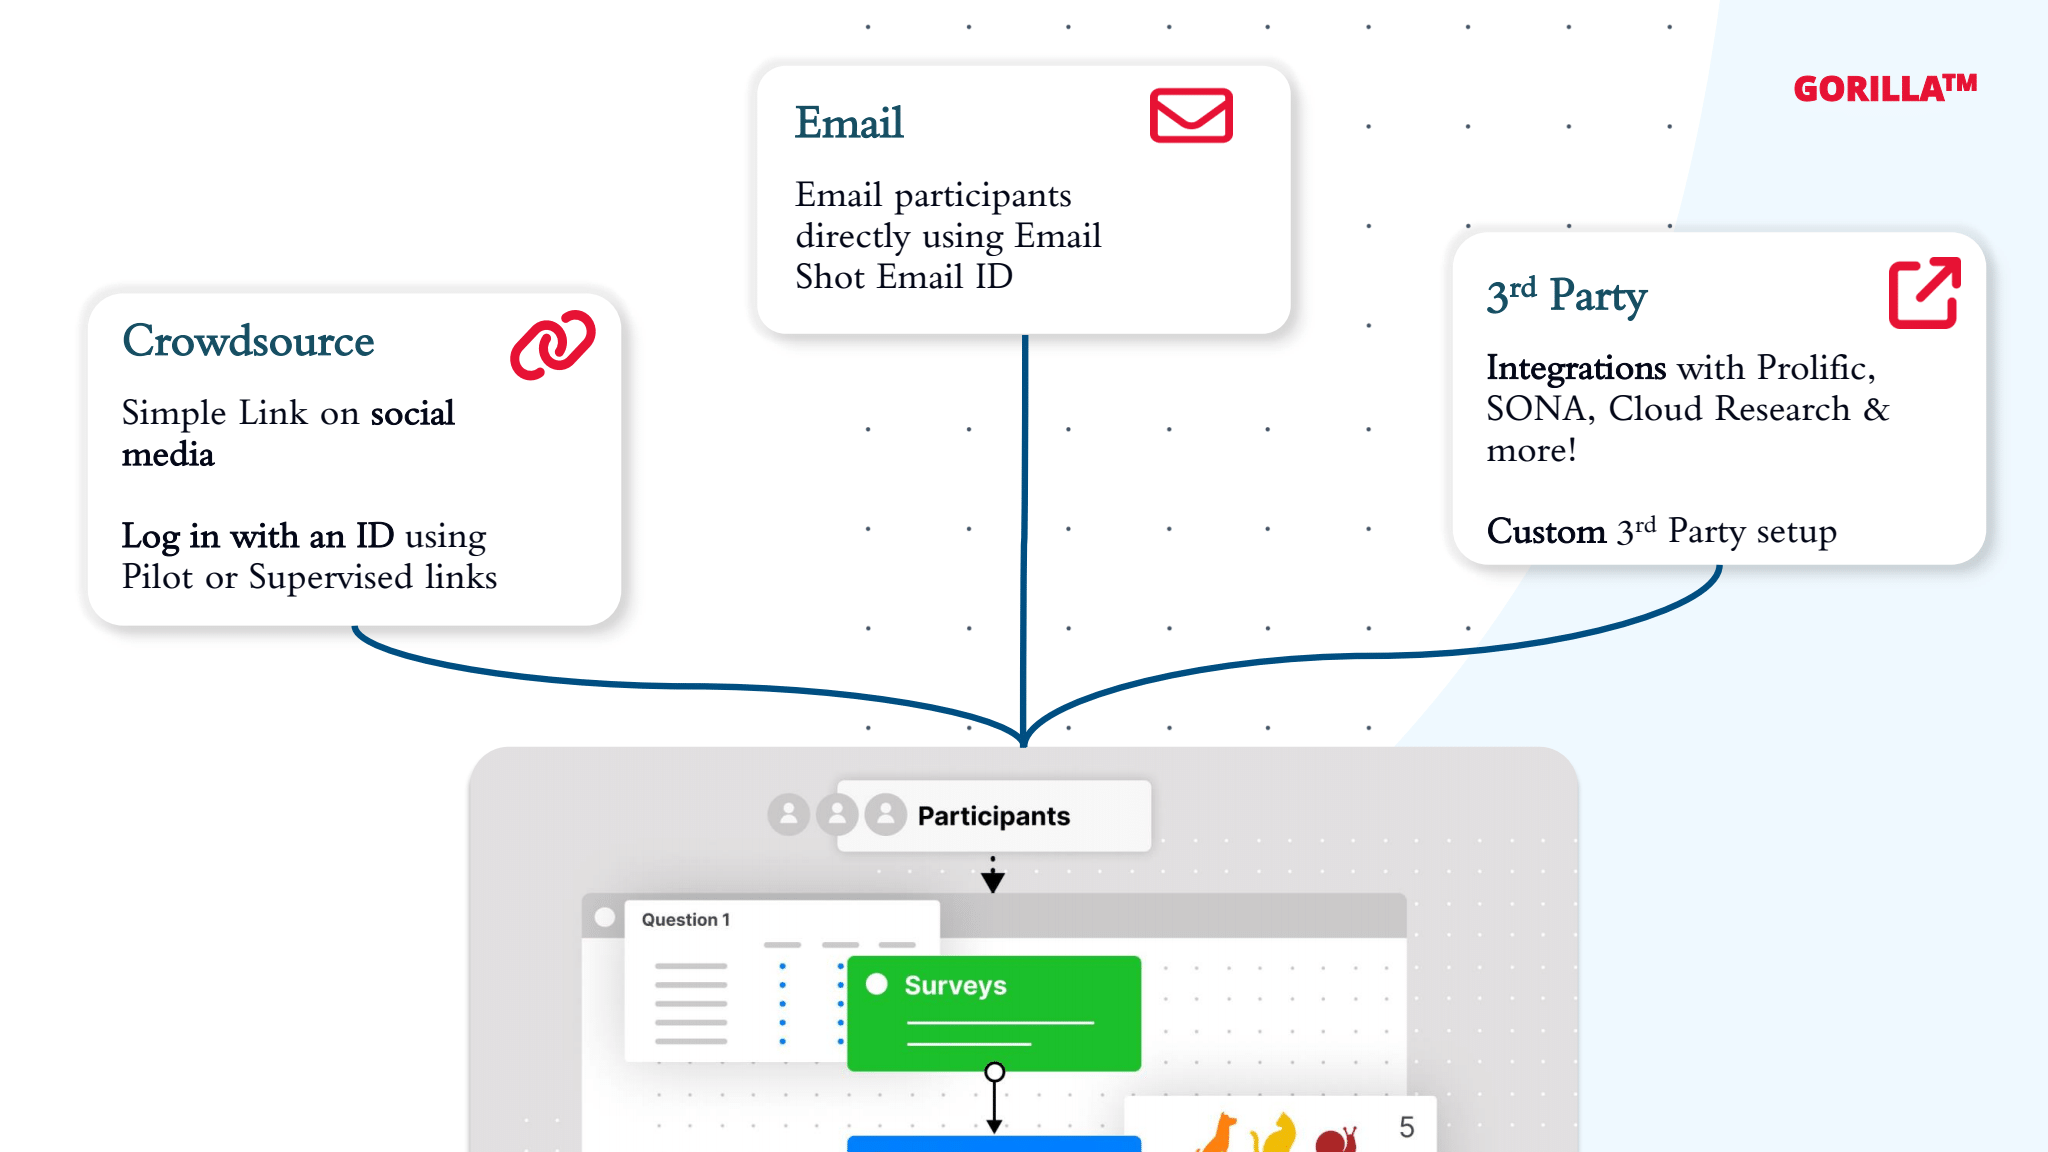
Here, you can explore the different recruitment policies available in Gorilla by browsing the list on the left. Recruitment policies determine how you distribute the link to your experiment and vary based on how you recruit participants. Below, we outline the possible use cases for each recruitment policy:
Want to recruit using multiple policies?
At the moment, it's not possible to set multiple recruitment policies at once within an experiment. You can change the recruitment policy at any time. So you could start recruiting using one policy, and then change to another when recruitment slows. Alternatively, you can clone your experiment and set a different recruitment policy on each experiment.
Crowdsource recruitment options
Use the Crowdsource recruitment options if you're piloting, recruiting via social media, or running a study in person.
Email recruitment options
If you already have a group of participants and their email addresses, you can use an Email based recruitment policy to send them your experiment.
Third party recruitment options
If you plan to recruit participants through a 3rd Party Recruitment Service, we have integrated recruitment policies for some providers (see the list on the left). If your recruitment provider isn’t listed, you can use the Custom 3rd Party Setup.

Want to run a longitudinal study? But not sure what recruitment policy to use?
Check out our Longitudinal or Multi-Part Studies guidance
The recruitment policy is Disabled by default when you create a new experiment. You are able to preview and edit your task but participants are not able to access it via any of the previous methods. Once you have completed your data collection on an experiment, or if you need to halt the experiment for any reason, returning the recruitment policy to 'Disabled' again will prevent any further access, regardless of the previous recruitment policy setting.
Anonymous Recruitment Policy
This is an anonymous recruitment policy, unless you explicitly collect identifying data
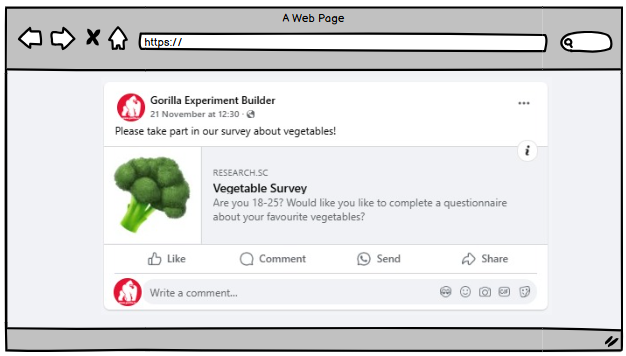
This recruitment policy provides a simple link (URL) that can be copied and pasted as necessary. Participants simply take part in your study by clicking the link. It could be posted to Facebook, Twitter or other social media channels, included on a poster, or sent out via email.
To allow your participants to ask you to withdraw their data, tick the 'Show Completion Code' setting in the Finish Node of your experiment. The participant will then see a unique completion code at the end of the experiment. This completion code will be included in their data in the 'Participant Completion Code' column, allowing you to identify and remove their data on request.
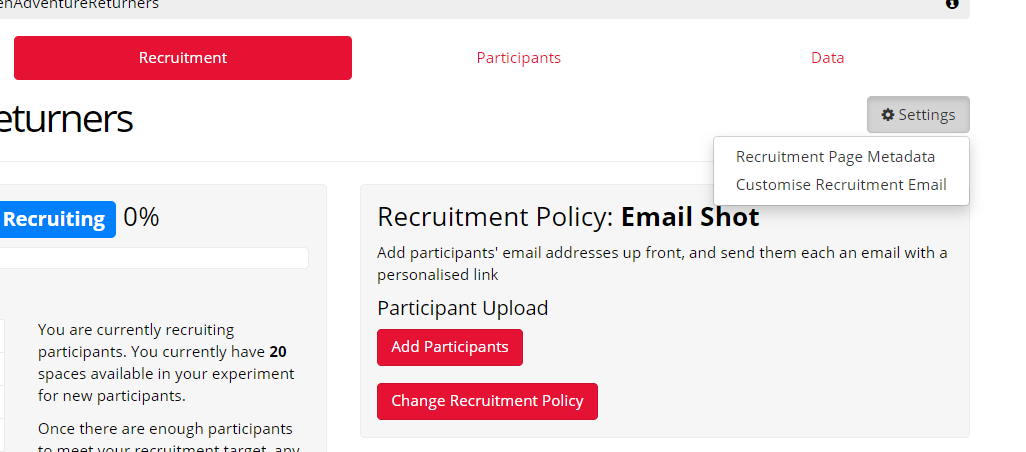
To customise how your link appears on social media, go to Settings at the top-right of the Recruitment tab and select Recruitment Page Metadata:
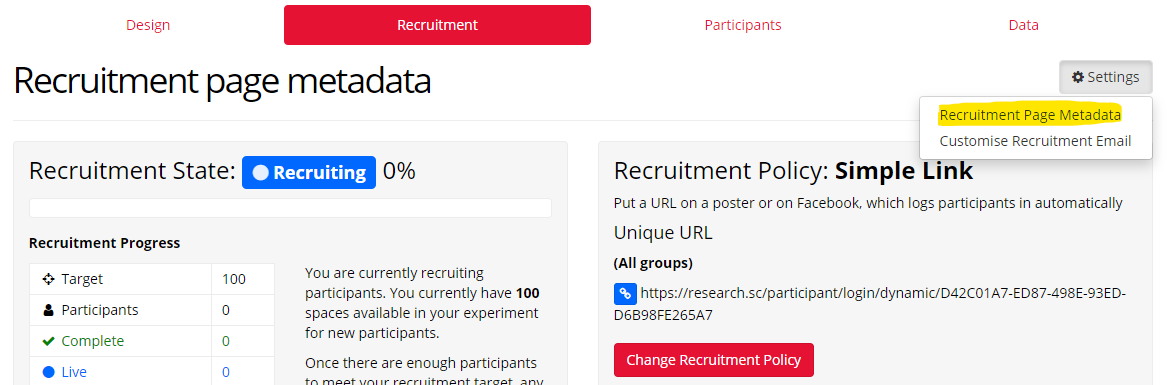
This will allow you to upload a thumbnail image to show with the link when posted on social media, as well as a site name, title, and description.
If you intend to distribute your link in a way that requires participants to retype it (such as on a leaflet or poster), you may want to use a service such as bitly to make your link shorter. You could also turn it into a QR code with a service such as with QR.io.
Simple links are easy to distribute but they are not personalised. The same person could click the link again and they will be processed as a different participant. For this reason, we don't recommend using it for longitudinal studies where you might be using Delay Nodes. However, if you do decide to use Simple Link with Delay Nodes, you must check Send Reminder and Reminder Form in the configuration settings of the Delay Node, or it will be impossible for your participants to return and complete your experiment! This will require collecting participants' email addresses, so make sure you have ethical clearance for this first.
Note: If the participant clicks on the link from within a mobile app, the experiment may open within the app, rather than in a full browser such as Safari or Chrome. If this occurs, participants may not be able to complete tasks. We strongly recommend you ask participants to copy and paste the link for use on mobiles, rather than clicking it.
Anonymous Recruitment Policy
This is an anonymous recruitment policy, unless you explicitly collect identifying data or use identifying participant IDs
This recruitment policy provides a link where participants have to log in using a text string as an ID. This text string is not controlled, so they can log in with anything - potentially, this could be an identifying text string, which could compromise anonymity, or the same ID as another participant, which would cause issues with recording their data. For these reasons, as the name suggests, we do not recommend using the Pilot recruitment policy for anything but piloting your study, using known IDs that you control.
We often use this policy for testing by using names like Test1, Test2, TestN! We also use it for piloting on team members, with us each using our initials.
Similar to the Simple link, the link can be distributed by any means. The additional benefit is the ability to identify participants later on, and allowing participants to resume where they left off.
Testing your experiment using the Pilot recruitment policy requires you to set a Recruitment Target and assign tokens to your experiment in the same way as all other recruitment policies. You can read some more information about piloting experiments in our From Creation to Launch guide.
Note: If the participant clicks on the link from within a mobile app, the experiment may open within the app, rather than in a full browser such as Safari or Chrome. If this occurs, participants may not be able to complete tasks. We strongly recommend you ask participants to copy and paste the link for use on mobiles, rather than clicking it.
Anonymous Recruitment Policy
This is an anonymous recruitment policy, unless you explicitly collect identifying data such as email addresses or use identifying participant IDs
This recruitment policy requires you to upload a spreadsheet containing your participant information. This spreadsheet must contain a Group column, but you only need to fill in the Group column if your experiment uses multiple Start Nodes. Otherwise, the Group column should be left empty.
This recruitment policy allows you to define a set of Public IDs to be used with participants who will log in using a generic link. The Supervised policy is intended for use in a case where participants may not have email addresses and/or the experiment will take place in an area you can control/supervise such as a classroom or lab. Similarly to Email Shot, Email ID, and Pilot policies, participants would be able to log in and resume their experiment where they left it. If a participant shared their public ID with someone else, that person would be able to log in as them. However, using this method in a controlled area such as a classroom or lab limits the possibility that a user could utilise someone else's ID.
Resend Email Action: If you do decide to use this policy in an unsupervised area, you can send participants emails. From your participants screen (for participants you have uploaded emails for) you can select the 'resend email' from the Action-menu. This will send the participant an email reminder to take part in your experiment. You may also wish to use this action to encourage participants to continue with their experiment if they have not yet returned to complete it.
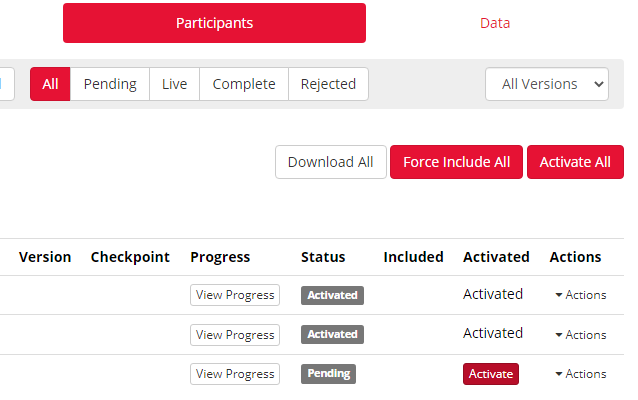
Note: You can add new participants to your experiment at any time: simply upload a new .csv, .xlsx, or .ods file with IDs you wish to add - these will be added to your list of IDs, without overwriting the existing ones. Once you have uploaded your IDs, the Status will show as Pending in your Participant tab. You must click Activate in the 'Activated' column (or Activate All on the top right) before your participants will be able to start your experiment. Once you have done this, the 'Status' and 'Activated' columns will show the participant as Activated until they start your experiment, as shown below:
Identifying Recruitment Policy
This is an identifying recruitment policy, as it requires participant email addresses
This recruitment policy requires you to upload a spreadsheet containing your participant information. This spreadsheet must contain a Group column, but you only need to fill in the Group column if your experiment uses multiple Start Nodes. Otherwise, the Group column should be left empty.
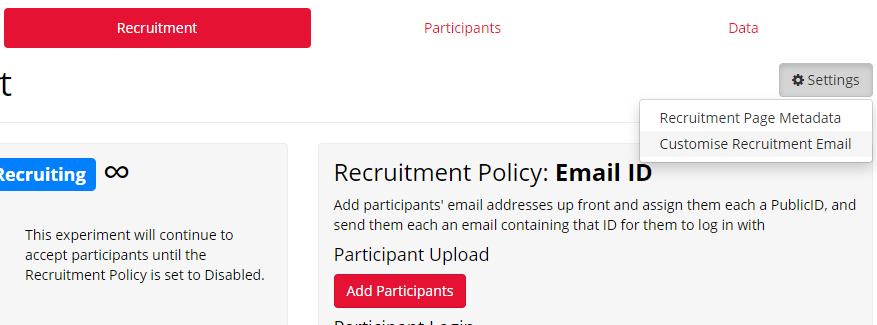
This recruitment policy allows you to define a list of email addresses and public IDs for participants. Unlike the Email ID policy (which uses a generic link), each email address receives a personalised link. This allows you to identify participants without them needing to log in with an ID, and prevents participants from repeating an experiment more than once. There is nothing to prevent the participant from sharing their unique URL with some else, though they will still only be able to complete the experiment once. Participants also have the option to complete part of the experiment and then continue later by using the URL again.
You can customise the email you send to participants by selecting Customise Recruitment Email from your Recruitment tab settings as shown below:
Fill in the Subject and Body boxes with customised information you wish to display to your participants. Make sure you include the tag {{url}} in your email where you would like to place the recruitment link. You can also add in the participant's name (as it appears in your Participants tab) using the tag {{name}}. The email can be further customised via HTML formatting.
From your Participants screen you can select 'Resend email' from the Actions menu. This will send the participant an email reminder to take part in your experiment. You may also wish to use this action to encourage participants to continue with their experiment if they have not yet returned to complete it.
We recommend advising participants to check their spam and junk folders, as sometimes these recruitment emails can be misdirected there!
You can add new participants to your experiment at any time: simply upload a new .csv, .xlsx, or .ods file with email addresses and IDs you wish to add - these will be added to your list of emails and IDs, without overwriting the existing ones. Once you have uploaded your emails and IDs, the Status will show as Pending in your Participant tab. You must click Activate in the 'Activated' column (or Activate All on the top right) before your participants will be able to start your experiment. Once you have done this, the 'Status' and 'Activated' columns will show the participant as Activated until they start your experiment, as shown below:
Identifying Recruitment Policy
This is an identifying recruitment policy, as it requires participant email addresses
This recruitment policy requires you to upload a spreadsheet containing your participant information. This spreadsheet must contain a Group column, but you only need to fill in the Group column if your experiment uses multiple Start Nodes. Otherwise, the Group column should be left empty.
This recruitment policy allows you to define a list of email addresses for participants, and requires you to set up a unique public ID for each participant in advance. Unlike Email Shot (which generates a unique link) the email will contain a generic link to a login page where the participant must use their unique public ID. With the link and public ID, the participant would be able to log in again to resume an experiment at a later time. However, nothing prevents the participant from sharing their link and public ID with another person.
You can customise the email you send to participants by selecting a Customise Recruitment Email from your Recruitment tab settings as shown below:
Fill in the Subject and Body boxes with customised information you wish to display to your participants. Make sure you include the tag {{url}} in your email where you would like to place the recruitment link. You can also add in the participant's name (as it appears in your Participants tab) using the tag {{name}}. The email can be further customised via HTML formatting.
From your Participants screen you can select 'Resend email' from the Actions menu. This will send the participant an email reminder to take part in your experiment. You may also wish to use this action to encourage participants to continue with their experiment if they have not yet returned to complete it.
We recommend advising participants to check their spam and junk folders, as sometimes these recruitment emails can be misdirected there!
You can add new participants to your experiment at any time: simply upload a new .csv, .xlsx, or .ods file with email addresses and IDs you wish to add - these will be added to your list of emails and IDs, without overwriting the existing ones. Once you have uploaded your emails and IDs, the Status will show as Pending in your Participant tab. You must click Activate in the 'Activated' column (or Activate All on the top right) before your participants will be able to start your experiment. Once you have done this, the 'Status' and 'Activated' columns will show the participant as Activated until they start your experiment, as shown below:
Gorilla offers built-in integration with a number of popular participant recruitment services. Click the recruitment service you want to use for details on how to set this up in Gorilla:
Alternatively, you can use the generic Third Party recruitment policy to set up a custom integration with any third-party recruitment service of your choice, such as the following:
Anonymous Recruitment Policy
This is an anonymous recruitment policy, unless you explicitly collect identifying data
This recruitment policy allows you to recruit participants via the 3rd party tool Prolific.
You might want to consider encouraging your participants to click the 'Open Study in New Window' button on Prolific so that they get your study fullscreen.
We also recommend you read Prolific's Gorilla Integration Guide in addition to their general use documentation.
In Gorilla: On your experiment's 'Recruitment' page make sure you have selected 'Prolific' as your recruitment policy.
In Gorilla: Copy the Gorilla Experiment URL provided.
In Prolific: Paste the Gorilla Experiment URL provided into the 'Study URL' field in Prolific. Gorilla automatically captures the Prolific ID and Session ID and stores them in Gorilla as a participant's 'Participant Public ID' and 'Participant External Session ID' respectively. You will need to 'Unblind' your data to view the public ID within your downloadable data.
In Gorilla: On your experiment's Finish node(s), under Onward URL, enter your Prolific Redirect URL.
If you're recruiting for a longitudinal or multi-part study using Prolific, some extra setup steps are involved. Open the expandable section below for more details.
To create a longitudinal or multi-part study hosted on Gorilla where you recruit participants from Prolific:
For more information, see our page on longitudinal studies.
Mismatch in spaces available on Prolific and Gorilla
If more spaces are available for an experiment on Prolific than in Gorilla, participants will see an 'Experiment Full' warning when trying to access the study. We have two ways of preventing this.
Participants who either manually return the study on Prolific, or are rejected by Prolific due to a timeout, will automatically be rejected on the Gorilla side as well. These participants will show up in your Participants tab as RejectedManual. Find out more about participant status and progress in our Participants Guide.
If participants from Prolific try to access an experiment that is full, the owner and collaborators on the Gorilla project will be automatically notified by email. The project owner can then increase the spaces available on Gorilla or decrease the spaces available on Prolific. If you receive this email after data collection is finished, you don't need to do anything - it is only designed to alert you to a problem during active recruitment.
If you are experiencing issues with a disconnect between your recruitment target in Gorilla and in Prolific, please contact support.
Anonymous Recruitment Policy
This is an anonymous recruitment policy, unless you explicitly collect identifying data
This recruitment policy allows you to recruit participants via the 3rd party tool Sona Systems®.
Use Case: Use this when you want to recruit your participants using Sona Systems®.
When set up correctly, by integrating your experiment with Sona Systems®, Sona will be able to automatically grant credit to your participants upon their completion of your Gorilla Experiment. This eliminates the need for researchers to manually grant credits.
If you need further information about connecting your experiment with Sona you can view the Sona Systems Support page.
Anonymous Recruitment Policy
This is an anonymous recruitment policy, unless you explicitly collect identifying data
This recruitment policy allows you to recruit participants via the 3rd party tool Amazon Mechanical Turk (MTurk).
Use Case: Use this when you want to recruit your participants from MTurk.
Your participants will start in Gorilla, once they complete your experiment (by entering a Finish Node) they will then be shown their MTurk completion code.
To connect your Gorilla experiment to MTurk, simply use the Gorilla URL as the URL for your HIT.
Gorilla will automatically show your participants a unique completion code, which they can use to confirm that they have completed the HIT. These completion codes will be included in your data download, so you can check them to ensure that they match those submitted for your HITs
Sometimes you will not wish to show a participant a completion code, such as when you want to reject a participant.
A Reject Node can be used to end the experiment for that participant, and can show them a completion code.
Anonymous Recruitment Policy
This is an anonymous recruitment policy, unless you explicitly collect identifying data
This recruitment policy allows you to recruit participants via the 3rd party tool CloudResearch, specifically their crowdsourcing platform Connect.
Use Case: Use this when you want to recruit your participants from CloudResearch's Connect crowdsourcing platform.
In Gorilla: On your experiment's 'Recruitment' page, make sure you have selected 'CloudResearch: Connect' as your recruitment policy.
In Gorilla: Copy the Gorilla Experiment URL provided.
In CloudResearch: Paste the Gorilla Experiment URL provided into the 'Project Link' section in Connect.
Gorilla automatically captures the CloudResearch: Connect participantId and stores it in Gorilla as the Participant Public ID. This will appear on the Participants tab of your Gorilla experiment. It will also be included in your downloadable Gorilla data if you tick the 'Unblind' setting when generating your experiment data. Gorilla also automatically captures the CloudResearch: Connect projectID and stores it in Gorilla as the External Session ID. This will be included in your downloadable Gorilla data.
In Gorilla: On your experiment's Finish node(s), under Onward URL, enter your CloudResearch redirect URL. If you prefer to use a completion code, copy the completion code from CloudResearch and display it on the final page of your experiment. Instruct your participants to return to CloudResearch and enter the completion code to confirm they have completed the study.
As well as Connect, CloudResearch offers two other participant pools: MTurk Toolkit and Prime Panels. For MTurk Toolkit, use the CloudResearch: MTurk Toolkit recruitment policy. For Prime Panels, use the 3rd Party recruitment policy and set the Inbound Participant ID Parameter to aid.
Anonymous Recruitment Policy
This is an anonymous recruitment policy, unless you explicitly collect identifying data
This recruitment policy allows you to recruit participants via the 3rd party tool CloudResearch, specifically MTurk Toolkit, which sources approved participant groups from Amazon Mechanical Turk.
Use Case: Use this when you want to recruit your participants from CloudResearch's MTurk Toolkit platform.
workerId and store it in Gorilla as the Participant Public ID. This will appear on the Participants tab of your Gorilla experiment. It will also be included in your downloadable Gorilla data if you tick the 'Unblind' setting when generating your experiment data. Gorilla also automatically captures the CloudResearch: MTurk Toolkit hitId and stores it in Gorilla as the External Session ID. This will be included in your downloadable Gorilla data.As well as MTurk Toolkit, CloudResearch offers two other participant pools: Connect and Prime Panels. For Connect, use the CloudResearch: Connect recruitment policy. For Prime Panels, use the 3rd Party recruitment policy and set the Inbound Participant ID Parameter to aid.
Anonymous Recruitment Policy
This is an anonymous recruitment policy, unless you explicitly collect identifying data
This recruitment policy allows you to recruit participants via the 3rd party tool Qualtrics.
Use Case: Use this when you want to recruit your participants from Qualtrics or else link your Qualtrics surveys with your Gorilla experiments.
Your participants will start in Qualtrics, and then be passed to Gorilla to complete the experiment. When set up correctly, a participant's 'Response ID' in Qualtrics will be identical to their PublicID in Gorilla. Allowing you to easily match up data from both systems.
You can also send participants to a Qualtrics survey from within a Gorilla experiment using the Redirect Node.
In Gorilla
Add a Redirect Node to your experiment tree where you want to send your participants to Qualtrics. In the URL field, paste the anonymous link that can be found on the Qualtrics Distribution Tab. Then, enter a memorable name in the Add PublicID field, for example, subjectid. From the Completion dropdown, select Completion Token. Click Save to save the changes to the node.
In Qualtrics
In the Survey Flow Tab of the questionnaire, you will need to embed both the appended PublicID and the completion token to be stored by Qualtrics. To do this, add a new element and select 'embedded data' and enter the chosen names for your data. These will need to match across Gorilla and Qualtrics, so in this example, we would enter subjectid and completion_token. Then, drag this embedded data to the top of the survey flow. When data is collected, you will be able to see the recorded subjectid and completion_token in the Data & Analytics tab and the survey response within Qualtrics.
To return participants back to Gorilla, go to the Survey Option in Qualtrics and select Survey Termination box at the bottom. In the 'Return to a full URL' field, you will need to add two pieces of information. First, the return Gorilla URL https://research.sc/participant/login/resume/ and the code that tells Qualitrics to look for the completion token. If you have set this up as described above, this will be: ${e://Field/completion_token}. The final URL to enter in this case would be: https://research.sc/participant/login/resume/${e://Field/completion_token}. Click Publish to save the changes to the survey.
Anonymous Recruitment Policy
This is an anonymous recruitment policy, unless you explicitly collect identifying data
This recruitment policy allows you to recruit participants via the 3rd party tool Qualtrics Panel.
Use Case: Use this recruitment policy when you want to recruit your participants from a Qualtrics Panel.
Your participants will need to start in Qualtrics, and then be passed to Gorilla to complete the experiment, before being passed back to the Qualtrics Panel again to flag that they have completed the experiment.
When set up correctly, a participant's 'Response ID' in Qualtrics will be identical to their PublicID in Gorilla. Allowing you to easily match up data from both systems.
Make sure all your Finish nodes redirect back to Qualtrics, otherwise Qualtrics has no way of knowing that they've finished!
Anonymous Recruitment Policy
This is an anonymous recruitment policy, unless you explicitly collect identifying data
This recruitment policy allows you to recruit participants via the 3rd party tool Kantar Profiles.
Use Case: Use this recruitment policy when you want to recruit your participants from Kantar Profiles.
To connect your Gorilla experiment to Kantar Profiles, simply use the Gorilla URL as the URL for your study.
Gorilla will automatically capture your participants' parameters and append them to any return URLs, allowing you to track if they have completed the study.
Anonymous Recruitment Policy
This is an anonymous recruitment policy, unless you explicitly collect identifying data or your recruitment provider uses identifying participant IDs
This recruitment policy allows you to recruit participants via a third party organisation or send participants to Gorilla from another platform such as REDCap.
If you're using a third party recruitment provider that isn't supported by a built-in recruitment policy, you'll need to set up the integration by following the steps below.
See the left sidebar for a full list of recruitment services where we offer a built-in recruitment policy, including Prolific, Sona Systems and Amazon Mechanical Turk.
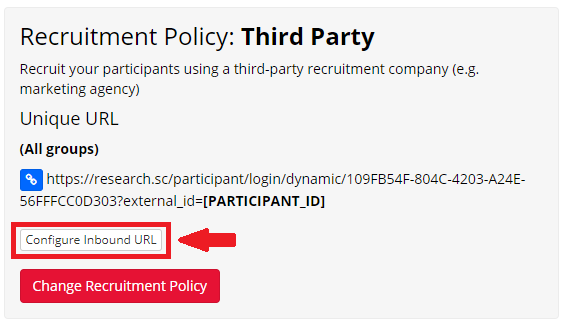
?external_id=[PARTICIPANT_ID], is called a query string. This is how the participant ID will be passed from your recruitment service to Gorilla. external_id: the name of the participant ID parameter.[PARTICIPANT_ID]: a placeholder for each participant's individual ID.![Screenshot of 3rd Party recruitment policy showing unique URL including ?external_id=[PARTICIPANT_ID] and 'Configure Inbound URL' button](/support/images/launching-your-study/3rd-party-recruitment.png)
external_id. If you cannot change this on the recruitment service end, use the 'Configure Inbound URL' setting to change this on the Gorilla end (see expandable section 'Configure Inbound URL: Participant ID' below).? - on your external recruitment service.[PARTICIPANT_ID] with the participant's specific ID.CloudResearch's Prime Panels is an example of a third-party recruitment service that does not have a built-in integration with Gorilla. Prime Panels uses the name aid for the participant ID parameter. In this case, we need to configure the inbound URL to change the participant ID parameter on the Gorilla side to match.
This will open the following window:
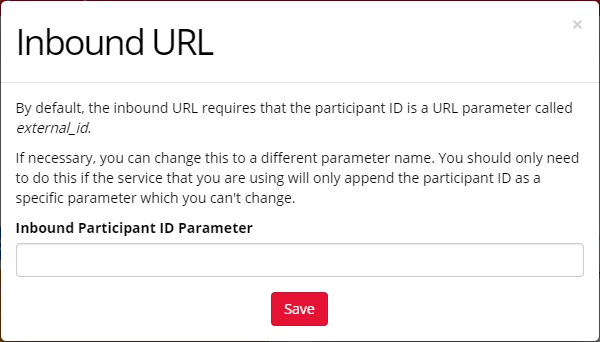
In the 'Inbound Participant ID Parameter' box:
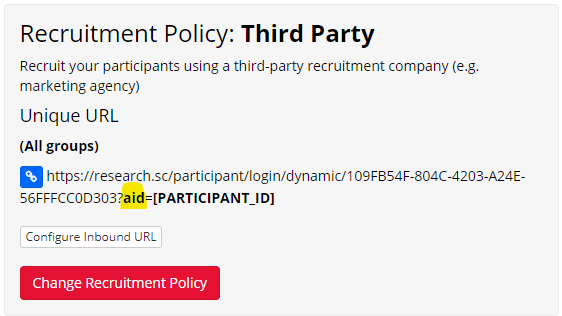
aid if using CloudResearch's Prime Panels. You will see that the Unique URL on the Recruitment tab has now updated to replace external_id with your new parameter name:
aid parameter in the URL as the participant ID. Optionally, you can also pass additional information from your external recruitment service to Gorilla.
You can do this by adding further parameters to the query string on the recruitment service side.
https://research.sc/participant/login/dynamic/109FB54F-804C-4203-A24E-56FFFCC0D303. external_id is 12345, and whose completion_code is 67890. https://research.sc/participant/login/dynamic/109FB54F-804C-4203-A24E-56FFFCC0D303?external_id=12345&completion_code=67890?. &.If the participant ID is not passed through correctly, participant data may be mis-identified, or you may not be able to link your data across platforms.
We highly recommend piloting your third party recruitment setup with at least a few real participants before launching your study.
If you need assistance with getting everything set up, don't hesitate to contact the support desk!
You want to reward your participants for taking part in your experiment, but you don't use a recruitment service that pays participants? Consider using a Reward Node, where you can send a voucher or a gift card to your participants and make sure to compensate them for the time and effort they put in when taking part in your research study.
There are a few reward platforms you could use to implement a reward. Have a look at their websites: