Sharing and Cloning
- Sharing
- Cloning
Overview
Research is a team effort, and replication of existing work is a cornerstone of scientific progress. That's why we've made it easy to collaborate with others and build on existing materials using Gorilla.
Sharing access to your materials
- To share your materials with someone who has a Gorilla account:
- To share a whole Project, and optionally allow the other user to make changes and view the data:
- Add the user to your Project as a collaborator.
- See our collaboration guide for how to set permissions for collaborators.
- To share a version of a specific task/questionnaire/experiment:
- To share a whole Project, and optionally allow the other user to make changes and view the data:
- To share your materials with someone who doesn't have a Gorilla account:
- Add your tasks/questionnaires/experiments to Open Materials.
Building on materials you have access to
- If you are a collaborator on the project:
- If you have edit permissions, you can directly make changes to the materials in the project.
- Whether or not you have edit permissions, you can clone any of the materials into your projects to create your own copy.
- If the materials have been Sent to your Library, are public Samples, or are on Open Materials:
- You can clone any of the materials into your projects to create your own copy.
- If the materials have been sent to you as a zip file from an Export:
- You can create a new task/questionnaire/game/shop and Import the zip file to create your own copy.
Check the sections of this guide for more information on collaborating, sending, exporting/importing, Open Materials, and cloning.
Collaborating
Use Collaborate to invite other Gorilla users to work with you by giving them access to your Gorilla project.
This is useful for giving your supervisor access to your tasks and experiments, or working together with colleagues to develop or run your study.
The project owner is, by default, the user who created the project.
Only project owners can add collaborators, change collaborator permissions, and change the recruitment policy or recruitment target on Experiments. This prevents collaborators from using the project owner's tokens without permission.
You can change the project owner by submitting a Project Ownership Change Request, which must be approved by both the original project owner and the new owner.
Adding a collaborator
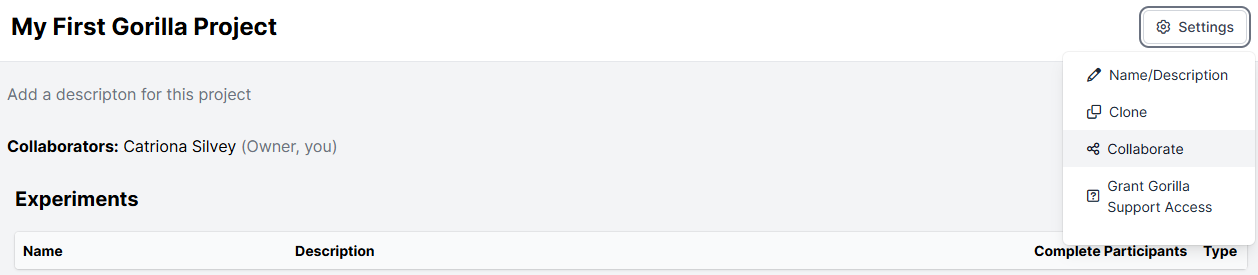
To add a collaborator to your Project:
- Open the Project that you want to collaborate on.
- Click 'Settings' at the top right.
- Click 'Collaborate'.
- In the search bar, type the email address or name of the person you want to add as a collaborator.
- Select your collaborator from the list and click 'Add to project'.
- Decide what permissions to give your collaborator.
- By default, collaborators will be able to view all materials within your Project, and clone them to make their own copies.
- Toggle on 'Make Changes' to allow your collaborator to make changes to materials within your Project.
- Only one user can have an open change at any given time.
- The user currently editing must commit or discard their changes before another user can open an edit.
- Toggle on 'View Data' to allow your collaborator to download participant data from experiments within your project.
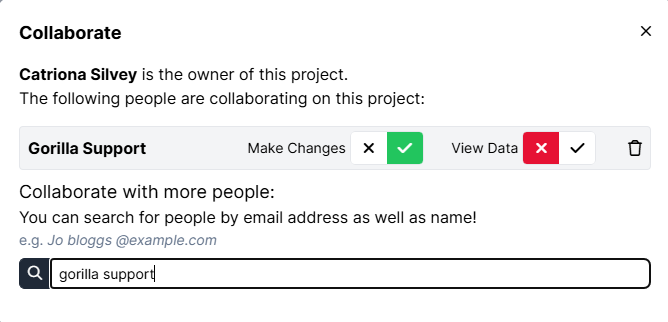
In the screenshot above, permission has been granted for the collaborator 'Gorilla Support' to make changes, but not view data.
Your new collaborator will be notified by email that they've joined your project.
You can view current collaborators on your project and change their permissions via Settings -> Collaborate.
Being a collaborator
If another user adds you as a collaborator on one of their Projects, the Project will show up at the bottom of your Projects page under the heading 'Projects I'm collaborating on'.
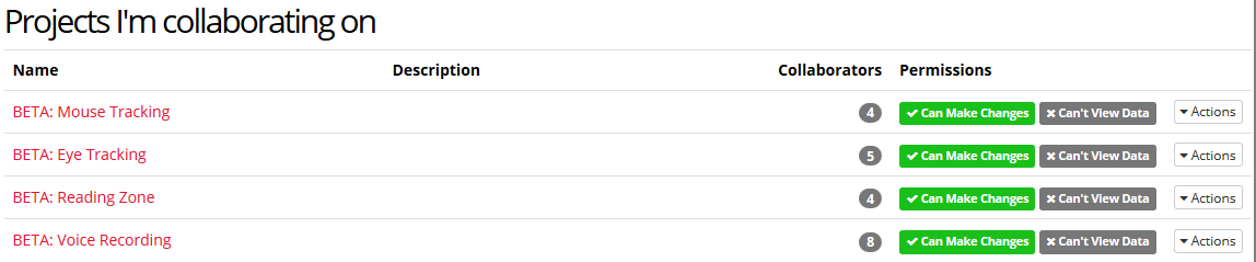
The Permissions column shows whether you have permission to make changes and/or access the data.
If you have any issues editing materials in projects where you're a collaborator, see our Troubleshooting Guide.
Sending
Use Send to share a committed version of any Gorilla asset - a Questionnaire, Task, Game, Shop, or Experiment - with another Gorilla user.
Sending an Experiment does not share any participant details or data.
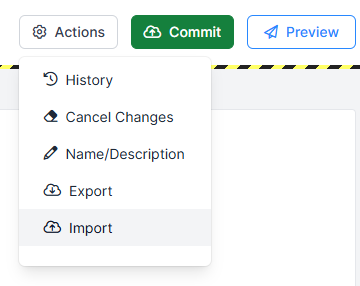
Open, uncommitted changes to an asset cannot be sent. Either commit the changes first, or use Export to share open changes.
Sending an asset
The steps below refer to sending in New Experiment Builder, Task Builder 2, Questionnaire Builder 2, and Game Builder. For guidance on sending in Classic Experiment Builder and our legacy tools, open the expandable section.
In Classic Experiment Builder and legacy tools, to send an asset:
- Open the asset you want to send.
- Select the version of the asset you want to send.
- At the top right, click 'Version History' .
- Select the version from the dropdown and click 'Show This Version'.
- At the top right, click 'Settings' and select 'Send'.
- Type the email address or name of the person you want to send the asset to and select them from the list.
- Click 'Send'.
In our new tools, to send an asset:
- Open the asset you want to send.
- Select the version of the asset you want to send.
- At the top right, click 'More Actions' and select 'Version History' .
- Select the version from the dropdown and click 'Show This Version'.
- At the top right, click 'More Actions' and select 'Send'.
- Type the email address or name of the person you want to send the asset to and select them from the list.
- Click 'Send'.
When you send an asset to another Gorilla user, they can view (but not edit) the asset from their Gorilla Library. They can clone the asset to create their own version, but the original asset will be fixed at the version you sent to them. This keeps your version and their version of the asset completely separate.
If you instead wish for the user to see your most recent (or active) version of your asset, and/or you would like them to be able to make changes to your assets, use the Collaborate feature instead.
Receiving an asset
If someone has sent you a Gorilla asset, you will find it in your Gorilla Library.
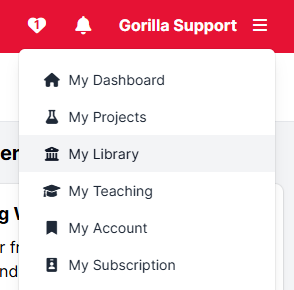
Access your Library from the main menu at the top-right, under 'My Library':
In your Library, you will see any assets you have been sent, their type, and who they were sent by. The Version column shows the version number of any asset that was sent to you, making it easy to select the latest version from a group of similarly named assets.
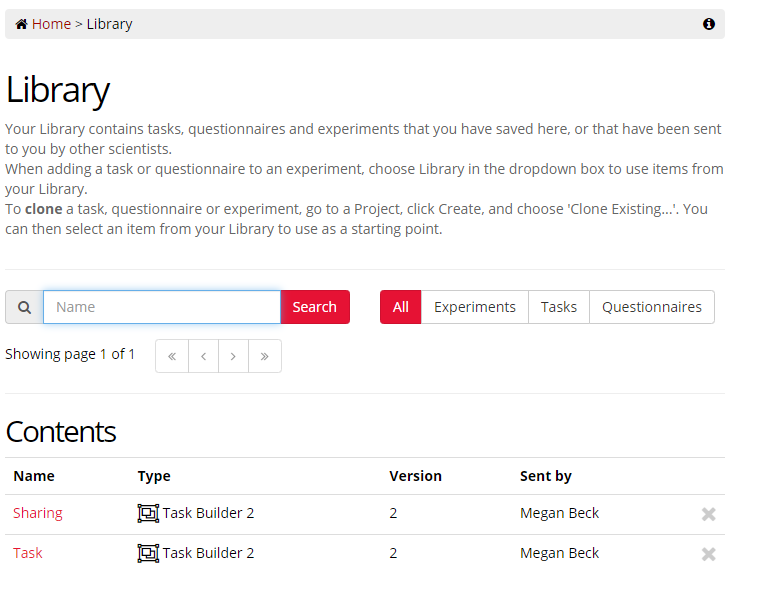
Click on the Name of an asset to view it. You cannot edit library tasks - to make changes, you will first need to clone it into one of your own projects. Check out the Cloning section of this guide to find out how.
Exporting / Importing
Use Export to download a committed or in-progress version of a Gorilla asset and all its stimuli as a zip file. You can then import this zip file into a new asset to create a copy, or share the zip file with another user.
Exporting and importing is only available in Task Builder 2, Questionnaire Builder 2, Game Builder, and Shop Builder. To make a copy of an Experiment or of a task/questionnaire from our legacy tools, use Send or Clone.
Exporting an asset
- Open the asset you want to export.
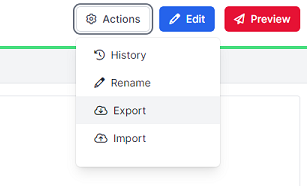
- At the top right, click 'More Actions' and select 'Export'.
Exporting is also the easiest way to download all task stimuli at once. The stimuli will appear in the exported 'assets' folder.
Importing an asset
- Create a new asset of the type you want to import (so a Task, Questionnaire, Game, or Shop as appropriate).
- At the top right, click 'More Actions' and select 'Import'.
- Click 'Choose file' and select the exported zip file.
- Click 'Import'.
You should see the exported asset in the editor. You can now make changes, or commit this version if no changes are needed.
You can also send the zip file to other researchers via email to import in the same way.
Open Materials
Gorilla Open Materials is our contribution to Open Science. It allows researchers to view and try out each others' experiments (for free!), making it incredibly easy to communicate experimental designs.
You can also use Open Materials to quickly create your own study, by cloning an existing experiment, or by cloning tasks from several different researchers to use as templates.
Head to our announcement page to find out more about Gorilla Open Materials, or check out the repository for yourself.
Do also check out our support pages on how to use Open Materials!
What Is Cloning?
Use Clone to make your own independent copy of a Gorilla Task, Questionnaire, Shop, Game, Experiment, or Project.
You can clone something if:
- It's in a Project you own
- It's in a Project you're collaborating on
- Another user has sent it to your Library
- It's available on Gorilla Open Materials
- It's one of Gorilla's Samples
Open, uncommitted changes to an asset cannot be cloned. Either commit the changes first, or use Export to copy open changes.
Cloning produces an identical copy of the selected version of the asset, including any stimuli. Cloning does not copy the version history of the original. The newly cloned asset will start at version 1.
You can also clone an entire Gorilla Project if you are the owner or a collaborator.
The rest of this guide gives more detailed guidance on:
Cloning an Activity (Questionnaire, Task, Shop, or Game)
To clone a Questionnaire, Task, or Game, you can do any of the following:
- open the Activity directly and clone it
- create a new Activity and select 'Clone Existing'
- clone the Activity from Open Materials
Shops cannot be cloned by opening them in Shop Builder, but you can use either of the other two methods.
For step-by-step instructions, open the expandable sections below the video.
In Task Builder 2, Questionnaire Builder 2, Game Builder:
- Open the activity you want to clone.
- If the activity is a Sample, you will see a 'Clone & Edit' button at the top right. Click this button and skip to step 5.
- If the activity is not a Sample, select the version of the activity you want to clone.
- At the top right, click 'More Actions' and select 'History' .
- Select the version from the dropdown and click 'Show This Version'.
- At the top right, click 'More Actions' and select 'Clone'.
- Optionally enter the new name you want to give the cloned activity.
- Select the project you want to clone the activity into.
- By default, you will see projects you own. Use the dropdown at the top to instead select projects you're collaborating on, or create a new project.
- Click 'Clone' / 'OK'.
In Task Builder 1, Questionnaire Builder 1, Code Editor:
- Open the activity you want to clone.
- Select the version of the activity you want to clone.
- At the top right, click 'Version History' .
- Select the version from the dropdown and click 'Show This Version'.
- At the top right, click 'Settings' and select 'Clone'.
- Optionally enter the new name you want to give the cloned activity.
- Select the project you want to clone the activity into.
- By default, you will see projects you own. Use the dropdown at the top to instead select projects you're collaborating on, or create a new project.
- Click 'Clone' / 'OK'.
- Create or open the Project you want to clone the activity into.
- Below 'Tasks & Questionnaires', click 'Create New'.
- Select the type of activity you want to clone (Task, Questionnaire, Game, or Shop).
- Click 'Clone Existing'.
- Enter a name for your cloned activity.
- Use the dropdown menu to select the project that contains the activity you want to clone.
- The dropdown menu contains projects you own, your Library, projects you're collaborating on, and Gorilla's Samples projects.
- Select the activity you want to clone from the list.
- Click 'Create'.
- Open the Open Materials page containing the activity you want to clone.
- Click the 'Clone' button next to the activity you want to clone.
- Select the project you want to clone the activity into.
- By default, you will see projects you own. Use the dropdown at the top to instead select projects you're collaborating on, or create a new project.
- Optionally enter the new name you want to give the cloned activity.
- Click 'OK'.
Cloning an Experiment
When cloning an Experiment, the Recruitment, Participants and Data tabs are not cloned.
This makes cloning an experiment a great way to reset your recruitment numbers and start a new round of recruitment.
Just remember to give the experiment clone a unique name so you can easily distinguish between the different copies!
To clone an Experiment, you can do any of the following:
- open the Experiment directly and clone it
- create a new Experiment and select 'Clone Existing'
- clone the Experiment from Open Materials
For step-by-step instructions, open the expandable sections below the video.
- Open the experiment you want to clone.
- If you want to clone the current version:
- Commit or cancel any open changes.
- If you want to clone an older version:
- Click 'More Actions' and select 'History' .
- Select the version of the experiment you want to clone and click 'Show This Version'.
- If you want to clone the current version:
- Click 'More Actions' and select 'Clone'.
- Select the project you want to clone the experiment into.
- By default, you will see projects you own. Use the dropdown at the top to instead select projects you're collaborating on, or create a new project.
- If you are cloning the experiment into a different project, you will see an additional checkbox that controls what happens to the activities within the experiment.
- By default, activities within the experiment that are in its current project will also be cloned, and the nodes in the cloned experiment updated to use the cloned activities. Untick the checkbox if you do not want activities within the experiment to be cloned.
- For more details, see the info box at the bottom of this page.
- Click 'OK'.
In Classic Experiment Builder:
- Open the experiment you want to clone.
- If you want to clone the current version:
- Commit or cancel any open changes.
- If you want to clone an older version:
- Click 'Version History' .
- Select the version of the experiment you want to clone and click 'Show This Version'.
- If you want to clone the current version:
- At the top right, click 'Settings' and select 'Clone'.
- Select the project you want to clone the experiment into.
- By default, you will see projects you own. Use the dropdown at the top to instead select projects you're collaborating on, or create a new project.
- If you are cloning the experiment into a different project, you will see an additional checkbox that controls what happens to the activities within the experiment.
- By default, activities within the experiment that are in its current project will also be cloned, and the nodes in the cloned experiment updated to use the cloned activities. Untick the checkbox if you do not want activities within the experiment to be cloned.
- For more details, see the info box at the bottom of this page.
- Click 'OK'.
- Create or open the Project you want to clone the Experiment into.
- Below 'Experiments', click 'Create New'.
- Click 'Clone Existing'.
- Enter a name for your cloned experiment.
- Use the dropdown menu to select the project that contains the experiment you want to clone.
- The dropdown menu contains projects you own, your Library, projects you're collaborating on, and Gorilla's Samples projects.
- Select the experiment you want to clone from the list.
- If you are cloning the experiment into a different project, you will see an additional checkbox that controls what happens to the activities within the experiment.
- By default, activities within the experiment that are in its current project will also be cloned, and the nodes in the cloned experiment updated to use the cloned activities. Untick the checkbox if you do not want activities within the experiment to be cloned.
- For more details, see the info box at the bottom of this page.
- Click 'Create'.
- Open the Open Materials page containing the experiment you want to clone.
- Click the 'Clone' button next to the experiment you want to clone.
- Select the project you want to clone the experiment into.
- By default, you will see projects you own. Use the dropdown at the top to instead select projects you're collaborating on, or create a new project.
- Optionally enter the new name you want to give the cloned experiment.
- By default, activities within the experiment that are in the same project will also be cloned, and the nodes in the cloned experiment updated to use the cloned activities. Untick the checkbox if you do not want activities within the experiment to be cloned.
- For more details, see the info box at the bottom of this page.
- Click 'OK'.
When cloning an experiment from one project into a different project, you will see a message with a checkbox that is selected by default:

- If the checkbox is selected:
- Any activities (tasks, questionnaires etc.) that are in the same project as the original experiment will be cloned into the destination project. Gorilla will update all nodes within the cloned experiment to refer to these cloned versions.
- The specific version(s) of the activities used within the experiment will be cloned. Where this is not the latest version, the cloned activity will have the suffix
-versionXappended to its name.
- If you deselect the checkbox:
- Gorilla will not clone any activities within the experiment. The nodes in your cloned experiment will still refer to the original version of the activities.
Any activities that are in a different project from the original experiment will not be cloned. These nodes in your cloned experiment will still refer to the original version of the activities.
To replace these with cloned versions, open them from your experiment tree and clone them following the steps in the Cloning an Activity section. Then, remove the old nodes from your experiment and add your new cloned versions in their place.
Cloning a Project
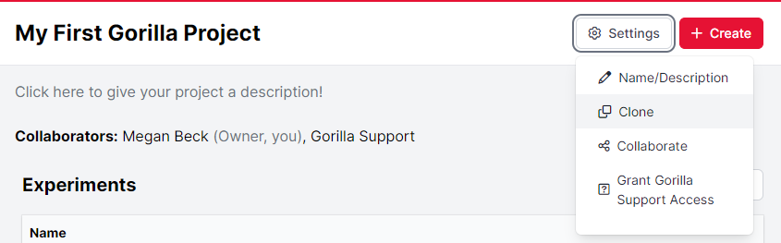
- Open the project that you want to clone.
- At the top right, click 'Settings' .
- Click 'Clone' .
When cloning a project, only the latest commited version of each asset is cloned. The only exception is if an older version of an asset is used within an experiment (see below).
Experiments within cloned projects
When you clone a project that contains an experiment, the experiment will be cloned into the destination project.
Any activities within the experiment (tasks, questionnaires etc.) that are in the same project as the original experiment will also be cloned into the destination project. Gorilla will update all nodes within the cloned experiment to refer to these cloned versions.
The specific version(s) of the activities used within the experiment will be cloned. Where this is not the latest version, the cloned activity will have the suffix -versionX appended to its name.
Any activities that are in a different project from the original experiment will not be cloned. These nodes in your cloned experiment will still refer to the original version of the activities.
To replace these with cloned versions, open them from your experiment tree and clone them following the steps in the Cloning an Activity section. Then, remove the old nodes from your experiment and add your new cloned versions in their place.