You're viewing the support pages for our Legacy Tooling and, as such, the information may be outdated. Now is a great time to check out our new and improved tooling, and make the move to Questionnaire Builder 2 and Task Builder 2! Our updated onboarding webinar (live or on-demand) is a good place to start.
The best way to get started in Gorilla is to try our tools out! To help you do that, we've created this 10 Step Stroop Task walkthrough. It does exactly what it says: walks you through creating an entire Stroop task in Gorilla, from scratch, in just 10 steps.
If you're not sure what the Stroop task is, click here for a quick explanation.
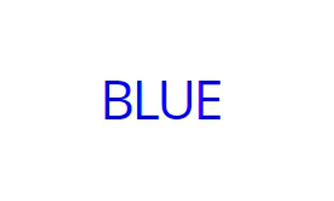
Try saying the colour of the word in the following image. Not the word itself, the text colour.
Now try this one.
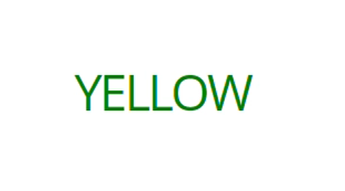
Most people find the second example harder. Where the word and the text colour are different (incongruent), average reaction times are slower.
We suggest you have 2 tabs open, one with this walkthrough, and one to create the task in. To start the walkthrough you should open your Gorilla homepage.
You're viewing the support pages for our Legacy Tooling and, as such, the information may be outdated. Now is a great time to check out our new and improved tooling, and make the move to Questionnaire Builder 2 and Task Builder 2! Our updated onboarding webinar (live or on-demand) is a good place to start.
The first step is simple: create a Project and add a new Task to it!
You're viewing the support pages for our Legacy Tooling and, as such, the information may be outdated. Now is a great time to check out our new and improved tooling, and make the move to Questionnaire Builder 2 and Task Builder 2! Our updated onboarding webinar (live or on-demand) is a good place to start.
The main sections of Gorilla tasks are called displays. Within each display, you can have multiple screens.
You can think of a screen a little like a PowerPoint slide. They’re fully customisable, or you can choose and edit one of our pre-made templates.
A Stroop Task trial uses 2 screens: one with a fixation cross and one with the stimuli presentation. There’s a template we can use for the fixation cross screen. For the stimuli, we want to add a blank screen that we’ll customise.
You're viewing the support pages for our Legacy Tooling and, as such, the information may be outdated. Now is a great time to check out our new and improved tooling, and make the move to Questionnaire Builder 2 and Task Builder 2! Our updated onboarding webinar (live or on-demand) is a good place to start.
Now we need to add components to Screen 2, our stimuli screen. Any component we can add to a Task screen on Gorilla is called a Zone. There are over 50 different zones in total! You can find the full list in our Tooling Reference Guide.
The first zone we’re going to add is a text zone, which will let us present a word and choose its colour.
You're viewing the support pages for our Legacy Tooling and, as such, the information may be outdated. Now is a great time to check out our new and improved tooling, and make the move to Questionnaire Builder 2 and Task Builder 2! Our updated onboarding webinar (live or on-demand) is a good place to start.
We also need 3 more zones for our trial. One keyboard response zone allows you to set responses for 2 different keys, so we want 2 of those to give us a total of 4 response options (red, yellow, blue, green). We also want a feedback accuracy zone, to let participants know if they were correct.
You're viewing the support pages for our Legacy Tooling and, as such, the information may be outdated. Now is a great time to check out our new and improved tooling, and make the move to Questionnaire Builder 2 and Task Builder 2! Our updated onboarding webinar (live or on-demand) is a good place to start.
Time to choose our zone settings! In the Stroop Task there are 4 different words that can be presented: blue, yellow, red and green. This means we don’t want the text zone to show the same word in every trial.
To achieve this, we’ll set the text zone to use the spreadsheet (more on this later) to pick a word. We’ll also do the same for the text colour.
You're viewing the support pages for our Legacy Tooling and, as such, the information may be outdated. Now is a great time to check out our new and improved tooling, and make the move to Questionnaire Builder 2 and Task Builder 2! Our updated onboarding webinar (live or on-demand) is a good place to start.
Now we need to set up the keyboard responses, so Gorilla knows which key presses to listen for and what they mean. We’re going to ask participants to press Q for red, W for yellow, O for blue, and P for green.
You're viewing the support pages for our Legacy Tooling and, as such, the information may be outdated. Now is a great time to check out our new and improved tooling, and make the move to Questionnaire Builder 2 and Task Builder 2! Our updated onboarding webinar (live or on-demand) is a good place to start.
We need to tell participants what keys to press, so we want to create a second display to show instructions at the beginning of the task.
We’re using another text zone, but this time the text doesn’t need to change, so we can leave the source as Static and copy in exactly the text we want to show. The instructions text we’re adding is below:
Welcome to the Stroop Task!
Press the correct key for the text colour of the word on the screen. Do not press for the meaning of the word.
Press Q for red.
Press W for yellow.
Press O for blue.
Press P for green.
Click Next when you’re ready to start!
You're viewing the support pages for our Legacy Tooling and, as such, the information may be outdated. Now is a great time to check out our new and improved tooling, and make the move to Questionnaire Builder 2 and Task Builder 2! Our updated onboarding webinar (live or on-demand) is a good place to start.
Now for the spreadsheet! In Gorilla, we need one spreadsheet row for each display we want to show. If we want to show the same display twice, we’ll add two separate rows for it.
The display column tells Gorilla which of your displays to show. Here, we want to show the instructions followed by three trials. When a spreadsheet cell goes green, Gorilla has recognised the text entered. This makes it easy to check for typos and other mistakes!
The ColourWord and Colour columns were automatically created when we set the text zone content and colour to have spreadsheet sources. In the ColourWord column, we’re going to enter the word that will be displayed in text. In the Colour column, we’re going to set which colour the word will be displayed in. The Answer column tells Gorilla which response is correct for that trial. Setting an Answer can be useful for a lot of different things! Here, we’re setting answers so that we can use the Feedback Zone.
Gorilla will use the keyboard zones we set up earlier (Q for red, etc) to compare against the spreadsheet Answer column. In a Stroop Task, the correct answer is always the text colour. You can create as many trials as you want in exactly the same way: just add 1s in the randomise_trials column to randomise them.
You're viewing the support pages for our Legacy Tooling and, as such, the information may be outdated. Now is a great time to check out our new and improved tooling, and make the move to Questionnaire Builder 2 and Task Builder 2! Our updated onboarding webinar (live or on-demand) is a good place to start.
And we’re done! Let’s check the task with a preview before committing it.
You're viewing the support pages for our Legacy Tooling and, as such, the information may be outdated. Now is a great time to check out our new and improved tooling, and make the move to Questionnaire Builder 2 and Task Builder 2! Our updated onboarding webinar (live or on-demand) is a good place to start.
If you want to make your task even better, here are some suggestions:
Now you know how to create a task in Gorilla, you can go ahead and build more of your own! Our samples page is a great place to start for existing tasks that you can clone and edit.
Or, you can go on to the next step: incorporating your task into an experiment!
If you get stuck, try searching our support pages.
Good luck!